High-quality image reduction in constant time
I want to share a very simple and effective method for resizing an image that works in constant time relative to the size of the original image and gives an unexpectedly high-quality result. The method is applicable for all languages and applications.
To begin, let's reason logically. If you resize the image, you probably want the result to even remotely resemble the original. To do this, take into account as much information as possible from the original image. Have you heard of the “nearest neighbor” method? In this method, for each point of the final image, just one point of the original image is taken in an unchanged form.

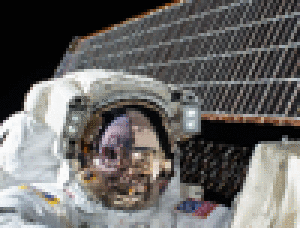
Reducing the image to 4928 × 3280 to 256 × 170 nearest neighbor.
I recommend to watch examples from the article in the browser on a scale of 100% and without retina. That is, to the maximum exclude resize when viewing.
The result is no good. The image is jerky, grainy, it is even difficult to understand what is depicted on it. Especially if the original image had many small details, or it was itself grainy. Why is this so? Because in the final image was taken into account very little information from the source. If we conditionally mark on the source image those points that fall into the final one, we get the following grid:

Points that fall into the final image size of 20 × 13.
Now you can visually assess how little information about the original image falls into the final one. Agree, it is unlikely that it is for this grid will be located pixels, which will give a good idea of the image on the original image.
A completely different result is, for example, resizing using convolutions. In it, each pixel of the original image contributes to the final, and more than once. Therefore, the image is smooth, and when choosing a good filter, clear.

Reduction from 4928 × 3280 to 256 × 170 convolutions with a bicubic filter.
Nevertheless, the “nearest neighbor” method has one indisputable advantage: it works in constant time relative to the size of the original image. This means that no matter how large or small the original image was, the time to decrease to a certain size will be the same. I will give examples on Python with the Pillow library, but you can get almost the same result with any language and libraries.
>>> from PIL import Image >>> im = Image.open('pineapple.jpeg'); im.load(); im.size (2560, 1600) >>> %time im.resize((256, 170), Image.NEAREST) Wall time: 0.35 ms >>> im = Image.open('space.jpeg'); im.load(); im.size (4928, 3280) >>> %time im.resize((256, 170), Image.NEAREST) Wall time: 0.44 ms In reality, the time is not quite constant, since various factors like processor caches and data locality interfere, but even for 4 times the larger source image, we received a slowdown of only 23%.
The speed of convolutions, on the contrary, decreases linearly with an increase in the original image.
>>> from PIL import Image >>> im = Image.open('pineapple.jpeg'); im.load(); im.size (2560, 1600) >>> %time im.resize((256, 170), Image.BICUBIC) Wall time: 33.2 ms >>> im = Image.open('space.jpeg'); im.load(); im.size (4928, 3280) >>> %time im.resize((256, 170), Image.BICUBIC) Wall time: 130 ms For 4 times larger original image, time also increased by 4 times.
Fixed core
Some applications and libraries for working with graphics use this trick: they sort of use the same filters for resizing as resize convolutions (there are, for example, bilinear, bicubic and Lanczosh filter), but when reducing the image, they do not increase the filter core adaptively. As a result, to build any point of the final image, only 4 pixels of the original image are used with a bilinear filter, with a bicubic one - 16, with a 3-frontal Lanczos filter - 36. That is, the running time is also constant relative to the original size.
But this approach only works to reduce about 2 times, and then the result is not much different from the “nearest neighbor”.

From 4928 × 3280 to 256 × 170 with a bilinear filter with a fixed core.
And saying "not much different from the" nearest neighbor "," I mean not only that it is also ragged and grainy, I mean that it almost coincides with the result of the "nearest neighbor." Open both pictures in the adjacent tabs of the browser and switch between them, the pictures are almost the same. It may even seem that there is an error somewhere, that this should not be so, because with a fixed core 4 pixels are interpolated, and the first one that comes across is not stupid, and the result should be closer to the original. But there is no error, and here's why:

Points that will be interpolated when decreasing to 20 × 13.
These are the points of the original image, on which the final is built. There are 4 times more of them, but they are all located in the same places as in the method of the nearest neighbor. That is, most likely, we will not receive new information about the image. You can try to further increase the number of points of the original image involved in the process by applying a bicubic filter, but the result will again be almost the same and even slightly more ragged , because the extreme pixels in the bicubic filter are taken with negative coefficients.

From 4928 × 3280 to 256 × 170 with a bicubic filter with a fixed core.
As it is not difficult to guess, the complexity and execution time when using filters with large coverage increases significantly, while the final image almost does not change. All three of the following examples give approximately the same picture, but their work time differs up to 20 times.
>>> im = Image.open('space.jpeg'); im.load(); im.size (4928, 3280) # >>> %time im.resize((256, 170), Image.NEAREST) Wall time: 0.441 ms # >>> %time im.transform((256, 170), Image.AFFINE, (im.width / 256, 0, 0, 0, im.height / 170, 0), Image.BILINEAR) Wall time: 3.62 ms # >>> %time im.transform((256, 170), Image.AFFINE, (im.width / 256, 0, 0, 0, im.height / 170, 0), Image.BICUBIC) Wall time: 9.21 ms Here I simulated a resize with a fixed core using affine transformations. But some applications and libraries really do this: they use more expensive filters to reduce, the result of which is almost equal to the nearest neighbor method. So does OpenCV, so do browsers when they draw an image on the canvas , so do video cards when texturing without mip levels. Because even though time is more, it is constant relative to the resolution of the original image. What about quality? For quality, there are convolutions.
How to fix
You probably think why I’m telling you all this, it’s still clear: if speed is needed, you need to take a “neighbor” or a fixed core, if the quality is convolution. But the fact is that, it turns out, a decrease with a fixed core can be corrected so that its result will be radically better. So much better that it is possible for your problems, this will be enough and no convolutions will be needed. Moreover, the complexity will not just be a constant relative to the size of the original image, it will be the same constant as when using a fixed core.
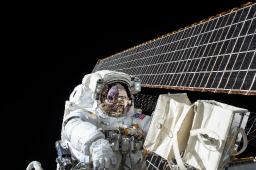
The resize result is 4928 × 3280 to 256 × 170 for constant time.
As you can see, the result of this algorithm cannot be compared with the multi-colored dumbness obtained after the “nearest neighbor” or a fixed core. For the examples for this article, I deliberately took a rather large picture with a fine grid, with lots of details (look at the astronaut's reflection in the helmet) and reduce it very much. I did my best to get as many artifacts as possible, but the algorithm still copes! When I first learned about this method from random1st , I thought that the method most likely gives only a slight improvement over the fixed core, because the number of pixels involved is the same. But the result greatly exceeded my expectations.
The secret is to take for processing not the points that are missed by 4 pieces, as with a fixed core, but to use a uniform grid with 2 times higher resolution than it should be in the end. And from it already interpolate the final image.

Points to be used when decreasing to 20 × 13.
As you can see, quite a few points of the original image are still taken. But because they are evenly distributed, they are more representative. And due to the fact that they are exactly 4 times larger, they all make the same contribution to the final image.
And now the most interesting thing: to use this method, you do not need to program anything! All you need you already have. The first step is to make a uniform grid of pixels of 2 times higher resolution using the “nearest neighbor” method, and at the second step you can compress it by 2 times at least a fixed filter, even with convolutions, even a box-filter (depending on what is in your library). The only thing for bundles, I would advise to take a Hamming filter or bicubic, but not bilinear.
>>> im = Image.open('space.jpeg'); im.load(); im.size (4928, 3280) # >>> %time im.resize((512, 340), Image.NEAREST)\ .transform((256, 170), Image.AFFINE, (2, 0, 0, 0, 2, 0), Image.BILINEAR) Wall time: 3.59 ms # >>> %time im.resize((512, 340), Image.NEAREST)\ .resize((256, 170), Image.HAMMING) Wall time: 2.42 ms # >>> %time im.resize((512, 340), Image.NEAREST)\ .resize((256, 170), Image.BICUBIC) Wall time: 3.53 ms # - # , OpenCV # INTER_NEAREST # . https://github.com/opencv/opencv/issues/9096 >>> import cv2 >>> im = cv2.imread('space.jpeg') >>> %time cv2.resize(cv2.resize(im, (512, 340), interpolation=cv2.INTER_NEAREST), (256, 170), interpolation=cv2.INTER_AREA) Wall time: 0.81 ms Further development of the idea
This improvement is impressive, but you can not stop there. Who said that to build you need to use exactly 2 times larger image? Why not take 3 times or 4 for better quality. However, it will be impossible to use a resize with a fixed core for the second step, because the same problems that we are trying to get rid of will come out. But convolutions - please. In this case, the time will remain constant, just the constant will be more.


Resize from 4928 × 3280 to 256 × 170 using 2x and 4x intermediate images.
Perhaps on this scale the differences are not very visible, but they are quite strong. To see them, look at the gif with a zoom:
Well, time:
>>> im = Image.open('space.jpeg'); im.load(); im.size (4928, 3280) # 2x >>> %time im.resize((512, 340), Image.NEAREST)\ .resize((256, 170), Image.BICUBIC) Wall time: 3.53 ms # 3x >>> %time im.resize((768, 510), Image.NEAREST)\ .resize((256, 170), Image.BICUBIC) Wall time: 6.27 ms # 4x >>> %time im.resize((1024, 680), Image.NEAREST)\ .resize((256, 170), Image.BICUBIC) Wall time: 9.23 ms As you can see, the version with 2x intermediate image works for a time approximately equal to the bilinear filter with a fixed core, and the version with 4x intermediate image during bicubic time. Well, generally speaking, you can use not a whole number of points.
How to make the right choice
The question arises: if this method gives such best results and works at the speed of a fixed core, why bother to use a fixed core to reduce it? Of course, this method has a field of applicability - it is better not to use it with a decrease of less than 2 times . And this coincides with the limit of applicability of a fixed core, which is better not to use with a decrease of more than 2 times . It turns out, by combining methods, it is possible to obtain a resize of acceptable quality for a fixed time at any scale.
Important addition
Vintage comments correctly indicate that this method is correctly called supersampling. Supersampling is often used in games to eliminate aliasing. In essence, the game scene is an image of infinite resolution, because we could draw it in any resolution. For supersampling, the scene is drawn at a higher resolution than necessary and several neighboring pixels are averaged over one. That is a complete analogy. But this does not negate the fact that such a method is very rarely used in software despite its merits.
Examples
And finally, a few examples with other images. From left to right:
1) fixed core, bilinear filter (what many are using now)
2) bicubic convolutions as a reference
3) supersampling with 2x magnification
4) supersampling with 4x magnification
The main thing when viewing is to remember that the third image is generated at exactly the same time as the first one, and the fourth one even ≈3 times longer, but also for a constant time and often up to 20 times faster than the second one.
Once again, an example from the article. The image is 4928 × 3280 reduced by 19.25 times.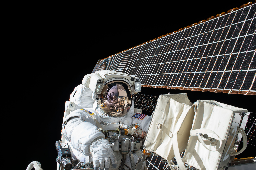
The same picture, but this time reduced from 600 × 399, that is 2.34 times.
Such a small decrease is a more difficult case for this method.


Image 2560 × 1600 reduced by 10 times.


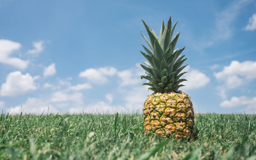
Image 4000 × 2667 reduced 15.625 times.


The image is 2448 × 3264 reduced 9.5625 times.


Image 2000 × 2000 reduced by 7.8125 times.


')
Source: https://habr.com/ru/post/340966/
All Articles