Introduction to Spring Frameworks: Spring MVC
Hi, Habr.
This is my first article. Please do not beat with a hammer.
Today, this post will begin my series of articles on Spring frameworks.
')
I will not go into the subtleties of the theory, here on Habré there are enough articles about it. I prefer practice.
However, it is worth recalling that you can work with the Spring Framework using both the xml configuration and annotations. Also, nothing prevents to combine both approaches.
Personally, I prefer to work with annotations, which I advise you. Therefore, all the examples that I will give, will use annotations.
I think we should tell you what we will do today.
Today we will create a simple web application that will count the sum of two numbers and, of course, send the user a response.
We will work in IDE Intellij IDEA 12. We proceed.
Create a new project (File-New Project).
We select “Project Type” - Spring MVC. Give the project a name (Project name) and click Finish. If you wish, you can specify a different base package (Base package), so I changed it to "com.springapp.controllers". Also, if you can specify the path to the JDK (Project SDK) and Server (Application server) on which the application will be deployed. As you can see, I'm using Java version 7 and the Glassfish server.
The project was created and should have such a structure.
This is a template project that uses the xml configuration. But we want to use annotations. So remove the excess.
Delete the mvc-dispatcher-servlet.xml file and the test folder (the tests in it use the mvc-dispatcher-servlet.xml file).
Once again I will give a screen of what should be in this step.
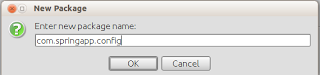
Now you need to create the same dispatcher-servlet, only using the usual java-class. I believe that the program should always be well structured and, I think, many will support me. To begin, create a new “config” package that will store the entire Spring configuration. To do this, select the java folder and press "ALT-INSERT". Enter the package name (com.springapp.config) and click OK.
Package created. Add a new class to it. For this, all the same - ALT-INSERT and select "Class". Let's call it MvcConfig.
The created class should look like this.
Let's start creating the configuration. I will give at once a ready configuration class and below I will describe all the necessary details.
Let's start from the beginning.
I think the annotation
Now in more detail about the class methods themselves.
In the getViewResolver () method, we specify, in my opinion, the simplest page viewer, whose configuration consists of adding a prefix and a suffix to the page.
In the addResourceHandlers (ResourceHandlerRegistry registry) method, we specify the location of all the resources that will be used for the pages. It can be cascading style sheets, java-script files, images and so on.
Here is such a simple configuration.
Now it is necessary to explain to the web container that we will use this class as a dispatcher. To do this, you need to edit the web.xml file. The idea has created such a template code for us.
We need to replace it with this.
I will not describe in detail, I will only say - we indicate that the context and dispatcher configuration is performed using annotations (using the contextClass parameter and its value org.springframework.web.context.support.AnnotationConfigWebApplicationContext). We also indicate in which package to look for configuration classes (parameter contextConfigLocation).
Next, you need to create a controller. The controller in Spring performs address translation (what we see in the browser) and redirects to the pages (in our case hello.jsp).
Since, the Idea created the base controller for us, we will not have to write it manually. Just in case, I will give his code and explain what is happening there.
Let's start with annotations.
Suppose there are 2 addresses mydomain.com/info, mydomain.com/about. If we specify in RequestMapping instead of "/" - "/ about", then the controller will never try to translate the address of mydomain.com/info, since we simply will not see it.
About what the printWelcome () method does. This method simply sends the message “Hello World” to the page and, of course, indicates the name of the page itself. Well, using the viewer that we described in the dispatcher class (MvcConfig), this name is translated to the full path to the page, by adding a prefix and suffix.
It remains to give only the code of the page hello.jsp.
Actually, you can proceed to the application scan. To do this, use the start button.
We are waiting for now, the server will start, the application will unfold. And voila, we see everyone's favorite "Hello World".
Once everything works as it should, you can proceed to the implementation of the calculation of the sum of two numbers.
To begin, change our jsp page by adding a form for entering numbers.
Nothing complicated. We have added two fields for entering numbers, a submit button and a result output derivative. For simplicity, I decided to use the same page to display the result.
And finally, add a method for processing a POST request to our controller.
In this method, we use the
We start (the idea will offer 4 options, choose “Redeploy”), we see that our form is.
Well, we consider the amount.
Actually, that's all.
Next time we will look at what Spring Data JPA is and how to work with it.
All the information that I cited is purely my experience or opinion and does not pretend to be a standard or standard. I show ways to how you can do it, and not how it is NECESSARY.
I will be glad to constructive criticism, as I have not much experience in the field of “becoming a construction industry”.
Bye everyone, see you later.
This is my first article. Please do not beat with a hammer.
Today, this post will begin my series of articles on Spring frameworks.
')
I will not go into the subtleties of the theory, here on Habré there are enough articles about it. I prefer practice.
However, it is worth recalling that you can work with the Spring Framework using both the xml configuration and annotations. Also, nothing prevents to combine both approaches.
Personally, I prefer to work with annotations, which I advise you. Therefore, all the examples that I will give, will use annotations.
I think we should tell you what we will do today.
Today we will create a simple web application that will count the sum of two numbers and, of course, send the user a response.
We will work in IDE Intellij IDEA 12. We proceed.
Create a new project (File-New Project).
We select “Project Type” - Spring MVC. Give the project a name (Project name) and click Finish. If you wish, you can specify a different base package (Base package), so I changed it to "com.springapp.controllers". Also, if you can specify the path to the JDK (Project SDK) and Server (Application server) on which the application will be deployed. As you can see, I'm using Java version 7 and the Glassfish server.
Screenshot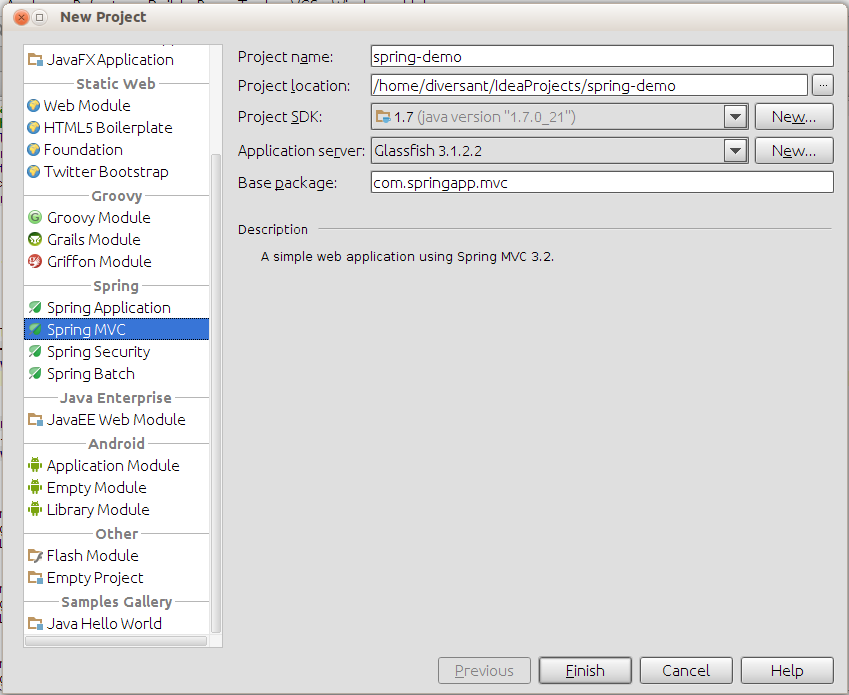
The project was created and should have such a structure.
Screenshot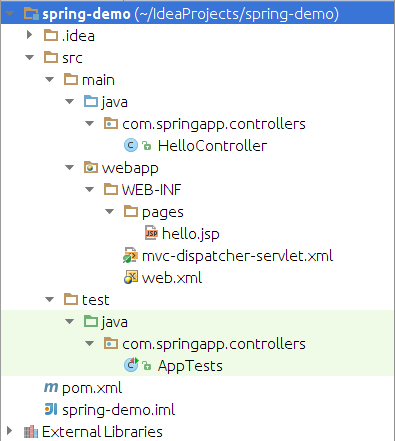
This is a template project that uses the xml configuration. But we want to use annotations. So remove the excess.
Delete the mvc-dispatcher-servlet.xml file and the test folder (the tests in it use the mvc-dispatcher-servlet.xml file).
Once again I will give a screen of what should be in this step.
Screenshot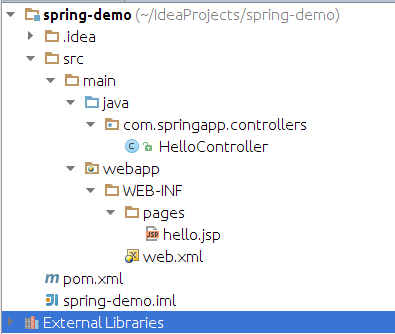
Now you need to create the same dispatcher-servlet, only using the usual java-class. I believe that the program should always be well structured and, I think, many will support me. To begin, create a new “config” package that will store the entire Spring configuration. To do this, select the java folder and press "ALT-INSERT". Enter the package name (com.springapp.config) and click OK.
Screenshot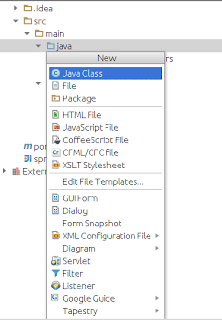
Package created. Add a new class to it. For this, all the same - ALT-INSERT and select "Class". Let's call it MvcConfig.
The created class should look like this.
package com.springapp.config; /** * Created with IntelliJ IDEA. * User: diversant * Date: 18.06.13 * Time: 13:05 * To change this template use File | Settings | File Templates. */ public class MvcConfig { } Let's start creating the configuration. I will give at once a ready configuration class and below I will describe all the necessary details.
package com.springapp.config; import org.springframework.context.annotation.Bean; import org.springframework.context.annotation.ComponentScan; import org.springframework.context.annotation.Configuration; import org.springframework.web.servlet.ViewResolver; import org.springframework.web.servlet.config.annotation.EnableWebMvc; import org.springframework.web.servlet.config.annotation.ResourceHandlerRegistry; import org.springframework.web.servlet.config.annotation.WebMvcConfigurerAdapter; import org.springframework.web.servlet.view.InternalResourceViewResolver; @Configuration @ComponentScan(basePackages="com.springapp") @EnableWebMvc public class MvcConfig extends WebMvcConfigurerAdapter { @Bean public ViewResolver getViewResolver(){ InternalResourceViewResolver resolver = new InternalResourceViewResolver(); resolver.setPrefix("/WEB-INF/pages/"); resolver.setSuffix(".jsp"); return resolver; } @Override public void addResourceHandlers(ResourceHandlerRegistry registry) { registry.addResourceHandler("/resources/**").addResourceLocations("/resources/"); } } Let's start from the beginning.
@Configuration - we say that this class is configurational for Spring, that is, it includes the configuration of bins.@ComponentScan - specify the package to which the necessary directives for interacting with bins will be searched.@EnableWebMvc - we indicate that this class is configurational for Spring MVC.@Bean - we say that the annotated method is a bin.I think the annotation
@Override known to everyone who has worked at least a little with Java.Now in more detail about the class methods themselves.
In the getViewResolver () method, we specify, in my opinion, the simplest page viewer, whose configuration consists of adding a prefix and a suffix to the page.
In the addResourceHandlers (ResourceHandlerRegistry registry) method, we specify the location of all the resources that will be used for the pages. It can be cascading style sheets, java-script files, images and so on.
Here is such a simple configuration.
Now it is necessary to explain to the web container that we will use this class as a dispatcher. To do this, you need to edit the web.xml file. The idea has created such a template code for us.
<web-app version="2.4" xmlns="http://java.sun.com/xml/ns/j2ee" xmlns:xsi="http://www.w3.org/2001/XMLSchema-instance" xsi:schemalocation="http://java.sun.com/xml/ns/j2ee http://java.sun.com/xml/ns/j2ee/web-app_2_4.xsd"> <display-name>Spring MVC Application</display-name> <servlet> <servlet-name>mvc-dispatcher</servlet-name> <servlet-class>org.springframework.web.servlet.DispatcherServlet</servlet-class> <load-on-startup>1</load-on-startup> </servlet> <servlet-mapping> <servlet-name>mvc-dispatcher</servlet-name> <url-pattern>/</url-pattern> </servlet-mapping> </web-app> We need to replace it with this.
<web-app version="2.4" xmlns="http://java.sun.com/xml/ns/j2ee" xmlns:xsi="http://www.w3.org/2001/XMLSchema-instance" xsi:schemalocation="http://java.sun.com/xml/ns/j2ee http://java.sun.com/xml/ns/j2ee/web-app_2_4.xsd"> <display-name>Spring MVC</display-name> <context-param> <param-name>contextClass</param-name><param-value>org.springframework.web.context.support.AnnotationConfigWebApplicationContext</param-value></context-param> <listener> <listener-class>org.springframework.web.context.ContextLoaderListener</listener-class> </listener> <servlet> <servlet-name>SpringDispatcher</servlet-name> <servlet-class>org.springframework.web.servlet.DispatcherServlet</servlet-class> <init-param> <param-name>contextClass</param-name><param-value>org.springframework.web.context.support.AnnotationConfigWebApplicationContext</param-value></init-param> <init-param> <param-name>contextConfigLocation</param-name><param-value>com.springapp.config</param-value></init-param> <load-on-startup>1</load-on-startup> </servlet> <servlet-mapping> <servlet-name>SpringDispatcher</servlet-name> <url-pattern>/</url-pattern> </servlet-mapping> <session-config> <session-timeout>30</session-timeout> </session-config> </web-app> I will not describe in detail, I will only say - we indicate that the context and dispatcher configuration is performed using annotations (using the contextClass parameter and its value org.springframework.web.context.support.AnnotationConfigWebApplicationContext). We also indicate in which package to look for configuration classes (parameter contextConfigLocation).
Next, you need to create a controller. The controller in Spring performs address translation (what we see in the browser) and redirects to the pages (in our case hello.jsp).
Since, the Idea created the base controller for us, we will not have to write it manually. Just in case, I will give his code and explain what is happening there.
package com.springapp.controllers; import org.springframework.stereotype.Controller; import org.springframework.ui.Model; import org.springframework.ui.ModelMap; import org.springframework.web.bind.annotation.RequestMapping; import org.springframework.web.bind.annotation.RequestMethod; import org.springframework.web.bind.annotation.RequestParam; @Controller @RequestMapping("/") public class HelloController { @RequestMapping(method = RequestMethod.GET) public String printWelcome(ModelMap model) { model.addAttribute("message", "Hello world!"); return "hello"; } } Let's start with annotations.
@Controller - actually we say that this is a controller. Nothing to add@RequestMapping("/") this annotation, we indicate the scope for this controller (if this annotation is applicable to a class) or a specific broadcast address (if it is a method). You can also specify at which particular request one or another address will be transmitted (the method parameter). In this case, we say that this controller will see all the addresses (what is in the browser) and try to translate them to the desired page. For more clarity, I will give an example.Suppose there are 2 addresses mydomain.com/info, mydomain.com/about. If we specify in RequestMapping instead of "/" - "/ about", then the controller will never try to translate the address of mydomain.com/info, since we simply will not see it.
About what the printWelcome () method does. This method simply sends the message “Hello World” to the page and, of course, indicates the name of the page itself. Well, using the viewer that we described in the dispatcher class (MvcConfig), this name is translated to the full path to the page, by adding a prefix and suffix.
It remains to give only the code of the page hello.jsp.
<html> <body> <h1>${message}</h1> </body> </html> Actually, you can proceed to the application scan. To do this, use the start button.
We are waiting for now, the server will start, the application will unfold. And voila, we see everyone's favorite "Hello World".
Screenshot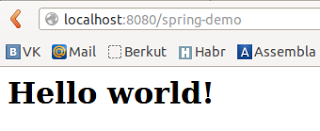
Once everything works as it should, you can proceed to the implementation of the calculation of the sum of two numbers.
To begin, change our jsp page by adding a form for entering numbers.
<html> <body> <h1>${message}</h1> <form method="post"> <input name="value1" type="text"/> + <input name="value2" type="text"/> <input type="submit"/> </form> <h3>Result: ${result}</h3> </body> </html> Nothing complicated. We have added two fields for entering numbers, a submit button and a result output derivative. For simplicity, I decided to use the same page to display the result.
And finally, add a method for processing a POST request to our controller.
package com.springapp.controllers; import org.springframework.stereotype.Controller; import org.springframework.ui.Model; import org.springframework.ui.ModelMap; import org.springframework.web.bind.annotation.RequestMapping; import org.springframework.web.bind.annotation.RequestMethod; import org.springframework.web.bind.annotation.RequestParam; @Controller @RequestMapping("/") public class HelloController { @RequestMapping(method = RequestMethod.GET) public String printWelcome(ModelMap model) { model.addAttribute("message", "Hello world!"); return "hello"; } @RequestMapping(method = RequestMethod.POST) public String calcSum(Model m, @RequestParam(value = "value1") Double value1, @RequestParam(value = "value2") Double value2 ){ m.addAttribute("result", (value1+value2)); return "hello"; } } In this method, we use the
@RequestMapping annotation @RequestMapping specify the POST processing method, and also use the @RequestParam annotation @RequestParam obtain information from the form fields (value1, value2).We start (the idea will offer 4 options, choose “Redeploy”), we see that our form is.
Screenshot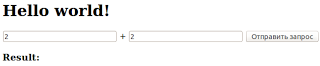
Well, we consider the amount.
Screenshot
Actually, that's all.
Next time we will look at what Spring Data JPA is and how to work with it.
All the information that I cited is purely my experience or opinion and does not pretend to be a standard or standard. I show ways to how you can do it, and not how it is NECESSARY.
I will be glad to constructive criticism, as I have not much experience in the field of “becoming a construction industry”.
Bye everyone, see you later.
Source: https://habr.com/ru/post/183854/
All Articles