We use a component from a standard Android application in our project.
The power of Android is in its openness. The source code of any favorite application (if it is not one of Google Apps) or a component can be not only studied, but also bolted to your project for the joy of yourself and users. Moreover, its design and behavior will be familiar and familiar to users. In this article, I will show how to do this. We will select the component we want to borrow, find it in the source, examine it, add it to our library and connect it to our application.
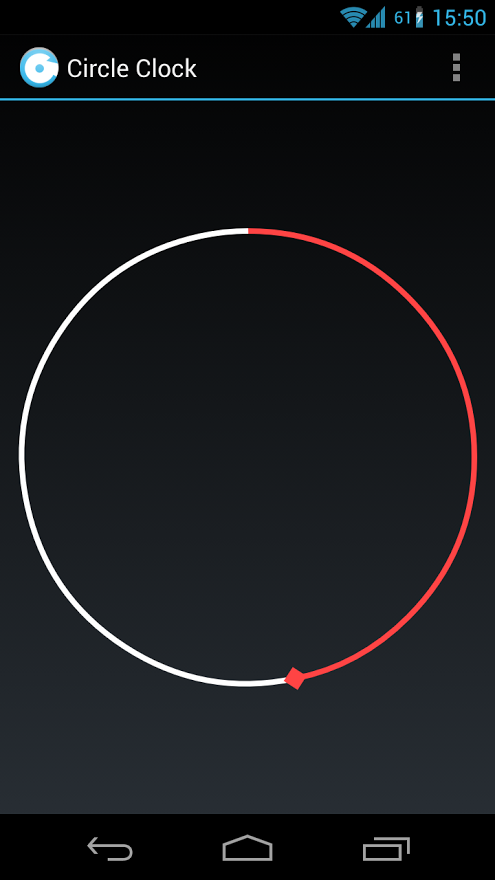
To begin with, we’ll choose what attracts our view so strongly in one of the standard Android applications. In my case, this is a circular timer in the clock application. It looks like this:
')
But I want to use it not as a timer, but as an indicator of progress.
The next step is to find the source code of this particular component among many other sources in Android applications. All of these sources can be found at http://grepcode.com/project/repository.grepcode.com/java/ext/com.google.android/android-apps/
Select the latest version (at the time of writing this is 4.2.2_r1), go to “com / android” and look for the desired application. In my case, this is "deskclock". We run through the list of classes and ... we are lucky - there is a class with a talking name CircleTimerView. However, instead of the class description - “TODO: Insert description here. (generated by isaackatz) »This class inherits View - it will be the key class of our library.
You can skip this paragraph if the component you decide to add to the application is small. For example, as in my case. But for example, still do it through the library. We start favorite IDE, we create the new project, having noted "Mark project as a library".
Copy the found class to the library (or directly to the project). Is there a lot of critical mistakes in the class? And right! We have copied only the class, which will be the point of contact between our application and all classes added to our library from the sources of the standard application.
We look at what our class depended on before we pulled it out of its usual habitat. In my case, these are the Utils, Stopwatches and the R constants box
Copy the Utils class and see a lot of dependencies on other classes already in it. Now you can either connect all the classes he needs, and then all the classes that are needed by these ... But it is better to just leave from the utilitarian class only those methods that we need. Throwing out everything except getTimeNow () and calculateRadiusOffset (), removing extra imports is great.
From the Stopwatches class, only three constants are used and, running ahead, I will say that I will not need them, as well as the method that uses them.
Out of the R box, we take the data about indents and color, and here it’s impossible to just copy the class - it is generated automatically, based on resources. We'll have to add resources. You can find them in the source code at the address “packages / apps”, select the application being prepared, go to the res / values folder, copy the files “colors.xml” and “dimens.xml” to the similar folder of our library project.
Let's fix the imports in the main class and the library is ready. Nearly. Two added files should be cleaned, leaving there only the necessary data, and also add other versions of these files for different devices. For the implementation of the latter, you need to find in the source code all files with such names in folders with the names “values- *” and copy them to the library. Thus, for example, on the tablet indents will be more than on the phone.
Now the sweetest thing is to see the result of the work in action. We open the project of our application, which needs this component so much, we connect the created library, we throw the com.android.deskclock.CircleTimerView element on the markup, and this is what we see when the application starts:
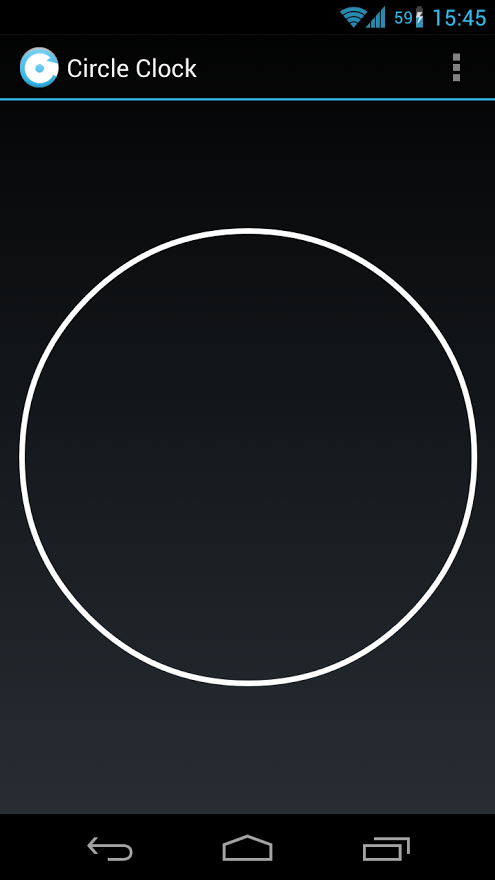
Great, this is a white circle, almost what we wanted. It remains only to bring it into action - you need a code that will make our circle be cool.
Again we climb into the source, looking for an activity or a fragment that uses a component that we lent. In my case, this is StopwatchFragment. After a brief study of this fragment, it becomes clear that for a simple demonstration of the operation of an element, it is enough to write three lines:
Run the application again and see the desired (at least, me) result:
Now everything is as it should be, which means it's time to say thanks to the Android development team. It's about adding the text of the Apache License Agreement version 2.0 license to your application. For example, display it by clicking the button in the settings.
Yes, everything is already working as it should, but we almost did not look at the code that we took. Of course, this can not be done - the source code from the Android development team and the devil from the component is unlikely to pop up, but by studying the code, you can improve it, and learn the most useful things yourself.
In the class from my example, everything is simple: all the rendering is in the onDraw (Canvas canvas) method, to call a redraw - postInvalidate (). To keep the circle animation continuous, invalidate () is called directly in onDraw (...).
UPDATE Now I experienced a component in the field - the fears about calling invalidate () from onDraw (...) were confirmed: having performed the recalculation and drawing, the component immediately accepted to repeat this action and so it goes on continuously.
Drawing, of course, turns out smooth, but it uses 700 MHz processor, the phone quickly consumes energy and even the curtain of notifications slows down. And this is probably the first time when my Galaxy Nexus began to noticeably heat up.
To fix this is quite simple: not always we need to update the timer continuously. Here it is necessary to take into account how much time must pass in order for the change to be visually noticeable. For example, we start counting 5 seconds in this component on a high-resolution tablet, then it makes sense to do a continuous update. Or is it a two-hour timer on a low-resolution phone? We can perform at least 10 redraws per second, but they will not be visually noticeable.
If necessary, you can rewrite the component to fit your needs (for example, under the progress indicator) or inherit it and redefine the necessary methods.
We were lucky - the component from the example did not use anything that is not in the API of level 7 (Android 2.1), otherwise we would have to solve this unpleasant problem. About it - next time.
If someone read this article to the end, remembered a beautiful component from a favorite standard Android application and added it to my project - I am pleased that my work was not in vain.
Choose a component
To begin with, we’ll choose what attracts our view so strongly in one of the standard Android applications. In my case, this is a circular timer in the clock application. It looks like this:
')
But I want to use it not as a timer, but as an indicator of progress.
Find the source
The next step is to find the source code of this particular component among many other sources in Android applications. All of these sources can be found at http://grepcode.com/project/repository.grepcode.com/java/ext/com.google.android/android-apps/
Select the latest version (at the time of writing this is 4.2.2_r1), go to “com / android” and look for the desired application. In my case, this is "deskclock". We run through the list of classes and ... we are lucky - there is a class with a talking name CircleTimerView. However, instead of the class description - “TODO: Insert description here. (generated by isaackatz) »This class inherits View - it will be the key class of our library.
Create a library
You can skip this paragraph if the component you decide to add to the application is small. For example, as in my case. But for example, still do it through the library. We start favorite IDE, we create the new project, having noted "Mark project as a library".
Copy the found class to the library (or directly to the project). Is there a lot of critical mistakes in the class? And right! We have copied only the class, which will be the point of contact between our application and all classes added to our library from the sources of the standard application.
We look at what our class depended on before we pulled it out of its usual habitat. In my case, these are the Utils, Stopwatches and the R constants box
Copy the Utils class and see a lot of dependencies on other classes already in it. Now you can either connect all the classes he needs, and then all the classes that are needed by these ... But it is better to just leave from the utilitarian class only those methods that we need. Throwing out everything except getTimeNow () and calculateRadiusOffset (), removing extra imports is great.
From the Stopwatches class, only three constants are used and, running ahead, I will say that I will not need them, as well as the method that uses them.
Out of the R box, we take the data about indents and color, and here it’s impossible to just copy the class - it is generated automatically, based on resources. We'll have to add resources. You can find them in the source code at the address “packages / apps”, select the application being prepared, go to the res / values folder, copy the files “colors.xml” and “dimens.xml” to the similar folder of our library project.
Let's fix the imports in the main class and the library is ready. Nearly. Two added files should be cleaned, leaving there only the necessary data, and also add other versions of these files for different devices. For the implementation of the latter, you need to find in the source code all files with such names in folders with the names “values- *” and copy them to the library. Thus, for example, on the tablet indents will be more than on the phone.
We connect the library to our application
Now the sweetest thing is to see the result of the work in action. We open the project of our application, which needs this component so much, we connect the created library, we throw the com.android.deskclock.CircleTimerView element on the markup, and this is what we see when the application starts:
Great, this is a white circle, almost what we wanted. It remains only to bring it into action - you need a code that will make our circle be cool.
Again we climb into the source, looking for an activity or a fragment that uses a component that we lent. In my case, this is StopwatchFragment. After a brief study of this fragment, it becomes clear that for a simple demonstration of the operation of an element, it is enough to write three lines:
final CircleTimerView circleTimerView1 =
(CircleTimerView) findViewById(R.id.circleTimerView1);circleTimerView1.setIntervalTime(10000);circleTimerView1.startIntervalAnimation();Run the application again and see the desired (at least, me) result:
Now everything is as it should be, which means it's time to say thanks to the Android development team. It's about adding the text of the Apache License Agreement version 2.0 license to your application. For example, display it by clicking the button in the settings.
What's inside?
Yes, everything is already working as it should, but we almost did not look at the code that we took. Of course, this can not be done - the source code from the Android development team and the devil from the component is unlikely to pop up, but by studying the code, you can improve it, and learn the most useful things yourself.
In the class from my example, everything is simple: all the rendering is in the onDraw (Canvas canvas) method, to call a redraw - postInvalidate (). To keep the circle animation continuous, invalidate () is called directly in onDraw (...).
UPDATE Now I experienced a component in the field - the fears about calling invalidate () from onDraw (...) were confirmed: having performed the recalculation and drawing, the component immediately accepted to repeat this action and so it goes on continuously.
Drawing, of course, turns out smooth, but it uses 700 MHz processor, the phone quickly consumes energy and even the curtain of notifications slows down. And this is probably the first time when my Galaxy Nexus began to noticeably heat up.
To fix this is quite simple: not always we need to update the timer continuously. Here it is necessary to take into account how much time must pass in order for the change to be visually noticeable. For example, we start counting 5 seconds in this component on a high-resolution tablet, then it makes sense to do a continuous update. Or is it a two-hour timer on a low-resolution phone? We can perform at least 10 redraws per second, but they will not be visually noticeable.
If necessary, you can rewrite the component to fit your needs (for example, under the progress indicator) or inherit it and redefine the necessary methods.
What's next?
We were lucky - the component from the example did not use anything that is not in the API of level 7 (Android 2.1), otherwise we would have to solve this unpleasant problem. About it - next time.
Thanks to all
If someone read this article to the end, remembered a beautiful component from a favorite standard Android application and added it to my project - I am pleased that my work was not in vain.
Source: https://habr.com/ru/post/183846/
All Articles