Apache Kafka and Stream Processing with Spark Streaming
Hi, Habr! Today we will build a system that will, using Spark Streaming, process Apache Kafka message streams and record the result of processing into the AWS RDS cloud database.
Imagine that a certain credit organization sets before us the task of processing incoming transactions “on the fly” at all of its branches. This can be done for the purpose of promptly calculating an open currency position for the treasury, limits or financial result for transactions, etc.
How to implement this case without the use of magic and magic spells - read under the cut! Go!
')

(Image source)
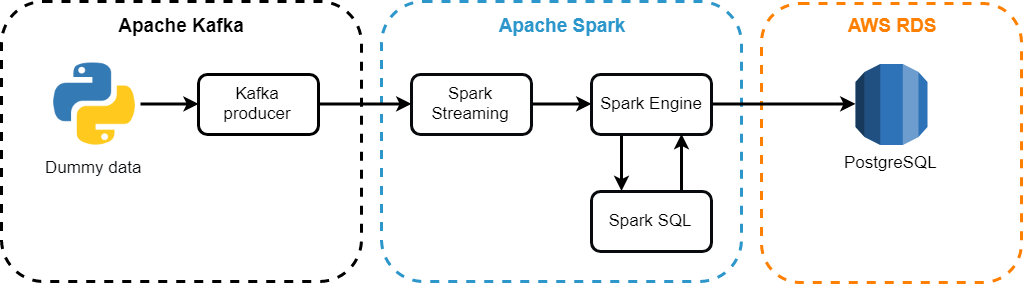
Of course, the processing of large amounts of data in real time provides ample opportunities for use in modern systems. One of the most popular combinations for this is the Apache Kafka and Spark Streaming tandem, where Kafka creates a stream of incoming message packets, and Spark Streaming processes these packets at a specified time interval.
To increase the resiliency of the application, we will use checkpoints - checkpoints. Using this mechanism, when the Spark Streaming module needs to recover the lost data, it will only need to return to the last checkpoint and resume the calculations from it.
Components Used:
Before using Kafka directly, you need to make sure Java is available, because JVM is used for work:
Create a new user to work with Kafka:
Next, download the distribution from the official website of Apache Kafka:
Unpack the downloaded archive:
The next step is optional. The fact is that the default settings do not allow full use of all the features of Apache Kafka. For example, delete the topic, category, group on which messages can be posted. To change this, edit the configuration file:
Add the following to the end of the file:
Before starting the Kafka server, you need to start the ZooKeeper server, we will use the auxiliary script that comes with the Kafka distribution:
After ZooKeeper has successfully started, we launch the Kafka server in a separate terminal:
Create a new topic called Transaction:
Make sure that the topic with the required number of partitions and replication was created:

Let's miss the moments of testing the producer and the consumer for the newly created topic. For more information on how you can test sending and receiving messages, it is written in the official documentation - Send some messages . Well, we turn to writing a producer in Python using the KafkaProducer API.
The producer will generate random data - 100 messages every second. By random data we mean a dictionary consisting of three fields:
The code for the producer is as follows:
Next, using the send method, we send a message to the server, to the topic we need, in JSON format:
When you run the script, we receive the following messages in the terminal:

This means that everything works as we wanted - the producer generates and sends messages to the topic we need.
The next step is to install Spark and process this message flow.
Apache Spark is a versatile and high-performance cluster computing platform.
Spark surpasses the popular implementations of the MapReduce model in performance, while providing support for a wider range of calculation types, including interactive queries and streaming processing. Speed plays an important role in processing large amounts of data, since it is speed that allows you to work online without spending minutes or hours waiting. One of the most important advantages of Spark, providing such a high speed - the ability to perform calculations in memory.
This framework is written in Scala, so you need to install it first:
Download from the official website of the Spark distribution:
Unpack the archive:
Add the path to Spark to the bash file:
We add through the editor the following lines:
Run the command below after making changes to bashrc:
It remains to deploy the database, where we will upload the processed information from the streams. For this we will use the AWS RDS service.
Go to the AWS console -> AWS RDS -> Databases -> Create database:
Select PostgreSQL and click Next:

Because This example is dealt with solely for educational purposes; we will use the free server “at minimum wages” (Free Tier)

Next, we put a tick in the Free Tier block, and after that we will be offered a t2.micro class instance — albeit a weak one, but free and quite suitable for our task:

Following are very important things: the name of the DB Instance, the name of the master user and his password. Let's call the instance: myHabrTest, master user: habr , password: habr12345 and click on the Next button:

The following page contains the parameters responsible for the availability of our database server from the outside (Public accessibility) and the availability of ports:

Let's create a new configuration for the VPC security group, which will allow us to access our database server through port 5432 (PostgreSQL) from the outside.
Let's move in a separate browser window to the AWS console in the VPC Dashboard section -> Security Groups -> Create security group:

Set the name for the Security group - PostgreSQL, the description, specify which VPC this group should be associated with and click the Create button:
Fill in for the newly created Inbound rules group for port 5432, as shown in the picture below. You may not specify the port manually, but select PostgreSQL from the Type drop-down list.
Strictly speaking, the value :: / 0 means the availability of incoming traffic for a server from all over the world, which is canonically not quite true, but let us use the following approach to parse an example:
We return to the browser page, where we openly “Configure advanced settings” and select in the VPC security groups -> Choose existing VPC security groups -> PostgreSQL section:

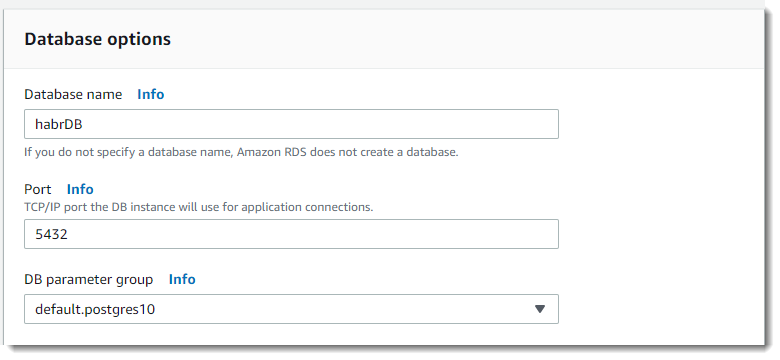
Further, in the Database options -> Database name -> section, set the name - habrDB .
The rest of the parameters, with the exception of perhaps disabling backup (backup retention period - 0 days), monitoring and Performance Insights, can be left as default. Click on the Create database button:
The final stage will be the development of Spark-joba, which will be every two seconds to process new data that came from Kafka and enter the result in the database.
As noted above, checkpoints are the primary mechanism in SparkStreaming, which must be configured for fault tolerance. We will use checkpoints and, in the event of a drop in procedure, the Spark Streaming module to restore the lost data will only need to go back to the last checkpoint and resume the calculations from it.
The checkpoint can be enabled by setting the directory in a fault-tolerant, reliable file system (for example, HDFS, S3, etc.) in which the checkpoint information will be stored. This is done using, for example:
In our example, we will use the following approach, namely, if checkpointDirectory exists, then the context will be recreated from the checkpoint data. If the directory does not exist (that is, it is executed for the first time), then the functionToCreateContext function is called to create a new context and configure DStreams:
Create a DirectStream object in order to connect to the topic “transaction” using the KafkaUtils library createDirectStream method:
Parsing incoming data in JSON format:
Using Spark SQL, we make a simple grouping and output the result to the console:
Getting the query text and running it through Spark SQL:
And then we save the resulting aggregated data into a table in AWS RDS. To save the aggregation results to a database table, we will use the DataFrame object's write method:
In order to correctly link Spark and Kafka, you should run the job through smark-submit using the spark-streaming-kafka-0-8_2.11 artifact . Additionally, we also apply an artifact for interacting with the PostgreSQL database, we will pass them through --packages.
For the flexibility of the script, we will also take as input parameters the name of the message server and the topic from which we want to receive data.
So, it's time to start and check the performance of the system:
Everything worked out! As you can see in the picture below, during the operation of the application, new aggregation results are output every 2 seconds, because we set the packaging interval to 2 seconds when we created the StreamingContext object:

Next, we make a simple database query to check for records in the transaction_flow table:

This article has reviewed an example of streaming information using Spark Streaming in conjunction with Apache Kafka and PostgreSQL. With the growth of data from various sources, it is difficult to overestimate the practical value of Spark Streaming for creating streaming and real-time applications.
You can find the full source code in my GitHub repository .
I am pleased to discuss this article, waiting for your comments, and also, I hope for constructive criticism of all concerned readers.
I wish you success!
PS It was originally planned to use a local PostgreSQL database, but considering my love for AWS, I decided to bring the database to the cloud. In the next article on this topic, I will show how to implement the entire AWS system described above using AWS Kinesis and AWS EMR. Follow the news!
Imagine that a certain credit organization sets before us the task of processing incoming transactions “on the fly” at all of its branches. This can be done for the purpose of promptly calculating an open currency position for the treasury, limits or financial result for transactions, etc.
How to implement this case without the use of magic and magic spells - read under the cut! Go!
')
(Image source)
Introduction
Of course, the processing of large amounts of data in real time provides ample opportunities for use in modern systems. One of the most popular combinations for this is the Apache Kafka and Spark Streaming tandem, where Kafka creates a stream of incoming message packets, and Spark Streaming processes these packets at a specified time interval.
To increase the resiliency of the application, we will use checkpoints - checkpoints. Using this mechanism, when the Spark Streaming module needs to recover the lost data, it will only need to return to the last checkpoint and resume the calculations from it.
The architecture of the developed system
Components Used:
- Apache Kafka is a distributed publication and subscription messaging system. Suitable for both offline and online message usage. To prevent data loss, Kafka messages are stored on disk and replicated within the cluster. The Kafka system is built on top of the ZooKeeper synchronization service;
- Apache Spark Streaming - Spark component for streaming data processing. The Spark Streaming module is built using a microbatch architecture, when the data stream is interpreted as a continuous sequence of small data packets. Spark Streaming takes data from different sources and combines them into small packets. New packages are created at regular intervals. At the beginning of each time interval, a new packet is created, and any data received during this interval is included in the packet. At the end of the interval, the packet increase stops. The interval size is determined by a parameter called the batch interval;
- Apache Spark SQL - combines relational processing with Spark functional programming. Under the structured data refers to data that have a scheme, that is, a single set of fields for all records. Spark SQL supports input from a variety of structured data sources and, thanks to the availability of schema information, it can efficiently retrieve only the required fields of records, and also provides DataFrame APIs;
- AWS RDS is a relatively inexpensive cloud relational database, a web service that simplifies configuration, operation, and scaling, is administered directly by Amazon.
Installation and start of the Kafka server
Before using Kafka directly, you need to make sure Java is available, because JVM is used for work:
sudo apt-get update sudo apt-get install default-jre java -version Create a new user to work with Kafka:
sudo useradd kafka -m sudo passwd kafka sudo adduser kafka sudo Next, download the distribution from the official website of Apache Kafka:
wget -P /YOUR_PATH "http://apache-mirror.rbc.ru/pub/apache/kafka/2.2.0/kafka_2.12-2.2.0.tgz" Unpack the downloaded archive:
tar -xvzf /YOUR_PATH/kafka_2.12-2.2.0.tgz ln -s /YOUR_PATH/kafka_2.12-2.2.0 kafka The next step is optional. The fact is that the default settings do not allow full use of all the features of Apache Kafka. For example, delete the topic, category, group on which messages can be posted. To change this, edit the configuration file:
vim ~/kafka/config/server.properties Add the following to the end of the file:
delete.topic.enable = true Before starting the Kafka server, you need to start the ZooKeeper server, we will use the auxiliary script that comes with the Kafka distribution:
Cd ~/kafka bin/zookeeper-server-start.sh config/zookeeper.properties After ZooKeeper has successfully started, we launch the Kafka server in a separate terminal:
bin/kafka-server-start.sh config/server.properties Create a new topic called Transaction:
bin/kafka-topics.sh --create --zookeeper localhost:2181 --replication-factor 1 --partitions 3 --topic transaction Make sure that the topic with the required number of partitions and replication was created:
bin/kafka-topics.sh --describe --zookeeper localhost:2181 Let's miss the moments of testing the producer and the consumer for the newly created topic. For more information on how you can test sending and receiving messages, it is written in the official documentation - Send some messages . Well, we turn to writing a producer in Python using the KafkaProducer API.
Producer writing
The producer will generate random data - 100 messages every second. By random data we mean a dictionary consisting of three fields:
- Branch - name of the point of sale of the credit organization;
- Currency - the transaction currency;
- Amount - the amount of the transaction. The amount will be a positive number if it is a purchase of currency by the Bank, and a negative one if it is a sale.
The code for the producer is as follows:
from numpy.random import choice, randint def get_random_value(): new_dict = {} branch_list = ['Kazan', 'SPB', 'Novosibirsk', 'Surgut'] currency_list = ['RUB', 'USD', 'EUR', 'GBP'] new_dict['branch'] = choice(branch_list) new_dict['currency'] = choice(currency_list) new_dict['amount'] = randint(-100, 100) return new_dict Next, using the send method, we send a message to the server, to the topic we need, in JSON format:
from kafka import KafkaProducer producer = KafkaProducer(bootstrap_servers=['localhost:9092'], value_serializer=lambda x:dumps(x).encode('utf-8'), compression_type='gzip') my_topic = 'transaction' data = get_random_value() try: future = producer.send(topic = my_topic, value = data) record_metadata = future.get(timeout=10) print('--> The message has been sent to a topic: \ {}, partition: {}, offset: {}' \ .format(record_metadata.topic, record_metadata.partition, record_metadata.offset )) except Exception as e: print('--> It seems an Error occurred: {}'.format(e)) finally: producer.flush() When you run the script, we receive the following messages in the terminal:
This means that everything works as we wanted - the producer generates and sends messages to the topic we need.
The next step is to install Spark and process this message flow.
Install Apache Spark
Apache Spark is a versatile and high-performance cluster computing platform.
Spark surpasses the popular implementations of the MapReduce model in performance, while providing support for a wider range of calculation types, including interactive queries and streaming processing. Speed plays an important role in processing large amounts of data, since it is speed that allows you to work online without spending minutes or hours waiting. One of the most important advantages of Spark, providing such a high speed - the ability to perform calculations in memory.
This framework is written in Scala, so you need to install it first:
sudo apt-get install scala Download from the official website of the Spark distribution:
wget "http://mirror.linux-ia64.org/apache/spark/spark-2.4.2/spark-2.4.2-bin-hadoop2.7.tgz" Unpack the archive:
sudo tar xvf spark-2.4.2/spark-2.4.2-bin-hadoop2.7.tgz -C /usr/local/spark Add the path to Spark to the bash file:
vim ~/.bashrc We add through the editor the following lines:
SPARK_HOME=/usr/local/spark export PATH=$SPARK_HOME/bin:$PATH Run the command below after making changes to bashrc:
source ~/.bashrc Deploying AWS PostgreSQL
It remains to deploy the database, where we will upload the processed information from the streams. For this we will use the AWS RDS service.
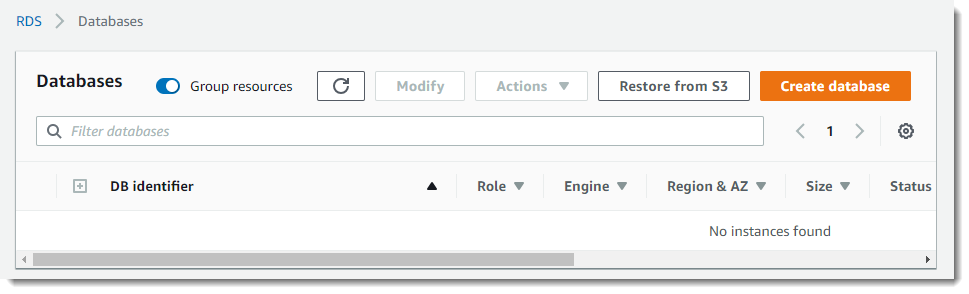
Go to the AWS console -> AWS RDS -> Databases -> Create database:
Select PostgreSQL and click Next:
Because This example is dealt with solely for educational purposes; we will use the free server “at minimum wages” (Free Tier)
Next, we put a tick in the Free Tier block, and after that we will be offered a t2.micro class instance — albeit a weak one, but free and quite suitable for our task:
Following are very important things: the name of the DB Instance, the name of the master user and his password. Let's call the instance: myHabrTest, master user: habr , password: habr12345 and click on the Next button:
The following page contains the parameters responsible for the availability of our database server from the outside (Public accessibility) and the availability of ports:
Let's create a new configuration for the VPC security group, which will allow us to access our database server through port 5432 (PostgreSQL) from the outside.
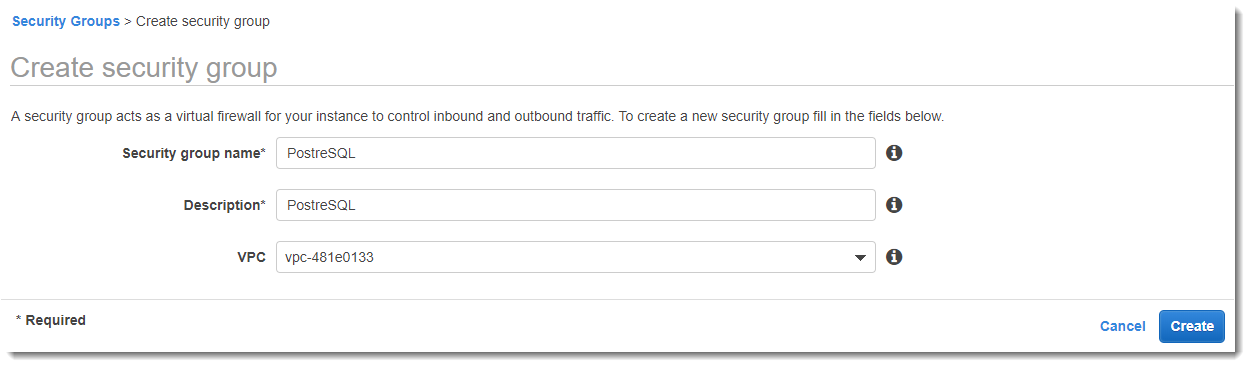
Let's move in a separate browser window to the AWS console in the VPC Dashboard section -> Security Groups -> Create security group:
Set the name for the Security group - PostgreSQL, the description, specify which VPC this group should be associated with and click the Create button:
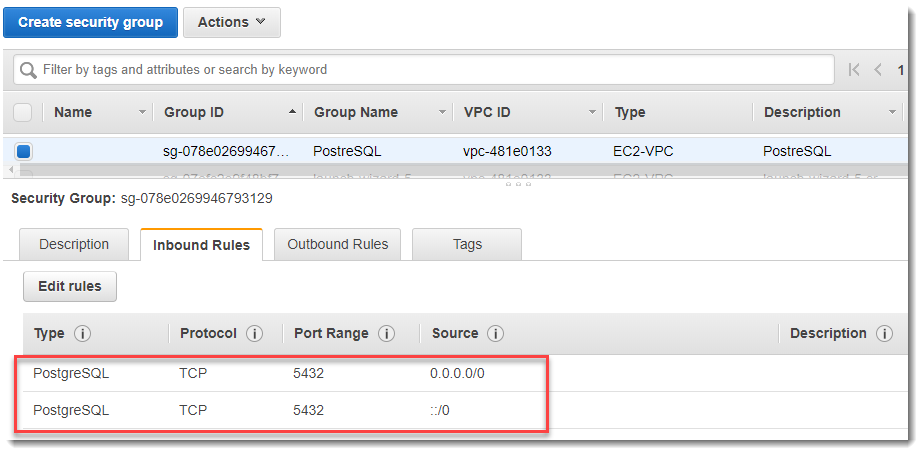
Fill in for the newly created Inbound rules group for port 5432, as shown in the picture below. You may not specify the port manually, but select PostgreSQL from the Type drop-down list.
Strictly speaking, the value :: / 0 means the availability of incoming traffic for a server from all over the world, which is canonically not quite true, but let us use the following approach to parse an example:
We return to the browser page, where we openly “Configure advanced settings” and select in the VPC security groups -> Choose existing VPC security groups -> PostgreSQL section:
Further, in the Database options -> Database name -> section, set the name - habrDB .
The rest of the parameters, with the exception of perhaps disabling backup (backup retention period - 0 days), monitoring and Performance Insights, can be left as default. Click on the Create database button:
Thread handler
The final stage will be the development of Spark-joba, which will be every two seconds to process new data that came from Kafka and enter the result in the database.
As noted above, checkpoints are the primary mechanism in SparkStreaming, which must be configured for fault tolerance. We will use checkpoints and, in the event of a drop in procedure, the Spark Streaming module to restore the lost data will only need to go back to the last checkpoint and resume the calculations from it.
The checkpoint can be enabled by setting the directory in a fault-tolerant, reliable file system (for example, HDFS, S3, etc.) in which the checkpoint information will be stored. This is done using, for example:
streamingContext.checkpoint(checkpointDirectory) In our example, we will use the following approach, namely, if checkpointDirectory exists, then the context will be recreated from the checkpoint data. If the directory does not exist (that is, it is executed for the first time), then the functionToCreateContext function is called to create a new context and configure DStreams:
from pyspark.streaming import StreamingContext context = StreamingContext.getOrCreate(checkpointDirectory, functionToCreateContext) Create a DirectStream object in order to connect to the topic “transaction” using the KafkaUtils library createDirectStream method:
from pyspark.streaming.kafka import KafkaUtils sc = SparkContext(conf=conf) ssc = StreamingContext(sc, 2) broker_list = 'localhost:9092' topic = 'transaction' directKafkaStream = KafkaUtils.createDirectStream(ssc, [topic], {"metadata.broker.list": broker_list}) Parsing incoming data in JSON format:
rowRdd = rdd.map(lambda w: Row(branch=w['branch'], currency=w['currency'], amount=w['amount'])) testDataFrame = spark.createDataFrame(rowRdd) testDataFrame.createOrReplaceTempView("treasury_stream") Using Spark SQL, we make a simple grouping and output the result to the console:
select from_unixtime(unix_timestamp()) as curr_time, t.branch as branch_name, t.currency as currency_code, sum(amount) as batch_value from treasury_stream t group by t.branch, t.currency Getting the query text and running it through Spark SQL:
sql_query = get_sql_query() testResultDataFrame = spark.sql(sql_query) testResultDataFrame.show(n=5) And then we save the resulting aggregated data into a table in AWS RDS. To save the aggregation results to a database table, we will use the DataFrame object's write method:
testResultDataFrame.write \ .format("jdbc") \ .mode("append") \ .option("driver", 'org.postgresql.Driver') \ .option("url","jdbc:postgresql://myhabrtest.ciny8bykwxeg.us-east-1.rds.amazonaws.com:5432/habrDB") \ .option("dbtable", "transaction_flow") \ .option("user", "habr") \ .option("password", "habr12345") \ .save() A few words about setting up a connection to AWS RDS. We created the user and password to it in the “Deploying AWS PostgreSQL” step. As a database server url, use Endpoint, which is displayed in the Connectivity & security section:

In order to correctly link Spark and Kafka, you should run the job through smark-submit using the spark-streaming-kafka-0-8_2.11 artifact . Additionally, we also apply an artifact for interacting with the PostgreSQL database, we will pass them through --packages.
For the flexibility of the script, we will also take as input parameters the name of the message server and the topic from which we want to receive data.
So, it's time to start and check the performance of the system:
spark-submit \ --packages org.apache.spark:spark-streaming-kafka-0-8_2.11:2.0.2,\ org.postgresql:postgresql:9.4.1207 \ spark_job.py localhost:9092 transaction Everything worked out! As you can see in the picture below, during the operation of the application, new aggregation results are output every 2 seconds, because we set the packaging interval to 2 seconds when we created the StreamingContext object:
Next, we make a simple database query to check for records in the transaction_flow table:
Conclusion
This article has reviewed an example of streaming information using Spark Streaming in conjunction with Apache Kafka and PostgreSQL. With the growth of data from various sources, it is difficult to overestimate the practical value of Spark Streaming for creating streaming and real-time applications.
You can find the full source code in my GitHub repository .
I am pleased to discuss this article, waiting for your comments, and also, I hope for constructive criticism of all concerned readers.
I wish you success!
PS It was originally planned to use a local PostgreSQL database, but considering my love for AWS, I decided to bring the database to the cloud. In the next article on this topic, I will show how to implement the entire AWS system described above using AWS Kinesis and AWS EMR. Follow the news!
Source: https://habr.com/ru/post/451160/
All Articles