Adding jump lists to the UWP application
Jump lists have been and remain part of the classic Windows applications, allowing you to switch to different application functionality. For example, open the last file or launch an application with an activated feature.
UWP applications allow us to use similar functionality implemented in the form of additional items on the context menu of the taskbar or the start screen tile.
JumpList is not available in early builds of 10s. Therefore, the first thing we update is the system and the SDK. I updated to 10.0.10586
Open App.xaml.cs and add the following Task:
public static async Task SetupJumpList() { JumpList jumpList = await JumpList.LoadCurrentAsync(); jumpList.Items.Clear(); JumpListItem photoItem = JumpListItem.CreateWithArguments("photo", ""); photoItem.Logo = new Uri("ms-appx:///Assets/photo.png"); JumpListItem videoItem = JumpListItem.CreateWithArguments("video", ""); videoItem.Logo = new Uri("ms-appx:///Assets/video.png"); jumpList.Items.Add(photoItem); jumpList.Items.Add(videoItem); await jumpList.SaveAsync(); } Add the required namespaces:
')
using System.Threading.Tasks; using Windows.UI.StartScreen; In the project properties you can see the minimum version of the target platform. If it is quite early, then the code inside our Task will need to be wrapped in a try-catch.
Looking at the code, you can see that it uses the photo.png and video.png files from the Assets folder. These icon files need to be added to the application.
You can call the Task and register the JumpList context menu at any time. Let's do this in the OnLaunched event (LaunchActivatedEventArgs e).
await SetupJumpList(); In the same OnLaunched event, you can determine whether the application was opened via the JumpList item or was opened in the usual way. The LaunchActivatedEventArgs e argument contains the necessary information. If its value is “photo”, then this means that the application was opened via the context link “photo”.
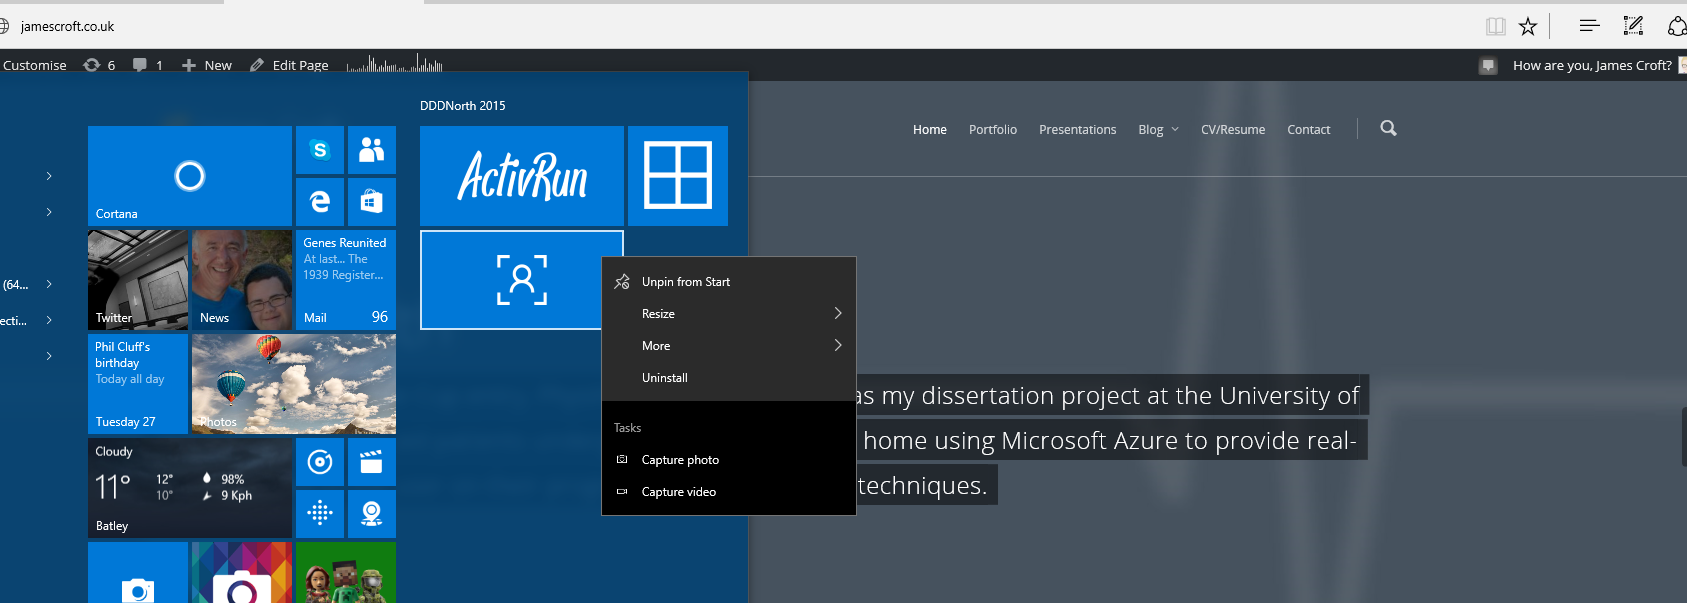
Here is the menu I got:
I wanted to make sure that when choosing a video or photo item, the transition did not take place on the MainPage, but on some other page. To do this, first create this other page. I created a page called PhotoPage.xaml
The contents of it made quite simple:
<Page x:Class="JumpListsDemo.PhotoPage" xmlns="http://schemas.microsoft.com/winfx/2006/xaml/presentation" xmlns:x="http://schemas.microsoft.com/winfx/2006/xaml" xmlns:local="using:JumpListsDemo" xmlns:d="http://schemas.microsoft.com/expression/blend/2008" xmlns:mc="http://schemas.openxmlformats.org/markup-compatibility/2006" mc:Ignorable="d"> <Grid Background="{ThemeResource ApplicationPageBackgroundThemeBrush}"> <Image x:Name="imgPhoto" Width="auto" Height="auto"></Image> <TextBlock FontSize="28" HorizontalAlignment="Center"> </TextBlock> </Grid> </Page> Let's catch how the application was opened and make the transition to the PhotoPage page. For this, in App.xaml.cs, you need to find the code inside the OnLaunched method:
rootFrame.Navigate(typeof(MainPage), e.Arguments); and replace it with something like:
if (e.Arguments == "photo") { rootFrame.Navigate(typeof(PhotoPage), e.Arguments); } else { rootFrame.Navigate(typeof(MainPage), e.Arguments); } Voila When you select through the context menu item "photo" we will open a page with video. You can navigate through the “video” item via else if, or by replacing the whole structure with a switch.
A short article turned out, right? Let's take a brief look at a bonus on how you can remember the last open file and add a link to it in JumpList.
Suppose somewhere in the program we open a file using FileOpenPicker.
FileOpenPicker filePicker = new FileOpenPicker(); filePicker.FileTypeFilter.Add(".jpg"); filePicker.ViewMode = PickerViewMode.List; filePicker.SuggestedStartLocation = PickerLocationId.PicturesLibrary; filePicker.SettingsIdentifier = "picker1"; Windows.Storage.StorageFile f = await filePicker.PickSingleFileAsync(); Now, if the file has been selected, we will do with it what we wanted, and then write it to the list of recently visited files:
if (f != null) { // ….. // String mruToken = MostRecentlyUsedList.Add(f, f.Name); } In UWP, just like in Windows 8.x applications, there are special file access rules. If permissions are specified in the manifest, then access to folders / libraries of images, music, videos can be obtained. In order to access other files it is necessary that the user selects them using File- or Folder- Picker-a. Well, so that after restarting the application, access permission to the contents of the file is not lost, you need to use the MostRecentlyUsedList property of the Windows class. Security.AccessCache.StorageApplicationPermissions. So the namespace should be added to the code:
using Windows.Storage.AccessCache.StorageApplicationPermissions; Let's slightly change our first example. Transfer the registration on the lock screen from OnLaunched to the code that opens the file. Add to the end of the if just mentioned code
await App.SetupJumpList(f); By the way, SetupJumpList will also change:
public static async Task SetupJumpList(Windows.Storage.StorageFile fl) { JumpList jumpList = await JumpList.LoadCurrentAsync(); jumpList.Items.Clear(); JumpListItem lastItem = JumpListItem.CreateWithArguments("lastfile", fl.DisplayName); lastItem.Logo = new Uri("ms-appx:///Assets/photo.png"); jumpList.Items.Add(lastItem); await jumpList.SaveAsync(); } Make changes to OnLaunched
if (e.Arguments == "lastfile") { rootFrame.Navigate(typeof(PhotoPage), e.Arguments); } else { rootFrame.Navigate(typeof(MainPage), e.Arguments); } Now it remains only when navigating to the PhotoPage page to process the argument, which is passed as a parameter by calling
rootFrame.Navigate(typeof(PhotoPage), e.Arguments); This argument is apparently passed from App.xaml.cs to the PhotoPage page. You can catch it in the OnNavigatedTo event. The code you need to add to PhotoPage is:
protected override async void OnNavigatedTo(NavigationEventArgs e) { try { Windows.Storage.StorageFile f; String mruFirstToken = MostRecentlyUsedList.Entries.FirstOrDefault().Token; f = await MostRecentlyUsedList.GetFileAsync(mruFirstToken); SetPhoto(f); }catch{} } public async void SetPhoto(StorageFile storageFile) { BitmapImage image = new BitmapImage(); IRandomAccessStream stream = await storageFile.OpenAsync(FileAccessMode.Read); image.SetSource(stream); imgPhoto.Source = image; } An example is ready. After the user selects the image file, the file name appears in the context menu called on the tile. After selecting this context menu item, the application will open on the PhotoPage page and the image will be displayed on the screen.

Written based on:
Developing for Windows 10 - Implementing jump lists
UWP Quick tip - JumpLists
Source: https://habr.com/ru/post/272613/
All Articles