Interactive gender on Android
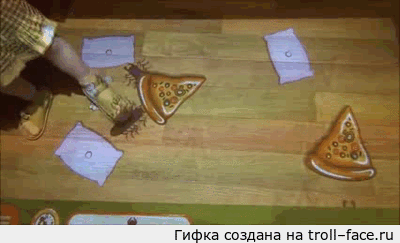
Probably many of you have seen interactive games for children in shopping centers. Where the dynamic scene is projected on the floor, and next to it, the installed sensor determines the touch points with the surface and converts them into events for the application on the control computer. After searching the Internet for information about this device, it turned out that it was a rather expensive toy. For example, Chinese clones start at a price tag of $ 1,200, but something more original costs already $ 10,000. After analyzing the technical component of the product, it was decided to make a similar device myself.
Iron project consists of three parts:
Ideally, all the glands together should not cost more than 700 dollars. It was assumed that connecting all three parts should be relatively easy, as there are such libraries on the Internet as OpenNI and libfreenect, which work on both Android and Linux. Due to the lack of experience at an early stage, it seemed that there was a choice in hardware and OS; There are examples of open source and combine everything together is not difficult. Some time after the start of the project, it turned out that this was not the case. Integrating all the parts and even running the libraries on the target device is the most difficult task. I had to choose between the availability of information on setting up Linux and the abundance of applications in the market for the Android platform.
')
However, first things first.
In order to immediately start experimenting with hardware, a used Microsoft Kinect sensor and a projector were purchased. Then, a mounting for a projector and a sensor was made from a square shaped tube:
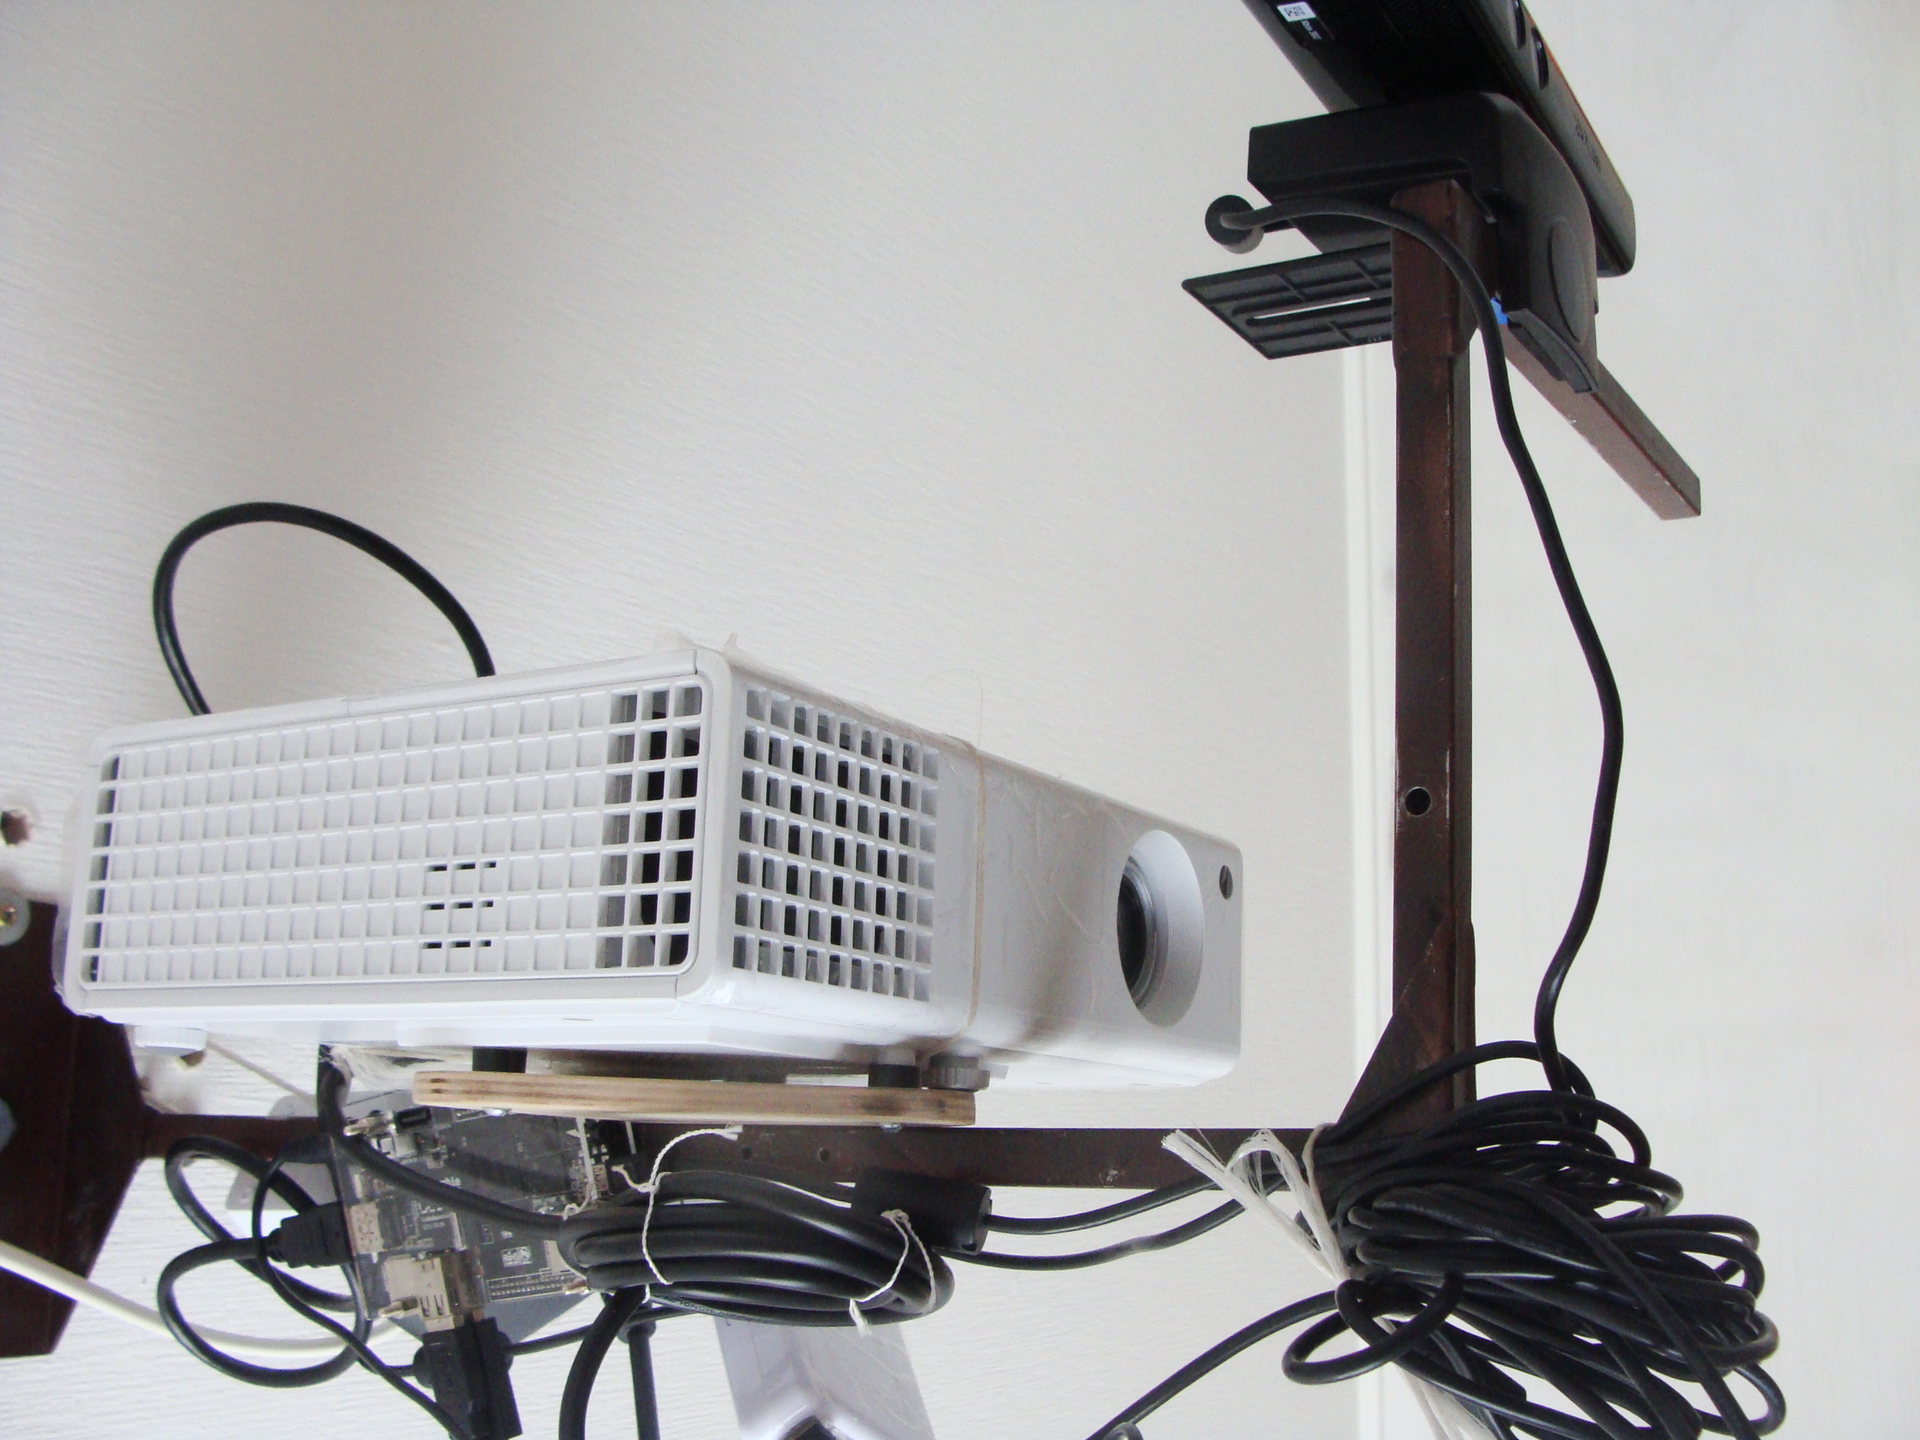
In the upper part of the mount a small piece of the welded corner is mounted to the ceiling. Plates in the form of kerchiefs are welded in places at the bends of the pipe to strengthen the structure. The projector is connected to the mount through a triangular plate of plywood. To connect the sensor with the mount, a special Kinect accessory is used, which can be easily found on ebay. To reduce the cost, the Cubieboard A10 board was chosen as the controlling computer, which can also be easily found on ebay. At the time of this writing, the Cubieboard A20 and A80, two and eight-core counterparts, have already been released. If the budget allows, it is advisable to buy A80, so that the system has a power reserve for the simultaneous operation of user applications and services for capturing and processing data from the depth sensor. The power supply of the board and the sensor is controlled by a USB power supply with an output current of 4A. The projector and the sensor are connected to the mount so that the depth camera is in the same plane as the projector lens:

The model of the projector is better to choose such that the picture is as large as possible from a small distance. On this description of the iron parts can be completed. Now about the software.
The operating system was chosen to build Android under Cubieboard with a funny screensaver on the desktop. I had to tweak the configuration files a bit and compile the assembly myself due to the fact that in Android it is impossible to change the sequence of loading modules, or rather, you can, but until the next system reboot.
To implement the events, the sun4i-ts touch screen driver module was required. In fact, the test application implements the TUIO client, but as it turned out, even with the touchpad driver, the existing TUIO server for Android does not support multitouch events. Perhaps this is due to the touchpad driver sun4i-ts under Allwinner. Based on these facts, the option of direct implementation of the events was chosen.
To capture depth data, the lightweight and fast libfreenect library is used, which in turn uses libusb to transfer data via USB. Depth data is processed using OpenCV for Android. The essence of processing is quite simple: it is necessary to convert the depth map into closed contours with a length not less than the threshold one, in order to eliminate false alarms - and find their geometric centers.
At the very beginning of work, when there are no objects on the scene, the application builds a background depth map, then in the process, the map is used to separate the target objects from the background. The application is a control part and service with C / C ++ code. All logic for processing and capturing depth data is implemented in C / C ++. Part of the code for working with TUIO and OpenCV was taken from this project on github.
Consider the code in more detail. In the code, as I said, OpenCV is used. At the very beginning of the work, the application builds a depth map:
In line 6, the depth data is stored in a buffer. It should be noted that the buffer is of type std :: vector <cv :: Mat1s>. This is an array of matrices and the assignment in line 6 is actually copying all the pixels of the frame into the buffer. After the frame counter reaches the threshold, the BackgroundTrain function calls the function to calculate the average depth value for all frames in line 11:
In the function above, the matrix of double-byte integers is transformed into a matrix of floating-point numbers, then the accumulator is added to the matrix and, at the end, the average is calculated. In line 8, the division operation is performed for each element of the matrix.
In the next part of the code, objects are selected using the previously created depth background in line 4. Then, using the OpenCV function, findContours () contours are selected. For contours with a length greater than the threshold, their geometric center is calculated. The coordinates of the obtained centers are added to the array of touchPoints, which stores the coordinates of the click events on the surface:
In the last part, events are sent to the system. The coordinates for the surface pressure events are taken from the previously created touchPoints array.
The function sendEventToTouchDriver () is called to send events to the system, and the functions addTuioCursor () and updateTuioCursor () are called to send a message to TUIO server.
At the end of the discussion of the code I would like to talk about the event sending module of the system. The module is called stouchEventInjector.cpp. At the very beginning of work in the constructor, using the open () function, the input device event file / dev / input / eventX is opened, where X is a number. The module itself tries to find the descriptor associated with the required driver (sun4i_ts). To do this, the getevent function is called sequentially with the -pl switch for each existing / dev / input / eventX file. Sending an event is actually writing to the / dev / input / eventX file of the uinput_event structure using the write () function. The touchscreen has its own coordinate system with a maximum and minimum value along the axes; in the case of sun4i-ts, the maximum number on both axes oh and oy is 4095. The sequence of commands that you need to send to simulate pressing the touchscreen can be found in the source code in the sendTouchDownAbs function ( ).
To automatically start the touchscreen driver after the device starts, as I said at the beginning, you need to change the Android build configuration. To build Android, the latest version of Ubuntu in my case was version 14.10. The source code is taken from here Cubieboard A10 Android and unpack. We need to change two files:
In the file init.sun4i.rc you need to uncomment the line insmod /system/vendor/modules/sun4i-ts.ko. In the platform.xml file, you need to add usb, input and shell groups to the INTERNET section:
After making changes, run the assembly with the command:
To build the Android ICS version, you need the GCC compiler version 4.6 and make version 3.81. If the version of the compiler and make differs from the required one, then it can be changed with the commands:
Then follow the instructions on the page Cubieboard A10 Android . Compilation errors may occur during the build process. Error correction hints can be found in the Fix building issues section in the fix_android_firmware.readme file in the source code repository. To connect the board to the PC, you need to add rules for connecting the device via USB. To do this, create a file:
And add the following line:
For the changes to take effect, restart the udev service:
We connect the board to the PC and upload the sun4i_crane_cubieboard.img firmware image using the LiveSuit utility. Before installing, carefully read the instructions for LiveSuit, if installed incorrectly, the application will not be able to download the image to the device. After downloading the image and restarting the board, you can install and run the SimpleTouch application. The application will automatically start a service that captures / processes data from Kinect and sends events to the system. The application can simply be minimized and run any game from PlayMarket.
Source code can be downloaded from bitbucket .
Work demo video:
Iron project consists of three parts:
- Depth sensor (original is ASUS Xtion);
- Control computer (Cubieboard A80, ODROID-U3);
- Projector.
Ideally, all the glands together should not cost more than 700 dollars. It was assumed that connecting all three parts should be relatively easy, as there are such libraries on the Internet as OpenNI and libfreenect, which work on both Android and Linux. Due to the lack of experience at an early stage, it seemed that there was a choice in hardware and OS; There are examples of open source and combine everything together is not difficult. Some time after the start of the project, it turned out that this was not the case. Integrating all the parts and even running the libraries on the target device is the most difficult task. I had to choose between the availability of information on setting up Linux and the abundance of applications in the market for the Android platform.
')
However, first things first.
In order to immediately start experimenting with hardware, a used Microsoft Kinect sensor and a projector were purchased. Then, a mounting for a projector and a sensor was made from a square shaped tube:
In the upper part of the mount a small piece of the welded corner is mounted to the ceiling. Plates in the form of kerchiefs are welded in places at the bends of the pipe to strengthen the structure. The projector is connected to the mount through a triangular plate of plywood. To connect the sensor with the mount, a special Kinect accessory is used, which can be easily found on ebay. To reduce the cost, the Cubieboard A10 board was chosen as the controlling computer, which can also be easily found on ebay. At the time of this writing, the Cubieboard A20 and A80, two and eight-core counterparts, have already been released. If the budget allows, it is advisable to buy A80, so that the system has a power reserve for the simultaneous operation of user applications and services for capturing and processing data from the depth sensor. The power supply of the board and the sensor is controlled by a USB power supply with an output current of 4A. The projector and the sensor are connected to the mount so that the depth camera is in the same plane as the projector lens:
The model of the projector is better to choose such that the picture is as large as possible from a small distance. On this description of the iron parts can be completed. Now about the software.
The operating system was chosen to build Android under Cubieboard with a funny screensaver on the desktop. I had to tweak the configuration files a bit and compile the assembly myself due to the fact that in Android it is impossible to change the sequence of loading modules, or rather, you can, but until the next system reboot.
To implement the events, the sun4i-ts touch screen driver module was required. In fact, the test application implements the TUIO client, but as it turned out, even with the touchpad driver, the existing TUIO server for Android does not support multitouch events. Perhaps this is due to the touchpad driver sun4i-ts under Allwinner. Based on these facts, the option of direct implementation of the events was chosen.
To capture depth data, the lightweight and fast libfreenect library is used, which in turn uses libusb to transfer data via USB. Depth data is processed using OpenCV for Android. The essence of processing is quite simple: it is necessary to convert the depth map into closed contours with a length not less than the threshold one, in order to eliminate false alarms - and find their geometric centers.
At the very beginning of work, when there are no objects on the scene, the application builds a background depth map, then in the process, the map is used to separate the target objects from the background. The application is a control part and service with C / C ++ code. All logic for processing and capturing depth data is implemented in C / C ++. Part of the code for working with TUIO and OpenCV was taken from this project on github.
Consider the code in more detail. In the code, as I said, OpenCV is used. At the very beginning of the work, the application builds a depth map:
1 void STouchDetector::process(const uint16_t& depthData) { 2 frmCount++; 3 // create background model (average depth) 4 if (frmCount < BackgroundTrain) { 5 depth.data = (uchar*)(&depthData); 6 buffer[frmCount] = depth; 7 } 8 else { 9 if (frmCount == BackgroundTrain) { 10 // Calculate average depth based on all frames from buffer 11 average(buffer, background); 12 Scalar bmeanVal = mean(background(roi)); 13 double bminVal = 0.0, bmaxVal = 0.0; 14 minMaxLoc(background(roi), &bminVal, &bmaxVal); 15 LOGD("Background extraction completed. Average depth is %f min %f max %f", bmeanVal.val[0], bminVal, bmaxVal); 16 } In line 6, the depth data is stored in a buffer. It should be noted that the buffer is of type std :: vector <cv :: Mat1s>. This is an array of matrices and the assignment in line 6 is actually copying all the pixels of the frame into the buffer. After the frame counter reaches the threshold, the BackgroundTrain function calls the function to calculate the average depth value for all frames in line 11:
1 void STouchDetector::average(vector<Mat1s>& frames, Mat1s& mean) { 2 Mat1d acc(mean.size()); 3 Mat1d frame(mean.size()); 4 for (unsigned int i=0; i<frames.size(); i++) { 5 frames[i].convertTo(frame, CV_64FC1); 6 acc = acc + frame; 7 } 8 acc = acc / frames.size(); 9 acc.convertTo(mean, CV_16SC1); 10 } In the function above, the matrix of double-byte integers is transformed into a matrix of floating-point numbers, then the accumulator is added to the matrix and, at the end, the average is calculated. In line 8, the division operation is performed for each element of the matrix.
In the next part of the code, objects are selected using the previously created depth background in line 4. Then, using the OpenCV function, findContours () contours are selected. For contours with a length greater than the threshold, their geometric center is calculated. The coordinates of the obtained centers are added to the array of touchPoints, which stores the coordinates of the click events on the surface:
1 // Update 16 bit depth matrix 2 depth.data = (uchar*)(&depthData); 3 // Extract foreground by simple subtraction of very basic background model 4 foreground = background - depth; 5 6 // Find touch mask by thresholding (points that are close to background = touch points) 7 touch = (foreground > TouchDepthMin) & (foreground < TouchDepthMax); 8 9 // Extract ROI 10 Mat touchRoi = touch(roi); 11 12 // Find contours by depth data 13 vector< vector<Point2i> > contours; 14 vector<Point2f> touchPoints; 15 findContours(touchRoi, contours, CV_RETR_LIST, CV_CHAIN_APPROX_SIMPLE, Point2i(xMin, yMin)); 16 17 for (unsigned int i=0; i < contours.size(); i++) { 18 Mat contourMat(contours[i]); 19 // Find touch points by area thresholding 20 if ( contourArea(contourMat) > ContourAreaThreshold ) { 21 Scalar center = mean(contourMat); 22 Point2i touchPoint(center[0], center[1]); 23 touchPoints.push_back(touchPoint); 24 } 25 } In the last part, events are sent to the system. The coordinates for the surface pressure events are taken from the previously created touchPoints array.
1 // Send TUIO cursors 2 tuioTime = TuioTime::getSessionTime(); 3 tuio->initFrame(tuioTime); 4 5 for (unsigned int i=0; i < touchPoints.size(); i++) { // touch points 6 float cursorX = (touchPoints[i].x - xMin) / (xMax - xMin); 7 float cursorY = 1 - (touchPoints[i].y - yMin) / (yMax - yMin); 8 TuioCursor* cursor = tuio->getClosestTuioCursor(cursorX,cursorY); 9 10 LOGD("Touch detected %d %d", (int)touchPoints[i].x, (int)touchPoints[i].y); 11 12 // TODO improve tracking (don't move cursors away, that might be closer to another touch point) 13 if (cursor == nullptr || cursor->getTuioTime() == tuioTime) { 14 tuio->addTuioCursor(cursorX,cursorY); 15 eventInjector->sendEventToTouchDevice((int)(touchPoints[i].x - xMin), 16 (int)(touchPoints[i].y - yMin)); 17 LOGD("TUIO cursor was added at %d %d", (int)touchPoints[i].x, (int)touchPoints[i].y); 18 } else { 19 tuio->updateTuioCursor(cursor, cursorX, cursorY); 20 } 21 } The function sendEventToTouchDriver () is called to send events to the system, and the functions addTuioCursor () and updateTuioCursor () are called to send a message to TUIO server.
At the end of the discussion of the code I would like to talk about the event sending module of the system. The module is called stouchEventInjector.cpp. At the very beginning of work in the constructor, using the open () function, the input device event file / dev / input / eventX is opened, where X is a number. The module itself tries to find the descriptor associated with the required driver (sun4i_ts). To do this, the getevent function is called sequentially with the -pl switch for each existing / dev / input / eventX file. Sending an event is actually writing to the / dev / input / eventX file of the uinput_event structure using the write () function. The touchscreen has its own coordinate system with a maximum and minimum value along the axes; in the case of sun4i-ts, the maximum number on both axes oh and oy is 4095. The sequence of commands that you need to send to simulate pressing the touchscreen can be found in the source code in the sendTouchDownAbs function ( ).
To automatically start the touchscreen driver after the device starts, as I said at the beginning, you need to change the Android build configuration. To build Android, the latest version of Ubuntu in my case was version 14.10. The source code is taken from here Cubieboard A10 Android and unpack. We need to change two files:
android/device/softwinner/apollo-cubieboard/init.sun4i.rc android/frameworks/base/data/etc/platform.xml In the file init.sun4i.rc you need to uncomment the line insmod /system/vendor/modules/sun4i-ts.ko. In the platform.xml file, you need to add usb, input and shell groups to the INTERNET section:
<group gid="usb"/> <group gid="input"/> <group gid="shell"/> After making changes, run the assembly with the command:
./build.sh -p sun4i_crane -k 3.0 To build the Android ICS version, you need the GCC compiler version 4.6 and make version 3.81. If the version of the compiler and make differs from the required one, then it can be changed with the commands:
sudo update-alternatives --install /usr/bin/gcc gcc /usr/bin/gcc-4.6 60 --slave /usr/bin/g++ g++ /usr/bin/g++-4.6 sudo update-alternatives --install /usr/bin/gcc gcc /usr/bin/gcc-4.9 40 --slave /usr/bin/g++ g++ /usr/bin/g++-4.9 sudo update-alternatives --config gcc sudo mv /usr/bin/make /usr/bin/make40 sudo update-alternatives --install /usr/bin/make make /usr/local/bin/make 60 sudo update-alternatives --install /usr/bin/make make /usr/bin/make40 40 sudo update-alternatives --config make Then follow the instructions on the page Cubieboard A10 Android . Compilation errors may occur during the build process. Error correction hints can be found in the Fix building issues section in the fix_android_firmware.readme file in the source code repository. To connect the board to the PC, you need to add rules for connecting the device via USB. To do this, create a file:
/etc/udev/rules.d/51-android.rules And add the following line:
SUBSYSTEM=="usb", ATTRS{idVendor}=="18d1", ATTRS{idProduct}=="0003",MODE="0666" For the changes to take effect, restart the udev service:
$sudo chmod a+rx /etc/udev/rules.d/51-android.rules $sudo service udev restart We connect the board to the PC and upload the sun4i_crane_cubieboard.img firmware image using the LiveSuit utility. Before installing, carefully read the instructions for LiveSuit, if installed incorrectly, the application will not be able to download the image to the device. After downloading the image and restarting the board, you can install and run the SimpleTouch application. The application will automatically start a service that captures / processes data from Kinect and sends events to the system. The application can simply be minimized and run any game from PlayMarket.
Source code can be downloaded from bitbucket .
Work demo video:
Source: https://habr.com/ru/post/256143/
All Articles