(Translation) Introduction to C ++ Development in UE4
Part 1. Introduction. Creating a class and adding properties. Extending the C ++ class with Blueprint.
Part 2. Classes of gameplay. Structures. Reflection (reflection) in Unreal. Object / Actor iterators. Memory manager and garbage collector.
Part 3. Prefixes in class names. Integer types. Types of containers. Container iterators For-each loop, hash functions.
Part 4. Bonus. Unreal Engine 4 for Unity developers.
This article is a translation of part of the UE4 documentation. You can find the original article by following this link .
This guide will show you how to write C ++ code in the Unreal Engine. Do not worry, development on With ++ in Unreal Engine cheerful, and at all not difficult to begin it. We like to think of Unreal C ++ as “helping C ++” *, since we created many different features to make C ++ easier for everyone!
* I will be glad if someone offers the best translation of "assisted C ++", but please in a personal.
')
Before we begin, it is important that you are already familiar with C ++ or another similar programming language. This guide is written for developers with C ++ experience. If you know C #, Java or JS, you will find many familiar aspects.
If you have absolutely no development experience, you can study the visual scripting guide using Blueprint *. After studying this guide, you can create games using Blueprint **.
You can write “good old C ++ code”, but you will be a more advanced developer after reading this manual and learning about the Unreal development model.
The UE provides two methods for creating gameplay elements — C ++ and Blueprint. C ++ programmers add basic gameplay blocks, so that designers (meaning level designer, not artist) means using these blocks to create their own gameplay elements for a particular level or the whole game. In this case, programmers work in their (their) favorite IDE (for example, MS Visual Studio, Xcode), and the designer works in the Blueprint editor of the UE.
The gameplay API and class framework are fully accessible from both systems. Both systems can be used separately, but using them together you get a more powerful and flexible system. This means that the best practice will be the coordinated work of programmers who create the basics of gameplay and level designers who use these blocks to create exciting gameplay.
In view of the foregoing, the typical C ++ programmer’s workflow, which creates blocks for the designer, will be discussed later. In this case, you must create a class that will be further extended using Blueprint, created by a designer or another programmer. In this class, we will create various properties (variables) that the designer can set. Based on these set values, we are going to extract the new values of the created properties. This process is very simple thanks to the tools and macros that we provide for you.
The first thing you need to do is use the class wizard provided by the UE to create the base of the future C ++ class, which will be further expanded using Blueprint. The following shows how the selection takes place when creating a new class, a child of the class Actor.

Next you need to enter the name of your class. We will use the default name ( MyActor ).

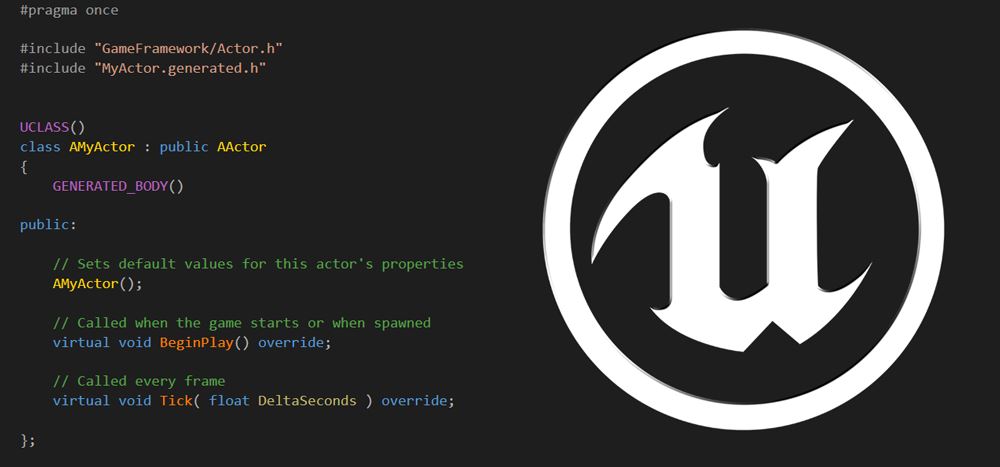
After you create the class, the wizard generates the files and opens the IDE so that you can immediately start editing it. Below is the resulting code for the class created. For additional. information about the class wizard, you can follow this link .
The class wizard generates a class with the BeginPlay () and Tick () methods, with the override specifier. The BeginPlay () event occurs when Actor enters the game in the playable state . It is a good practice to initiate the gameplay code of your class in this method. The Tick () method is called every frame with a parameter that is equal to the time since its last call. This method should contain constantly repeating logic. If you do not have it, then it is best to remove this method, which will slightly increase productivity. If you deleted the code for this method, make sure that you also deleted a line in the class constructor, which indicates that Tick () should be called every frame. Below is the constructor code with the specified string:
Now we have our own class. Let's create several properties that can be used by other developers directly in the UE. To display a property in the editor, you need to use the special macro UPROPERTY (). All you need to do is to write the UPROPERTY macro (EditAnywhere) before declaring a variable, as written below:
This is all you need to do to edit this value in the editor. There are several more ways to specify how and where this variable is being edited. This is done by specifying the add. options in the macro. For example, if you want this property to be grouped in a section with other relevant properties, you must specify a category, as indicated below:
Now, users will see your variable placed in a category with the title “Damage” . In this category, there may also be other properties that have the same category. This is a great way to put the most frequently used variables together.
Now make the property available from Bluerpint:
As you can see, we specified a special parameter to be able to read and write the property. You can also use another option - BlueprintReadOnly , so that your variables in the editor are specified as constant. In addition, there are many other properties that are passed to the UPROPERTY macro, which can be found by clicking on the link .
Before moving on to the next section, let's add a few variables to our class. We already have a variable storing full damage that Actor can do, but let's assume that damage can be done for a long time. The code below contains one new variable for editing by the level designer and one unavailable for editing:
As you can see, the DamageTimeInSeconds property, which is editable in the editor. DamagePerSecond will be calculated, as you will see later, based on the value specified in DamageTimeInSeconds , for example, by the level designer. The VisibleAnywhere flag indicates that the property is displayed, but cannot be changed. The Transient flag means that this property cannot be saved or read from disk, that is, the resulting value is not constant. The picture below shows how these properties are displayed in the default section of our class.

Setting the initial values of variables occurs as in the ordinary C ++ class - in the constructor. Below are two examples of how this can be done, both examples are equivalent in functionality:
Here is the same piece of window, but with the given values in the constructor

It is also possible to set initial values based on the values specified in the editor. This data is set after the constructor, this requires the use of the PostInitProperties () method. In this example, TotalDamage and DamageTimeInSeconds are set by the level designer. Regardless of whether these values are set from the editor, you can still set the required initial values, as we did earlier.
Note: if you do not specify default values, they will automatically be set to 0 or nullptr for pointer values.
The same piece of the window as before, but after adding PostInitProperties () to the call chain.

UE 4 provides an opportunity that may surprise you if you are used to normal C ++ programming in other projects. You can compile the C ++ code you added without restarting the editor. There are two ways to do this:
1. If the editor is running, build in Visual Studio or Xcode, as you usually do. The editor will detect the new compiled DLLs and reload your changes right away.

Note: If you have a debugger attached, you must unpin it at the beginning, otherwise VS will not allow you to do a build.
2. Or simply click on Compele in the main toolbar in the editor.

You can use this feature as you go through this guide.
Before that, we created a simple gameplay class, using C ++ class wizards, and added several variables to it. Now we will learn how a user can create unique classes from our modest sketches.
The first thing to do is create a Blueprint class from our AMyActor class. Notice that in the image below, the name of the base class is listed as MyActor , not AMyActor . This is done in order to hide the naming conventions that is used in our tools from the user, making the names more convenient for him.

After clicking on Select, a new Blueprint will be created with the default name. We will give it the name CustomActor1 , as indicated in the image from the Content Browser below.

This is our first class that our user will edit. First, we change the values of our variables. In this case, we set TotalDamage equal to 300 and the time during which these damages are dealt with is equal to two seconds. You can see this in the pictures below:

Wait ... Our estimated value does not match our expectation. It should be 150, but we see a value equal to 200. This is because at the moment we calculate the values immediately after the initialization of the values, which occurs at the moment of loading. But we have runtime changes in the editor ( runtime changes ), which are not taken into account. This problem is easy to solve, because the engine notifies the target object of an event that is triggered when a change is made in the editor. The code below shows exactly what you need to add to calculate the new values obtained when changing variables in the editor:
Notice that the PostEditChangeProperty method is located inside a directive that indicates whether we are working in the editor or not. This is done in order for the build, the game contains only the necessary code for it, without unnecessary lines that increase the size of the executable file, unnecessarily. Now, after recompilation, the DamagePerSecond value will be as expected. This is indicated in the pictures below.

So far, we have studied the work with variables. In addition, you need to explore another important basic thing, before studying the engine in more detail. In the process of creating gameplay, the user must be able to call functions created by a C ++ programmer in Blueprint. To begin, let's do the CalculateValues () method that can be called from Bluerpint.
The macro UFUNCTION () contains a description of how our C ++ function is processed by the reflection system. The BlueprintCallable option indicates the possibility of processing this method in the Blueprint virtual machine (hereafter referred to as Blueprint VM ). In order for the context menu (called by the right mouse button) to work properly, each method that is allowed by the editor must contain the name of the category. The image below shows exactly how the categories are displayed in the context menu:

As you can see, the method can be selected in the category Damage . The blueprint below shows how changes in the TotalDamage value occur , followed by a method call for recalculating dependent values.

Here we use the method described earlier to recalculate dependent properties. Most of the engine's methods are available for calling from Blueprint, using the UFUNCTION () macro, so that developers can create games without writing C ++ code. However, a more competent approach would be to use C ++ to create basic gameplay blocks and code whose performance is critical, and use Blueprint to customize the created behavior or construct a new one based on the generated code.
Now that our users can invoke your C ++ code, consider another way to invoke C ++ code in Blueprint. This approach allows calling functions implemented in Blueprint in C ++ code. In this way, you can notify the user about events to which they can react in the way they see fit. Often this can be the creation of effects or other graphical interactions, like showing / hiding objects. The code snippet below contains a method that is implemented in Blueprint:
This function is called just like a regular C ++ function. The UE generates the basis of the implementation of the C ++ function to call it correctly in the Blueprint VM . We usually call it Thunk . If Blueprint does not implement the function body, then its behavior is C ++, a function with an empty body that does nothing. What if we want to provide a default C ++ implementation and make it possible to override it in Bluerpint. The macro UFUNCTION () has an option for this case. The code snippet below shows what changes to the header file need to be made to achieve this:
This version of the method still converts the method to call it in the Blueprint VM. How should we provide a default implementation? Tools also generate a new method definition with the _Implementation () postfix. We must submit your version of this method or your project will not be linked. Here is the implementation for the above definition:
Now this method is called when Blueprint does not override it. Note: in future versions of the build of tools, the auto-generated _Implementation () definition will be removed and it will need to be explicitly added to the header. In version 4.7, the autogeneration of this definition still occurs.
Now you have learned the basics of gameplay design and how to work with users to create more diverse gameplay. It's time for you to choose your own adventures. You can continue to explore the development in the following parts, or you can familiarize yourself with one of the examples of projects that you can find in the launcher (start screen) to gain even more useful skills.
Part 2. Classes of gameplay. Structures. Reflection (reflection) in Unreal. Object / Actor iterators. Memory manager and garbage collector.
Part 3. Prefixes in class names. Integer types. Types of containers. Container iterators For-each loop, hash functions.
Part 4. Bonus. Unreal Engine 4 for Unity developers.
This article is a translation of part of the UE4 documentation. You can find the original article by following this link .
Unreal C ++ is very cool!
This guide will show you how to write C ++ code in the Unreal Engine. Do not worry, development on With ++ in Unreal Engine cheerful, and at all not difficult to begin it. We like to think of Unreal C ++ as “helping C ++” *, since we created many different features to make C ++ easier for everyone!
* I will be glad if someone offers the best translation of "assisted C ++", but please in a personal.
')
Before we begin, it is important that you are already familiar with C ++ or another similar programming language. This guide is written for developers with C ++ experience. If you know C #, Java or JS, you will find many familiar aspects.
If you have absolutely no development experience, you can study the visual scripting guide using Blueprint *. After studying this guide, you can create games using Blueprint **.
Notes
* Blueprint Visual Scripting guide
** Further, where Blueprint is written, both Blueprints Visual Scripting and the “Blueprint class” are implied. What exactly is implied to you will be clear from the context.
** Further, where Blueprint is written, both Blueprints Visual Scripting and the “Blueprint class” are implied. What exactly is implied to you will be clear from the context.
You can write “good old C ++ code”, but you will be a more advanced developer after reading this manual and learning about the Unreal development model.
C ++ and Blueprints
The UE provides two methods for creating gameplay elements — C ++ and Blueprint. C ++ programmers add basic gameplay blocks, so that designers (meaning level designer, not artist) means using these blocks to create their own gameplay elements for a particular level or the whole game. In this case, programmers work in their (their) favorite IDE (for example, MS Visual Studio, Xcode), and the designer works in the Blueprint editor of the UE.
The gameplay API and class framework are fully accessible from both systems. Both systems can be used separately, but using them together you get a more powerful and flexible system. This means that the best practice will be the coordinated work of programmers who create the basics of gameplay and level designers who use these blocks to create exciting gameplay.
In view of the foregoing, the typical C ++ programmer’s workflow, which creates blocks for the designer, will be discussed later. In this case, you must create a class that will be further extended using Blueprint, created by a designer or another programmer. In this class, we will create various properties (variables) that the designer can set. Based on these set values, we are going to extract the new values of the created properties. This process is very simple thanks to the tools and macros that we provide for you.
Class Wizard
The first thing you need to do is use the class wizard provided by the UE to create the base of the future C ++ class, which will be further expanded using Blueprint. The following shows how the selection takes place when creating a new class, a child of the class Actor.
Next you need to enter the name of your class. We will use the default name ( MyActor ).
After you create the class, the wizard generates the files and opens the IDE so that you can immediately start editing it. Below is the resulting code for the class created. For additional. information about the class wizard, you can follow this link .
#include "GameFramework/Actor.h" #include "MyActor.generated.h" UCLASS() class AMyActor : public AActor { GENERATED_BODY() public: // Actor AMyActor(); // Actor virtual void BeginPlay() override; // virtual void Tick( float DeltaSeconds ) override; }; The class wizard generates a class with the BeginPlay () and Tick () methods, with the override specifier. The BeginPlay () event occurs when Actor enters the game in the playable state . It is a good practice to initiate the gameplay code of your class in this method. The Tick () method is called every frame with a parameter that is equal to the time since its last call. This method should contain constantly repeating logic. If you do not have it, then it is best to remove this method, which will slightly increase productivity. If you deleted the code for this method, make sure that you also deleted a line in the class constructor, which indicates that Tick () should be called every frame. Below is the constructor code with the specified string:
AMyActor::AMyActor() { // actor Tick() . // , // . PrimaryActorTick.bCanEverTick = true; } Creating properties displayed in the editor
Now we have our own class. Let's create several properties that can be used by other developers directly in the UE. To display a property in the editor, you need to use the special macro UPROPERTY (). All you need to do is to write the UPROPERTY macro (EditAnywhere) before declaring a variable, as written below:
UCLASS() class AMyActor : public AActor { GENERATED_BODY() UPROPERTY(EditAnywhere) int32 TotalDamage; } This is all you need to do to edit this value in the editor. There are several more ways to specify how and where this variable is being edited. This is done by specifying the add. options in the macro. For example, if you want this property to be grouped in a section with other relevant properties, you must specify a category, as indicated below:
UPROPERTY(EditAnywhere, Category="Damage") int32 TotalDamage; Now, users will see your variable placed in a category with the title “Damage” . In this category, there may also be other properties that have the same category. This is a great way to put the most frequently used variables together.
Now make the property available from Bluerpint:
UPROPERTY(EditAnyway, BlueprintReadWrite, Category="Damage") int32 TotalDamage; As you can see, we specified a special parameter to be able to read and write the property. You can also use another option - BlueprintReadOnly , so that your variables in the editor are specified as constant. In addition, there are many other properties that are passed to the UPROPERTY macro, which can be found by clicking on the link .
Before moving on to the next section, let's add a few variables to our class. We already have a variable storing full damage that Actor can do, but let's assume that damage can be done for a long time. The code below contains one new variable for editing by the level designer and one unavailable for editing:
UCLASS() class AMyActor : public AActor { GENERATED_BODY() UPROPERTY(EditAnywhere, BlueprintReadWrite, Category="Damage") int32 TotalDamage; UPROPERTY(EditAnywhere, BlueprintReadWrite, Category="Damage") float DamageTimeInSeconds; UPROPERTY(BlueprintReadOnly, VisibleAnywhere, Transient, Category="Damage") float DamagePerSecond; ... } As you can see, the DamageTimeInSeconds property, which is editable in the editor. DamagePerSecond will be calculated, as you will see later, based on the value specified in DamageTimeInSeconds , for example, by the level designer. The VisibleAnywhere flag indicates that the property is displayed, but cannot be changed. The Transient flag means that this property cannot be saved or read from disk, that is, the resulting value is not constant. The picture below shows how these properties are displayed in the default section of our class.
Setting default values in the constructor
Setting the initial values of variables occurs as in the ordinary C ++ class - in the constructor. Below are two examples of how this can be done, both examples are equivalent in functionality:
AMyActor::AmyActor() { TotalDamage = 200.0f; DamageTimeInSeconds = 1.0f; } AMyActor::AmyActor() : TotalDamage (200.0f); DamageTimeInSeconds (1.0f); { } Here is the same piece of window, but with the given values in the constructor
It is also possible to set initial values based on the values specified in the editor. This data is set after the constructor, this requires the use of the PostInitProperties () method. In this example, TotalDamage and DamageTimeInSeconds are set by the level designer. Regardless of whether these values are set from the editor, you can still set the required initial values, as we did earlier.
Note: if you do not specify default values, they will automatically be set to 0 or nullptr for pointer values.
void AMyActor::PostInitProperties() { Super::PostInitProperties(); DamagePerSecond = TotalDamage / DamageTimeInSeconds; } The same piece of the window as before, but after adding PostInitProperties () to the call chain.
Hot reboot.
UE 4 provides an opportunity that may surprise you if you are used to normal C ++ programming in other projects. You can compile the C ++ code you added without restarting the editor. There are two ways to do this:
1. If the editor is running, build in Visual Studio or Xcode, as you usually do. The editor will detect the new compiled DLLs and reload your changes right away.
Note: If you have a debugger attached, you must unpin it at the beginning, otherwise VS will not allow you to do a build.
2. Or simply click on Compele in the main toolbar in the editor.
You can use this feature as you go through this guide.
Extending the C ++ class using Blueprint
Before that, we created a simple gameplay class, using C ++ class wizards, and added several variables to it. Now we will learn how a user can create unique classes from our modest sketches.
The first thing to do is create a Blueprint class from our AMyActor class. Notice that in the image below, the name of the base class is listed as MyActor , not AMyActor . This is done in order to hide the naming conventions that is used in our tools from the user, making the names more convenient for him.
After clicking on Select, a new Blueprint will be created with the default name. We will give it the name CustomActor1 , as indicated in the image from the Content Browser below.
This is our first class that our user will edit. First, we change the values of our variables. In this case, we set TotalDamage equal to 300 and the time during which these damages are dealt with is equal to two seconds. You can see this in the pictures below:
Wait ... Our estimated value does not match our expectation. It should be 150, but we see a value equal to 200. This is because at the moment we calculate the values immediately after the initialization of the values, which occurs at the moment of loading. But we have runtime changes in the editor ( runtime changes ), which are not taken into account. This problem is easy to solve, because the engine notifies the target object of an event that is triggered when a change is made in the editor. The code below shows exactly what you need to add to calculate the new values obtained when changing variables in the editor:
void AMyActor::PostInitProperties() { Super::PostInitProperties(); CalculateValues(); } void AMyActor::CalculateValues() { DamagePerSecond = TotalDamage / DamageTimeInSeconds; } #if WITH_EDITOR void AMyActor::PostEditChangeProperty(FPropertyChangedEvent& PropertyChangedEvent) { CalculateValues(); Super::PostEditChangeProperty(PropertyChangedEvent); } #endif Notice that the PostEditChangeProperty method is located inside a directive that indicates whether we are working in the editor or not. This is done in order for the build, the game contains only the necessary code for it, without unnecessary lines that increase the size of the executable file, unnecessarily. Now, after recompilation, the DamagePerSecond value will be as expected. This is indicated in the pictures below.
Calling C ++ methods in Blueprint
So far, we have studied the work with variables. In addition, you need to explore another important basic thing, before studying the engine in more detail. In the process of creating gameplay, the user must be able to call functions created by a C ++ programmer in Blueprint. To begin, let's do the CalculateValues () method that can be called from Bluerpint.
UFUNCTION(BlueprintCallable, Category="Damage") void CalculateValues(); The macro UFUNCTION () contains a description of how our C ++ function is processed by the reflection system. The BlueprintCallable option indicates the possibility of processing this method in the Blueprint virtual machine (hereafter referred to as Blueprint VM ). In order for the context menu (called by the right mouse button) to work properly, each method that is allowed by the editor must contain the name of the category. The image below shows exactly how the categories are displayed in the context menu:
As you can see, the method can be selected in the category Damage . The blueprint below shows how changes in the TotalDamage value occur , followed by a method call for recalculating dependent values.
Here we use the method described earlier to recalculate dependent properties. Most of the engine's methods are available for calling from Blueprint, using the UFUNCTION () macro, so that developers can create games without writing C ++ code. However, a more competent approach would be to use C ++ to create basic gameplay blocks and code whose performance is critical, and use Blueprint to customize the created behavior or construct a new one based on the generated code.
Now that our users can invoke your C ++ code, consider another way to invoke C ++ code in Blueprint. This approach allows calling functions implemented in Blueprint in C ++ code. In this way, you can notify the user about events to which they can react in the way they see fit. Often this can be the creation of effects or other graphical interactions, like showing / hiding objects. The code snippet below contains a method that is implemented in Blueprint:
UFUNCTION(BlueprintImplementableEvent, Category="Damage") void CalledFromCpp(); This function is called just like a regular C ++ function. The UE generates the basis of the implementation of the C ++ function to call it correctly in the Blueprint VM . We usually call it Thunk . If Blueprint does not implement the function body, then its behavior is C ++, a function with an empty body that does nothing. What if we want to provide a default C ++ implementation and make it possible to override it in Bluerpint. The macro UFUNCTION () has an option for this case. The code snippet below shows what changes to the header file need to be made to achieve this:
UFUNCTION(BlueprintNativeEvent, Category="Damage") void CalledFromCpp(); This version of the method still converts the method to call it in the Blueprint VM. How should we provide a default implementation? Tools also generate a new method definition with the _Implementation () postfix. We must submit your version of this method or your project will not be linked. Here is the implementation for the above definition:
void AMyActor::CalledFromCpp_Implementation() { // Do something cool here } Now this method is called when Blueprint does not override it. Note: in future versions of the build of tools, the auto-generated _Implementation () definition will be removed and it will need to be explicitly added to the header. In version 4.7, the autogeneration of this definition still occurs.
Now you have learned the basics of gameplay design and how to work with users to create more diverse gameplay. It's time for you to choose your own adventures. You can continue to explore the development in the following parts, or you can familiarize yourself with one of the examples of projects that you can find in the launcher (start screen) to gain even more useful skills.
Small notes:
1) There is a lot of text, I tried to check a couple of times, I am sure that there are some errors. If you find, please write the drug as soon as I correct it. The same applies to the translation of some idioms or terms.
2) Personally, I don’t really like descriptions where sentences with the same meaning are repeated 3 times, as if you were hammered into something. But it’s not for me to argue with the creators of the documentation, I think they know better.
3) If translations are requested by the community, I will not dwell on these 4 parts, and if possible I will translate all the basic pieces of documentation.
Source: https://habr.com/ru/post/254931/
All Articles