Secrets of exporting from Blender to Unity
- Theory of the coordinate system (right and left)
- The theory of the correct creation of 3d models in blender
- Fast export of files from Blender to Unity3d.
- How to correctly compare the scale of the model in Blender and Unity.
- Export with the correct orientation of the model
- Why is the number of vertices differently displayed in Unity and Blender?
Scripts for automatic export from Blender to Unity3d (The link was provided by the user darkfrei)
Video to article
Blender lesson number 1
Blender lesson number 2
Blender lesson number 3
Bonus Texture Lesson in Unity3d
Theory of the coordinate system (right and left)
In fact, this is the most important part, I ran into a number of problems in the work of physics 3d models due to incorrect export. And so let's first get acquainted with the coordinate system of the right-sided and left-sided.
')
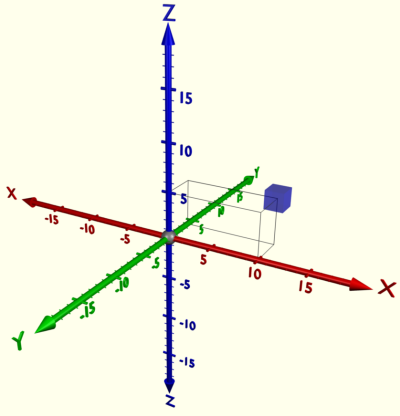
Blender uses a right-handed coordinate system with the Z axis pointing up. This coordinate system is used by almost all CAD systems . See the picture:
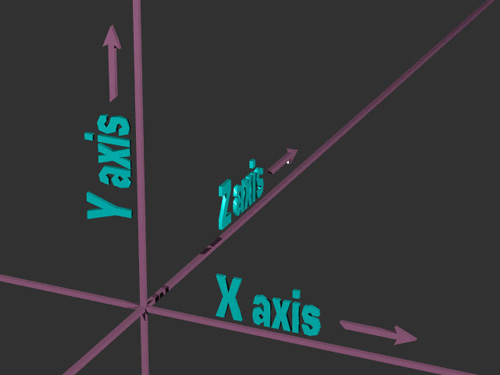
Unity3d, like almost any other game engine, uses a left-sided coordinate system. When Y is up, X is sideways, Z is forward. See the picture:
The theory of the correct creation of 3d models in blender
First you need to study the folder and file structure of our 3d model in Blender.
Refence - a folder in which can be stored auxiliary drawings, drawings that help build a 3D model
Textures - the folder in which the textures should be stored.
Flags_snow.blend - our 3d model in blender format

Now for the correct export of the 3d model, we have to understand for ourselves that Z + it will be the direction in the game when the object moves forward, (Z-) is the direction when the object moves backwards. (X + -) is the direction of turning sideways - but this is in Unity , which uses the left-side coordinate system . And in the right- side coordinate system (Blender, 3ds max) Y + it will be the direction when the object is looking forward and (X + -) is the direction to the side. This means that the object should stand in the scene as in the figure, otherwise wait for problems with physics:

All rotation parameters must be set to 0 for further work and for Mesh (Mesh) to be generated correctly, you need to set the Scale as default. To do this, we will do the following in Blender.
1) Select all objects in the scene (A key)
2) Object> Apply> Rotate & Scale.
Now all the rotation parameters are taken and set to 0 . And scaling parameters (Scale) are set to default (1) . See the picture:
Thanks to Leopotam , it turned out that assigning a texture is better in Unity3d itself, and not in Blender , otherwise, each time you export an FBX file, you will have an object.fbm folder (an empty folder that doesn’t affect anything except to create an extra object in the Project window.
Export with the correct orientation of the model
Now we can make “Right export” from the right-side coordinate system to the left-side coordinate system.
1) Select all objects (A key)
2) Click the sequence R> X> -90 .
3) Object> Apply> Rotate.
4) Click the sequence R> X> 90 .
Be sure to do in this sequence. Next, export the model to Unity . File> Export> FBX with the following settings:

Fast export of files from Blender to Unity3d.
After exporting the model:
1) Go to the folder with this model and copy the Textures folder (the folder with textures) and our FBX file .

2) Paste our project into the Assets folder. This will allow Unity to import the model directly with the textures that were configured in Blender .

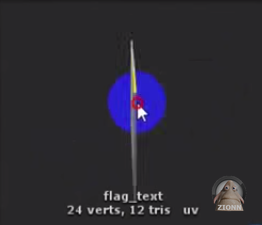
Why is the number of vertices differently displayed in Unity and Blender?
As we see in the figure, the number of vertices (verts) on an object in Unity3d shows 28.
See the picture:

And the number of vertices in Blender = 8

This is due to the fact that in Unity3d the number of vertices of the figure itself and the number of vertices in the UV scan are calculated:

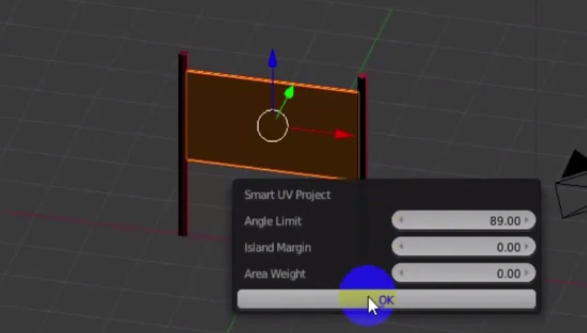
When creating seams, one face is divided into 2 faces, and following mathematics, 1 face consists of 2 vertices, therefore, 2 faces will have 4 vertices. For example, use the Smart UV Project sweep and set the maximum Angle Limit .
We look in Blender and the number of vertices has decreased from 28 to 24 vertices. If anyone has a more optimized way. Write in the comments, discuss. Some will say that what has decreased by only 4 vertices, but imagine if such objects are 100 or 200, or the number of vertices in more detailed objects is reduced by 100-300. Wash my not a bad way to optimize.
How to correctly compare the model scale in Blender and Unity.
All units of measure that in Blender that in Unity by default has a unit of measure Units . 1 Units = 1 Meter . Therefore, developers are advised to take 1 unit of gaming space for 1 real meter, and it is better to adhere to this (at least to mess with physics less).
And so let's deal with the units of measurement in Blender, in Blender, you can change them in Blender, but Units is used in the default Blender.
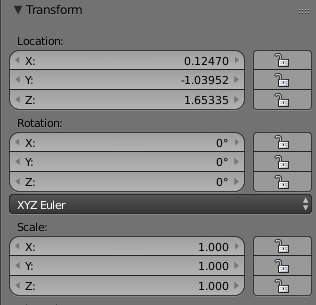
We look at the picture:

We see the parameter Dimension (Dimensions or size). in the figure we see Dimension in X, Y, Z = 1,1,1; hence this cube figure with dimensions of 1x1x1 meter. We export to Unity and go to the Inspector tab.
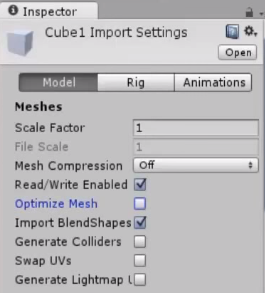
look at the Scale Factor parameter, if your Unity version is less than 5, then the Scale Factor defaults to 0.01, correct this parameter to 1, if you have Unity5 then the Scale Factor defaults to 1.
Conclusion
That's the whole article, as we see exporting 3d models from Blender to Unity , this is not so difficult. For a more detailed consideration of this material, I suggest watching the video tutorials at the beginning of the article >> link
Addition from Leopotam
Leopotam:
Nothing was said that it was impossible to hang textures into the material (only that in the UV window), otherwise the unit would start creating folders like object.fbm and try to import textures into them regardless of what lies in the next folder Textures. Here lies the problem - it is useless to delete them when the next re-import (for example, when taking a repository to a new folder or changing the target platform) of the asset, the folder will appear again. The only solution is to properly prepare this matter in a blender. Well, or disable the import of materials and customize prefabs by hand.
Answer:
Yes, indeed, in Unity 5, these folders began to be created (during the initial import) did not notice them before, but they are empty and can be deleted (they are created only during the primary import) and looks for textures in the Textures folder and the Shader is used depending on the material settings, if Material is standard and then apply Diffuse with an already configured texture, if Transperty is applied in materials, then apply the appropriate Transperty shader in Unity3d and texture also apply. I changed the target platform, from Web Player to Desktop - nothing has changed, folders have not been created. Replaced by Ios - nothing has changed. Unity 5.0.1f1
Leopotam:
Nothing was said that if the armature with animations is exported, then FBX 7.4 BINARY format cannot be used, only the old FBX 6.1 ASCII format, otherwise everything in the unit will go in the “blood-style” style.
Answer:
Thanks for the additional information, the animation in Blender did not work and the bone project itself does not require bone animation, so he knew little about this material.
Source: https://habr.com/ru/post/254937/
All Articles