Bubot is a very easy Python 3 framework for robot programming and home automation.
Prehistory
I wanted to create my own robot, as well as automate the control of light and climate at home. To this end, began to explore the possibilities. For myself, I divided all the solutions into two groups: systems in which the code on the controller is executed in one main loop (arduino, lego, etc.) and systems consisting of parallel processes exchanging messages between themselves.
Intuitively, I chose the second group, because I wanted to find the simplest solution with a friendly user interface. Of the most popular members of this “family”, Microsoft Robotics Studio and ROS liked very much. But unfortunately, at the current moment, it is not easy to tie them to a specific hardware, and it is also not a very trivial task to understand them from scratch. In the end, I decided to write myself, but I really didn’t want to “code” in C, Soul asked for something simpler and easier. As a result, I chose Python. And taking into account that a bunch of other ideas started to creep into the head by the robot and the “smart home”, I decided to immediately create a small framework in which the main focus would be on the simplicity of development.
Concept
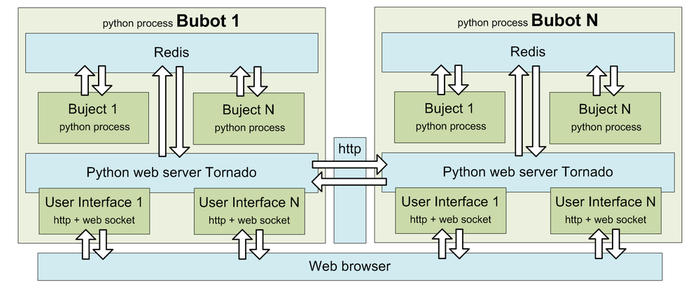
Conceptually, the framework is a set of user-supported modules that implement various functions of robotics. When running, Bubot builds a network of processes that can asynchronously receive and send messages among themselves. You can also build a network of robots that will communicate with each other.
')
The process network is built on the basis of the standard Python module multiprocessing. The messaging system and shared memory are implemented using Redis .
Each Bubot has a built-in web server, the Tornado web server, which allows you to monitor the status, control the robot, change (calibrate) the robot on the go, and also enable the data exchange between robots.
Bubot is not a real-time system, although Bubot can be integrated with a real-time code.
Hello bubot
Learning something new is always easier with an example, and the first thing that comes to mind is to remake a radio-controlled toy for management via a web interface via wi-fi or 3G.
To do this, we need any Chinese radio-controlled machine and any mini computer on which Python 3 can work. As the guinea pig, one of the most affordable was purchased - raspberry pi b +.
Initially, almost any radio-controlled machine is two motors and a primitive radio module. We only need motors from it and that the machine itself be the right size to accommodate all the electronics.
To begin with, let's simplify the task - our machine must perform four actions: go forward or backward, turn left or right.
To solve the problem we need:
- Connect motors to raspberry
- Implement a service that will accept and interpret user commands for specific physical devices.
- Implement a web interface that will send user commands: Set the power of the main or rotary engine -100% / 0% / 100%.
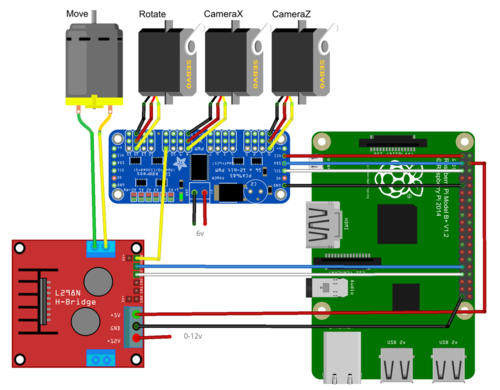
We connect the motors
The simplest way to connect the motors to the Raspberry Pi is to use a ready-made controller, the choice of which depends only on the expected power of the motors. I chose with a margin based on L298N. The search string on aliexpress "L298N motor driver board" will cost you about $ 3 with shipping.

Also, to power a raspberry, you will need at least one step-down voltage converter. I took the base LM2596. The search string on aliexpress "DC-DC LM2596" will cost you about $ 1 with shipping.
With this connection, in order to force the machine to execute one of our teams, it is enough to set a high level on the corresponding GPIO.
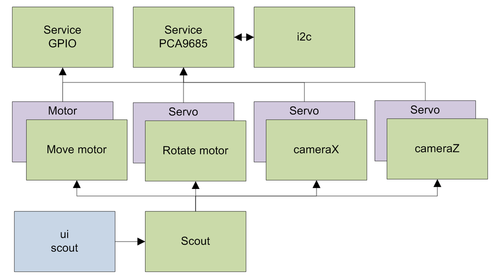
We realize the motor module
In order to simplify the model, let our teams go directly to the motors.
Since we have two identical (from a software point of view) motor, we will need one module. All modules are inherited either from the base class Buject, or from its descendants. From the base class, the developer receives the main infinite loop, methods for processing and transmitting events. The modules in the framework are in the buject directory. Each module consists of two files:
- [module name] .py - module logic
- [module name] .json - module description. It contains a list of module parameters, their default values, a list of possible statuses, a description of messages generated by the module, and a list of messages to which the module is signed.
An example of the module for our motors \ buject \ MotorTest.py:
import json from buject.Buject import Buject import RPi.GPIO as GPIO class MotorTest(Buject): # def __init__(self, user_config=None): super(MotorTest, self).__init__(user_config) # # GPIO def on_ready(self): GPIO.setmode(self.param["mode"]) GPIO.setwarnings(False) # , # # # set_power def incoming_request_set_power(self, message): data = json.loads(message['data']) if data['param']['value'] > 0: # GPIO.setup(self.param['GPIO_reward'], GPIO.OUT, 0) GPIO.setup(self.param['GPIO_forward'], GPIO.OUT, 1) self.status['action'] = "forward" elif data['param']['value'] == 0: GPIO.setup(self.param['GPIO_forward'], GPIO.OUT, 0) GPIO.setup(self.param['GPIO_reward'], GPIO.OUT, 0) self.status['action'] = "stopped" else: GPIO.setup(self.param['GPIO_forward'], GPIO.OUT, 0) GPIO.setup(self.param['GPIO_reward'], GPIO.OUT, 1) self.status['action'] = "backward {0}%".format(self.status["power"]) # , if self.param['debug'] > 1: self.log('Buject "{0}" {1}'.format(self.param['name'], self.status['action'])) Comments, I think unnecessary. A request arrives, in the parameters of which the motor power is indicated, if it is greater than zero, we tell the motor to go forward, less - backward, equal to zero - we stand.
The infinite loop was not involved in this case. In case of its presence, it is sufficient to define the method main_loop ().
An example of a module description for our motors \ buject \ Motor.json:
{ "param": { "name": { "value": "MotorTest", "description": " " }, "parent": { "value": "Buject", "description": " , " }, "buject": { "value": "MotorTest", "description": " = " }, "GPIO_forward": { "value": 0, "description": " GPIO " }, "GPIO_backward": { "value": 0, "description": " GPIO " }, "GPIO_mode": { "value": 11, "description": "value for GPIO.setmode GPIO.BOARD=10 GPIO.BCM=11" } }, "incoming_request": { "set_power": { "name": "set_power", "description": " ", "param": { "value": { "description": " ", "type": "int" } } } } } The param section contains a list of parameters required for starting and operating the module. The first three are required for each module, and are inherited from the base class Buject. The latter are specific only for this module, the number and name of them you yourself invent depending on your needs. GPIO_mode sets the GPIO addressing mode and will not be redefined later. While for GPIO_forward and GPIO_backward there is no point in setting default values, since they depend solely on what conclusions a particular motor will be connected to and we will define them further in the launch parameters of this module.
The module description may also contain a status section - where all calculated parameters are described - reflecting the current state of the module. In our module there are no added statuses, however, if you noticed, in the code of the module itself, we change the status of 'action', which is defined in the description of the basic module Buject.
The framework provides the ability to use five types of messages.
- incoming_request - a list of requests that the module can handle.
- outgoing_request - a list of requests generated by the module. As parameters, you must specify the name of the service receiving the requests and the name of the request.
- incoming_event - list of subscriptions to events of other modules, you must specify the name of the service and the name of the event.
- outgoing_event - a list of events to which other modules can subscribe.
- incoming_response - service type, which is declared on the outgoing request. Says that the service will wait for an asynchronous response to the request.
We implement web interface
Each robot can have an unlimited number of web interfaces. In our case, to control the robot, we need only one - implementing 4 buttons, which will give a command when pressed, and cancel if released.
User interfaces are stored in the ui directory. Each page of the user interface is described in a separate subdirectory, and consists of at least 2 files:
- [Page name] .html - page layout.
- [Page name] .json - interface description. Each page (session) for the framework is essentially a separate service, this file contains a description of the events on which this page is signed, as well as the messages it generates.
- [Page name] .py - (optional) may contain server-side logic for processing commands of this user interface, in our case it is not useful.
Let's again, to improve perception, a little more simplified. In the example below, we consider the algorithm for one button ahead. The rest can be done by analogy.
So, we create in the ui directory the subdirectory scout_easy and in it two files scout_easy.html and scout_easy.json with the following content (comments on the text).
\ ui \ scout_easy \ scout_easy.html
<!DOCTYPE html> <html> <head lang="en"> <meta charset="UTF-8"> <link rel="stylesheet" href="/static/jquery-ui-1.11.2/jquery-ui.css"> <script type="text/javascript" src="/static/jquery-2.1.3.min.js"></script> <script type="text/javascript" src="/static/jquery-ui-1.11.2/jquery-ui.js"></script> <script type="text/javascript" src="/static/bubot_socket.js"></script> <title>BuBot</title> <script> function bubot_on_open() { // , // WebSocketa // , ui/studio ui/scout--> } function get_bubot_actions() { // , , // . // ui/studio ui/scout--> return {}; } $(function () { // $("#command_move_forward").button({}).mousedown(function () { // , // 100% // 0%--> bubot_send_message('send_request', {'name': "set_move_motor_power", 'data': {'value': 100}}); }).mouseup(function () { bubot_send_message('send_request', {'name': "set_move_motor_power", 'data': {'value': 0}}); }); }) </script> </head> <body class="ui-widget-content"> <button id="command_move_forward" class="command_button">forward</button> <div id="console" class="ui-widget-content"></div> </body> </html> Pay attention to the div id = console, if it is present, the framework will display all console messages in it, including server-side error code.
bubot_socket.js - must be present on every ui page, since it is he who is responsible for establishing a connection with the server and exchanging messages.
The connection to the server takes place via the web socket, the bubot_send_message method ([message name], [message parameters]) is responsible for sending messages to the server. On the server, when a message arrives, a method of the same name is called, to which the message parameters are passed. In our case, the method sending the request set_move_motor_power is called, the framework service of the message recipient is taken from the user interface description file, the names of these services are defined in the final section when describing the robot.
\ ui \ scout_easy \ scout_easy.json
{ "incoming_request": { "console": { "time": {}, "message": {} } }, "outgoing_request": { "set_move_motor_power": { "name": "set_power", "buject": "move_motor", "description": " ", "param": { "value": { "description": " , > 0, < 0", "type": "int" } } }, "set_rotate_motor_power": { "name": "set_power", "buject": "rotate_motor", "description": " ", "param": { "value": { "description": " , > 0, < 0", "type": "int" } } } } } Run the robot
So, we have prepared all the parts of the robot. To run it, you need another file with a description of the robot itself.
The config directory stores descriptions of all your robots. You can create a description both manually and with the help of the configurator - but more about this in the bubot: scout video.
So, for our first robot, the description will look like this:
\ config \ scout_easy.json
{ "param": { "name": { "value": "scout_easy" } }, "depend_buject": { # "move_motor": { # , , "param": { "buject": { # "value": "MotorTest" }, "name": { # "value": "move_motor" }, "GPIO_forward": { # "value": 20 }, "GPIO_reward": { "value": 21 } } }, "rotate_motor": { # "param": { "buject": { "value": "MotorTest" }, "name": { "value": "rotate_motor" }, "GPIO_forward": { "value": 13 }, "GPIO_reward": { "value": 19 } } } } } According to this description, at launch, Bubot will create two copies of the MotorTest module with different parameters: one for the main motor - move_motor, the other for the steering motor - rotate_motor and will start out as processes. As you can see, we did not specify the way of GPIO addressing, since we are satisfied with the default value, but we redefined the GPIO_forward and GPIO_backward parameters in accordance with the motor connection scheme.
Now we have absolutely everything ready. You can run.
python3 StartBubot scout_easy Open the user interface http: // localhost / ui / scout_easy in the browser and try to click on the button. When you first start you will be asked to enter a username and password - enter any values, the default access rights to the system are not installed.
Bubot scout
If we progressively develop our machine further, the next step is adjustment of the drive speed, replacement of the steering motor for servus, installation of the camera, camera drives, speech synthesizer, recognition of voice commands, etc. But that's another story.
Download Bubot
Source: https://habr.com/ru/post/254749/
All Articles