Real-time object recognition on iOS using YOLOv3

Hello!
In this article, we will write a small program to solve the problem of object detection and recognition (object detection) in real time. The program will be written in the Swift programming language for the iOS platform. To detect objects, we will use a convolutional neural network with an architecture called YOLOv3. In this article, we will learn how to work in iOS with neural networks using the CoreML framework, a little understanding of what the YOLOv3 network is and how to use and process the outputs of this network. We’ll also check the operation of the program and compare several variations of YOLOv3: YOLOv3-tiny and YOLOv3-416.
Sources will be available at the end of the article, so everyone will be able to test the operation of the neural network on their device.
Object detection
To begin with, we will briefly understand what the task of detecting objects (object detection) in the image is and what tools are used for this today. I understand that many are quite familiar with this topic, but I still allow myself to tell a little about it.
')
Now a lot of tasks in the field of computer vision are solved with the help of convolutional neural networks (Convolutional Neural Networks), hereinafter CNN. Due to their structure, they well extract features from the image. CNNs are used in classification, recognition, segmentation, and many others.
Popular CNN architectures for object recognition:
- R-CNN. We can say the first model to solve this problem. Works like a regular image classifier. Different regions of the image are fed to the network input and predictions are made for them. Very slow since it runs a single image several thousand times.
- Fast R-CNN. An improved and faster version of R-CNN, works on a similar principle, but first the entire image is fed to CNN input, then regions are generated from the received internal representation. But still pretty slow for real-time tasks.
- Faster R-CNN. The main difference from the previous ones is that instead of the selective search algorithm, it uses a neural network to select regions to “memorize” them.
- YOLO. A completely different principle of operation compared to the previous ones does not use regions at all. The fastest. More details about it will be discussed in the article.
- SSD It is similar in principle to YOLO, but uses VGG16 as a network to extract features. Also quite fast and suitable for real-time work.
- Feature Pyramid Networks (FPN). Another type of network such as Single Shot Detector, due to the features of feature extraction, is better than small objects recognized by SSD.
- RetinaNet. Uses a combination of FPN + ResNet and thanks to a special function of error (focal loss) gives higher accuracy (accuracy).
In this article, we will use the YOLO architecture, namely its latest modification, YOLOv3.
Why YOLO?

YOLO or You Only Look Once is CNN's very popular architecture at the moment, which is used to recognize multiple objects in an image. More complete information about it can be obtained on the official website , where you can also find publications that describe in detail the theory and mathematical component of this network, as well as the process of its training.
The main feature of this architecture compared to others is that most systems apply CNN several times to different regions of the image; in YOLO, CNN is applied once to the entire image at once. The network divides the image into a kind of grid and predicts bounding boxes and the likelihood that there is a desired object for each section.
The advantages of this approach is that the network looks at the entire image at once and takes into account the context when detecting and recognizing an object. YOLO is also 1000 times faster than R-CNN and about 100x faster than Fast R-CNN. In this article, we will launch a network on a mobile device for online processing, so this is the most important quality for us.
More detailed information on comparing architectures can be found here .
YOLOv3
YOLOv3 is an improved version of the YOLO architecture. It consists of 106 convolutional layers and better detects small objects compared to its predecessor YOLOv2. The main feature of YOLOv3 is that there are three layers at the output, each of which is designed to detect objects of different sizes.
The picture below shows its schematic structure:
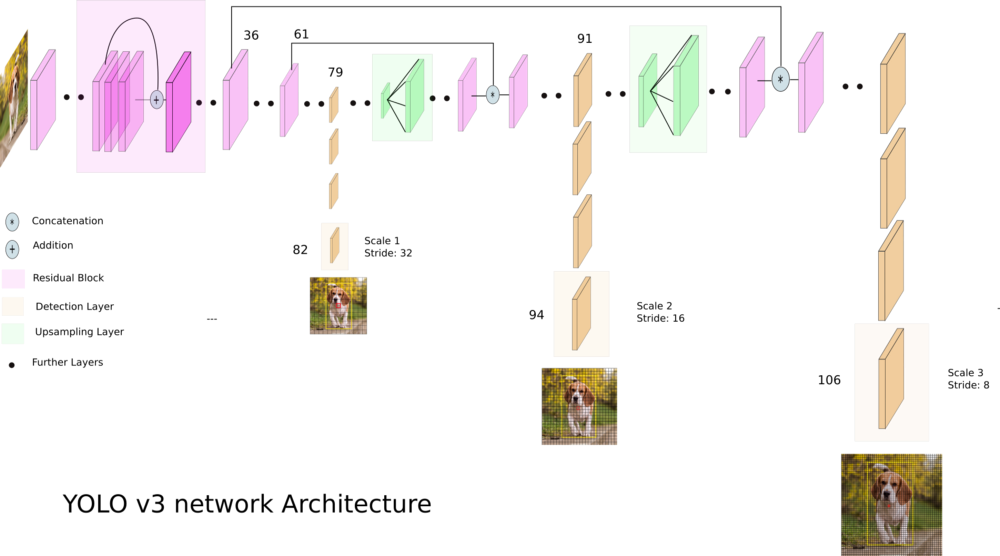
YOLOv3-tiny - A cropped version of the YOLOv3 architecture, consists of fewer layers (there are only 2 output layers). It predicts smaller objects worse and is designed for small datasets. But, due to the truncated structure, the network weights occupy a small amount of memory (~ 35 MB) and it produces a higher FPS. Therefore, such an architecture is preferable for use on a mobile device.
We are writing a program for object recognition
The fun part begins!
Let's create an application that will recognize various objects in the image in real time using the phone’s camera. All code will be written in the Swift 4.2 programming language and run on an iOS device.
In this tutorial we will take a ready-made network with scales pre-trained on a COCO dataset. It presents 80 different classes. Therefore, our neuron will be able to recognize 80 different objects.
From Darknet to CoreML
The original YOLOv3 architecture is implemented using the Darknet framework.
On iOS, starting with version 11.0, there is a wonderful CoreML library that allows you to run machine learning models directly on the device. But there is one limitation: the program can only be run on a device running iOS 11 and above.
The problem is that CoreML only understands the specific format of the .coreml model. For most popular libraries, such as Tensorflow, Keras or XGBoost, it is possible to directly convert to CoreML format. But for Darknet there is no such possibility. In order to convert the saved and trained model from Darknet to CoreML, you can use various options, for example, save Darknet to ONNX , and then convert it from ONNX to CoreML.
We will use a simpler way and we will use Keras implementation of YOLOv3. The algorithm of action is this: load the Darknet weights into the Keras model, save it in the Keras format and directly convert it to CoreML from this.
- Download Darknet. Download the files of the trained Darknet-YOLOv3 model from here . In this article, I will use two architectures: YOLOv3-416 and YOLOv3-tiny. We will need both cfg and weights files.
- From Darknet to Keras. First we clone the repository , go to the repo folder and run the command:
python convert.py yolov3.cfg yolov3.weights yolo.h5
where yolov3.cfg and yolov3.weights downloaded Darknet files. As a result, we should have a file with the extension .h5 - this is the saved YOLOv3 model in Keras format. - From Keras to CoreML. The last step remained. In order to convert the model to CoreML, you need to run the python script (first you need to install the coremltools library for python):
import coremltools coreml_model = coremltools.converters.keras.convert( 'yolo.h5', input_names='image', image_input_names='image', input_name_shape_dict={'image': [None, 416, 416, 3]}, # image_scale=1/255.) coreml_model.input_description['image'] = 'Input image' coreml_model.save('yolo.mlmodel')
The steps described above must be done for the two models YOLOv3-416 and YOLOv3-tiny.
When we did all this, we have two files: yolo.mlmodel and yolo-tiny.mlmodel. Now you can start writing the code of the application itself.
Creating an iOS app
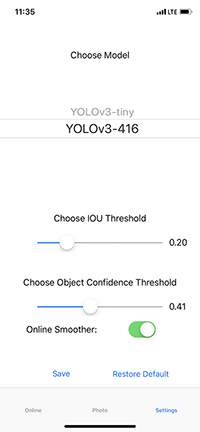
I won’t describe all the application code, you can see it in the repository link to which will be given at the end of the article. Let me just say that we have three UIViewController-a: OnlineViewController, PhotoViewController and SettingsViewController. The first is the output of the camera and online detection of objects for each frame. In the second, you can take a photo or select a picture from the gallery and test the network on these images. The third one contains the settings, you can choose the YOLOv3-416 or YOLOv3-tiny model, as well as choose the thresholds IoU (intersection over union) and object confidence (the probability that there is an object in the current image section).
Loading Models in CoreML
After we converted the trained model from Darknet format to CoreML, we have a file with the extension .mlmodel . In my case, I created two files: yolo.mlmodel and yolo-tiny.mlmodel , for the models YOLOv3-416 and YOLOv3-tiny, respectively. Now you can load these files into a project in Xcode.
We create the ModelProvider class; it will store the current model and methods for asynchronously invoking the neural network for execution. Model loading is carried out in this way:
private func loadModel(type: YOLOType) { do { self.model = try YOLO(type: type) } catch { assertionFailure("error creating model") } } The YOLO class is directly responsible for loading .mlmodel files and handling model outputs. Download model files:
var url: URL? = nil self.type = type switch type { case .v3_Tiny: url = Bundle.main.url(forResource: "yolo-tiny", withExtension:"mlmodelc") self.anchors = tiny_anchors case .v3_416: url = Bundle.main.url(forResource: "yolo", withExtension:"mlmodelc") self.anchors = anchors_416 } guard let modelURL = url else { throw YOLOError.modelFileNotFound } do { model = try MLModel(contentsOf: modelURL) } catch let error { print(error) throw YOLOError.modelCreationError } Full ModelProvider Code.
import UIKit import CoreML protocol ModelProviderDelegate: class { func show(predictions: [YOLO.Prediction]?, stat: ModelProvider.Statistics, error: YOLOError?) } @available(macOS 10.13, iOS 11.0, tvOS 11.0, watchOS 4.0, *) class ModelProvider { struct Statistics { var timeForFrame: Float var fps: Float } static let shared = ModelProvider(modelType: Settings.shared.modelType) var model: YOLO! weak var delegate: ModelProviderDelegate? var predicted = 0 var timeOfFirstFrameInSecond = CACurrentMediaTime() init(modelType type: YOLOType) { loadModel(type: type) } func reloadModel(type: YOLOType) { loadModel(type: type) } private func loadModel(type: YOLOType) { do { self.model = try YOLO(type: type) } catch { assertionFailure("error creating model") } } func predict(frame: UIImage) { DispatchQueue.global().async { do { let startTime = CACurrentMediaTime() let predictions = try self.model.predict(frame: frame) let elapsed = CACurrentMediaTime() - startTime self.showResultOnMain(predictions: predictions, elapsed: Float(elapsed), error: nil) } catch let error as YOLOError { self.showResultOnMain(predictions: nil, elapsed: -1, error: error) } catch { self.showResultOnMain(predictions: nil, elapsed: -1, error: YOLOError.unknownError) } } } private func showResultOnMain(predictions: [YOLO.Prediction]?, elapsed: Float, error: YOLOError?) { if let delegate = self.delegate { DispatchQueue.main.async { let fps = self.measureFPS() delegate.show(predictions: predictions, stat: ModelProvider.Statistics(timeForFrame: elapsed, fps: fps), error: error) } } } private func measureFPS() -> Float { predicted += 1 let elapsed = CACurrentMediaTime() - timeOfFirstFrameInSecond let currentFPSDelivered = Double(predicted) / elapsed if elapsed > 1 { predicted = 0 timeOfFirstFrameInSecond = CACurrentMediaTime() } return Float(currentFPSDelivered) } } Processing neural network outputs
Now let's figure out how to process the outputs of the neural network and get the corresponding bounding boxes. In Xcode, if you select a model file, you can see what they are and see the output layers.
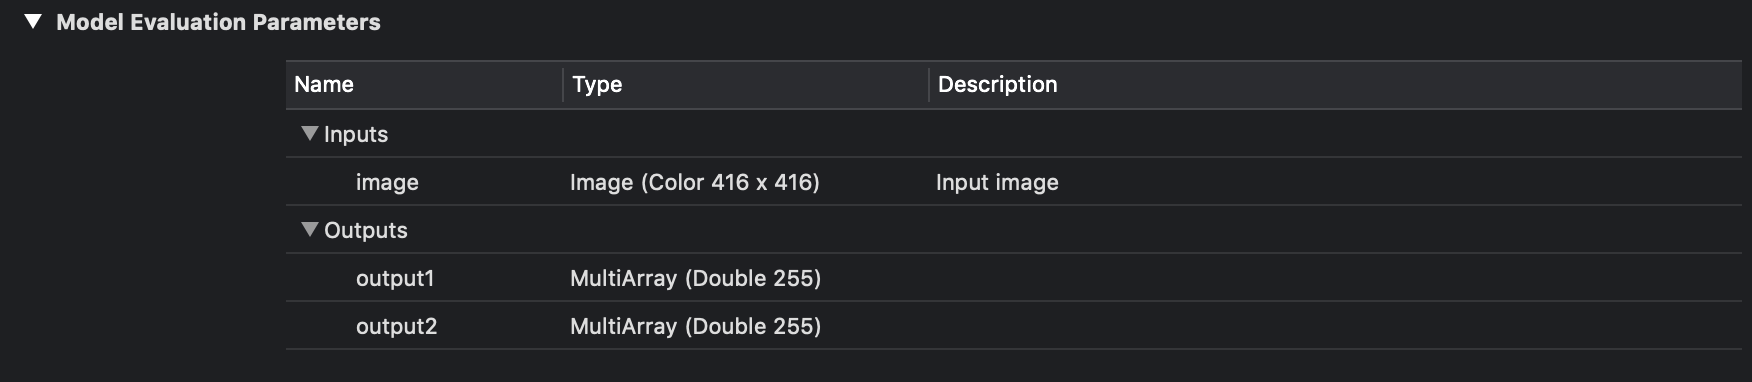
Entry and exit YOLOv3-tiny.
Entrance and exit YOLOv3-416.
As you can see in the image above, we have three for YOLOv3-416 and two for YOLOv3-tiny output layers in each of which bounding boxes for various objects are predicted.
In this case, this is an ordinary array of numbers, let's figure out how to parse it.
The YOLOv3 model uses three layers as the output for splitting the image into a different grid, the cell sizes of these grids have the following values: 8, 16 and 32. Suppose we have an image of 416x416 pixels in size at the input, then the output matrices (grids) will have a size of 52x52 , 26x26 and 13x13 (416/8 = 52, 416/16 = 26 and 416/32 = 13). In the case of YOLOv3-tiny, everything is the same, but instead of three grids, we have two: 16 and 32, that is, matrices of 26x26 and 13x13 dimensions.
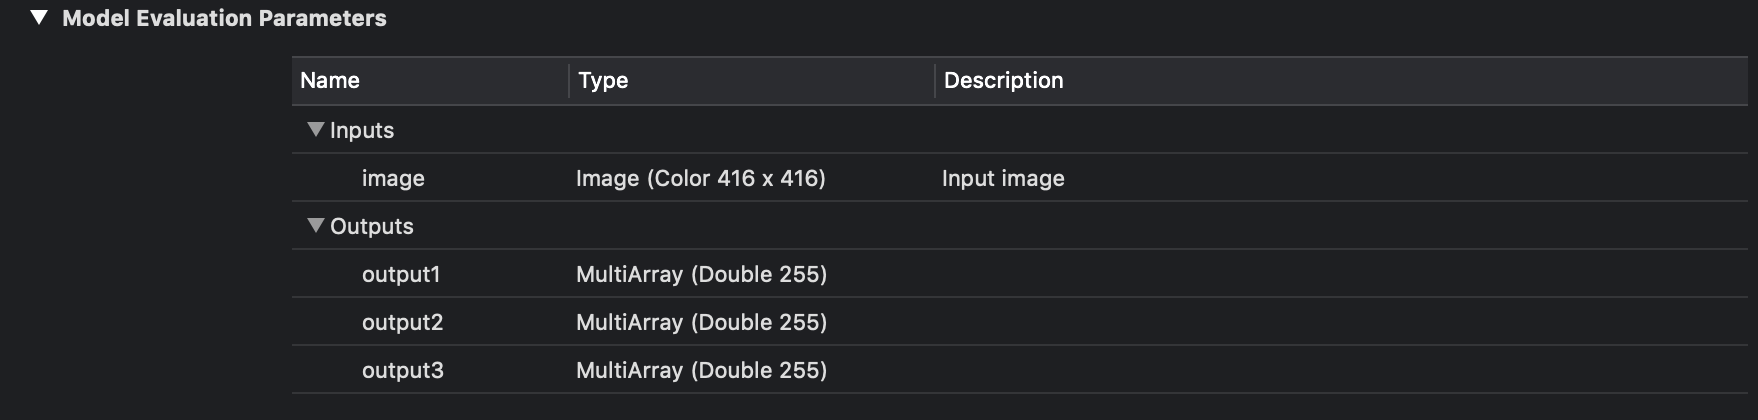
After starting the loaded CoreML model, we get two (or three) objects of the MLMultiArray class on the output. And if you look at the shape property of these objects, we will see the following picture (for YOLOv3-tiny):
As expected, the dimension of the matrices will be 26x26 and 13x13. But what will the number 255 mean? As mentioned earlier, the output layers are 52x52, 26x26 and 13x13 matrices. The fact is that each element of this matrix is not a number, it is a vector. That is, the output layer is a three-dimensional matrix. This vector has dimension B x (5 + C), where B is the number of bounding box in the cell, C is the number of classes. Where does the number 5 come from? The reason is this: for each box-a, the probability that there is an object (object confidence) is predicted is one number, and the remaining four are x, y, width and height for the predicted box-a. The figure below shows a schematic representation of this vector:
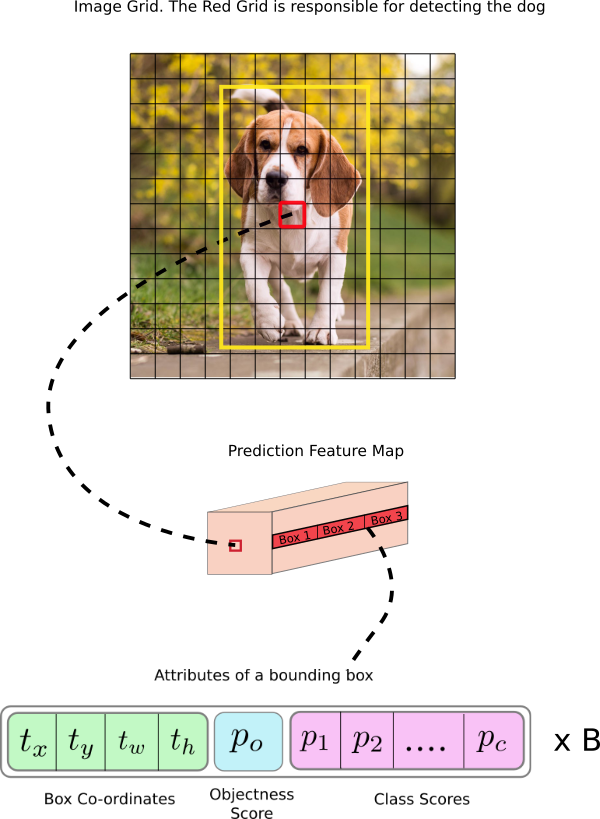
Schematic representation of the output layer (feature map).
For our network trained in 80 classes, 3 bounding box-a is predicted for each cell of the partition grid, for each of them - 80 class probabilities + object confidence + 4 numbers responsible for the position and size of this box-a. Total: 3 x (5 + 80) = 255.
To get these values from the MLMultiArray class, it is better to use a raw pointer to a data array and address arithmetic:
let pointer = UnsafeMutablePointer<Double>(OpaquePointer(out.dataPointer)) // if out.strides.count < 3 { throw YOLOError.strideOutOfBounds } let channelStride = out.strides[out.strides.count-3].intValue let yStride = out.strides[out.strides.count-2].intValue let xStride = out.strides[out.strides.count-1].intValue func offset(ch: Int, x: Int, y: Int) -> Int { // return ch * channelStride + y * yStride + x * xStride } Now you need to process a vector of 255 elements. For each box, you need to get a probability distribution for 80 classes, you can do this using the softmax function.
What is softmax
Function converts a vector dimension K into a vector of the same dimension where each coordinate the resulting vector is represented by a real number in the interval [0,1] and the sum of the coordinates is 1.
where K is the dimension of the vector.
Softmax function on Swift:
private func softmax(_ x: inout [Float]) { let len = vDSP_Length(x.count) var count = Int32(x.count) vvexpf(&x, x, &count) var sum: Float = 0 vDSP_sve(x, 1, &sum, len) vDSP_vsdiv(x, 1, &sum, &x, 1, len) } To get the coordinates and sizes of bounding box-a you need to use the formulas:
Where - predicted x, y coordinates, width and height, respectively, Is the sigmoid function, and - values of anchors for three boxes. These values are determined during training and are set in the Helpers.swift file:
let anchors1: [Float] = [116,90, 156,198, 373,326] // let anchors2: [Float] = [30,61, 62,45, 59,119] // let anchors3: [Float] = [10,13, 16,30, 33,23] // 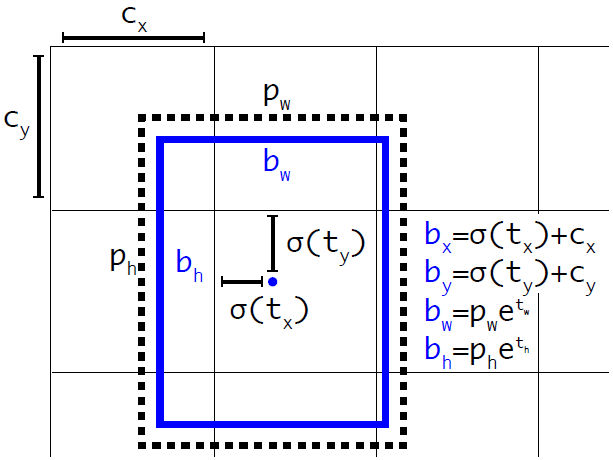
Schematic illustration of the calculation of the position of a bounding box.
Full code for processing output layers.
private func process(output out: MLMultiArray, name: String) throws -> [Prediction] { var predictions = [Prediction]() let grid = out.shape[out.shape.count-1].intValue let gridSize = YOLO.inputSize / Float(grid) let classesCount = labels.count print(out.shape) let pointer = UnsafeMutablePointer<Double>(OpaquePointer(out.dataPointer)) if out.strides.count < 3 { throw YOLOError.strideOutOfBounds } let channelStride = out.strides[out.strides.count-3].intValue let yStride = out.strides[out.strides.count-2].intValue let xStride = out.strides[out.strides.count-1].intValue func offset(ch: Int, x: Int, y: Int) -> Int { return ch * channelStride + y * yStride + x * xStride } for x in 0 ..< grid { for y in 0 ..< grid { for box_i in 0 ..< YOLO.boxesPerCell { let boxOffset = box_i * (classesCount + 5) let bbx = Float(pointer[offset(ch: boxOffset, x: x, y: y)]) let bby = Float(pointer[offset(ch: boxOffset + 1, x: x, y: y)]) let bbw = Float(pointer[offset(ch: boxOffset + 2, x: x, y: y)]) let bbh = Float(pointer[offset(ch: boxOffset + 3, x: x, y: y)]) let confidence = sigmoid(Float(pointer[offset(ch: boxOffset + 4, x: x, y: y)])) if confidence < confidenceThreshold { continue } let x_pos = (sigmoid(bbx) + Float(x)) * gridSize let y_pos = (sigmoid(bby) + Float(y)) * gridSize let width = exp(bbw) * self.anchors[name]![2 * box_i] let height = exp(bbh) * self.anchors[name]![2 * box_i + 1] for c in 0 ..< 80 { classes[c] = Float(pointer[offset(ch: boxOffset + 5 + c, x: x, y: y)]) } softmax(&classes) let (detectedClass, bestClassScore) = argmax(classes) let confidenceInClass = bestClassScore * confidence if confidenceInClass < confidenceThreshold { continue } predictions.append(Prediction(classIndex: detectedClass, score: confidenceInClass, rect: CGRect(x: CGFloat(x_pos - width / 2), y: CGFloat(y_pos - height / 2), width: CGFloat(width), height: CGFloat(height)))) } } } return predictions } Non max suppression
Once you have received the coordinates and sizes of the bounding boxes and the corresponding probabilities for all the objects found in the image, you can begin to draw them on top of the image. But there is one problem! Such a situation may arise when for one object several boxes are predicted with fairly high probabilities. What to do in this case? Here a fairly simple algorithm called Non maximum suppression comes to our aid.
The algorithm is as follows:
- We are looking for a bounding box with the highest probability of belonging to the object.
- We run through all bounding boxes that also belong to this object.
- We delete them if Intersection over Union (IoU) with the first bounding box is greater than the specified threshold.
IoU is calculated using a simple formula:
Calculation of IoU.
static func IOU(a: CGRect, b: CGRect) -> Float { let areaA = a.width * a.height if areaA <= 0 { return 0 } let areaB = b.width * b.height if areaB <= 0 { return 0 } let intersection = a.intersection(b) let intersectionArea = intersection.width * intersection.height return Float(intersectionArea / (areaA + areaB - intersectionArea)) } Non max suppression.
private func nonMaxSuppression(boxes: inout [Prediction], threshold: Float) { var i = 0 while i < boxes.count { var j = i + 1 while j < boxes.count { let iou = YOLO.IOU(a: boxes[i].rect, b: boxes[j].rect) if iou > threshold { if boxes[i].score > boxes[j].score { if boxes[i].classIndex == boxes[j].classIndex { boxes.remove(at: j) } else { j += 1 } } else { if boxes[i].classIndex == boxes[j].classIndex { boxes.remove(at: i) j = i + 1 } else { j += 1 } } } else { j += 1 } } i += 1 } } After that, work directly with the results of neural network prediction can be considered complete. Next, you need to write functions and classes to get the footage from the camera, display the image on the screen and render the predicted bounding boxes. I will not describe all this code in this article, but it can be viewed in the repository.
It is also worth mentioning that I added a little smoothing of the bounding boxes when processing online images, in this case it is the usual averaging of the position and size of the predicted square over the last 30 frames.
Testing the program
Now we test the application.
Let me remind you once again: There are three ViewControllers in the application, one for processing photos or snapshots, one for processing an online video stream, and a third for setting up the network.
Let's start with the third. In it you can choose one of two models YOLOv3-tiny or YOLOv3-416, choose confidence threshold and IoU threshold, you can also enable or disable online anti-aliasing.
Now let's see how the trained neuron works with real images, for this we take a photo from the gallery and pass it through the network. The picture below shows the results of YOLOv3-tiny with different settings.
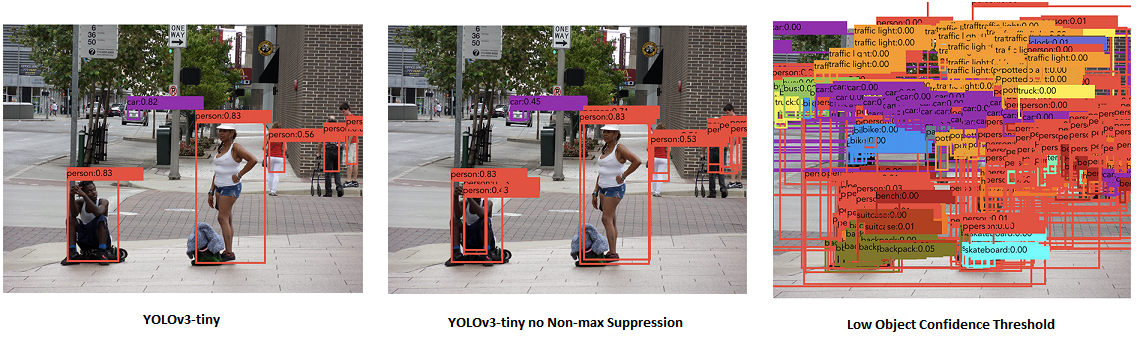
Different operating modes of YOLOv3-tiny. The left picture shows the usual mode of operation. On the middle - the threshold IoU = 1 i.e. as if Non-max suppression is missing. On the right is a low threshold of object confidence, i.e. all possible bounding boxes are displayed.
The following is the result of YOLOv3-416. You can notice that, compared to YOLOv3-tiny, the resulting frames are more correct, as well as smaller objects in the image are recognized, which corresponds to the work of the third output layer.
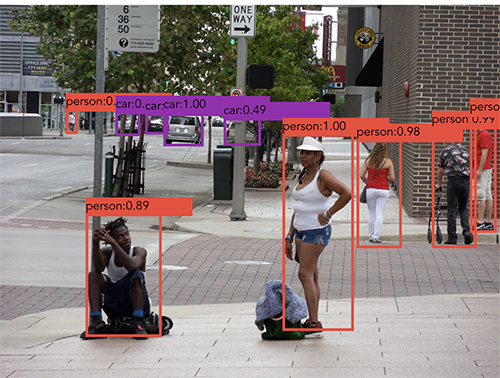
Image processed using YOLOv3-416.
When the online operating mode was turned on, each frame was processed and a prediction was made for it, tests were carried out on the iPhone XS, so the result was quite acceptable for both network options. YOLOv3-tiny produces an average of 30 - 32 fps, YOLOv3-416 - from 23 to 25 fps. The device on which it was tested is quite productive, so on earlier models the results may differ, in which case of course it is preferable to use YOLOv3-tiny. Another important point: yolo-tiny.mlmodel (YOLOv3-tiny) takes about 35 MB, while yolo.mlmodel (YOLOv3 -16) weighs about 250 MB, which is a very significant difference.
Conclusion
As a result, an iOS application was written that with the help of a neural network can recognize objects in the image. We saw how to work with the CoreML library and how to use it to execute various pre-trained models (by the way, you can also train with it). The object recognition problem was solved using the YOLOv3 network. On the iPhone XS, this network (YOLOv3-tiny) is capable of processing images at a frequency of ~ 30 frames per second, which is enough to work in real time.
The full application code can be viewed on GitHub .
Source: https://habr.com/ru/post/460869/
All Articles