Chat bot development (laravel + botman)
Welcome! I, as a junior full stack developer, have encountered many problems when trying to write a bot using laravel and botman. Firstly, I do not know much English, and there are very few articles in Russian on this topic, and those that have not helped me solve my problems. The article will tell and show how to develop a chat bot on a laravel + botman for a telegram. I myself developed bots (commercial) for viber and telegram. As a telegram developer, I like the most.
I will not show how to install laravel and configure the server for it to work. If you have never done this, then it will be easier to install openserver, a composer (package manager for php) is built into it and the local server for laravel is already configured. You just need to register some code in .htaccess. At home, I just work. The article will show one of the ways to develop a chat bot, configure the bot to work in telegrams, and also, at the end, leave links to useful articles about laravel'e and botman'e.
Design / preparation
I suggest developing a bot, like all normal developers, to start with designing, setting a task and explaining how laravel works. Before that, I will say that I am writing code in phpStrom. You can write in any other IDE, but I use it.
In laravel, the MVC (Model View Controller) pattern is implemented. This does not mean that you need to write only under mvc, you can govnodkodit, but it is better to use the advantages that the framework provides. If you are familiar with mvc, but did not use it like me, then developing with laravel is the best way to consolidate knowledge.
What our bot should do:
- Ask the user for his name
- Ask if the user likes the weather or not
- Also write the answer to the database
- Say goodbye and send a picture
A little bit about MVC. When accessing our software through commands (url addresses), we must accept these commands and process, understand what the user needs. For this there are ways, so-called routes. Routes determines which Controller to use, in turn the controller, if required, accesses the database through the model. Model binds to the database and returns the result we need. In the bot view is not needed, because All work goes through the messenger interface. Thus, after receiving the data from the model, the controller sends this data to the view, in our case, this is the blade pattern (it is the laravel that uses it). The data can be given to the usual php page, but it is better to do this through the blade templates. We use the messenger interface, then we will send the data immediately to it.
Development
To create a project, simply enter the following command in the console
composer create-project --prefer-dist botman/studio botelegram
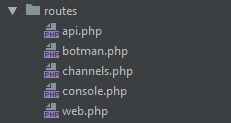
The entry point is the routing "/ start". In botman'e there are several routes implementations. Because we will access routes via a bot in a telegram, then we need "botman.php".
In it we need to write the following line
$botman->hears('/start', function ( $bot ) { $bot->startConversation ( new mainConversation ); } ); The telegram itself suggests starting work with a bot through the "start" command, and if so, then we can facilitate interaction with the bot by setting the initial entry point as "/ start" and go directly to working with it.
Using $ bot-> startConversation (new mainConversation); we indicate which controller will be responsible for the work. Also, let's prescribe the use of our controller, for this we need to add this code in the file with paths:
use App\Conversations\mainConversation; We continue. We need to create a database and the controller itself. I mean you are using openserver. The database can be created via the console or using phpMyAdmin, which is built into the openserver.
Now a few configurations. We need to enter the database data in the laravel configuration file. It lies in the root directory of the project and is called .env

Find the lines associated with the database
DB_CONNECTION=mysql DB_HOST=127.0.0.1 DB_PORT=3306 DB_DATABASE=botelegram DB_USERNAME=root DB_PASSWORD= Here we are only interested in the name of the database, user name and password. If you are using openserver, you can write to the root name, and leave the password empty, the database name depends on you.
Now our application has access to the database. The next thing we need is to create model and migration. Register in the console:
php artisan make:model messengerUser -m
The -m flag will create a migration for the database and link it with our model. Let's immediately set up our migration in order not to return to it anymore.
It’s better not to do this, but in order not to create a bunch of files, we will write all the data into one table.
We need:
- chat id
- Username
- Good weather or not
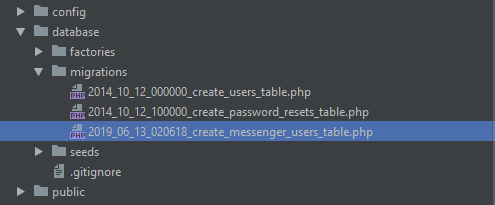
This is enough to demonstrate the basic capabilities of botman. Open the newly created migration, which is located in database / migrations / creation_date_create_messanger_users_table.php
Complete the up method in this migration, it should look like this:
public function up() { Schema::create('messenger_users', function (Blueprint $table) { $table->increments('id'); $table->string("id_chat"); $table->string("name"); $table->string('response'); $table->timestamps(); }); } Now we need to start the migration so that our table exists in the database. In the console you need to register:
php artisan migrate
Tip: if during the development process you need to change the fields in the table, and there are data in the table, and if you do not need them, you can update the tables with the php artisan migrate:refresh command.
Result:
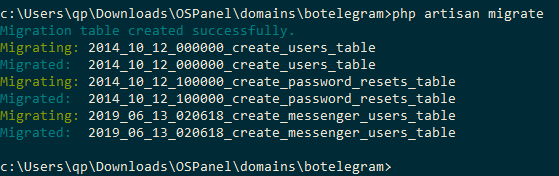
laravel spent 3 migrations, but we are only interested in the 3rd migration because exactly there we will record our data.
It is time to create a controller, connect our model to it and write the logic.
In general, it is better to create all files through the console, but since we are using the botman, and I am already used to it, we will create the controller manually. The botman controller is called conversation, perhaps there are significant differences between them, but I didn’t understand this - there was no need. In the app / Conversations folder, create a file called mainConversation.php.
On the screen you see the minimum complete set of conversation
namespace App\Conversations; use BotMan\BotMan\Messages\Conversations\Conversation; class mainConversation extends conversation { public function run () { } } In your class there must be a public run method, it is the entry point for the controller.
Let's connect our model to the controller:
use app\messengerUser;
We write the initial logic. The run method will launch a private method that asks for the user's name, writes his id and name in id_chat and name of our table.
To begin, we prescribe:
use App\messengerUser as database; use BotMan\BotMan\Messages\Attachments\Image; use BotMan\BotMan\Messages\Conversations\Conversation; use BotMan\BotMan\Messages\Incoming\Answer as BotManAnswer; use BotMan\BotMan\Messages\Outgoing\Actions\Button; use BotMan\BotMan\Messages\Outgoing\OutgoingMessage; use BotMan\BotMan\Messages\Outgoing\Question as BotManQuestion; which allows us to use botman methods
And now we will make changes to our controller:
class mainConversation extends conversation { public $response = []; public function run () { $this->setName(); } private function setName() { $question = BotManQuestion::create("! ?"); $this->ask( $question, function ( BotManAnswer $answer ) { if( $answer->getText () != '' ){ array_push ($this->response, $answer->getText()); $this->askWeather (); } }); } } run () runs the method we need, this is setName (). Already in setName () we ask the name of the user, write the name into the array, then run the following method, which asks the user about the weather.
private function askWeather () { $question = BotManQuestion::create(" ?"); $question->addButtons( [ Button::create('')->value(1), Button::create('')->value(2) ]); $this->ask($question, function (BotManAnswer $answer) { // , array_push ($this->response, $answer); $this->exit(); }); } askWeather () has a similar structure, but here we use buttons to limit the user's choice and make life easier for him. buttons remove a lot of errors that the user can create. Here we also create a question, with the help of addButtons () we bind to the question of the button, and later we call this question and process the answer, and also proceed to the last method.
The exit () method will record all data in the database (you can put it in a separate method), say goodbye to the user, and also send him a picture.
private function exit() { $db = new database(); $db->id_chat = $this->bot->getUser()->getId(); $db->name = $this->response[0]; $db->response = $this->response[1]; $db->save(); $attachment = new Image('https://gykov.ru/projects/botelegram.png'); $message = OutgoingMessage::create(' !') ->withAttachment($attachment); $this->bot->reply($message); return true; } With OutgoingMessage :: create ('See you again!') -> withAttachment ($ attachment) we create a new message and attach a picture to it. In general, all public files that a user should see are placed in the public folder, but in my last bot, a problem occurred and I had to place them in a separate folder on the server (not related to the project). Here I did the same.
The logic of our bot is ready. To test it, it is enough to open the site through openserver, but before that, you need to create a .htiaccess file with the following contents
<IfModule mod_rewrite.c> RewriteEngine On RewriteRule ^(.*)$ public/$1 [L] </IfModule> The file must be in the root of the site. Now all requests will be transferred to the public folder. This is how laravel works. We open the site and test the bot, do not forget that first you need to enter "/ start".
Making sure that everything works and you can attach it to the telegrams. To do this, you need to create a new bot in @botfather, copy the bot key to the end of the .env file. It looks like this:
TELEGRAM_KEY=key_bot
Now we need to put a driver in our project to work together with our logic and bot telegrams. This is done with just one command in the console:
composer require botman/driver-telegram
You will also need to register the bot in laravel.
php artisan botman:telegram:register
We will be asked to enter the address at which our bot will be available.

If you are developing a bot on the server, then it is enough to add https: // url_site / botman after this bot can be tested in the messenger itself. But know that for laravel you need special server settings and you will most likely have to configure it yourself. A link on how to configure the server I will leave at the end of the article.
Perhaps that's all. If you read it to the end, then congratulations, now you can develop chat bots under laravel using botman. If you have questions, I will be happy to answer in the comments, as well as the promised links:
Sources on github
Botman documentation
Server Tuning
Article by which I created my first bot
Ru article on botman
')
Source: https://habr.com/ru/post/456240/
All Articles