Quest with iobroker for games “Quests in reality”
Hello everyone, on Habré there are already several articles about automating games like “quests in reality” ( one , two , three , four , five ...), I would also like to share my experience of participating in such a project. Back in 2015, my friends decided to organize an escape-room quest like “Bank robbery” in our city. They knew that I had long been fond of various automatics, including smart home systems based on open source solutions, so they asked for help in organizing the game. I found this idea interesting and I agreed - I wanted to apply my experience and solutions for something more interesting than blinking a light bulb in my apartment.
I tried to take part in the full cycle of the project - from making changes to the script to the subsequent running of tasks, identifying and correcting bugs, and subsequent refinements. I visited several games in our city (in 2015 they could be counted on the fingers of one hand), not for fun, but rather for gaining experience and reverse engineering solutions, and this was clearly seen by the reaction of the organizers. But after participating in the game in Moscow, I understood the real scale of the “disaster” and I strongly wanted to do my job no worse than the technical side. So, the quest "Rob a bank" in Tver, for details on how it was created and developed over the course of several years, I ask for a cat.
Description of technical solutions
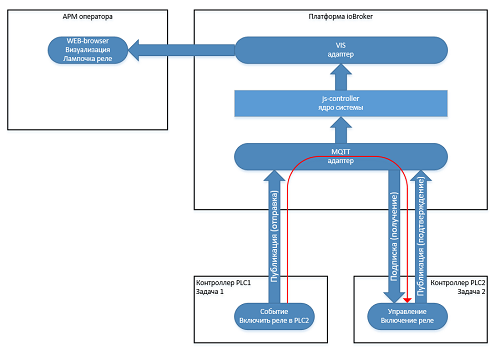
After my colleagues explained to me on fingers what they wanted from me and how everything should work, an architecture took shape in my head in just a few minutes: a central server with the ioBroker platform, local controllers based on Arduino boards and modules, data exchange with server and between controllers using the MQTT protocol. As a result, the architecture was about the following:
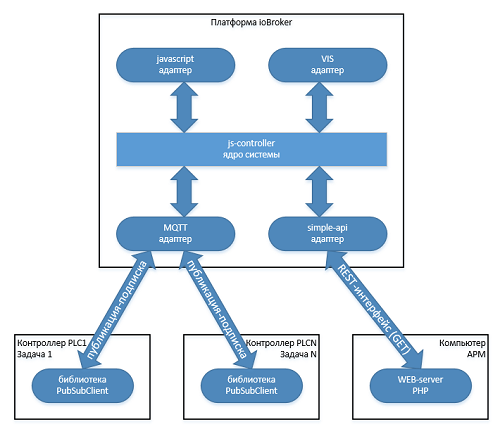
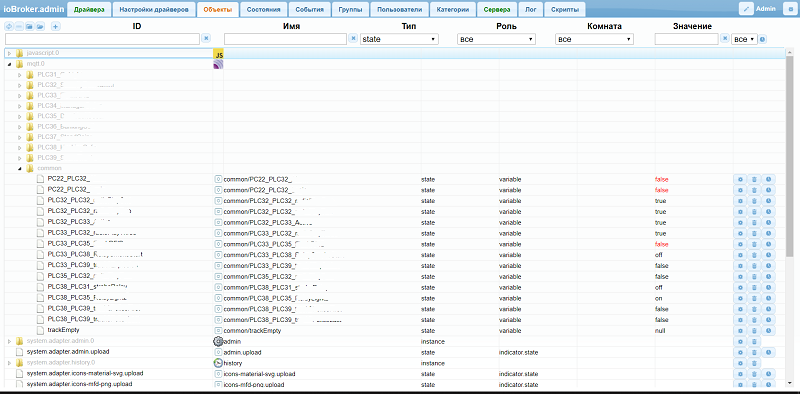
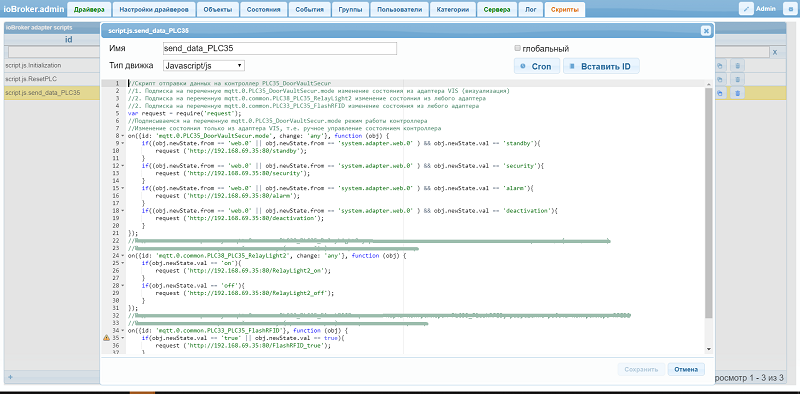
In addition to the interaction of the task controller with the central server, it was necessary to establish interaction between the controllers of different quest tasks. For this, in my opinion, the MQTT protocol with a broker on a central server was ideally suited. Clients - controllers publish their status on the server, subscribe to commands from the server and the status of other controllers. To implement this solution, the MQTT adapter was used - it was also a MQTT broker and allowed to create a hierarchy of topics in the ioBroker object tree to use the data for visualization and control (the screenshot is below the old version of the admin panel).
')
Subsequently, I did not regret that I chose this solution:
- MQTT is a lightweight protocol, the library took up little space and was more than enough even for an Arduino UNO with an ATmega328 chip
- When the controllers were restarted or turned on for the first time, they received the initial conditions for starting the operation via MQTT - very convenient
- This solution turned out to be the most reliable of those tested and quite simple to implement and study for a beginner.
The data streams yield only a few options, the simplest of them is that an event occurs in the task controller No. 1 (the button is pressed), it publishes the button state to a certain topic and its state is displayed by changing the color of the graphic element on the operator’s visual form.

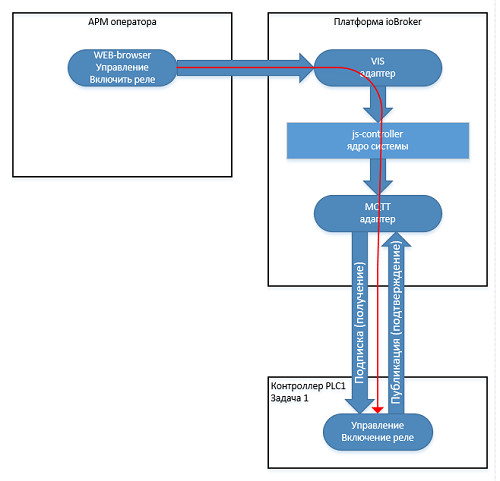
An equally simple and reverse option is to manually turn on the relay through task controller No. 1, the control event is sent via the VIS adapter, which changes the state of the topic of this controller, and with ask = false. The MQTT adapter receives the change of the topic with ask = false, which means that this topic did not come from the controller, respectively, the change is published to the controller, which in turn publishes a confirmation with ask = true in response.
Inter-controller exchange occurs on an event at one of the controllers. For example, the first controller has completed its task and must turn on the relay on the second controller - it publishes its status in the general topic, the broker displays it in the tree and on the visualization page, since the second controller is subscribed to this topic, the broker publishes it in the second controller and the latter, in turn, publishes a confirmation in response.
The project still needed to add a computer interaction task. The interface was written in php, the page was spinning on the WEB-server with autorun in full-screen browser mode. Integration with the main system was carried out through the simple-api driver — through php, certain http requests to ioBroker were simply twitching. The system unit itself was hidden in the bowels of the office desk, the interface was controlled by a mouse, and the quest manager had a wireless keyboard.
The visualization for the operator was developed in the VIS driver for a single resolution - the operator’s monitor, but later the quest staff were able to use mobile tablets with the same interface, it was convenient to reset when preparing for a new game and to diagnose the system. The interface turned out to be spartan, without fashionable dashboards and ryushk-switches, but understandable, simple and fast. There was no need for special logic, layers, graphs and other things in the interface, only icons for displaying the state of the equipment, buttons for controlling and several text fields for displaying the operation mode of the controllers and the system operation log.

At the time of the project development, there were no other visualization options. Later, visualization adapters appeared for both mobile devices (I use material ) and stationary tablets / computers: habpanel , lovelace , tileboard, and others.
The main logic was laid in the code of the controllers, but the general interaction, initialization of parameters for launching, service functions, etc. - is implemented on the main server using the javascript adapter. The code was written in JS using the built-in functions of ioBroker with the subsequent “move” to blockly (this functionality appeared later than the start of work on the project).
In total, several scripts were involved:
- script for initial system initialization (first start)
- script reset all controllers before the next game
- one of the controllers did not immediately “move” to MQTT, so for some time a script was used to exchange with the controller via HTTP - GET requests
- script for maintaining a separate log of the gameplay
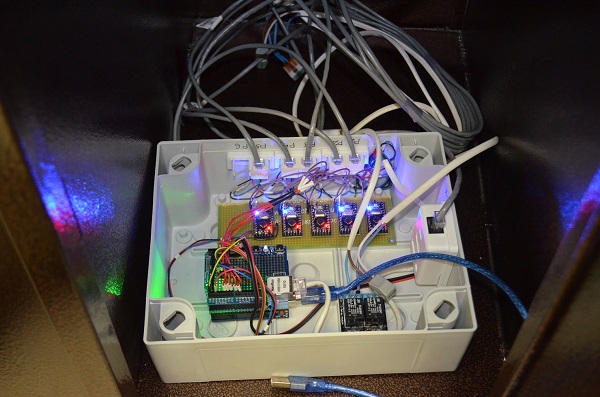
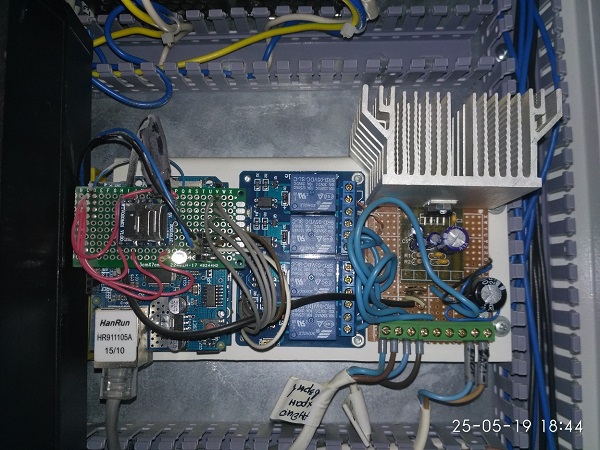
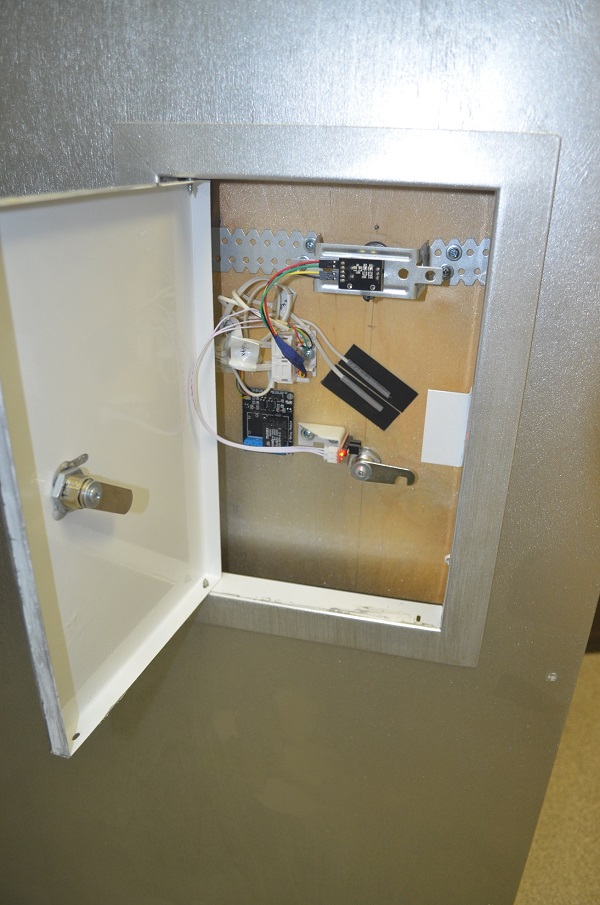
All controllers based on Arduino UNO boards (later several controllers had to be redone for Arduino MEGA boards - there was not enough memory) were equipped with an Ethernet expansion card based on the W5100 chip. Data exchange between the controllers and the server (as written above) using the MQTT protocol. Development of algorithms in the Arduino IDE was conducted using standard libraries. For the iron part, there is nothing supernatural - the maximum use of ready-made modules and expansion cards with a minimum of soldering and without manufacturing custom boards is all on development boards. Load control through modules with ordinary and solid state relays, transistor switches for indication LEDs and low power loads. Mechanically, I tried to use mobile elements as little as possible: microswitches, pushers, E / M locks and more to use ready-made LED photodiode modules (open optocouplers), solid-state relays, conventional magnetic locks, contactless card readers and reed switches. A few photos below:
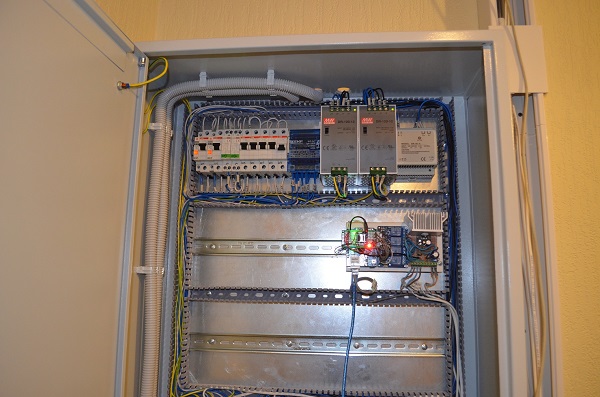
The on-site controllers were powered through home-made POE adapters — unused conductors “broadcast” 12V DC over a twisted pair. Conversion on controller boards through ready-made DC-DC cards up to 5V - from which the Arduino + Ethernet boards themselves were powered and low-power loads with 5V logic: low-power LEDs, relays, etc. More powerful 12V loads: magnetic locks, powerful relays or contactors, various lighting engineering - Separate cable lines were used with the wire SCWP or PVA. Two inputs of 220V AC were brought to the main automation cabinet and a UPS was connected to the contactors via the ATS at the contactors, which in turn was connected via a bypass, for ease of maintenance. To power all the automation and low voltage in the cabinet installed a powerful power supply 2 to 12V and one 5V. From the automation cabinet, cable lines of 220V were allowed to power computers and various peripherals of the quest: from puff to Wi-Viu))
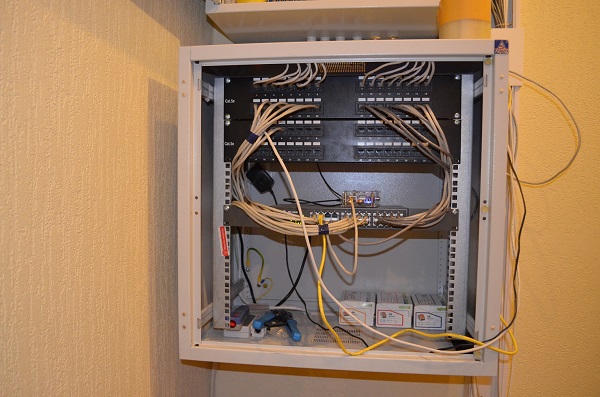
The remaining solutions are fairly standard for similar projects. Video surveillance system on wired IP-cameras, always with IR illumination and built-in microphones. The video stream is used in one of the tasks of the quest and is additionally processed on the quest manager's PC, using open source software (ZoneMinder). The local network of Arduino controllers was separated from the rest of the networks so that the stream from the video cameras would not load the already weak W5100 chips on the ethernet cards.
Hands-free communication with the participants of the game using a conventional Soviet amplifier and built-in ceiling speakers.
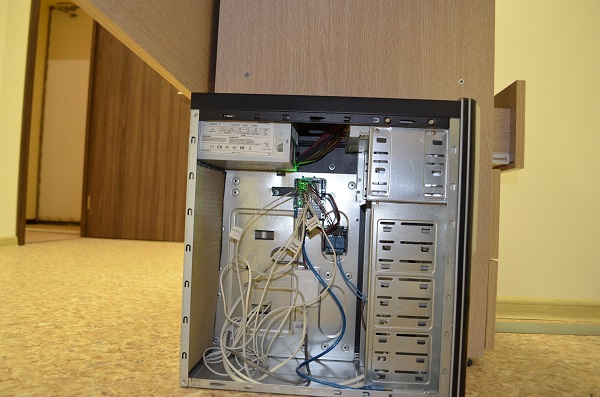
In the end I wanted to describe a little central server. The ioBroker platform is deployed on the BananaPi ARM single-platform device, the capacity of which was sufficient for all tasks. Environment - the Armbian operating system, a couple of bash scripts for working with GPIO and for creating backup copies to the cloud on Yandex.Disk. Several GPIOs are used to indicate the operation status of individual modules and adapters (LEDs) and a button for correct system shutdown. In the photo 19 ”of the cabinet above, it can be seen that the board is in a standard cheap plexiglas case; afterwards it was installed in a 1U case with a normal power supply and other peripherals.
Bugs, pitfalls, difficulties
My colleagues and I thought out the main architecture well in advance (I did the project) and managed to assemble and test many nodes “on the table”, so there were no major changes. Minor "roughness" corrected on the spot. The main problems, the solution of which took quite a long time:
- Lack of memory Arduino on the chip 328, moving to the Arduino MEGA board. Predictably rested on some controllers in the memory of the chip. The main time was spent on remaking expansion cards.
- The glitches in working with the MQTT driver were quite quickly resolved by the author of the ioBroker project.
- The long and difficult process of selecting the browser for normal visualization in the driver VIS. It turned out to be difficult to work with this adapter. As a result, editing was carried out in the Chrome browser, and the runtime operator launched via the Dragon browser of a certain version. As errors were corrected, they completely moved to the latest version of Chrome browser.
- The gradual creation of anti-vandal solutions - abandoned microswitches, mechanical buttons and pushers, film keyboards, etc.
- The electromechanical locks “Sheriff” turned out to be of very poor quality, it was necessary to replace the place with ordinary electromagnetic locks.
- The unstable operation of Arduino controllers when IP cameras work, as a result, the networks were divided and everything worked as it should.
Conclusion
The whole project took about six months from studying and coordinating the script to launching the first test groups - a lot, but it was the first experience and, moreover, I almost kept up with the main construction / renovation works. Plus, there was a lot of work "in the table" - mainly when using separate Arduino modules, because they did not work exactly as I expected. When implementing the project, we tried to adhere to the following principles:
- The project meant maintenance and minor repairs by any engineer who at least once held a soldering iron in his hands, knows what an Arduino is and will be able to “blink” the LED on the board.
- Developed in the Arduino IDE using standard libraries for maximum simplicity.
- Maximum use of ready-made, common modules in the project for ease of maintenance and replacement
- Use standard protocols and data networks
- Minimize the number of mechanical parts for durability and anti-vandalism.
As a result, in the first couple of weeks it turned out to get rid of all the minor flaws and now the system is almost in the original environment for over 4 years.
Source: https://habr.com/ru/post/456230/
All Articles