Renga BIM API
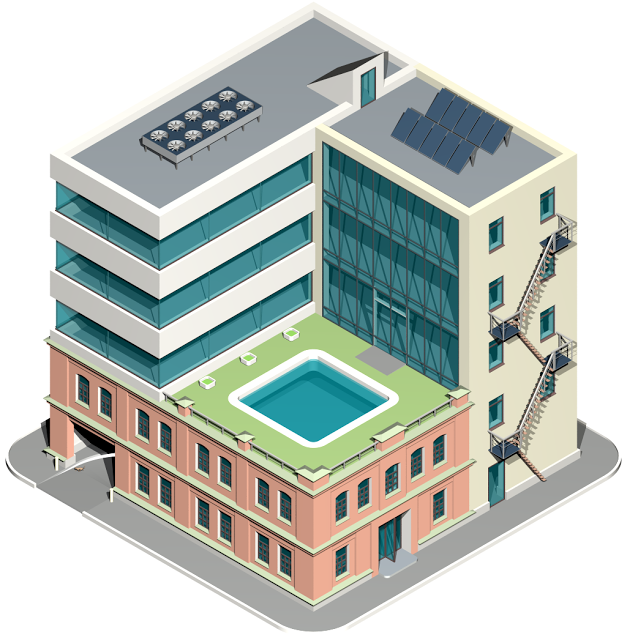
Hello! In this article, I will discuss the Renga BIM system API. You can read about the system itself here , here you can also request a version for non-commercial use. In short, Renga is a three-dimensional computer-aided design system in architecture and construction. In it, the designer / architect / designer works with the information model of the building, gets associative drawings, specifications, in general, creates a project.
First, as usual, some water.
')
The development of extensions for CAD systems is quite common, since in any design there are various areas, sections and standards for the design documentation that require different highly specialized functionality. In addition, there are tasks of integration with the programs of calculation, visualization, workflow and many others. Output - the creation of plug-ins that extend the functionality of the system.
Let us analyze the main steps to create an extension. You will need VisualStudio and confidence that you know C ++ (now the Renga C ++ API, but in the future we have a transition to COM, we will support .Net extensions).
So, in steps:
If everything is done correctly, then when Renga is launched in the settings dialog in the “Extensions” section, our extension will appear, which does nothing.
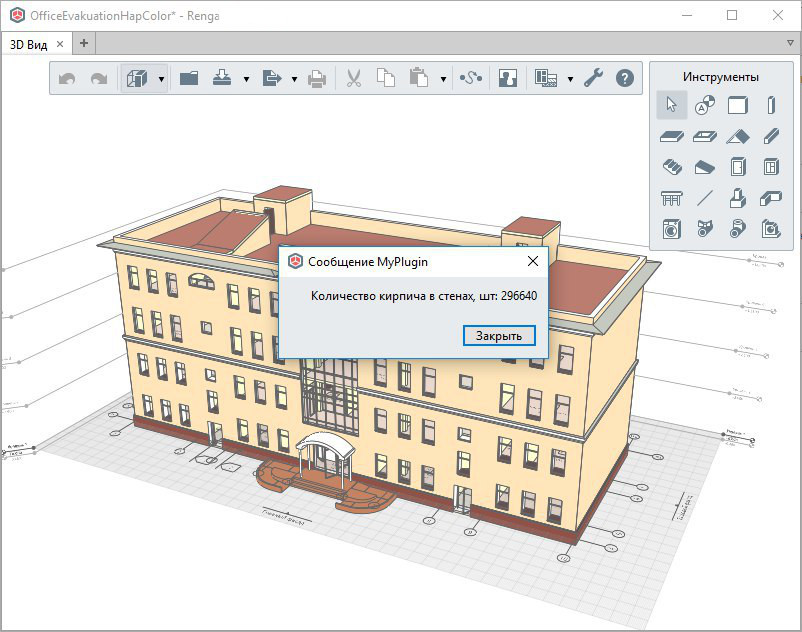
Let's make him calculate the amount of brick needed to build walls in a building. The consumption rate we take this - 400 pieces per cubic meter, taking into account the seams.
1. First, create a button in the main application bar. Let's do it right in the initialize method.
2. Next, we will implement the button click handler, create a class CountBricksHandler, a successor from the interface rengaapi :: IInvokable. Create it in the MyPlugin class and set it as a button handler.
3. Declare the m_countBricksHandler field in the private section of the MyPlugin class, set as the handler for countBricksAction.
4. Now it remains to realize the calculation of the number of bricks in the walls. Let's create a simple class - a calculator that will count the volume of the “Brick” material used in the walls, and give the quantity depending on the transferred consumption rate. Call the calculation in the Invoke method of the button handler.
The full extension code is here.
In principle, everything to get started with the API Renga is in the SDK (http://rengabim.com/sdk/), there are also examples of all the main features.
Also, as examples, we have developed an extension for viewing the model in the form of a hierarchical structure (tree) and an extension for filtering model objects according to various criteria. These extensions are available both in assembled form and in the form of source code; you can use it as an example or modify it to your taste. In addition, third-party developers have created extensions for 3D rendering and for exporting to 3D PDF. These and new extensions are looking for here .
Now API Renga allows:
Today this is all, we will be happy to answer your questions. Write under Renga, generate ideas, develop with us!
 Evgeny Tyan, Lead Programmer, Renga Software.
Why do you need a CAD-system API
First, as usual, some water.
')
The development of extensions for CAD systems is quite common, since in any design there are various areas, sections and standards for the design documentation that require different highly specialized functionality. In addition, there are tasks of integration with the programs of calculation, visualization, workflow and many others. Output - the creation of plug-ins that extend the functionality of the system.
Simple extension example
Let us analyze the main steps to create an extension. You will need VisualStudio and confidence that you know C ++ (now the Renga C ++ API, but in the future we have a transition to COM, we will support .Net extensions).
So, in steps:
- Download the SDK from here , unpack it in a convenient place.
- Create a simple dll with default settings, let's call MyPlugin.
- In additional include folders and additional lib folders, add the path to RengaSDK, add RengaApi.lib and RengaBase.lib to the included libraries.
- Now we write the minimal implementation. In essence, the C ++ extension to Renga is a regular dll library with an export function that returns a pointer to the IPlugin interface. Therefore, all we need to do:
a) Create a class inherited from this interface. In the class, we implement both methods of the interface start and stop, these methods will be called after loading and before unloading, respectively. We'll leave the implementation empty for now.
b) Implement the export function returning a pointer to the IPlugin interface. For this, you can use the EXPORT_PLUGIN macro. - Create an extension description file called MyPlugin.rnedesc with the following text:
<RengaPlugin> <Name>MyPlugin</Name> <Version>1.0</Version> <Vendor>Vendor name</Vendor> <Copyright>Copyright text</Copyright> <RequiredAPIVersion>1.2</RequiredAPIVersion> <PluginFilename>MyPlugin.dll</PluginFilename> </RengaPlugin> - In order for the extension to appear in Renga in the Renga installation folder in the Plugins folder, create the folder MyPlugin, into which we put our dll and the description file.
If everything is done correctly, then when Renga is launched in the settings dialog in the “Extensions” section, our extension will appear, which does nothing.
Let's make him calculate the amount of brick needed to build walls in a building. The consumption rate we take this - 400 pieces per cubic meter, taking into account the seams.
1. First, create a button in the main application bar. Let's do it right in the initialize method.
bool MyPlugin::initialize(const wchar_t * pluginPath) { auto countBricksAction = rengaapi::UIControls::createAction(); countBricksAction.setToolTip(rengabase::String(L" ")); auto primaryPanelExtension = rengaapi::UIControls::createToolPanelExtension(); primaryPanelExtension.addToolButton(countBricksAction); return true; } 2. Next, we will implement the button click handler, create a class CountBricksHandler, a successor from the interface rengaapi :: IInvokable. Create it in the MyPlugin class and set it as a button handler.
//CountBricksHandler.h #pragma once #include <RengaAPI/IInvokable.h> class CountBricksHandler : public rengaapi::IInvokable { public: void invoke(); }; //CountBricksHandler.cpp #include "stdafx.h" #include "CountBricksHandler.h" void CountBricksHandler::invoke() {} 3. Declare the m_countBricksHandler field in the private section of the MyPlugin class, set as the handler for countBricksAction.
auto countBricksAction = rengaapi::UIControls::createAction(); countBricksAction.setToolTip(rengabase::String(L"Count bricks in walls")); countBricksAction.setTriggerHandler(&m_countBricksHandler); 4. Now it remains to realize the calculation of the number of bricks in the walls. Let's create a simple class - a calculator that will count the volume of the “Brick” material used in the walls, and give the quantity depending on the transferred consumption rate. Call the calculation in the Invoke method of the button handler.
//BricksCounter.h #pragma once namespace rengaapi { class Wall; } class BricksCounter { public: BricksCounter(int consumptionRatePerM3); int calculateBricks(); private: double calculateBricksVolume(); double calculateBricksVolumeInSingleWall(rengaapi::Wall* pWall); int calculateBricksCountInVolume(double bricksVolume); private: int m_consumptionRatePerM3; }; //BricksCounter.cpp #include "stdafx.h" #include "BricksCounter.h" #include <RengaAPI/Project.h> #include <RengaAPI/ModelObjectTypes.h> #include <RengaAPI/Wall.h> #include <RengaAPI/Materials.h> const wchar_t* c_briksMaterialName = L""; BricksCounter::BricksCounter(int consumptionRatePerM3) : m_consumptionRatePerM3(consumptionRatePerM3) { } int BricksCounter::calculateBricks() { double bricksVolume = calculateBricksVolume(); int bricksNumber = calculateBricksInVolume(bricksVolume); return bricksNumber; } double BricksCounter::calculateBricksVolume() { double result = 0.0; assert(rengaapi::Project::hasProject()); auto allObjects = rengaapi::Project::model().objects(); for (auto objectIt = allObjects.begin(); objectIt != allObjects.end(); ++objectIt) { if ((*objectIt)->type() == rengaapi::ModelObjectTypes::WallType) { rengaapi::Wall* pWall = dynamic_cast<rengaapi::Wall*>(*objectIt); assert(pWall != nullptr); result += calculateBricksVolumeInSingleWall(pWall); } } return result; } double BricksCounter::calculateBricksVolumeInSingleWall(rengaapi::Wall * pWall) { auto materialId = pWall->material(); rengaapi::LayeredMaterial wallMaterial; rengaapi::Materials::layeredMaterial(materialId, wallMaterial); auto materialLayers = wallMaterial.layers(); auto layerQuantityCollection = pWall->quantities().materialQuantities(); double bricksVolume = 0.0; for (size_t i = 0; i < materialLayers.size(); ++i) { if (materialLayers.get(i).material().name_() == rengabase::String(c_briksMaterialName)) { auto oVolumeMeasure = layerQuantityCollection.get(i).netVolume(); if (oVolumeMeasure.hasValue()) { bricksVolume += oVolumeMeasure.getValue()->inMeters3(); } } } return bricksVolume; } int BricksCounter::calculateBricksInVolume(double bricksVolume) { return static_cast<int>(bricksVolume * m_consumptionRatePerM3); } // CountBricksHandler.cpp #include "stdafx.h" #include "CountBricksHandler.h" #include "BricksCounter.h" #include <RengaAPI/Project.h> #include <RengaAPI/Message.h> const int c_bricksConsumptionRatePerM3 = 400; void CountBricksHandler::invoke() { if (!rengaapi::Project::hasProject()) { rengaapi::Message::showMessageBox(rengaapi::Message::Info, rengabase::String(L" MyPlugin"), rengabase::String(L" . .")); } else { BricksCounter counter(c_bricksConsumptionRatePerM3); int bricksCount = counter.calculateBricks(); std::wstring message = std::wstring(L" , : ") + std::to_wstring(bricksCount); rengaapi::Message::showMessageBox(rengaapi::Message::Info, rengabase::String(L" MyPlugin"), rengabase::String(message.data())); } } The full extension code is here.
More about Renga extensions
In principle, everything to get started with the API Renga is in the SDK (http://rengabim.com/sdk/), there are also examples of all the main features.
Also, as examples, we have developed an extension for viewing the model in the form of a hierarchical structure (tree) and an extension for filtering model objects according to various criteria. These extensions are available both in assembled form and in the form of source code; you can use it as an example or modify it to your taste. In addition, third-party developers have created extensions for 3D rendering and for exporting to 3D PDF. These and new extensions are looking for here .
What API allows
Now API Renga allows:
- Export a 3D representation of objects in the form of a polygonal mesh (mesh representation), divided into groups, so that, for example, you can distinguish the facade of the wall from the end.
- Add controls to the Renga user interface (well, and respond to them, of course).
- Get the parameters and design characteristics of three-dimensional model objects (volumes, areas, dimensions, etc.).
- Create custom properties, assign them to model objects, change the value.
- Manage visibility and highlight model objects.
Today this is all, we will be happy to answer your questions. Write under Renga, generate ideas, develop with us!
Evgeny Tyan, Lead Programmer, Renga Software.Source: https://habr.com/ru/post/343010/
All Articles