Ray casting in the web world today
The publication contains part of the translation of the article by Jacob Seidelin (Jacob Seidelin) on the creation of three-dimensional games using the method of "throwing rays" - Ray casting , JavaScript and HTML, as well as several examples of the implementation of this method. The purpose of the publication is to demonstrate the capabilities of Ray casting and acquaint the reader with the project of the aforementioned author.
With the acceleration of browser performance, it has become easier to develop JavaScript games more recently than tic-tac-toe. Now we don’t really need Flash and we can do quite complex and attractive games using the canvas element.
Before taking up this topic, I tested the game Wolfenstien. First there was an attempt to create the most common 3D engine using canvas, then I switched to re-casting using DOM .
')
In this article I will discuss in detail how you can create a full-fledged pseudo-three-dimensional engine using reykasting. I add the word “pseudo”, because in reality we will simply create a 2D map similar to the Maze from the Maze game ( one of the first 3D games in the world. Translator’s note ). This map will describe how the world will be drawn to the player. The game will only rotate on one axis, so as not to complicate the project. Vertical lines will be rendered exactly as vertical lines. The player will not be able to crouch or jump. Although it can be implemented quite simply. I will not go deep into the theoretical part, especially since there is already an excellent guide on the Internet covering the entire cycle of creating three-dimensional graphics using the technique of throwing rays. The author of this manual is F. Permadi.
Using materials from this article assumes a strong knowledge of JavaScript, familiarity with the element of HTML5 canvas, as well as school knowledge of trigonometry. Some parts of the project are fully disassembled in the article. Just remember, my explanations of individual sections of the code can not cover all aspects. To get a complete picture of the project and to be able to read the comments for each section of the code, I advise you to download the archive on your computer ...

Try out the final result of the author. .
For those who are not familiar with reykasting: a feature of this method is that the effect of three-dimensional space is not created by special tools built into the browser, as is the case with the functions of CSS 3d-transformations, but by means of the programming language and HTML5 features. The entire mathematical apparatus for representing two-dimensional objects of the markup language in the form of pseudo-three-dimensional objects is implemented directly in the code. The simplest engine usually contains an implementation of the three basic methods necessary for building 3D: rotation (rotation), translation (translation), and intersection.
Practically any basic implementation can be divided into three blocks: 1) camera control - rotation, movement. 2) throwing a beam - determining the distance from the camera to each pixel (or a larger sector, depends on the implementation) that falls in the field of view of the camera. 3) drawing the space in the field of view of the camera.
In fact, reykasting allows you to create a full-fledged 3D engine from scratch, without using ready-made libraries. In the simple case, an implementation can take 200-300 lines of code, such as in the engine from this article: "The first-person game engine with 256 lines of code." By the way, this article is also a brief guide to reykasting.
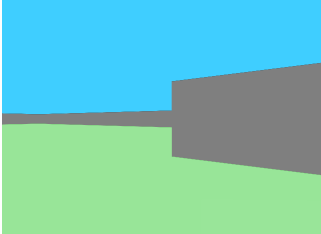
If you are interested in the method of reykasting and there was a desire to understand it with a simple example, then it seems to me that you should start your acquaintance with the simplest project. Of all the implementations in JavaScript, and I managed to find about ten, the simplest one — without textures, additional objects, and even without 2D map output — you can look at the githab by this link. Below is a screenshot of the project:
About more serious project in which Ray sasting was applied, it is possible to get acquainted in this article on Habré.
An article that led me to search for material about this method.
Creating pseudo three-dimensional games using HTML, canvas and Ray casting
Introduction
With the acceleration of browser performance, it has become easier to develop JavaScript games more recently than tic-tac-toe. Now we don’t really need Flash and we can do quite complex and attractive games using the canvas element.
Game or game engine?
Before taking up this topic, I tested the game Wolfenstien. First there was an attempt to create the most common 3D engine using canvas, then I switched to re-casting using DOM .
')
In this article I will discuss in detail how you can create a full-fledged pseudo-three-dimensional engine using reykasting. I add the word “pseudo”, because in reality we will simply create a 2D map similar to the Maze from the Maze game ( one of the first 3D games in the world. Translator’s note ). This map will describe how the world will be drawn to the player. The game will only rotate on one axis, so as not to complicate the project. Vertical lines will be rendered exactly as vertical lines. The player will not be able to crouch or jump. Although it can be implemented quite simply. I will not go deep into the theoretical part, especially since there is already an excellent guide on the Internet covering the entire cycle of creating three-dimensional graphics using the technique of throwing rays. The author of this manual is F. Permadi.
Using materials from this article assumes a strong knowledge of JavaScript, familiarity with the element of HTML5 canvas, as well as school knowledge of trigonometry. Some parts of the project are fully disassembled in the article. Just remember, my explanations of individual sections of the code can not cover all aspects. To get a complete picture of the project and to be able to read the comments for each section of the code, I advise you to download the archive on your computer ...
Try out the final result of the author. .
From translator
For those who are not familiar with reykasting: a feature of this method is that the effect of three-dimensional space is not created by special tools built into the browser, as is the case with the functions of CSS 3d-transformations, but by means of the programming language and HTML5 features. The entire mathematical apparatus for representing two-dimensional objects of the markup language in the form of pseudo-three-dimensional objects is implemented directly in the code. The simplest engine usually contains an implementation of the three basic methods necessary for building 3D: rotation (rotation), translation (translation), and intersection.
Practically any basic implementation can be divided into three blocks: 1) camera control - rotation, movement. 2) throwing a beam - determining the distance from the camera to each pixel (or a larger sector, depends on the implementation) that falls in the field of view of the camera. 3) drawing the space in the field of view of the camera.
In fact, reykasting allows you to create a full-fledged 3D engine from scratch, without using ready-made libraries. In the simple case, an implementation can take 200-300 lines of code, such as in the engine from this article: "The first-person game engine with 256 lines of code." By the way, this article is also a brief guide to reykasting.
If you are interested in the method of reykasting and there was a desire to understand it with a simple example, then it seems to me that you should start your acquaintance with the simplest project. Of all the implementations in JavaScript, and I managed to find about ten, the simplest one — without textures, additional objects, and even without 2D map output — you can look at the githab by this link. Below is a screenshot of the project:
Instead of a conclusion. About the advantages of Ray casting in relation to the web
- The essential feature of the method is that the map can be of any size, and this will not affect the performance in any way, since in the raikest method the speed of image rendering depends on the number of rays thrown, respectively, the smaller the window area with the output of the constructed world, the faster The engine will work. In other words, the function of throwing rays always processes only one rigidly specified portion of space (examines a certain number of points of the array relative to the position of the player).
- The possibility of creating
frame caching based on an attempt to predict where a player can move relative to his current location. - Building any space does not require 3D skills, since it can be done by simply editing the array with the map. It should be noted that the array of space in the code with neat formatting itself looks like the map above.
Those. if you need to show the floor plan in perspective, there is no need to download any massive 3D editor, just open the text and scribble
plan manually or scan / recognize a plan-scheme in a certain format. - Well-organized transitions between maps allow you to create the effect of large space, so in fact there are no restrictions either on the size of the map or on the number of maps for one project.
PS
About more serious project in which Ray sasting was applied, it is possible to get acquainted in this article on Habré.
An article that led me to search for material about this method.
Source: https://habr.com/ru/post/343016/
All Articles