Procedurally generated world maps on Unity C #, part 1

In this series of articles, we will learn how to create procedurally generated world maps using Unity and C #. The cycle will consist of four articles.
Content
Part 1 (this article):
')
Introduction
Noise generation
Beginning of work
Generate elevation map
Part 2 :
Map folding on one axis
Map folding on both axes
Neighbor Search
Bit masks
Fill
Part 3 :
Heat map generation
Humidity Map Generation
River generation
Part 4 :
Biome generation
Spherical map generation
Introduction
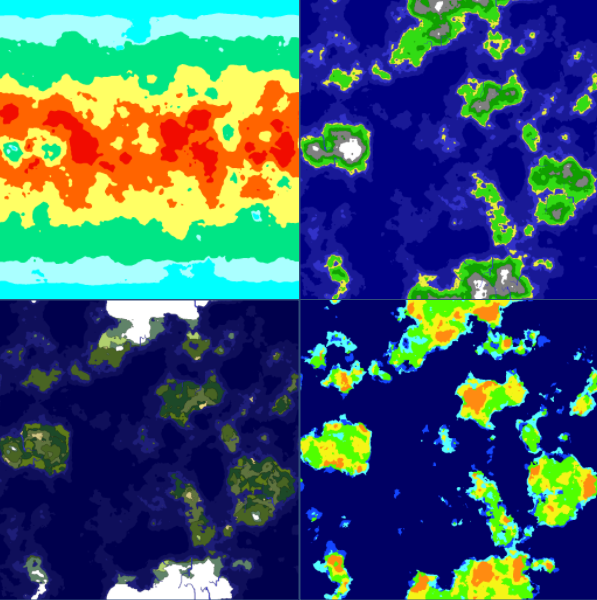
In these tutorial articles we will create procedurally generated maps, similar to these:

Here are the following maps:
- heat map (upper left)
- elevation map (upper right)
- humidity map (lower right)
- biome map (bottom left)
In the next articles of this series we will learn how to manage the data of these cards. We will also consider the method of projecting maps on spherical surfaces.
Noise generation
There are many different noise generators on the Internet, most of them are open source, so there’s no need to reinvent the wheel. I borrowed a ported version of the Accidental Noise library.
Porting to C # done by Nikolaj Mariager .
For the correct work in Unity in the ported version minor changes are made.
You can use any noise generator you like. All the techniques listed in the article can be applied to other sources of noise.
Beginning of work
First we need to create a container for storing the data that we will generate.
Let's start by creating a MapData class. The variables Min and Max are needed to track the lower and upper limits of the generated values.
public class MapData { public float[,] Data; public float Min { get; set; } public float Max { get; set; } public MapData(int width, int height) { Data = new float[width, height]; Min = float.MaxValue; Max = float.MinValue; } } We will also create a Tile class, which will later be used to create Unity game objects from the generated data.
public class Tile { public float HeightValue { get; set; } public int X, Y; public Tile() { } } To see what happens, we need a graphical representation of the data. To do this, we will create a new class TextureGenerator.
For now, this class will create a black and white display of our data.
using UnityEngine; public static class TextureGenerator { public static Texture2D GetTexture(int width, int height, Tile[,] tiles) { var texture = new Texture2D(width, height); var pixels = new Color[width * height]; for (var x = 0; x < width; x++) { for (var y = 0; y < height; y++) { float value = tiles[x, y].HeightValue; //Set color range, 0 = black, 1 = white pixels[x + y * width] = Color.Lerp (Color.black, Color.white, value); } } texture.SetPixels(pixels); texture.wrapMode = TextureWrapMode.Clamp; texture.Apply(); return texture; } } Soon we will expand this class.
Generate elevation map
I decided that the maps will be of a fixed size, so I need to specify the width (Width) and height (Height) of the map. We also need customizable parameters for the noise generator.
We will make this data visible in the Unity Inspector so that the map setup is much easier.
The Generator class initializes the Noise module, generates height map data, creates an array of tiles, and then generates a texture representation of this data.
Here is the code with comments:
using UnityEngine; using AccidentalNoise; public class Generator : MonoBehaviour { // Unity Inspector [SerializeField] int Width = 256; [SerializeField] int Height = 256; [SerializeField] int TerrainOctaves = 6; [SerializeField] double TerrainFrequency = 1.25; // ImplicitFractal HeightMap; // MapData HeightData; // Tile[,] Tiles; // ( unity) MeshRenderer HeightMapRenderer; void Start() { // , HeightMapRenderer = transform.Find ("HeightTexture").GetComponent (); // Initialize (); // GetData (HeightMap, ref HeightData); // LoadTiles(); // HeightMapRenderer.materials[0].mainTexture = TextureGenerator.GetTexture (Width, Height, Tiles); } private void Initialize() { // HeightMap = new ImplicitFractal (FractalType.MULTI, BasisType.SIMPLEX, InterpolationType.QUINTIC, TerrainOctaves, TerrainFrequency, UnityEngine.Random.Range (0, int.MaxValue)); } // private void GetData(ImplicitModuleBase module, ref MapData mapData) { mapData = new MapData (Width, Height); // x,y - for (var x = 0; x < Width; x++) { for (var y = 0; y < Height; y++) { // float x1 = x / (float)Width; float y1 = y / (float)Height; float value = (float)HeightMap.Get (x1, y1); // if (value > mapData.Max) mapData.Max = value; if (value < mapData.Min) mapData.Min = value; mapData.Data[x,y] = value; } } } // private void LoadTiles() { Tiles = new Tile[Width, Height]; for (var x = 0; x < Width; x++) { for (var y = 0; y < Height; y++) { Tile t = new Tile(); tX = x; tY = y; float value = HeightData.Data[x, y]; // 0 1 value = (value - HeightData.Min) / (HeightData.Max - HeightData.Min); t.HeightValue = value; Tiles[x,y] = t; } } } } After running the code, we get the following texture:

It looks so far not very interesting, but a start has been made. We have a data array containing values from 0 to 1, with a very curious pattern.
Now we need to give importance to our data. For example, let anything less than 0.4 be considered water. We can change the following in our TextureGenerator by setting all values below 0.4 to blue, and above to white:
if (value < 0.4f) pixels[x + y * width] = Color.blue; else pixels[x + y * width] = Color.white; After that we got the following final image:

We are already doing something. There are figures that correspond to this simple rule. Let's take the next step.
Add other custom variables to our Generator class. They will indicate the parameters with which the heights are associated.
float DeepWater = 0.2f; float ShallowWater = 0.4f; float Sand = 0.5f; float Grass = 0.7f; float Forest = 0.8f; float Rock = 0.9f; float Snow = 1; Also add new colors to the texture generator:
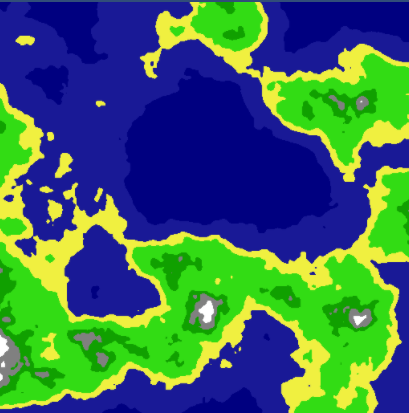
private static Color DeepColor = new Color(0, 0, 0.5f, 1); private static Color ShallowColor = new Color(25/255f, 25/255f, 150/255f, 1); private static Color SandColor = new Color(240 / 255f, 240 / 255f, 64 / 255f, 1); private static Color GrassColor = new Color(50 / 255f, 220 / 255f, 20 / 255f, 1); private static Color ForestColor = new Color(16 / 255f, 160 / 255f, 0, 1); private static Color RockColor = new Color(0.5f, 0.5f, 0.5f, 1); private static Color SnowColor = new Color(1, 1, 1, 1); By adding new rules in this way, we get the following results:

We got an interesting map of the peaks with the texture representing it.
You can download the source code for the first part from here: World Generator Part1 .
The second part .
Source: https://habr.com/ru/post/276251/
All Articles