Zombie hunt from the cloud
 All the new players are coming to the rapidly developing PaaS market. Not so long ago, IBM joined the battle, introducing the Bluemix service to the general programmer public. Just a cloud with the ability to perform Push-to-Deploy is no longer surprising anyone, and therefore the competition has moved from the “look, we also have a cloud!” To the side “we have a user-friendly interface, out-of-the-box ready services - and this is all for free until your project has grown. ” Under the cut, I'll show you how to make a service using this modern PAAS system and just a few lines of code that will closely monitor the site of some online games and send push notifications as soon as some interesting news appears.
Why do we need zombies
')
Choosing the “Hello world!” Application as an example is not very interesting. It is much more interesting to make a minimally working prototype of something useful. For example, an application to track changes on the site. On the Internet there are many solutions for this task, starting with VisualPing and ending with the extension for Chrome. Most of them want money for quick notifications, they sin with false positives - in general, they all show that this is a good, niche. My beloved zombie game will play the role of a guinea pig - it’s necessary to somehow attract your attention :)
Create a cloud
 Our solution will consist of four parts:
- Bluemix cloud with push notifications at the ready.
- Google Cloud Messaging to send notifications.
- Android application receiving push notifications.
- The Node.js application in the cloud, closely monitoring the site and immediately sending a notification when news arrives.
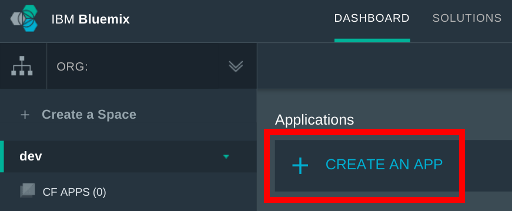
We register in Bluemix , go to the control panel and create the Node.js application. To create an application, just go to the “dashboard”, specify the name for the working environment (“space”) and select “create an app”:
In the next window you need to select the type of application, for our example it will be “mobile”:

By default, everything that we create will live within the framework of free tier, that is, absolutely free. IBM will want the money if we need a lot of memory for applications or we will send more than a million notifications per month, etc.
Important point : by default, the application is allocated 128 megabytes of memory, and up to 512 MB can be used for free. Therefore, immediately after creation, increase the memory available to the application so that, in the pursuit of zombies, the garbage collector has a real time space when parsing HTML.
 Bluemix offers a convenient abstraction — tags that allow an application to subscribe and receive push notifications only for relevant events. In our example, you need to go to the “Notifications” section and add a tag called mytag.
Add some Google Cloud Messaging
To make the example compact, I'll show you how to send notifications only on Android, although Bluemix also provides tools for working with iOS. We go to the Google Developers Console, create an application, activate push notifications for it and copy the access parameters to Bluemix:

Create a mobile application
Over the past few years, mobile application development tools have leaped forward. I still remember the days when the thoughtful setting of Eclipse was the entrance exam to the world of Android development. Now everything is different: download the latest version of Android Studio, select Create New Project, then Blank Activity - and the application is ready. You can run in the emulator, you can install on the phone.
Competition is a good thing. In the struggle for developers, modern cloud solutions offer not only the cloud infrastructure itself, but also the whole ecosystem built around it. Including useful libraries, for example, to work with push-notifications. To add the appropriate Bluemix library to the project, add the necessary dependencies to Gradle:
little gradle
compile 'com.google.android.gms:play-services:+' compile 'com.ibm.mobile.services:ibmbluemix:1.+' compile 'com.ibm.mobile.services:ibmpush:1.+' The Android application consists of components that exchange messages with each other. In order for the Bluemix code to perform the required tasks, you need to register a couple of components in AndroidManifest.xml. In the same place, we indicate the necessary application rights:
some xml
<?xml version="1.0" encoding="utf-8"?> <manifest> ... <uses-permission android:name="android.permission.INTERNET" /> <uses-permission android:name="android.permission.ACCESS_WIFI_STATE" /> <uses-permission android:name="android.permission.WAKE_LOCK" /> <uses-permission android:name="com.google.android.c2dm.permission.RECEIVE" /> ... <application> ... <service android:name="com.ibm.mobile.services.push.IBMPushIntentService"> </service> <receiver android:name="com.ibm.mobile.services.push.IBMPushBroadcastReceiver" android:permission="com.google.android.c2dm.permission.SEND" > <intent-filter> <action android:name="com.google.android.c2dm.intent.RECEIVE" /> <category android:name="com.ibm.mbaas.push.android.sample" /> </intent-filter> <intent-filter> <action android:name="android.intent.action.BOOT_COMPLETED" /> <category android:name="com.ibm.mbaas.push.android.sample" /> </intent-filter> </receiver> </application> </manifest> Now you can add the actual code to work with notifications. The simplest code that subscribes to notifications with the mytag tag needs to be inserted into MainActivity.java. In the code you need to specify “route”, “app key” and “app secret”, they are in the “mobile options” section on the application management screen:
and a small turkish java
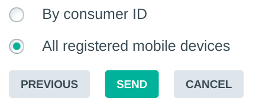
import java.util.List; import com.ibm.mobile.services.core.IBMBluemix; import com.ibm.mobile.services.push.IBMPush; import bolts.Continuation; import bolts.Task; public class MainActivity extends ActionBarActivity { private IBMPush push = null; @Override protected void onCreate(Bundle savedInstanceState) { super.onCreate(savedInstanceState); setContentView(R.layout.activity_main); IBMBluemix.initialize(this, "ff2c1e25-cc27-435d-b93a-a6b46fbc5056", "14d8536672d53bb5eb9d1ba28e83292e6320495c", "http://grigoryvp-test.eu-gb.mybluemix.net" ); push = IBMPush.initializeService(); // . push.register("mydevice", "myuser").continueWith(new Continuation<String, Void>() { @Override public Void then(Task<String> task) throws Exception { if (task.isFaulted()) return null; // , . push.getSubscriptions().continueWith(new Continuation<List<String>,Void>() { @Override public Void then(Task<List<String>> task) throws Exception { if (task.isFaulted()) return null; // ? if (task.getResult().isEmpty()) { // . push.subscribe("mytag").continueWith(new Continuation<String, Void>() { @Override public Void then(Task<String> task) throws Exception { return null; } }); } return null; } }); return null; } }); } That's it, the application is ready. At startup, it will subscribe to push notifications. You can check that everything works directly through the Bluemix web interface: go to the Notifications section, select “Send notification” - and see the notification in the phone.
Watching the zombies
 We only need to teach the Node.js application (which we already created in Bluemix in the first step) to monitor the specified site and send notifications using another library from IBM. By the way, the application can be edited online or added to the git repository, developed and debugged locally, and then deployed using git push. To work with the git repository, you need to go to the “dashboard”, select the application and select “add git” in the upper right corner of the application screen. The upper part of the interface will change: now there will be displayed the url for scheduling the git repository and the button for editing the code in a convenient online IDE:
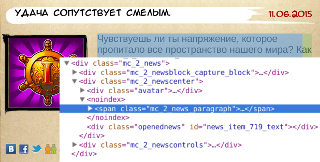 To explore the site, we use the Request and Cheerio libraries: the first one allows you to send an HTTPS request in one line and receive the contents of a web page, and the second provides the jQuery interface to search for the necessary information in the received HTML code. If you look closely at the studied site through DevTools, we will see that all the most interesting things change according to the CSS selector.
.mc_2_news: first-child .mc_2_news_paragraph
The code that will poll the site and send push notifications looks like this:
some javascript
var content = ""; var ibmpush = require('ibmpush'); var request = require('request'); var cheerio = require('cheerio'); function periodic() { request("https://www.pi-online.ru/", function (err, res, body) { if (!err && 200 == res.statusCode) { var $ = cheerio.load(body); var contentNew = $(".mc_2_news:first-child .mc_2_news_paragraph").text(); if (content && content !== contentNew) { var message = { "alert" : "something updated", "url": "http://www.google.com" }; req.ibmpush.sendBroadcastNotification(message, null).then( function() { logger.info("send success"); }, function() { logger.info("send failure"); } ); } content = contentNew; } setTimeout(periodic, 60 * 1000); }); } periodic(); Deploy it to the cloud - and our solution is ready. A few seconds after updating the site, you will receive a notification on your mobile phone. Is free.
findings
The solution shown is as simple as possible: there is no work with the database, error control, text display of the news and many other necessary things. But it serves as a clear demonstration of how far advanced cloud solutions have come. As part of free IBM applications, you can create services that work around the clock, send hundreds of thousands of push-notifications, use a huge number of ready-made libraries. The struggle for programmers is in full swing, and, I hope, healthy competition will bear fruit and make our work easier and more convenient.
Source: https://habr.com/ru/post/260933/
All Articles