Testing components in the Unity Engine
In continuation of the article on CPC, I will talk in more detail about testing components.
There is a lot of information about unit testing and BDD, this article will be devoted to configuring SpecFlow to work with the Unity Engine, and also contain general recommendations for creating a test architecture of a game with a component-oriented approach.
The general rules for developing a component that can be easily tested, I formulated as follows:
1) What only a person can see / hear should be in a separate component.
2) The component must have a "default" behavior. It is better to consider it a reference.
3) Do not forget: one component - one behavior.
Thus, I made adjustments to my implementation of the core gameplay of the Tower Defense game:
Some components access the Renderer via GetComponent () —an unnecessary dependency on the mandatory presence of the Renderer component. All visualization should be in separate components. I specified default values for all fields: this will simplify the setting of the component itself. Also expanded the functionality of the game by entering the Player:
A player is a person whose behavior is to transfer control to the game through input devices.
Now, to start the game, you need to click the "Start game" button in the UI, and then select the towers in UI for building with an indication of where to build them. And when all the towers are built, the game will begin.
But the question is: for which components are Unit tests needed, and which ones should be checked by specification?
The answer to this question may vary depending on the number of components and the total complexity of the project. It is worth remembering that the overall behavior of the game object is made up of the behavior of the components. And I have the following recommendation:
It is necessary to assess the complexity of the implementation of the logic inside the component. If it is easy to make a mistake in it, it is worth to be safe and make a separate unit test for the component. In other cases, you can make a general specification that will check the behavior of the game object as a whole.
Preparatory work.
From additions to Unity, we need the following:
1) UnityTestTools - runner NUnit tests from Unity developers in the editor environment.
2) Visual Studio Tools (former UnityVS) - plugin for debugging.
Visual Studio will need SpecFlow
And we start with the Unit tests.
Many add unit tests directly to the project itself, but do not make the assembly heavier. Not much time will take the selection of a set of tests in a separate assembly, which will not be included in the final version of the game (build).
After adding UnityTestTools to Unity, you need to open the solution (generated by UnityVs) and add a new project like “class library” to it, which will contain our unit tests of components. For example, let's call the assembly TowerDefenseCore.UnitTests. The important point is to set up the assembly:
1) Add to the references of the assembly:
- "nunit.framework.dll" and "nunit.core.dll" from Assets \ UnityTestTools \ UnitTesting \ Editor \ NUnit \ Libs
- "UnityEngine.dll" from Library \ UnityAssemblies
- Assembling "Assembly-CSharp.dll" from the solution
Important: do not copy them locally.
2) You need to configure the properties of the assembly, specifying the output path. The build must be in the Assets directory — for example, Assets \ Tests.
Writing unit tests performed in the Unity Test Runner is no different from regular unit tests. However, there are several important points.
First, instantiating a game object (GameObject.Instantiate method) is not necessary.
Here is a simple test of the DamageApplicator component:
DamageApplicator has no dependencies on other components that would be resolved in the Awake / Start / OnEnable method. But if a component uses Awake for this purpose, then it must be invoked forcibly:
Second: test the operation of components using Coroutine. It is important to specify MaxTime, the calculated reference runtime (if any) or in the while loop an additional check to see if the test passed.
The third point: it is better to test the behavior of each component, rather than the scene as a whole. In the Test Runner settings in the options, specify Run test on a new scene.
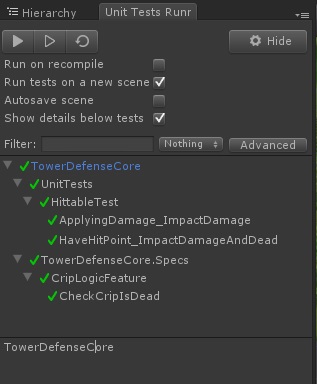
Build the build, switch to Unity, and in the Unity Test Tools menu, select Test Runner. As you will see, tests from the assembly will appear to run.
SpecFlow setting.
Let's create the class library TowerDefenseCore.Specs in the solution. Set it up:
1) Add packages to it: Install-Package SpecFlow.NUnit
2) Add assembly dependencies:
- "TechTalk.SpecFlow.dll" from \ packages \ SpecFlow.1.9.0 \ lib \ net35
- "UnityEngine.dll" from Library \ UnityAssemblies
- Assembling "Assembly-CSharp.dll" from the solution
Important: do not copy them locally.
3) You need to configure the properties of the assembly, specifying the output path. The build must be in the Assets directory — for example, Assets \ Tests.
4) Important: copy "TechTalk.SpecFlow.dll" in Assets \ UnityTestTools \ UnitTesting \ Editor \ NUnit \ Libs.
Now, in addition to the tests from TowerDefenseCore.UnitTests, there will be Steps from TowerDefenseCore.Specs in Test Runner.
A simple example of Feature that tests creep behavior when taking damage:
Feature: CreepLogic
Creep alive, take damage and dead.
@ creep
Scenario: Check creep is dead
Given creep is alive
When Creep take damage 100
Then creep is dead
And the generated steps:
In Test Runner, the test will be displayed with the name CheckCreepIsDead.
')
At the beginning of the article I mentioned the Player’s behavior. What are ways to automate the verification of his behavior without human intervention - the topic for a separate article.
There is a lot of information about unit testing and BDD, this article will be devoted to configuring SpecFlow to work with the Unity Engine, and also contain general recommendations for creating a test architecture of a game with a component-oriented approach.
The general rules for developing a component that can be easily tested, I formulated as follows:
1) What only a person can see / hear should be in a separate component.
2) The component must have a "default" behavior. It is better to consider it a reference.
3) Do not forget: one component - one behavior.
Thus, I made adjustments to my implementation of the core gameplay of the Tower Defense game:
Some components access the Renderer via GetComponent () —an unnecessary dependency on the mandatory presence of the Renderer component. All visualization should be in separate components. I specified default values for all fields: this will simplify the setting of the component itself. Also expanded the functionality of the game by entering the Player:
A player is a person whose behavior is to transfer control to the game through input devices.
Now, to start the game, you need to click the "Start game" button in the UI, and then select the towers in UI for building with an indication of where to build them. And when all the towers are built, the game will begin.
But the question is: for which components are Unit tests needed, and which ones should be checked by specification?
The answer to this question may vary depending on the number of components and the total complexity of the project. It is worth remembering that the overall behavior of the game object is made up of the behavior of the components. And I have the following recommendation:
It is necessary to assess the complexity of the implementation of the logic inside the component. If it is easy to make a mistake in it, it is worth to be safe and make a separate unit test for the component. In other cases, you can make a general specification that will check the behavior of the game object as a whole.
Preparatory work.
From additions to Unity, we need the following:
1) UnityTestTools - runner NUnit tests from Unity developers in the editor environment.
2) Visual Studio Tools (former UnityVS) - plugin for debugging.
Visual Studio will need SpecFlow
And we start with the Unit tests.
Many add unit tests directly to the project itself, but do not make the assembly heavier. Not much time will take the selection of a set of tests in a separate assembly, which will not be included in the final version of the game (build).
After adding UnityTestTools to Unity, you need to open the solution (generated by UnityVs) and add a new project like “class library” to it, which will contain our unit tests of components. For example, let's call the assembly TowerDefenseCore.UnitTests. The important point is to set up the assembly:
1) Add to the references of the assembly:
- "nunit.framework.dll" and "nunit.core.dll" from Assets \ UnityTestTools \ UnitTesting \ Editor \ NUnit \ Libs
- "UnityEngine.dll" from Library \ UnityAssemblies
- Assembling "Assembly-CSharp.dll" from the solution
Important: do not copy them locally.
2) You need to configure the properties of the assembly, specifying the output path. The build must be in the Assets directory — for example, Assets \ Tests.
Writing unit tests performed in the Unity Test Runner is no different from regular unit tests. However, there are several important points.
First, instantiating a game object (GameObject.Instantiate method) is not necessary.
Here is a simple test of the DamageApplicator component:
[Test] public void DamageApplicator_DirectDamage() { var damageApplicator = new DamageApplicator(); var hp = damageApplicator.DirectDamage(100, 10); Assert.AreEqual(90f, hp); } DamageApplicator has no dependencies on other components that would be resolved in the Awake / Start / OnEnable method. But if a component uses Awake for this purpose, then it must be invoked forcibly:
[Test] public void Hittable_DeadOnDirectDamage() { var componentsHolder = new GameObject(); // , componentsHolder.AddComponent<DamageAplicator>(); var hittable = componentsHolder.AddComponent<Hittable>(); hittable.Awake();//: , DamageApplicator hittable.DirectDamage(50); Assert.AreEqual(50, hittable.HP); hittable.DirectDamage(50); Assert.AreEqual(true, hittable.IsDead); } Second: test the operation of components using Coroutine. It is important to specify MaxTime, the calculated reference runtime (if any) or in the while loop an additional check to see if the test passed.
[Test] [MaxTime(10000)]//BeginDPS 5 0.5 , 100HP public void DamageInflictor_BeginDPS() { var target = new GameObject(); target.AddComponent<DamageApplicator>(); var hittable = target.AddComponent<Hittable>(); hittable.Awake(); var tower = new GameObject(); var dmger = tower.AddComponent<DamageInflictor>(); dmger.BeginDPS(hittable);// Coroutine while (dmger.inflictDamage().MoveNext())// Coroutine Thread.Sleep(100); Assert.True(hittable.IsDead); } The third point: it is better to test the behavior of each component, rather than the scene as a whole. In the Test Runner settings in the options, specify Run test on a new scene.
Build the build, switch to Unity, and in the Unity Test Tools menu, select Test Runner. As you will see, tests from the assembly will appear to run.
SpecFlow setting.
Let's create the class library TowerDefenseCore.Specs in the solution. Set it up:
1) Add packages to it: Install-Package SpecFlow.NUnit
2) Add assembly dependencies:
- "TechTalk.SpecFlow.dll" from \ packages \ SpecFlow.1.9.0 \ lib \ net35
- "UnityEngine.dll" from Library \ UnityAssemblies
- Assembling "Assembly-CSharp.dll" from the solution
Important: do not copy them locally.
3) You need to configure the properties of the assembly, specifying the output path. The build must be in the Assets directory — for example, Assets \ Tests.
4) Important: copy "TechTalk.SpecFlow.dll" in Assets \ UnityTestTools \ UnitTesting \ Editor \ NUnit \ Libs.
Now, in addition to the tests from TowerDefenseCore.UnitTests, there will be Steps from TowerDefenseCore.Specs in Test Runner.
A simple example of Feature that tests creep behavior when taking damage:
Feature: CreepLogic
Creep alive, take damage and dead.
@ creep
Scenario: Check creep is dead
Given creep is alive
When Creep take damage 100
Then creep is dead
And the generated steps:
[Binding] public class CreepLogicSteps { private Hittable _creep; [Given(@"Creep is alive")] public void GivenCreepIsAlive() { var componentsHolder = new GameObject(); componentsHolder.AddComponent<DamageApplicator>(); _creep = componentsHolder.AddComponent<Hittable>(); _creep.Awake(); } [When(@"Creep take damage (.*)")] public void WhenCreepTakeDamage(int dmg) { _creep.DirectDamage(dmg); } [Then(@"Creep is dead")] public void ThenCreepIsDead() { NUnitFramework.Assert.AreEqual(true, _creep.IsDead); } } In Test Runner, the test will be displayed with the name CheckCreepIsDead.
')
At the beginning of the article I mentioned the Player’s behavior. What are ways to automate the verification of his behavior without human intervention - the topic for a separate article.
Source: https://habr.com/ru/post/244091/
All Articles