It is not Android. Features of the development under Wear OS
On March 18, Google renamed the operating system for Android Wear wearable electronics and began distributing it under the name Wear OS to attract a new audience. The company has published new design guidelines and updated documentation . When I started developing an application for watches, I did not find a single Russian-language publication on this topic. Therefore, I want to share my experience and tell more about Wear OS, what it consists of and how to work with it. All those who are not indifferent to mobile technologies, please under the cat.
Starting from the version of Android Wear 2.0, the system has learned to work with Standalone Apps - completely independent wearable applications. The user can set them from native Google Play directly to the clock. Wear OS is a virtually independent system that still continues to work within the framework of the Google Services infrastructure, complementing it but not becoming attached to it.
Android but not much
No matter how Google has positioned Wear OS, the platform is based on Android with all its features, charms and flaws. Therefore, if you are already familiar with Android-development, then difficulties with Wear OS should not arise. Wear OS hardly differs from its “big brother”, except for the absence of some packages:
- android.webkit
- android.print
- android.app.backup
- android.appwidget
- android.hardware.usb
Yes, we will not be able to see the browser on the clock in the near future due to the lack of Webkit. But surfing the clock will still be uncomfortable. We still have a great and terrible Android Framework with the Support Library and Google Services. Structural and architectural differences will also be small.
Application structure
Suppose we decide to make a wearable application. Opened Android Studio, clicked "New project" and ticked off "Wear". We will immediately find out that two modules have appeared in the package of our application: wear and mobile.
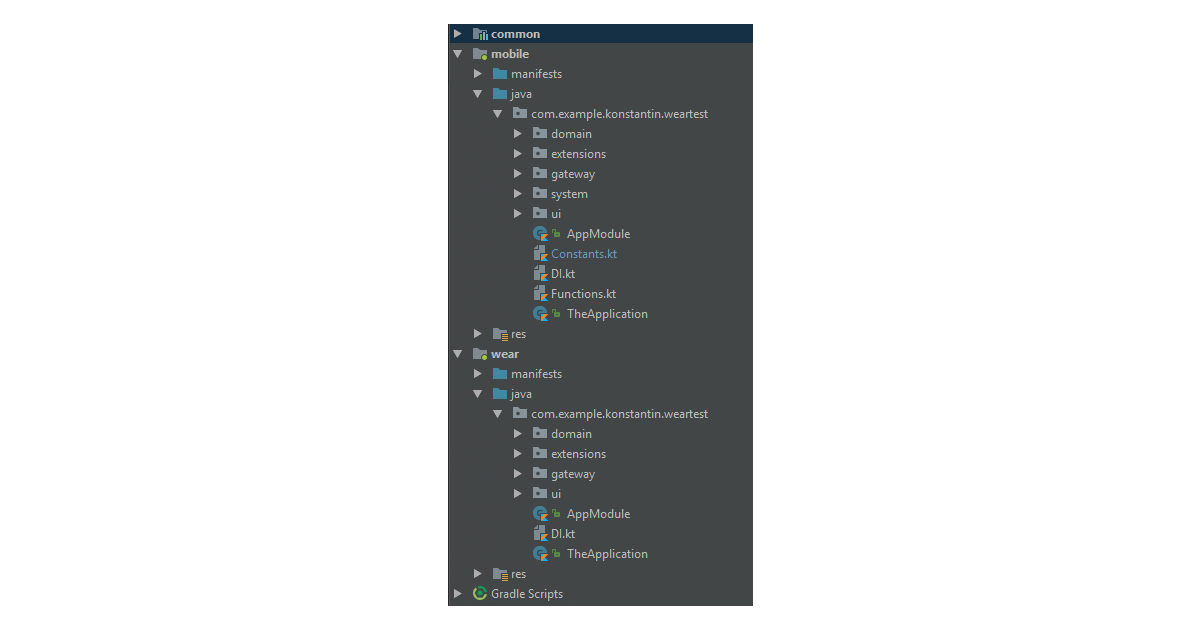
These two modules will be assembled in two different .apk files. But they must have the same package name, and when publishing must be signed with one release certificate. This is only necessary so that applications can interact with each other through Google Services. We will return to this later. In principle, nothing prevents us from building an application only on the Wear OS, tilting the mobile platform aside.
Clean architecture?
Why not? This is the same Android application, so architectural approaches for it may be similar to Android.

I used the same technology stack that we use in Android applications:
- Kotlin
- Clean architecture
- RxPM (as presentation pattern)
- Koin (for implementing DI)
- RxJava (just a matter of taste)
We have two modules in the project, and the data models are likely to be the same for both platforms. Therefore, part of the logic and models can be put into another module “common”. Then connect it to the mobile and wearable packages so as not to duplicate the code.
Ui
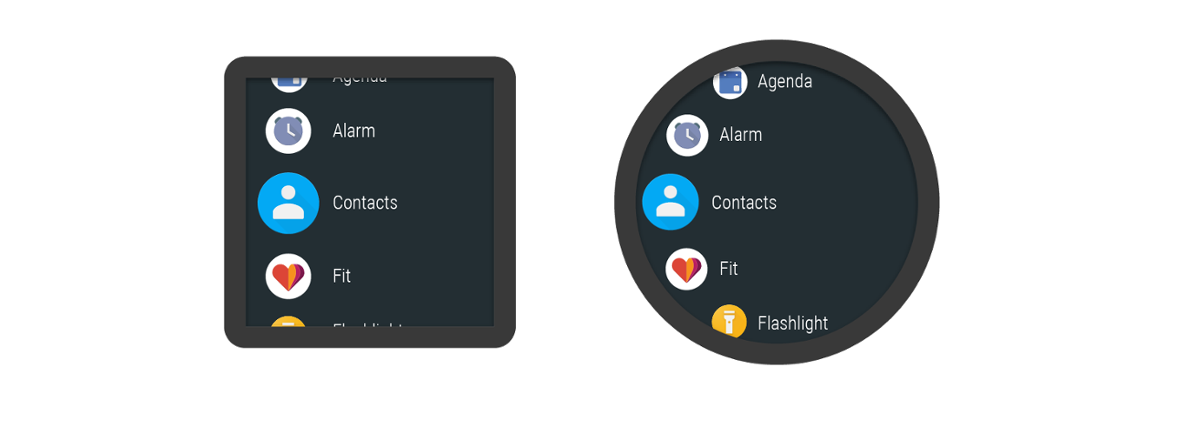
One of the main features of Android development is the abundance of devices of different sizes and with different screen resolutions. In Wear OS, also a different form of the screen: round, square and round with a cut edge.
If we try to lay out a layout and display it on different screens, we will most likely see a nightmare like this:
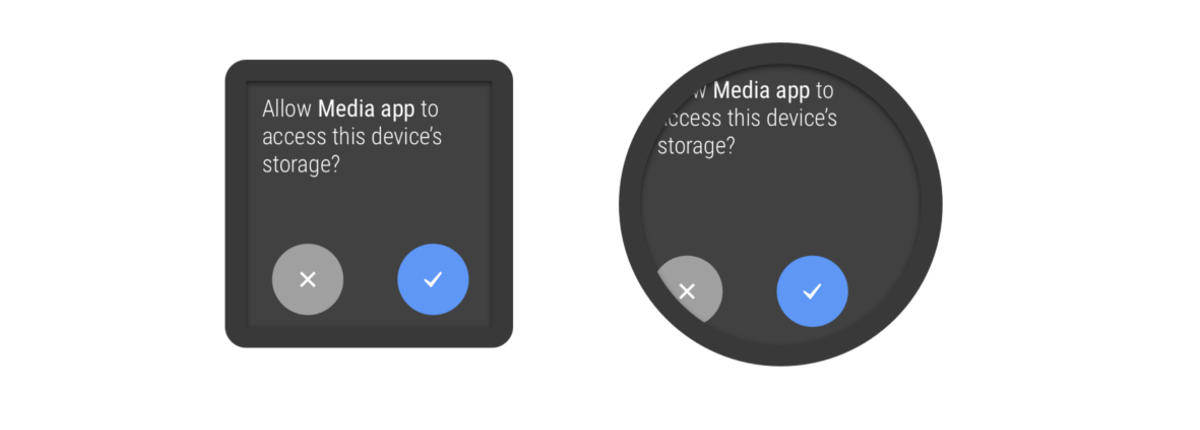
In the second version of the system, Google kindly solved part of the UI-problems by including new adaptive view components in the Support wearable library. Run through the most curious of them.
BoxInsetLayout
BoxInsetLayout is a FrameLayout that can adapt child elements to a round display. He places them in a rectangular area inscribed in the circumference of the screen. For square displays, such transformations, of course, are ignored.

Thus, the same layout will look about the same for all forms of watch screens.
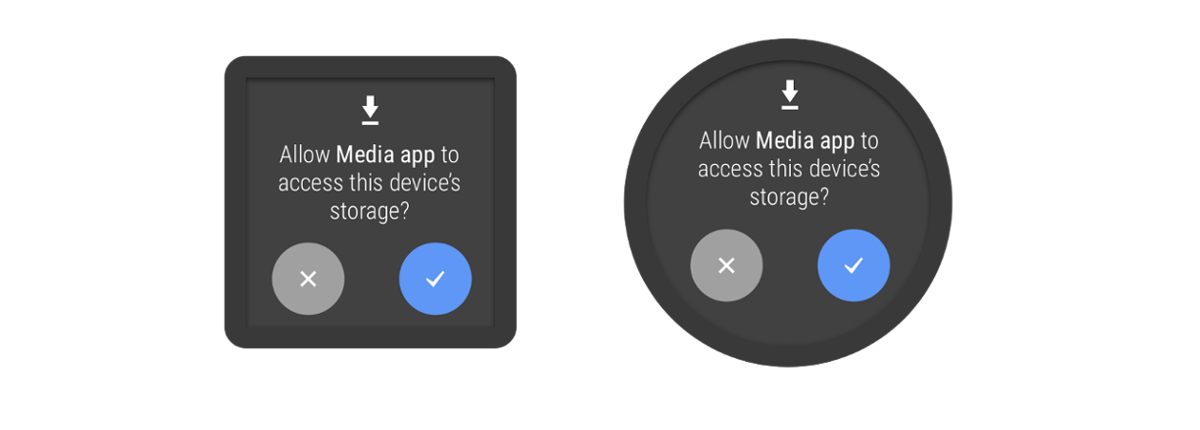
Looks better, isn't it?
WearableRecyclerView
Lists are a convenient pattern that is actively used in mobile (and not only) UX. Wear-interfaces were no exception. But due to the rounding of the corners of the display, the top View of the list may be clipped. WearableRecyclerView helps to correct such misunderstandings.
For example, there is the isEdgeItemsCenteringEnabled parameter, which allows you to specify the layout of the elements on the screen curvature and expand the central element, making the list more convenient to read on a small screen.
There is a WearableLinearLayoutManager, which allows you to scroll through the list with a mechanical dial on the clock and scroll the extreme elements to the middle of the screen, which is very convenient on round interfaces.
Now the Wear support library includes a couple of dozen adaptive View. They are all different, and all can be read in detail in the documentation .
Drawing data on the screen is fun, but you need to get this data from somewhere. In the case of a mobile client, we often use the REST API on top of the usual network protocols (HTTP / TCP). In Wear OS, this approach is also acceptable, but Google does not recommend it.
Energy efficiency plays a big role in wearable electronics. And an active Internet connection will quickly set up the battery, and disconnections can occur regularly. Wearable devices also require active synchronization, which also needs to be implemented.
All of these problems for us kindly solves the data exchange mechanism in Google Services called "Data Layer". Classes for working with him have found their place in the package com.google.android.gms.wearable.
Data layer
Data Layer helps to synchronize data between all wearable devices tied to one Google user account. It selects the most optimal route for data exchange (bluetooth, network) and implements a stable transmission. This ensures that the message reaches the desired device.

Data Layer consists of five main elements:
- Data Items
- Assets
- Messages
- Channels
- Capabilities
Data Item
Data Item is a component that is designed to synchronize small amounts of data between devices in the wearable infrastructure. You can work with them through the Data Client. All synchronization is implemented through Google services.
DataItem consists of three parts:
- payload is a 100kb payload, represented as a ByteArray. It looks a bit abstract, so Google itself recommends putting there some kind of key-value structure like Bundle or Map <String, Any>.
- patch is an identifying path by which we can identify our DataItem. The fact is that the Data Client stores all DataItem's in a linear structure, which is not suitable for all cases. If we need to reflect some kind of data hierarchy, we will have to do it ourselves, distinguishing objects by URI.
- Assets is a separate structure that is not stored in the DataItem itself, but it may have a link to it. We will talk about it later.
Let's try creating and saving a DataItem. To do this, use PutDataRequest, which will pass all the necessary parameters. Then put PutDataRequest to DataClient in the putDataItem () method.
For convenience, there is a DataMapItem in which the serialization problem has already been solved. With it, we can work with data as with a bundle-object, in which primitives can be stored.
val dataClient = Wearable.getDataClient(context) val dataRequest = PutDataMapRequest.create(PATCH_COFFEE).apply { dataMap.putString(KEY_COFFEE_SPECIEES, "Arabica") dataMap.putString(KEY_COFFEE_TYPE, "Latte") dataMap.putInt(KEY_COFFEE_SPOONS_OF_SUGAR, 2) } val putDataRequest = dataRequest.asPutDataRequest() dataClient.putDataItem(putDataRequest) Now our DataItem is stored in the DataClient, and we can access it from all Wearable devices.
Now we can take from the DataClient a list of all Item's, find the one that interests us, and parse it:
dataClient.dataItems.addOnSuccessListener { dataItems -> dataItems.forEach { item -> if (item.uri.path == PATCH_COFFEE) { val mapItem = DataMapItem.fromDataItem(item) val coffee = Coffee( mapItem.dataMap.getString(KEY_COFFEE_SPECIES), mapItem.dataMap.getString(KEY_COFFEE_TYPE), mapItem.dataMap.getInt(KEY_COFFEE_SPOONS_OF_SUGAR) ) coffeeReceived(coffee) } } } Assets
And now let's imagine that we suddenly needed to send a photo, audio or some other file to the clock. DataItem with such a load can not cope, because it is designed for fast synchronization, but Asset can. Asset synchronization mechanism is designed to save files larger than 100kb in the wearable infrastructure and is tightly connected to the DataClient.
As mentioned earlier, the DataItem may have a link to the Asset, but the data itself is saved separately. A scenario is possible when the Item is preserved faster than Asset, and the file is still loading.
You can create an Asset using Asset.createFrom [Uri / Bytes / Ref / Fd], and then pass it to the DataItem:
val dataClient = Wearable.getDataClient(context) val dataRequest = PutDataMapRequest.create(PATCH_COFFEE).apply { dataMap.putString(KEY_COFFEE_SPECIES, "Arabica") dataMap.putString(KEY_COFFEE_TYPE, "Latte") dataMap.putInt(KEY_COFFEE_SPOONS_OF_SUGAR, 2) // val asset = Asset.createFromUri(Uri.parse(COFFEE_PHOTO_PATCH)) dataMap.putAsset(KEY_COFFEE_PHOTO, asset) } val putDataRequest = dataRequest.asPutDataRequest() dataClient.putDataItem(putDataRequest) To load the Asset on the other side, open inputStream, get the byte array itself, and then present it in the form we need:
dataClient.dataItems.addOnSuccessListener { dataItems -> dataItems.forEach { item -> if (item.uri.path == PATCH_COFFEE) { val mapItem = DataMapItem.fromDataItem(item) val asset = mapItem.dataMap.getAsset(KEY_COFFEE_PHOTO) val coffee = Coffee( mapItem.dataMap.getString(KEY_COFFEE_SPECIES), mapItem.dataMap.getString(KEY_COFFEE_TYPE), mapItem.dataMap.getInt(KEY_COFFEE_SPOONS_OF_SUGAR), // Asset saveFileFromAsset(asset, COFFEE_PHOTO_PATCH) ) coffeeReceived(coffee) } } } private fun saveFileFromAsset(asset: Asset, name: String): String { val imageFile = File(context.filesDir, name) if (!imageFile.exists()) { Tasks.await(dataClient.getFdForAsset(asset)).inputStream.use { inputStream -> val bitmap = BitmapFactory.decodeStream(inputStream) bitmap.compress(Bitmap.CompressFormat.JPEG, 100, imageFile.outputStream()) } } return imageFile.absolutePath } Capabilities
The network of wearable devices can be much wider than two devices connected via Bluetooth and include dozens of devices. Imagine a situation where you need to send a message not to all devices, but for some specific hours. Need a way to identify devices on this network. The method is - this is the Capabilities mechanism. Its meaning is very simple - any device participating in the network with the help of CapabilitiesClient can find out how many nodes support a particular function, and send a message to one of these nodes.
In order to add Capabilities to our wearable application, you need to create the file res / values / wear.xml and write there an array of strings, which will denote our Capabilities. Sounds pretty simple. In practice, too, nothing complicated:
wear.xml:
<?xml version="1.0" encoding="utf-8"?> <resources> <string-array name="android_wear_capabilities"> <item>capability_coffee</item> </string-array> </resources> On the side of another device:
fun getCoffeeNodes(capabilityReceiver: (nodes: Set<Node>) -> Unit) { val capabilityClient = Wearable.getCapabilityClient(context) capabilityClient .getCapability(CAPABILITY_COFFEE, CapabilityClient.FILTER_REACHABLE) .addOnSuccessListener { nodes -> capabilityReceiver.invoke(nodes.nodes) } } If you, like me, have developed Rx of the brain, then from yourself I will recommend an extension for the Task object. This object quite often appears in frameworks from Google (including Firebase):
fun <T : Any?> Task<T>.toSingle(fromCompleteListener: Boolean = true): Single<T> { return Single.create<T> { emitter -> if (fromCompleteListener) { addOnCompleteListener { if (it.exception != null) { emitter.onError(it.exception!!) } else { emitter.onSuccess(it.result) } } } else { addOnSuccessListener { emitter.onSuccess(it) } addOnFailureListener { emitter.onError(it) } } } } Then the chain for Nodes will look more beautiful:
override fun getCoffeeNodes(): Single<Set<Node>> = Wearable.getCapabilityClient(context) .getCapability(CAPABILITY_COFFEE, CapabilityClient.FILTER_REACHABLE) .toSingle() .map { it.nodes } Messages
All previous Data Layer components assumed data caching. Message helps to send messages without synchronization in the format of "sent and zab (s | and) whether." Moreover, you can send a message only to a specific node or to a specific set of nodes that you must first obtain through the CapabilitiesClient:
fun sendMessage(message: ByteArray, node: Node) { val messageClient = Wearable.getMessageClient(context) messageClient.sendMessage(node.id, PATCH_COFFEE_MESSAGE, message) .addOnSuccessListener { // Success :) } .addOnFailureListener { // Error :( } } The potential recipient of the message, in turn, must subscribe to receive messages, and find the right one by its URI:
val messageClient = Wearable.getMessageClient(context) messageClient.addListener { messageEvent -> if (messageEvent.path == PATCH_COFFEE_MESSAGE) { // TODO: coffee processing } } Channels
Channels are used to transmit streaming data in real time without caching. For example, if we need to send a voice message from the clock to the phone, the channels will be a very convenient tool. The client for channels can be obtained through Wearable.getChannelClient (), and further open the input or output data stream (one channel can work in both directions).
Google is actively developing the Data Layer, and it is likely that in six months, these customers will again “move” somewhere, or their API will change again.
Of course, Data Layer is not the only way to communicate with the outside world, no one will forbid us to open the tcp-socket in the old-fashioned way and discharge the user's device.

Finally
It was just a brief overview of the current technical capabilities of the platform. Wear OS is developing rapidly. There are more devices, and perhaps soon it will not be just a clock. Support Wearable Library is also not standing still and is changing with the platform, delighting us with new UI components and the wonders of synchronization.
Like any other system, there are subtleties and interesting points about which you can talk for a long time. Many details were not fully disclosed, so write in the comments, what you would like to talk about in more detail, and we will tell about it in the next article. Share your wearable development experience in the comments.
')
Source: https://habr.com/ru/post/353748/
All Articles