WCF REST services and UWP applications

Quite a frequent question that arises for those who are trying to develop under UWP is “How does a UWP application get data from a SQL Server database?”. Direct data can not be obtained. Working with databases from UWP applications requires a customized web service.
Client application developers are usually far from creating server backends, but they need at least an idea of services.
Under the cat a description of how to create a local WCF REST service and retrieve data from it using a UWP application. The service will be able to receive data from a SQL Server database created in Azure (but similarly, you can get data from any local database). In addition, so that everything does not look very trite, the possibility of placing the service itself in Azure to work with it from the same client UWP application will be considered.
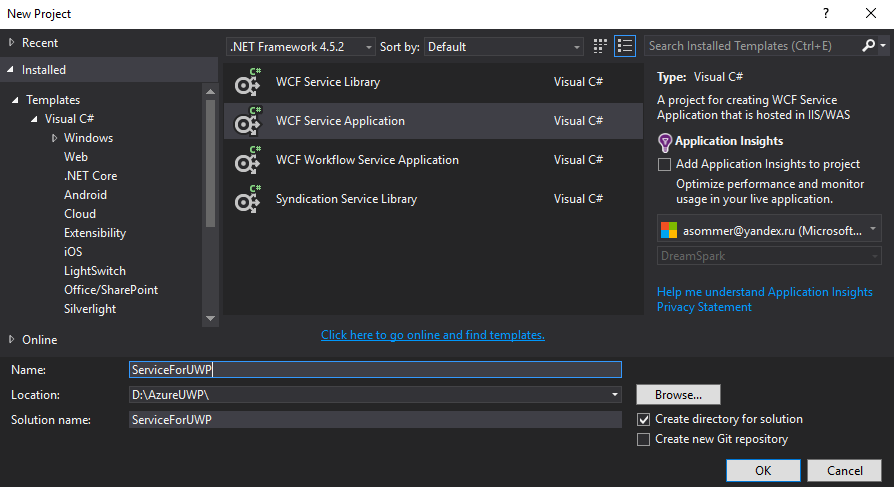
Creating a REST service
In order to test our UWP applications, we will create a simple service. I will describe the creation of WCF, and not Web API 2 service, since I was last interested in writing a backend several years ago (and not because it has advantages).
')
Delete the example code that will be created for us automatically.
Code that is removed
From IService1.cs
From Service1.svc.cs
[OperationContract] string GetData(int value); [OperationContract] CompositeType GetDataUsingDataContract(CompositeType composite); // TODO: Add your service operations here // Use a data contract as illustrated in the sample below to add composite types to service operations. [DataContract] public class CompositeType { bool boolValue = true; string stringValue = "Hello "; [DataMember] public bool BoolValue { get { return boolValue; } set { boolValue = value; } } [DataMember] public string StringValue { get { return stringValue; } set { stringValue = value; } } } From Service1.svc.cs
public string GetData(int value) { return string.Format("You entered: {0}", value); } public CompositeType GetDataUsingDataContract(CompositeType composite) { if (composite == null) { throw new ArgumentNullException("composite"); } if (composite.BoolValue) { composite.StringValue += "Suffix"; } return composite; } We add the following contract operation and class code to IService1.cs:
[ServiceContract] public interface IService1 { [WebGet(UriTemplate = "/GetScheduleJson", RequestFormat = WebMessageFormat.Json, ResponseFormat = WebMessageFormat.Json, BodyStyle = WebMessageBodyStyle.Bare)] List<Timetable> GetScheduleJson(); } [DataContract] public class Timetable { [DataMember] public int id { get; set; } [DataMember] public DateTime arrivaltime { get; set; } [DataMember] public Int16 busnumber { get; set; } [DataMember] public string busstation { get; set; } } The arrival time field could be made of type TimeSpan, but it is much more convenient to work with DateTime later in JSON. You can also specify the format of WebMessageFormat.Xml in the contract operation. The operation itself is marked with the attribute WebGet, and therefore returns the result. If you just need to execute the code, you can mark the operation WebInvoke.
And in Service1.svc.cs we add the following code:
public List<Timetable> GetScheduleJson() { return GetSchedule(); } private List<Timetable> GetSchedule() { List<Timetable> Schedule = new List<Timetable> { new Timetable { id=1, arrivaltime=DateTime.Parse("12:05:00"), busnumber=5, busstation ="" }, new Timetable { id=2, arrivaltime =DateTime.Parse("12:10:00"), busnumber=5, busstation =" " } }; return Schedule; } Easily configure Web.config. Add endpointBehavior to the behaviors section:
<endpointBehaviors> <behavior name="restBehavior"> <webHttp /> </behavior> </endpointBehaviors> And below, in the already existing code, add the name attribute with the value “servicebehavior” to the behavior tag:
<serviceBehaviors> <behavior name="servicebehavior"> <!-- To avoid disclosing metadata information, set the values below to false before deployment --> <serviceMetadata httpGetEnabled="true" httpsGetEnabled="true"/> <!-- To receive exception details in faults for debugging purposes, set the value below to true. Set to false before deployment to avoid disclosing exception information --> <serviceDebug includeExceptionDetailInFaults="false"/> </behavior> </serviceBehaviors> Now we can add the service and endpoint to the root of the system.serviceModel tag:
<services> <service name ="ServiceForUWP.Service1" behaviorConfiguration ="servicebehavior" > <endpoint name ="RESTEndPoint" contract ="ServiceForUWP.IService1" binding ="webHttpBinding" address ="" behaviorConfiguration ="restBehavior"/> </service> </services> We get a ready service.
By running debugging (you need to select a project in Solution Explorer) and open in browser (in my case, port 64870)
http://localhost:64870/Service1.svc/GetScheduleJsonwe will receive result in the form of JSON:
[{"Arrivaltime": "\ / Date (1487408400000 + 0300) \ /", "busnumber": 5, "busstation": "Birch", "id": 1}, {"arrivaltime": "\ / Date ( 1487408700000 + 0300) \ / "," busnumber ": 5," busstation ":" Children's World "," id ": 2}]
If we want to return the data filtered by any parameter, we can change the operation to something similar:
[WebGet(UriTemplate = "/GetScheduleJson/{id}", RequestFormat = WebMessageFormat.Json, ResponseFormat = WebMessageFormat.Json, BodyStyle = WebMessageBodyStyle.Bare)] List<Timetable> GetScheduleJson(int id); Now implementing the method
List<Timetable> GetScheduleJson(int id) we will get the result by going to http://localhost:64870/Service1.svc/GetScheduleJson/1 . In this case, 1 is the parameter passed to the method.Creating a client UWP application
Retrieving data from a UWP application is simple. There are 2 options: use Windows.Web.Http.HttpClient or System.Net.Http.HttpClient.
Both clients can be used in UWP applications. The Web is a bit newer (it was released in 8.1), and it is more suitable for native development under UWP. If you plan to use the code in ASP.NET applications or in Xamarin applications for other mobile platforms, then you better take the Net client. In addition, at the moment the Web client has more settings and features (for example, the ability to use a special SSL certificate for authentication).
Actually, in .NET Core for UWP applications, System.Net.Http is a wrapper over the Windows.Web.Http component. But this wrapper supports the same API as the System.Net.Http space from .NET.
Further two simple examples of receiving data from the service:
var uri = new Uri("http://localhost:64870/service1.svc/GetScheduleJson"); var client = new Windows.Web.Http.HttpClient(); var json = await client.GetStringAsync(uri); var uri = new Uri("http://localhost:64870/service1.svc/GetScheduleJson"); System.Net.Http.HttpClient client = new System.Net.Http.HttpClient(); System.Net.Http.HttpResponseMessage responseGet = await client.GetAsync(uri); string json = await responseGet.Content.ReadAsStringAsync(); In order to deserialize the data, you can use the NuGet package Newtonsoft.Json:
List<Timetable> appsdata = JsonConvert.DeserializeObject<Timetable>(json); Of course, you must also add the code of the Timetable class (exactly the same as in the service application).
Create SQL Server Database in Azure
Creating a database in Azure is easy. You need to go to the portal and fill in the following fields:

It remains only to choose a price category. Prices start at 5 USD per month. This amount will cover the bonus received from the free registration in Dev Essentials (25 USD is given every month during the year). At registration, you must bind the card. For such registrations, as a rule, an additional card is created, the limit of which can be adjusted.
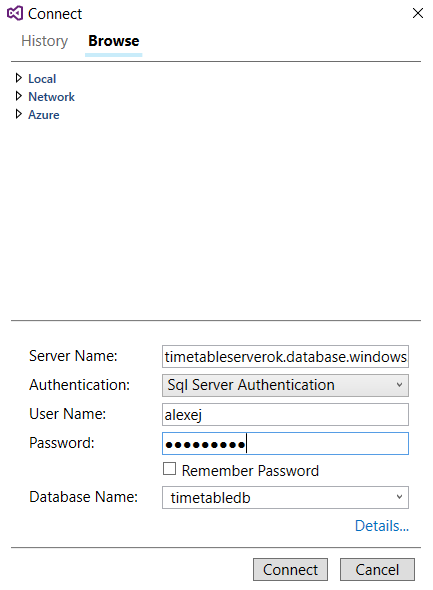
The ASP.NET connection string (SQL authentication) to the database in this case will be:
Server=tcp:timetableserverok.database.windows.net,1433;Initial Catalog=timetabledb;Persist Security Info=False;User ID={your_username};Password={your_password};MultipleActiveResultSets=False;Encrypt=True;TrustServerCertificate=False;Connection Timeout=30; You can view it by accessing the database properties in the Azure portal. In order to be able to access the database from the current machine, you need to add its IP to the firewall list.

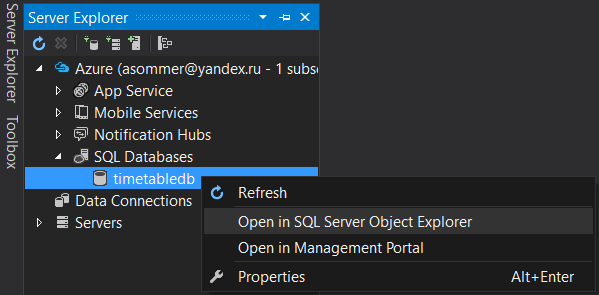
Editing is possible from the Server Explorer window of Visual Studio.
Create some table

And enter any test data.
Getting service data from SQL Server
In order to "pull" the data from the database, we need to make small changes to the project of our service. Add two namespaces:
using System.Data; using System.Data.SqlClient; Variable containing the text of the connection string to the SQL Server database:
public string ConnectionString = "Server=tcp:timetableserverok.database.windows.net,1433;Initial Catalog=timetabledb;Persist Security Info=False;User ID=alexej;Password=_;MultipleActiveResultSets=False;Encrypt=True;TrustServerCertificate=False;Connection Timeout=30;"; I use the newly created database in Azure, but, as already mentioned, you can connect to any databases, including local ones (in this case, of course, you will need to replace the connection string).
Now, in order to "pull" the data from the database, you need to change the code of the GetSchedule method to the following:
private List<Timetable> GetSchedule() { using (DataSet ds = new DataSet()) { using (SqlConnection sqlCon = new SqlConnection(ConnectionString)) { try { sqlCon.Open(); string sqlStr = "select * from Timetable"; using (SqlDataAdapter sqlDa = new SqlDataAdapter(sqlStr, sqlCon)) { sqlDa.Fill(ds); } } catch { return null; } finally { sqlCon.Close(); } } List<Timetable> Schedule = new List<Timetable>(); using (DataTable dt = ds.Tables[0]) { foreach (DataRow dr in dt.Rows) { Schedule.Add(new Timetable() { id = Convert.ToInt16((dr["ID"])), arrivaltime = DateTime.Parse(dr["arrivaltime"].ToString()), busnumber = Convert.ToInt16((dr["busnumber"] ?? 0)), busstation = dr["busstation"].ToString() }); } } return Schedule; } } Creating a cloud service
To place a service in Azure, you need to download and install the Azure SDK for .NET (approximately 450 MB) and create a new project of a special type of Cloud Service.

Choose a role and rename it to your taste
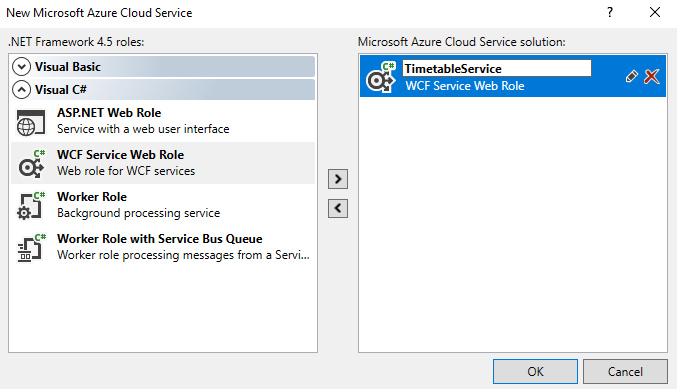
As a result, we will have two projects: AzureCloudServiceTimetable and TimetableService
In the second (TimetableService) we can copy the code from our local service. Namely - the contents of the files IService1.cs, Service1.svc.cs, Web.config. After that, the project can be tested. You can make changes in the Web.config file before publishing. In tag
<serviceMetadata httpGetEnabled="true" httpsGetEnabled="true"/> change values to false
To publish to Azure, you need to create packages. On the AzureCloudServiceTimetable project, you need to call the context menu and select Package.

After the process is complete, the directory with the package and the configuration file will be opened.
You can publish to Azure using the portal’s web interface. We go to the portal. Select the item Cloud services (classic), create a new one and fill in the fields

It is necessary to set 2 checkboxes: “Deploy, even if one or several roles contain a separate instance” and “Start deployment”. After deployment and launch (it may take some time to start) you can make a request by URI:
http://servicetimetable.cloudapp.net/Service1.svc/GetScheduleJsonThis address can be used in the UWP application. Deployment Details: Creating and Deploying a Cloud Service
PS: Thanks to the user dmitry_dvm for clarifying / editing
Source: https://habr.com/ru/post/322202/
All Articles