Development of 3D games for Windows 8 using C ++ and Microsoft DirectX
Game development is a constantly relevant topic: everyone likes to play games, they are willing to buy them, so they are profitable to sell. But when developing good games you should pay a lot of attention to performance. No one will like a game that “slows down” or jerks even on not the most powerful devices.
In this article, I will show how to develop a simple 3D football game using Microsoft DirectX and C ++, although mainly I am developing in C #. In the past I have worked quite a bit with C ++, but now this language is not so simple for me. In addition, DirectX for me is a novelty, so this article can be considered a newbie’s point of view on game development. I ask experienced developers to forgive me for any errors.
We will use the Microsoft Visual Studio 3D Starter Kit - a natural initial resource for everyone who wants to develop games for Windows 8.1.
Microsoft Visual Studio 3D Starter Kit
After downloading the Starter Kit, you can unzip it into a folder and open the StarterKit.sln file. This solution has a ready-made C ++ project for Windows 8.1. When it starts, an image similar to fig. one.')

Figure 1. The initial state of the Microsoft Visual Studio 3D Starter Kit
This program as part of the Starter Kit demonstrates several useful items.
- Five objects are animated: four figures revolve around the kettle, and the kettle, in turn, “dances”.
- Each item is made from a separate material; some have a solid color, and the surface of the cube is a raster pattern.
- The light source is in the upper left corner of the scene.
- In the lower right corner of the screen is the frame rate counter (the number of frames per second).
- Above is the points indicator.
- If you click on an item, it is highlighted and the number of points increases.
- If you click the game screen with the right mouse button or drag the screen from the bottom edge to the middle, two buttons will appear to sequentially switch the color of the kettle.
The main game loop is in the StarterKitMain.cpp file, where the page and frame rate counter are drawn. Game.cpp contains a game loop and click test. In this file, animation is calculated in the Update method, and in the Render method all objects are drawn. The frame rate counter is drawn in SampleFpsTextRenderer.cpp . Objects of the game are in the Assets folder. Teapot.fbx is a teapot, and the GameLevel.fbx file contains four shapes that rotate around a dancing teapot.
Now, having familiarized with the sample application in the Starter Kit package, you can proceed to creating your own game.
Adding resources to the game
We are developing a game of football, so our very first resource should be a soccer ball, which we will add to Gamelevel.fbx . First you need to delete four figures from this file, selecting each one and pressing the Delete button. In the solution browser, delete the CubeUVImage.png file as well , since we don’t need it: this is the texture for the cube we just deleted.Now add a sphere to the model. Open the tools (if you can't see them, click View> Toolbox) and double-click the sphere to add it to the model. We also need a stretched texture, such as in fig. 2

Figure 2. The texture of a soccer ball adapted to the sphere
If you do not want to create your own models in Visual Studio, you can find ready-made models on the Internet. Visual Studio supports any model in the format of FBX, DAE and OBJ: just add them to the solution resources. For example, you can use an .obj file similar to the one shown in Figure. 3 (free model from the site TurboSquid ).

Figure 3. Three-dimensional OBJ-ball model
Model animation
The model is ready, now it's time to animate it. But first you need to remove the kettle, because we do not need it. In the Assets folder, delete the file teapot.fbx . Now remove its download and animation. In the Game.cpp file, models are loaded asynchronously in CreateDeviceDependentResources :Code
// Load the scene objects. auto loadMeshTask = Mesh::LoadFromFileAsync( m_graphics, L"gamelevel.cmo", L"", L"", m_meshModels) .then([this]() { // Load the teapot from a separate file and add it to the vector of meshes. return Mesh::LoadFromFileAsync( You need to change the model and delete the continuation of the task so that only the ball is loaded:
Code
void Game::CreateDeviceDependentResources() { m_graphics.Initialize(m_deviceResources->GetD3DDevice(), m_deviceResources->GetD3DDeviceContext(), m_deviceResources->GetDeviceFeatureLevel()); // Set DirectX to not cull any triangles so the entire mesh will always be shown. CD3D11_RASTERIZER_DESC d3dRas(D3D11_DEFAULT); d3dRas.CullMode = D3D11_CULL_NONE; d3dRas.MultisampleEnable = true; d3dRas.AntialiasedLineEnable = true; ComPtr<ID3D11RasterizerState> p3d3RasState; m_deviceResources->GetD3DDevice()->CreateRasterizerState(&d3dRas, &p3d3RasState); m_deviceResources->GetD3DDeviceContext()->RSSetState(p3d3RasState.Get()); // Load the scene objects. auto loadMeshTask = Mesh::LoadFromFileAsync( m_graphics, L"gamelevel.cmo", L"", L"", m_meshModels); (loadMeshTask).then([this]() { // Scene is ready to be rendered. m_loadingComplete = true; }); } The ReleaseDeviceDependentResources method only needs to clear the grids:
Code
void Game::ReleaseDeviceDependentResources() { for (Mesh* m : m_meshModels) { delete m; } m_meshModels.clear(); m_loadingComplete = false; } Now you need to change the Update method so that only the ball rotates:
Code
void Game::Update(DX::StepTimer const& timer) { // Rotate scene. m_rotation = static_cast<float>(timer.GetTotalSeconds()) * 0.5f; } A multiplier (0.5f) is used to control the rotation speed. To make the ball spin faster, you just need to increase this multiplier. For each second, the ball will turn at an angle of 0.5 / (2 * Pi) radians. The Render method draws the ball with the desired rotation angle:
Code
void Game::Render() { // Loading is asynchronous. Only draw geometry after it's loaded. if (!m_loadingComplete) { return; } auto context = m_deviceResources->GetD3DDeviceContext(); // Set render targets to the screen. auto rtv = m_deviceResources->GetBackBufferRenderTargetView(); auto dsv = m_deviceResources->GetDepthStencilView(); ID3DllRenderTargetView *const targets[1] = { rtv }; context->OMSetRenderTargets(1, targets, dsv); // Draw our scene models. XMMATRIX rotation = XMMatrixRotationY(m_rotation); for (UINT i = 0; i < m_meshModels.size() ; i++) { XMMATRIX modelTransform = rotation; String^ meshName = ref new String (m_meshModels [i]->Name ()) ; m_graphics.UpdateMiscConstants(m_miscConstants); m_meshModels[i]->Render(m_graphics, modelTransform); } } ToggleHitEffect : . void Game :: ToggleHitEf feet (String^ object) { } We do not need to change the illumination of the ball, but we need to get data about its touch. To do this, use the modified onHitobject method:
Code
String^ Game: :OnHitobject (int x , int y) { String^ result = nullptr; XMFLOAT3 point; XMFLOAT3 dir; m_graphics.GetCamera().GetWorldLine(x, y, &point, &dir); XMFLOAT4X4 world; XMMATRIX worldMat = XMMatrixRotationY(m_rotation); XMStoreFloat4x4(&world, worldMat); float closestT = FLT_MAX; for (Mesh* m : m_meshModels) { XMFLOAT4X4 meshTransform = world; auto name = ref new String(m->Name()); float t = 0; bool hit = HitTestingHelpers::LineHitTest(*m, &point, &dir, SmeshTransform, &t); if (hit && t < closestT) { result = name; } } return result; } If you start the project now, you will see that the ball rotates around its Y axis.
Ball movement
To move the ball, you need to move it, for example, up and down. First you need to declare a variable for the current position of the ball in Game.h :Code
class Game { public: // snip private: // snip float m_translation; Then in the Update method you need to calculate the current position:
Code
void Game::Update(DX::StepTimer consts timer) { // Rotate scene. m_rotation = static_cast<float>(timer.GetTotalSeconds()) * 0.5f; const float maxHeight = 7. Of; auto totalTime = (float) fmod(timer.GetTotalSeconds(), 2.0f); m_translation = totalTime > 1.0f ? maxHeight - (maxHeight * (totalTime - 1.0f)) : maxHeight *totalTime; } Now the ball will rise and fall every 2 seconds. During the first second the ball will rise, during the next second it will lower. The Render method calculates the resulting matrix and draws the ball in a new position:
Code
void Game::Render() { // snip // Draw our scene models. XMMATRIX rotation = XMMatrixRotationY(m_rotation); rotation *= XMMatrixTranslation(0, m_translation, 0); If you run the project now, you will see that the ball moves up and down at a constant speed. Now you need to give the ball physical properties.
Adding ball physics
In order to give the ball physical effects, it is necessary to simulate the effect on it of a force representing gravity. If you remember the school course of physics, you know that the accelerated motion of the body is described by the following equations:s = s 0 + v 0 t + 1 / 2at 2
v = v 0 + at
Where s is the position of the body at time t, s 0 is the initial position, v 0 is the initial velocity, a is acceleration. For vertical movement, a is the acceleration of gravity (-10 m / s 2 ), and s 0 = 0 (first, the ball is on the ground, that is, at zero height). The equations turn into the following:
s = v 0 t-5t 2
v = v 0 -10t
We want to reach the maximum height in 1 second. At the maximum height, the speed is 0. Therefore, the second equation allows us to find the initial speed:
0 = v 0 - 10 * 1 => v 0 = 10 m / s
This gives us the ball movement:
s = 10t - 5t 2
You need to change the Update method to use this equation:
Code
void Game::Update(DX::StepTimer consts timer) { // Rotate scene. m_rotation = static_cast<float>(timer.GetTotalSeconds()) * 0.5f; auto totalTime = (float) fmod(timer.GetTotalSeconds(), 2.0f); m_translation = 10*totalTime - 5 *totalTime*totalTime; } Now that the ball is moving up and down realistically, it's time to add a football field.
Adding a football field
To add a football field, you need to create a new scene. In the Assets folder, right-click to add a new 3D scene, and name it field.fbx . From the toolbox, add a plane and select it, change its size along the X axis to 107, and along the Z axis to 60. Set the properties of this plane Texture1 to an image of a football field.You can now use the zoom tool (or press the Z key) to reduce the image.
Then you need to load the model in CreateDeviceDependentResources in Game.cpp :
Code
void Game::CreateDeviceDependentResources() { // snip // Load the scene objects. auto loadMeshTask = Mesh::LoadFromFileAsync( m_graphics, L"gamelevel.cmo", L"", L"", m_meshModels) .then([this]() { return Mesh::LoadFromFileAsync( m_graphics, L"field.cmo", L"", L"", m_meshModels, false // Do not clear the vector of meshes ); }); (loadMeshTask) .then([this] () { // Scene is ready to be rendered. m_loadingComplete = true; }); } When you start the program, you will see that the field jumps with the ball. To stop the field from moving, you need to change the Render method:
Code
// Renders one frame using the Starter Kit helpers, void Game::Render() { // snip for (UINT i = 0; i < m_meshModels.size(); i++) { XMMATRIX modelTransform = rotation; String^ meshName = ref new String(m_meshModels[i]->Name()); m_graphics.UpdateMiscConstants(m_miscConstants); if (String::CompareOrdinal(meshName, L"Sphere_Node") == 0) m_meshModels[i]->Render(m_graphics, modelTransform); else m_meshModels[i]->Render(m_graphics, XMMatrixIdentity()); } } With this change, the conversion applies only to the ball. The field is drawn without conversion. If you run the code now, you will see that the ball bounces off the field, but “falls” into it at the bottom. To correct this error, move the field to -0.5 along the Y axis. Select the field and change its translation along the Y axis to -0.5. Now when you start the application, the ball will bounce off the field, as in fig. four.

Figure 4. The ball bounces off the field.
Setting the position of the camera and the ball
The ball is located in the center of the field, but we do not need it there. In this game, the ball must be on the 11-meter mark. You should move the ball along the X axis by changing the ball movement in the Render method in Game.cpp : rotation *= XMMatrixTranslation(63.0, m_translation, 0); The ball moves 63 units along the X axis, that is, it is placed on the 11-meter mark. After this change, you will no longer see the ball, because it is out of the camera’s field of view: the camera is installed in the center of the field and aimed at the middle. The camera needs to be repositioned so that it is aimed at the goal line. You need to do this in the CreateWindowSizeDependentResources file in the Game.cpp file:
Code
m_graphics.GetCamera().SetViewport((UINT) outputSize.Width, (UINT) outputSize.Height); m_graphics.GetCamera().SetPosition(XMFLOAT3(25.Of, 10.0f, 0.0f)); m_graphics.GetCamera().SetLookAt(XMFLOAT3(100.0f, 0.0f, 0.0f)); float aspectRatio = outputSize.Width / outputSize.Height; float fovAngleY = 30.0f * XM_PI / 180.0f; if (aspectRatio < 1.0f) { // Portrait or snap view m_graphics.GetCamera().SetUpVector(XMFLOAT3(1.0f, 0.0f, 0.0f)); fovAngleY = 120.0f * XM_PI / 180.0f; } else { // Landscape view. m_graphics.GetCamera().SetUpVector(XMFLOAT3(0.0f, 1.0f, 0.0f)); } m_graphics.GetCamera().SetProjection(fovAngleY, aspectRatio, 1.0f, 100.0f); The camera is now located between the mid-field mark and the 11-meter mark and is directed towards the goal line. The new view is shown in Fig. five.

Figure 5. Modified ball position and new camera position
Adding a goal post
To add to the field of the gate, you need a new three-dimensional scene with a gate. You can create your own model or use the finished one. This model should be added to the Assets folder so that it can be compiled and used.This model needs to be loaded in the CreateDeviceDependentResources method in the Game.cpp file:
Code
auto loadMeshTask = Mesh::LoadFromFileAsync( m_graphics, L"gamelevel.cmo", L"", L"", m_meshModels) .then([this]() { return Mesh::LoadFromFileAsync( m_graphics, L"field.cmo", L"", L"", m_meshModels, false // Do not clear the vector of meshes ); }).then([this]() { return Mesh::LoadFromFileAsync( m_graphics, L"soccer_goal.cmo", L"", L"", m_meshModels, false // Do not clear the vector of meshes ); }); After loading, set the position and draw in the Render method in Game.cpp :
Code
auto goalTransform = XMMatrixScaling(2.0f, 2.0f, 2.0f) * XMMatrixRotationY(-XM_PIDIV2)* XMMatrixTranslation(85.5f, -0.5, 0); for (UINT i = 0; i < m_meshModels.size() ; i++) { XMMATRIX modelTransform = rotation; String'^ meshName = ref new String (m_meshModels [i]->Name ()) ; m_graphics.UpdateMiscConstants(m_miscConstants); if (String::CompareOrdinal(meshName, L"Sphere_Node") == 0) m_meshModels[i]->Render(m_graphics, modelTransform); else if (String::CompareOrdinal(meshName, L"Plane_Node") == 0) m_meshModels[i]->Render(m_graphics, XMMatrixIdentity()); else m_meshModels[i]->Render(m_graphics, goalTransform); } This change applies the transform to the gate and draws it. This transformation is a combination of three transformations: scaling (2 times increase in the original size), rotated 90 degrees and moving 85.5 units along the X axis and –0.5 units along the Y axis due to the depth of the field. After that, the gate is set facing the field on the goal line. Note that the order of transformations is important: if you apply a rotation after moving, the gate will be drawn in a completely different place and you will not see them.
Kick the ball
All elements are set in place, but the ball still bounces. It's time to hit him. For this you need to re-apply physical skills. Hitting the ball looks like it is shown in fig. 6
Figure 6. The scheme of hitting the ball
The ball is hit at an initial speed of v 0 at an angle α (if you don’t remember school physics lessons, play a little bit at Angry Birds to see this principle in action). The movement of the ball can be decomposed into two different movements: horizontally - this is movement at a constant speed (we assume that there is no air resistance and the effect of the wind), as well as vertical movement - the same as we used before. Horizontal equation of motion:
s X = s 0 + v 0 * cos (α) * t
Vertical motion equation:
s Y = s 0 + v 0 * sin (α) * t - 1/2 * g * t 2
Thus, we have two movements: one along the X axis, the other along the Y axis. If the blow was struck at an angle of 45 degrees, then cos (α) = sin (α) = sqrt (2) / 2 , therefore v 0 * cos ( α) = v 0 * sin (a) * t . It is necessary that the ball hit the goal, so the range of impact should exceed 86 units (the distance to the goal line is 85.5). It is necessary that the flight of the ball took 2 seconds. When substituting these values in the first equation we get:
86 = 63 + v 0 * cos (α) * 2> = v 0 * cos (α) = 23/2 = 11.5
If we replace the values in the equation, then the equation of displacement along the Y axis will be:
s Y = 0 + 11.5 * t-5 * t 2
And on the X axis - this:
s X = 63 + 11.5 * t
The equation for the Y axis gives us time when the ball hits the ground again. To do this, you need to solve the quadratic equation (yes, I understand that you hoped to say goodbye to them forever after the school algebra course, but nevertheless, here it is):
(-b ± sqrt (b 0 - 4 * a * c)) / 2 * a> = (-11.5 ± sqrt (11.52 - 4 * -5 * 0) / 2 * -5> = 0 or 23/10> = 2.3 s
These equations can replace the movement for the ball. First, in Game.h, create variables to save the movement along three axes:
float m_translationX, m_translationY, m_translationZ;
Then in the Update method in Game.cpp add the equations:
Code
void Game::Update(DX::StepTimer consts timer) { // Rotate scene. m_rotation = static_cast<float>(timer.GetTotalSeconds()) * 0.5f; auto totalTime = (float) fmod(timer.GetTotalSeconds(), 2.3f); m_translationX = 63.0 + 11.5 * totalTime; m_translationY = 11.5 * totalTime - 5 * totalTime*totalTime; } The Render method uses these new movements:
rotation * = XMMatrixTranslation (m_translationX, m_translationY, 0);
If you run the program now, you will see the ball fly into the middle of the gate. If you want the ball to move in other directions, you need to add a horizontal angle of impact. To do this, we use the displacement along the Z axis.
The distance from the 11-meter mark to the gate is 22.5 units, and the distance between the goal posts is 14 units. This gives us the angle α = atan (7 / 22.5), that is, 17 degrees. You can calculate and move along the Z axis, but you can make it easier: the ball should move to the line at the same moment when it reaches the bar. This means that the ball must move 7 / 22.5 units along the Z axis and 1 unit along the X axis. The equation for the Z axis will be:
s z = 11,5 * t / 3,2 ≥ s z = 3,6 * t
This move to the goal post. Any movement with a lower speed will have a smaller angle. For the ball to reach the goal, the speed must be between -3.6 (left bar) and 3.6 (right bar). If we consider that the ball must completely hit the gate, the maximum distance is 6 / 22.5, and the speed is from 3 to -3. With these numbers, you can set the angle of impact in the Update method:
Code
void Game::Update(DX::StepTimer consts timer) { // Rotate scene. m_rotation = static_cast<float>(timer.GetTotalSeconds()) * 0.5f; auto totalTime = (float) fmod(timer.GetTotalSeconds(), 2.3f); m_translationX = 63.0 + 11.5 * totalTime; m_translationY = 11.5 * totalTime - 5 * totalTime*totalTime; m_translationZ = 3 * totalTime; } Z Render: rotation *= XMMatrixTranslation(m_translationX, m_translationY, m_translationZ); … . The result should be approximately the same as in fig. 7

Figure 7. Blow at an angle
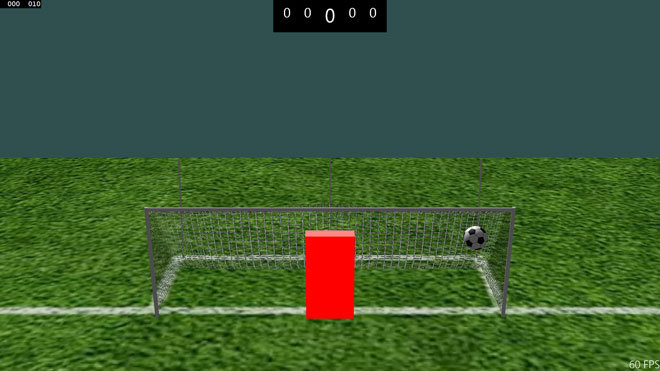
Adding a goalkeeper
The movement of the ball is ready, the gate is in place, now you need to add a goalkeeper who will catch the ball. In the role of the goalkeeper, we will have a distorted cube. In the Assets folder, add a new item (new 3D scene) and name it goalkeeper.fbx .Add a cube from the toolbox and select it. Set the scale: 0.3 for the X axis, 1.9 for the Y axis and 1 for the Z axis. Set the MaterialAmbient property to 1 for red and 0 for blue and green to make the object red.
Change the value of the Red property in the MaterialSpecular section to 1 and the value of the MaterialSpecularPower property to 0.2.
Load a new resource in the CreateDeviceDependentResources method :
Code
auto loadMeshTask = Mesh::LoadFromFileAsync( m_graphics, L"gamelevel.cmo", L"", L"", m_meshModels) .then([this]() { return Mesh::LoadFromFileAsync( m_graphics, L"field.cmo", L"", L"", m_meshModels, false // Do not clear the vector of meshes ); }).then([this]() { return Mesh::LoadFromFileAsync( m_graphics, L"soccer_goal.cmo", L"", L"", m_meshModels, false // Do not clear the vector of meshes ); }).then([this]() { return Mesh::LoadFromFileAsync( m_graphics, L"goalkeeper.cmo", L"", L"", m_meshModels, false // Do not clear the vector of meshes ); }); Now you need to position the goalkeeper in the middle of the gate and draw it. This must be done in the Render method in Game.cpp :
Code
void Game::Render() { // snip auto goalTransform = XMMatrixScaling(2.0f, 2.0f, 2.0f) * XMMatrixRotationY(-XM_PIDIV2)* XMMatrixTranslation(85.5f, -0.5f, 0); auto goalkeeperTransform = XMMatrixTranslation(85.65f, 1.4f, 0) ; for (UINT i = 0; i < m_meshModels.size(); i++) { XMMATRIX modelTransform = rotation; String^ meshName = ref new String (m_meshModels [i]->Name ()) ; m_graphics.UpdateMiscConstants(m_miscConstants); if (String::CompareOrdinal(meshName, L"Sphere_Node") == 0) m_meshModels[i]->Render(m_graphics, modelTransform); else if (String::CompareOrdinal(meshName, L"Plane_Node") == 0) m_meshModels[i]->Render(m_graphics, XMMatrixIdentity()); else if (String::CompareOrdinal(meshName, L"Cube_Node") == 0) m_meshModels[i]->Render(m_graphics, goalkeeperTransform); else m_meshModels[i]->Render(m_graphics, goalTransform); } } This code places the goalkeeper in the middle of the gate. Now you need to make sure that the goalkeeper can move left and right to catch the ball. To control the movement of the goalkeeper, the user will press the left and right arrow keys.
The goalkeeper’s movement is limited by goalposts located at a distance of +7 and -7 units along the Z axis. The goalkeeper’s width is 1 unit each way, so he can move 6 units left or right.
The keystroke is captured on the XAML page ( Directxpage.xaml ) and redirected to the Game class. Add the KeyDown event handler to Directxpage.xaml :
Code
<Page x:Class="StarterKit.DirectXPage" xmlns="http://schemas.microsoft.com/winfx/2006/xaml/presentation" xmlns:x="http://schemas.microsoft.com/winfx/2006/xaml" xmlns:local="using:StarterKit" xmlns:d="http://schemas.microsoft.com/expression/blend/2008" xmlns:mc="http://schemas.openxmlformats.org/markup-compatibility/2006" mc:Ignorable="d" KeyDown="OnKeyDown"> Event handler in DirectXPage.xaml.cpp :
Code
void DirectXPage::OnKeyDown(Platform::ObjectΛ sender, Windows::UI::Xaml::Input::KeyRoutedEventArgsΛ e) { m_main->OnKeyDown( ->Key); } m_main is an instance of the StarterKitMain class that renders the game's scenes and frame rate counter. You need to declare a public method in StarterKitMain.h :
Code
class StarterKitMain : public DX::IDeviceNotify { public: StarterKitMain(const std::shared_ptr<DX::DeviceResources>& deviceResources); ~StarterKitMain(); // Public methods passed straight to the Game renderer. Platform: : String'^ OnHitObject (int x, int y) { return m_sceneRenderer->OnHitObject(x, y); } void OnKeyDown(Windows::System::VirtualKey key) { m_sceneRenderer->OnKeyDown(key); } … . This method redirects the key to the OnKeyDown method in the Game class. Now we need to declare the OnKeyDown method in the Game.h file:
Code
class Game { public: Gamefconst std::shared_ptr<DX::DeviceResources>& deviceResources); void CreateDeviceDependentResources(); void CreateWindowSizeDependentResources(); void ReleaseDeviceDependentResources(); void Update(DX::StepTimer consts timer); void Render(); void OnKeyDown(Windows::System::VirtualKey key); … This method handles keystrokes and moves the goalkeeper in the appropriate direction. Before creating this method, you need to declare a private field in the Game.h file to save the position of the goalkeeper:
Code
class Game { // snip private: // snip float m_goalkeeperPosition; Initially, the goalkeeper is at position 0. This value will increase or decrease when the user presses an arrow key. If the position is greater than 6 or less than -6, the position of the goalkeeper does not change. This must be done in the OnKeyDown method in Game.cpp :
Code
void Game::OnKeyDown(Windows::System::VirtualKey key) { const float MaxGoalkeeperPosition = 6.0; const float MinGoalkeeperPosition = -6.0; if (key == Windows::System::VirtualKey::Right) m_goalkeeperPosition = m_goalkeeperPosition >= MaxGoalkeeperPosition ? m_goalkeeperPosition : m_goalkeeperPosition + 0.1f; else if (key == Windows::System::VirtualKey::Left) m_goalkeeperPosition = m_goalkeeperPosition <= MinGoalkeeperPosition ? m_goalkeeperPosition : m_goalkeeperPosition - 0.1f; } The new position of the goalkeeper is used in the Render method of the Game.cpp file, where the goalkeeper movement is calculated:
auto goalkeeperTransform = XMMatrixTranslation (85.65f, 1.40f, m_goalkeeperPosition);
By applying these changes, you can start the game: you will see that the goalkeeper moves to the right or left when you press the corresponding arrow keys (see Figure 8).

Figure 8. Playing with the goalkeeper in the desired position.
Until now, the ball moved constantly, but we do not need it. The ball must begin movement immediately after the strike and stop when the goal is reached. The goalkeeper should also not move before hitting the ball.
You must declare the private field m_isAnimating in the Game.h file so that the game “knows” when the ball is moving:
Code
class Game { public: // snip private: // snip bool m_isAnimating; This variable is used in the Update and Render methods in Game.cpp , so the ball moves only when m_isAnimating is true:
Code
void Game::Update(DX::StepTimer consts timer) { if (m_isAnimating) { m_rotation = static_cast<float>(timer.GetTotalSeconds()) * 0.5f; auto totalTime = (float) fmod(timer.GetTotalSeconds(), 2.3f); m_translationX = 63.0f + 11.5f * totalTime; m_translationY = 11.5f * totalTime - 5.Of * totalTime*totalTime; m_translationZ = 3.0f * totalTime; } } void Game::Render() { // snip XMMATRIX modelTransform; if (m_isAnimating) { modelTransform = XMMatrixRotationY(m_rotation); modelTransform *= XMMatrixTranslation(m_translationX, m_translationY, m_translationZ); } else modelTransform = XMMatrixTranslation(63.0f, 0.0f, 0.0f); … . The variable modelTransform moves from the loop to the beginning. The arrow keys should be processed in the OnKeyDown method only when m_isAnimating is true:
Code
void Game::OnKeyDown(Windows::System::VirtualKey key) { const float MaxGoalkeeperPosition = 6.0f; if (m_isAnimating) { auto goalKeeperVelocity = key == Windows::System::VirtualKey::Right ? 0.1f : -0.1f; m_goalkeeperPosition = fabs(m_goalkeeperPosition) >= MaxGoalkeeperPosition ? m_goalkeeperPosition : m_goalkeeperPosition + goalKeeperVelocity; } } Now you need to hit the ball. This happens when the user presses the space bar. Declare a new private field m_isKick in the Game.h file:
Code
class Game { public: // snip private: // snip bool m_isKick; Set this field to true in the OnKeyDown method in Game.cpp :
Code
void Game::OnKeyDown(Windows::System::VirtualKey key) { const float MaxGoalkeeperPosition = 6. Of; if (m_isAnimating) { auto goalKeeperVelocity = key == Windows::System::VirtualKey::Right ? 0.1f : -0.1f; m_goalkeeperPosition = fabs(m_goalkeeperPosition) >= MaxGoalkeeperPosition ? m_goalkeeperPosition : m_goalkeeperPosition + goalKeeperVelocity; } else if ( y == Windows::System::VirtualKey::Space) m_isKick = true; } When m_isKick is true, the animation method starts in the Update method:
Code
void Game::Update(DX::StepTimer consts timer) { if (m_isKick) { m_startTime = static_cast<float>(timer.GetTotalSeconds()); m_isAnimating = true; m_isKick = false; } if (m_isAnimating) { auto totalTime = static_cast<float>(timer.GetTotalSeconds()) – m_startTime; m_rotation = totalTime * 0.5f; m_translationX = 63.0f + 11.5f * totalTime; m_translationY = 11.5f * totalTime - 5.Of * totalTime*totalTime; m_translationZ = 3.0f * totalTime; if (totalTime > 2.3f) ResetGame(); } } m_startTime ( Game.h ), . 2,3 , ( ). ResetGame Game.h :
Code
void Game::ResetGame() { m_isAnimating = false; m_goalkeeperPosition = 0; } m_isAnimating false . : 11- , m_isAnimating false. . :
m_translationZ = 3.0f * totalTime;
, , . m_ballAngle Game.h Update :
Code
void Game::Update(DX::StepTimer const& timer) { if (m_isKick) { m_startTime = static_cast<float>(timer.GetTotalSeconds()); m_isAnimating = true; m_isKick = false; m_ballAngle = (static_cast <float> (rand()) / static_cast <float> (RAND_MAX) -0.5f) * 6.0f; } … . Rand()/RAND_MAX 0 1. 0,5, -0,5 0,5, 6, -3 3. , , srand CreateDeviceDependentResources :
Code
void Game::CreateDeviceDependentResources() { srand(static_cast <unsigned int> (time(0))); … . , ctime . , m_ballAngle Update :
m_translationZ = m_ballAngle * totalTime;
, , , . : , . , , . Update :
Code
void Game::Update(DX::StepTimer consts timer) { if (m_isKick) { m_startTime = static_cast<float>(timer.GetTotalSeconds()); m_isAnimating = true; m_isKick = false; m_isGoal = m_isCaught = false; m_ballAngle = (static_cast <float> (rand()) / static_cast <float> (RAND_MAX) -0.5f) * 6.0f; } if (m_isAnimating) { auto totalTime = static_cast<float>(timer.GetTotalSeconds()) – m_startTime; m_rotation = totalTime * 0.5f; if ( !m_isCaught) { // ball traveling m_translationX = 63.0f + 11.5f * totalTime; m_translationY = 11.5f * totalTime - 5.0f * totalTime*totalTime; m_translationZ = m_ballAngle * totalTime; } else { // if ball is caught, position it in the center of the goalkeeper m_translationX = 83.35f; m_translationY = 1.8f; m_translationZ = m_goalkeeperPosition; } if (!m_isGoal && !m_isCaught && m_translationX >= 85.5f) { // ball passed the goal line - goal or caught auto ballMin = m_translationZ - 0.5f + 7.0f; auto ballMax = m_translationZ + 0.5f + 7.0f; auto goalkeeperMin = m_goalkeeperPosition - 1.0f + 7.0f; auto goalkeeperMax = m_goalkeeperPosition + 1.0f + 7.0f; m_isGoal = (goalkeeperMax < ballMin || goalkeeperMin > ballMax); m_isCaught = !m_isGoal; } if (totalTime > 2.3f) ResetGame(); } } Game.h : m_isGoal m_IsCaught . , : . false, . , , . , , 7.0 f . , , . 7.0 f, , , . , . m_isGoal m_IsCaught .
, . , , , IDZ .
Conclusion
, . DirectX. , C++/DX , C#., . , , .
, , . .
Source: https://habr.com/ru/post/241085/
All Articles