JBrainfuck - Writing a Brainfuck compiler for Java VM
I have long been interested in the question of writing my own compiler for a Java VM, but there was not enough experience to do this. Yes, and somehow did not reach the hands, and recently still decided to understand this topic and at the same time to talk about his experience in creating a compiler for this VM.
Take Brainfuck as the implemented language. It is easy to implement, which is great for studying this topic, but first I will give you my own implementation.
JBrainfuck is an optimizing Brainfuck interpreter and compiler for Java VM. Thanks to JIT has high performance.
')
An obvious solution would be to write a Java compiler.
To generate the bytecode, take the ASM library. It is used by such popular languages as Groovy, JRuby, and others.
To conveniently view the JVM bytecode, install the plugins in our IDE.
I think many people know the Brainfuck language that we implement. It consists of only 8 simple commands, but nevertheless it is full in turing, which allows you to implement anything in this language, even OS (God forbid ).
Its essence is simple. We have a memory tape, on which you can move to the right or left, as well as change the value of the cell, adding or subtracting it.
Here is a list of these commands:
Sample Brainfuck program printing “Hello, Habr!”:
Since we are going to write the compiler according to all the rules, it will have three stages of compilation: lexical analysis, optimization and generation of bytecode.
For a start, it is worth considering the possible optimization, it will allow you to find out how convenient it is to design a compiler.
Probably the first thing that catches your eye is the same type of operation. Of course, the idea immediately appears to compress this whole thing and reduce a lot of operations to the form
Also, a code of the form
If you further promote the idea of reducing the number of operations, then you can understand that the operations of addition / subtraction are equivalent and differ only in the sign of the number. So you can bring them to a single operation. The same is also valid for left / right movement operation.
After all the optimizations we will create a new table of operations. Just under it and we will do our compiler.
We write a class that will store the operation and the number of repetitions.
Select the tokens that can appear in the Brainfuck code:
Now let's write an analyzer that highlights the sequence of these tokens:
Now our task is to compress recurring operations and remove unnecessary (for example, several ZERO commands in a row).
Everything is done relatively simply:
We proceed to the most difficult and interesting part, to the generation of bytecode under Java VM. To understand how to generate baytkod, we will help previously installed plugins for IDE. Let's get started
First we need to allocate memory for the tape and set the position. Simply create a class with a method without parameters and declare an array and a variable for the position in it.
Now we need to look at the bytecode that the Java compiler will create from this code. To do this, call the Show Bytecode outline command from the context menu of the editor (for IDEA this way). The environment will compile the class with our method and show bytecode. We find our method and watch it.
For a more confident understanding of the result, it is advisable to look at the JVM instruction table .
Now we have an idea how our code works at the bytecode level. Remove labels, specify the line number and all after return. This information is not needed for correct operation. As a result, we get this:
So far, everything is more or less simple. In the JVM, most of the operations after execution remove their arguments from the stack. It is very convenient and no need to clean up after. Now we will add all operations to our method, so far without cycles, including in the input / output, which we have described in the table .
It turns out something like this:
In this case, the meaning of the code is not important to us, it is important for us to see the bytecode of operations.
Remove the extra instructions and see it:
Now we have bytecode of all the operations we need to implement the generator without cycles.
I want to note that the
Let's start the code generator with the fact that in Java everything is stored in classes, so during the generation it will create the class. The ASM library has great tools for generating them. It all comes down to a simple construction of a class tree, with elements of the form fields, methods, and nested classes. Methods in themselves store arrays of instructions JVM. To make it easier to understand how to work with the result of compilation, let our class inherit from the Runnable interface.
Create an empty class inherited from this interface:
And see the baytkod:
As you can see, when generating the bytecode, the
For class generation there is a class ClassNode , and for MethodNode methods.
You can generate our empty class as follows (without taking into account labels and line numbers):
Now the task is to implement the addition of instructions to the
It remains to solve the problem with cycles. Again, we will resort to viewing the test method bytecode:
Here is its byte code:
As a result, for the cycles, we just need to correctly place the labels and transitions for them.
For labels there is a class LabelNode , in fact the object itself is a label. Where it is inserted among the instructions, there we go.
To jump, use the JumpInsnNode class. The first argument indicates the type of transition (unconditional or any of the conditional) and the second argument is the label itself, where the transition will be made.
For the distribution of labels with regard to nesting, we use the stack. Those. met the beginning of the cycle, saved the label to the stack, met the end, pulled out the label and registered transitions.
Here is the result:
Now all this business needs to be started somehow, but first we will load this class. Unfortunately, Java does not provide a regular API for this purpose, so we will resort to crutches like this (wherever without them ):
And the download and launch itself will look like this:
It will be interesting to find out how smart the option we have turned out. For this there is a special program on Brainfuck, which has many nested loops and is good for performance testing.
This code is also suitable for the compiler performance test, at the end of the program a symbol with code 202 is output, if so, then everything is fine.
We will conduct 6 tests. Let's check the usual Brainfuck interpreter, JVM compiler and compilation in VC ++. Each test will be tested with and without optimization (from Brainfuck).
Test results (less is better):
As you can see, our efforts were not in vain. JIT compilation in Java VM did its job and brought the performance to the level of native execution.
Java VM is a very convenient platform for implementing your own languages. VM with a thoughtful set of instructions and a convenient API allow you to write your language in a fairly short time.
Although the lack of simple and understandable tutorials on ASM at first complicates understanding of how the library works and is able to guide you to various ancient rakes, while the library itself offers elegant solutions.
And the purpose of this article was to fill this gap and give the opportunity to start creating as soon as possible.
I hope I did it.
Thanks for attention!
Take Brainfuck as the implemented language. It is easy to implement, which is great for studying this topic, but first I will give you my own implementation.
JBrainfuck is an optimizing Brainfuck interpreter and compiler for Java VM. Thanks to JIT has high performance.
')
- License: MIT
- Project address: https://github.com/SystemX-Files/jbrainfuck/
- Platforms: Linux, Windows, MacOS and wherever there is Java.
Selection of development tools
An obvious solution would be to write a Java compiler.
To generate the bytecode, take the ASM library. It is used by such popular languages as Groovy, JRuby, and others.
To conveniently view the JVM bytecode, install the plugins in our IDE.
- Bytecode Outline - for Eclipse
- ASM Bytecode Outline - for IDEA
We start to create
I think many people know the Brainfuck language that we implement. It consists of only 8 simple commands, but nevertheless it is full in turing, which allows you to implement anything in this language, even OS (
Its essence is simple. We have a memory tape, on which you can move to the right or left, as well as change the value of the cell, adding or subtracting it.
Here is a list of these commands:
| Team brainfuck | Analog in Java | Description |
|---|---|---|
| Start programs | | Allocate memory for tape and put the position in the middle |
< | | Jump left |
> | | Go right on tape |
| + | | Add 1 to current cell |
| - | | Subtract 1 from current cell |
| . | | Display the value of the current cell |
| , | | Enter the value of the current cell |
| [ | | We work in a loop until the value is zero |
| ] | | Transition to the beginning of the cycle |
Code
++++++++[>+>++>+++>++++>+++++>++++++>+++++++>++++++++> +++++++++>++++++++++>+++++++++++>++++++++++++>++++++++ +++++>++++++++++++++>+++++++++++++++>++++++++++++++++< <<<<<<<<<<<<<<<-]>>>>>>>>>.<<<<<<<<<>>>>>>>>>>>>>---.+ ++<<<<<<<<<<<<<>>>>>>>>>>>>>>----.++++<<<<<<<<<<<<<<>> >>>>>>>>>>>>----.++++<<<<<<<<<<<<<<>>>>>>>>>>>>>>-.+<< <<<<<<<<<<<<>>>>>>----.++++<<<<<<>>>>.<<<<>>>>>>>>>.<< <<<<<<<>>>>>>>>>>>>+.-<<<<<<<<<<<<>>>>>>>>>>>>++.--<<< <<<<<<<<<>>>>>>>>>>>>>>++.--<<<<<<<<<<<<<<>>>>+.-<<<<. Writing compiler
Since we are going to write the compiler according to all the rules, it will have three stages of compilation: lexical analysis, optimization and generation of bytecode.
For a start, it is worth considering the possible optimization, it will allow you to find out how convenient it is to design a compiler.
Optimization
Probably the first thing that catches your eye is the same type of operation. Of course, the idea immediately appears to compress this whole thing and reduce a lot of operations to the form
#~ , where # is the number of operations, and ~ is an operation.Also, a code of the form
[-] or [+] is cell zeroing, so it makes sense to select a separate operation for this.If you further promote the idea of reducing the number of operations, then you can understand that the operations of addition / subtraction are equivalent and differ only in the sign of the number. So you can bring them to a single operation. The same is also valid for left / right movement operation.
After all the optimizations we will create a new table of operations. Just under it and we will do our compiler.
| Operation | Java analogue | Description |
|---|---|---|
| SHIFT (arg) | | Ribbon Shift |
| ADD (arg) | | Addition (subtract negative number) |
| ZERO | | Zeroing |
| OUT (arg) | | Print arg times |
| IN (arg) | | Enter cell arg times |
| WHILE | | |
| END | |
We write a class that will store the operation and the number of repetitions.
Code
public class Opcode{ public enum Type{ SHIFT, ADD, ZERO, OUT, IN, WHILE, END } public Type type = null; // public int arg = 1; //- public Opcode(Type type, int arg) { this.type = type; this.arg = arg; } public Opcode(Type type) { this.type = type; } public Opcode clone(){ return new Opcode(type, arg); } } Lexical analyzer
Select the tokens that can appear in the Brainfuck code:
| Lexeme | Operation |
|---|---|
< | SHIFT with - |
> | SHIFT + |
+ | ADD with + |
- | ADD with - |
. | Out |
, | IN |
[ | WHILE |
] | END |
[-] or [+] | ZERO |
Now let's write an analyzer that highlights the sequence of these tokens:
Code
public abstract class Tokenizer{ public static List<Opcode> tokenize(String code) { // ( ) List<Opcode> retValue = new ArrayList<Opcode>(); int pos = 0; // while (pos < code.length()) { switch (code.charAt(pos++)) { // , case '>': retValue.add(new Opcode(Opcode.Type.SHIFT, +1)); break; case '<': retValue.add(new Opcode(Opcode.Type.SHIFT, -1)); break; case '+': retValue.add(new Opcode(Opcode.Type.ADD, +1)); break; case '-': retValue.add(new Opcode(Opcode.Type.ADD, -1)); break; case '.': retValue.add(new Opcode(Opcode.Type.OUT)); break; case ',': retValue.add(new Opcode(Opcode.Type.IN)); break; case '[': char next = code.charAt(pos); //, ([+] [-]) if((next == '+' || next == '-') && code.charAt(pos + 1) == ']') { retValue.add(new Opcode(Opcode.Type.ZERO)); pos += 2; } else retValue.add(new Opcode(Opcode.Type.WHILE)); break; case ']': retValue.add(new Opcode(Opcode.Type.END)); break; } } return retValue; } } Optimizer
Now our task is to compress recurring operations and remove unnecessary (for example, several ZERO commands in a row).
Everything is done relatively simply:
Code
public abstract class Optimizer { public static List<Opcode> optimize(String code) { return optimize(Tokenizer.tokenize(code)); } public static List<Opcode> optimize(List<Opcode> tokens) { Stack<Opcode> retValue = new Stack<Opcode>(); // for (Opcode token : tokens) { switch (token.type){ case SHIFT: case ADD: case OUT: case IN: case ZERO: // , if(retValue.size() == 0) { retValue.push(token.clone()); continue; } // , if(retValue.peek().type != token.type) { if(retValue.peek().arg == 0) // "" retValue.pop(); // if(retValue.peek().type == Opcode.Type.ZERO) // ZERO retValue.peek().arg = 1; // , retValue.push(token.clone()); // continue; } // , // retValue.peek().arg += token.arg; break; case WHILE: case END: // retValue.add(token.clone()); break; } } return retValue; } } Bytecode generator
We proceed to the most difficult and interesting part, to the generation of bytecode under Java VM. To understand how to generate baytkod, we will help previously installed plugins for IDE. Let's get started
First we need to allocate memory for the tape and set the position. Simply create a class with a method without parameters and declare an array and a variable for the position in it.
// public void test() { char[] arr = new char[30000]; int i = 15000; // } Now we need to look at the bytecode that the Java compiler will create from this code. To do this, call the Show Bytecode outline command from the context menu of the editor (for IDEA this way). The environment will compile the class with our method and show bytecode. We find our method and watch it.
For a more confident understanding of the result, it is advisable to look at the JVM instruction table .
public test()V // , ( ) L0 // VM, 5 L0 LINENUMBER 5 L0 // short 30000 SIPUSH 30000 // T_CHAR , - ( ) NEWARRAY T_CHAR // 1 ( JVM) ASTORE 1 L1 // LINENUMBER 6 L1 // 5 L1 SIPUSH 15000 // ISTORE 2 // integer 2 L2 LINENUMBER 7 L2 RETURN // L3 // LOCALVARIABLE this LByteCodeTest; L0 L3 0 LOCALVARIABLE arr [C L1 L3 1 LOCALVARIABLE i I L2 L3 2 MAXSTACK = 1 MAXLOCALS = 3 Now we have an idea how our code works at the bytecode level. Remove labels, specify the line number and all after return. This information is not needed for correct operation. As a result, we get this:
// SIPUSH 30000 NEWARRAY T_CHAR ASTORE 1 // SIPUSH 15000 ISTORE 2 // RETURN So far, everything is more or less simple. In the JVM, most of the operations after execution remove their arguments from the stack. It is very convenient and no need to clean up after. Now we will add all operations to our method, so far without cycles, including in the input / output, which we have described in the table .
It turns out something like this:
public void test() throws IOException { // read() char[] arr = new char[30000]; int i = 15000; i += 1111; arr[i] += 2222; arr[i] = 0; System.out.print(arr[i]); arr[i] = (char) System.in.read(); } In this case, the meaning of the code is not important to us, it is important for us to see the bytecode of operations.
Remove the extra instructions and see it:
public test()V throws java/io/IOException // SIPUSH 30000 NEWARRAY T_CHAR ASTORE 1 // SIPUSH 15000 ISTORE 2 // 1111 IINC 2 1111 // 2222 ALOAD 1 // ILOAD 2 // DUP2 // CALOAD // char , ( CASTORE) SIPUSH 2222 // 2222 IADD // I2C // char ( integer) CASTORE // // ALOAD 1 ILOAD 2 ICONST_0 // JVM 0 ( ) CASTORE // // GETSTATIC java/lang/System.out : Ljava/io/PrintStream; // ( ) ALOAD 1 ILOAD 2 CALOAD // INVOKEVIRTUAL java/io/PrintStream.print (C)V // // ALOAD 1 ILOAD 2 GETSTATIC java/lang/System.in : Ljava/io/InputStream; // INVOKEVIRTUAL java/io/InputStream.read ()I // I2C CASTORE // RETURN Now we have bytecode of all the operations we need to implement the generator without cycles.
I want to note that the
I2C instruction is not required (ascertained empirically). I can assume that the dimension of the type is also controlled by the CALOAD instruction CALOAD and as a result, the presence of I2C loses its meaning. We will also replace the SIPUSH instruction with LDC (add an integer constant to the stack), because our compiler stores repetitions in an integer (the field type arg is in the class Opcode ).Let's start the code generator with the fact that in Java everything is stored in classes, so during the generation it will create the class. The ASM library has great tools for generating them. It all comes down to a simple construction of a class tree, with elements of the form fields, methods, and nested classes. Methods in themselves store arrays of instructions JVM. To make it easier to understand how to work with the result of compilation, let our class inherit from the Runnable interface.
Create an empty class inherited from this interface:
public class ClassTest implements Runnable { @Override public void run() { } } And see the baytkod:
// class version 52.0 (52) // access flags 0x21 public class ClassTest implements java/lang/Runnable { // access flags 0x1 public <init>()V L0 LINENUMBER 3 L0 ALOAD 0 INVOKESPECIAL java/lang/Object.<init> ()V RETURN L1 LOCALVARIABLE this LClassTest; L0 L1 0 MAXSTACK = 1 MAXLOCALS = 1 // access flags 0x1 public run()V L0 LINENUMBER 7 L0 RETURN L1 LOCALVARIABLE this LClassTest; L0 L1 0 MAXSTACK = 0 MAXLOCALS = 1 } As you can see, when generating the bytecode, the
init method is added, whose task is to call the parent constructor. This moment should be taken into account and do not forget to add this method.For class generation there is a class ClassNode , and for MethodNode methods.
You can generate our empty class as follows (without taking into account labels and line numbers):
ClassNode cn = new ClassNode(); cn.version = V1_8; // ASM cn.access = ACC_PUBLIC + ACC_SUPER; // , ACC_SUPER, cn.name = "ClassTest"; // cn.superName = "java/lang/Object"; // cn.interfaces.add("java/lang/Runnable"); // { // public void <init>() MethodNode mn = new MethodNode(ACC_PUBLIC, "<init>", "()V", null, null); // InsnList il = mn.instructions; // // JVM il.add(new VarInsnNode(ALOAD, 0)); il.add(new MethodInsnNode(INVOKESPECIAL, cn.superName, "<init>", "()V", false)); // il.add(new InsnNode(RETURN)); // cn.methods.add(mn); } { // public void run() MethodNode mn = new MethodNode(ACC_PUBLIC, "run", "()V", null, null); // InsnList il = mn.instructions; // il.add(new InsnNode(RETURN)); // cn.methods.add(mn); } //, // COMPUTE_FRAMES // - ( JVM) // ClassWriter cw = new ClassWriter(ClassWriter.COMPUTE_FRAMES); // ClassNode ClassWriter cn.accept(cw); cw.toByteArray(); // Now the task is to implement the addition of instructions to the
run method from the array with Brainfuck operations. Let's do this through the usual switch . // // opcodes, Brainfuck public byte[] toByteCode(String className, int memorySize){ // ...................... MethodNode mn = new MethodNode(ACC_PUBLIC, "run", "()V", null, null); InsnList il = mn.instructions; // memorySize il.add(new LdcInsnNode(memorySize)); // integer il.add(new IntInsnNode(NEWARRAY, T_CHAR)); // il.add(new VarInsnNode(ASTORE, 1)); // 1 // il.add(new LdcInsnNode(memorySize / 2)); il.add(new VarInsnNode(ISTORE, 2)); // 2 // for (Opcode opcode : opcodes) { switch (opcode.type) { case SHIFT: // opcode.arg il.add(new IincInsnNode(2, opcode.arg)); break; case ADD: // opcode.arg il.add(new VarInsnNode(ALOAD, 1)); il.add(new VarInsnNode(ILOAD, 2)); il.add(new InsnNode(DUP2)); il.add(new InsnNode(CALOAD)); il.add(new LdcInsnNode(opcode.arg)); il.add(new InsnNode(IADD)); il.add(new InsnNode(CASTORE)); break; case ZERO: // il.add(new VarInsnNode(ALOAD, 1)); il.add(new VarInsnNode(ILOAD, 2)); il.add(new InsnNode(ICONST_0)); il.add(new InsnNode(CASTORE)); break; case OUT: // opcode.arg for (int i = 0; i < opcode.arg;+i) { il.add(new VarInsnNode(ALOAD, 0)); il.add(new FieldInsnNode(GETFIELD, cn.name, "out", "Ljava/io/PrintStream;")); il.add(new VarInsnNode(ALOAD, 1)); il.add(new VarInsnNode(ILOAD, 2)); il.add(new InsnNode(CALOAD)); il.add(new MethodInsnNode(INVOKEVIRTUAL, "java/io/PrintStream", "print", "(C)V", false)); } break; case IN: // opcode.arg for (int i = 0; i < opcode.arg;+i) { il.add(new VarInsnNode(ALOAD, 1)); il.add(new VarInsnNode(ILOAD, 2)); il.add(new VarInsnNode(ALOAD, 0)); il.add(new FieldInsnNode(GETSTATIC, cn.name, "in", "Ljava/io/InputStream;")); il.add(new MethodInsnNode(INVOKEVIRTUAL, "java/io/InputStream", "read", "()I", false)); il.add(new InsnNode(CASTORE)); } break; case WHILE: break; case END: break; } } // ...................... } It remains to solve the problem with cycles. Again, we will resort to viewing the test method bytecode:
public void test() { char[] arr = new char[30000]; int i = 15000; // while(arr[i] != 0) { i += 10000000; } } Here is its byte code:
public test()V L0 LINENUMBER 6 L0 SIPUSH 30000 NEWARRAY T_CHAR ASTORE 1 L1 LINENUMBER 7 L1 SIPUSH 15000 ISTORE 2 L2 LINENUMBER 9 L2 FRAME APPEND [[CI] // // ALOAD 1 ILOAD 2 CALOAD IFEQ L3 // , L3 ( ) L4 LINENUMBER 10 L4 // ILOAD 2 LDC 10000000 IADD ISTORE 2 // L2 ( - ) GOTO L2 L3 LINENUMBER 12 L3 //FRAME SAME // RETURN As a result, for the cycles, we just need to correctly place the labels and transitions for them.
For labels there is a class LabelNode , in fact the object itself is a label. Where it is inserted among the instructions, there we go.
To jump, use the JumpInsnNode class. The first argument indicates the type of transition (unconditional or any of the conditional) and the second argument is the label itself, where the transition will be made.
For the distribution of labels with regard to nesting, we use the stack. Those. met the beginning of the cycle, saved the label to the stack, met the end, pulled out the label and registered transitions.
Here is the result:
// Stack<LabelNode> lbls = new Stack<LabelNode>(); MethodNode mn = new MethodNode(ACC_PUBLIC, "run", "()V", null, null); // ...................... for (Opcode opcode : opcodes) { switch (opcode.type) { // ........................ case WHILE: // LabelNode begin = new LabelNode(), end = new LabelNode(); // lbls.push(end); lbls.push(begin); // il.add(begin); // il.add(new VarInsnNode(ALOAD, 1)); il.add(new VarInsnNode(ILOAD, 2)); il.add(new InsnNode(CALOAD)); il.add(new JumpInsnNode(IFEQ, end)); // , break; case END: // il.add(new JumpInsnNode(GOTO, lbls.pop())); // il.add(lbls.pop()); break; } } Performing bytecode
Now all this business needs to be started somehow, but first we will load this class. Unfortunately, Java does not provide a regular API for this purpose, so we will resort to crutches like this (
public class ByteCodeLoader extends ClassLoader { public static final ByteCodeLoader clazz = new ByteCodeLoader(); public Class<?> loadClass(byte[] bytecode) { return defineClass(null, bytecode, 0, bytecode.length); } } And the download and launch itself will look like this:
Class<?> aClass = ByteCodeLoader.clazz.loadClass( // toByteCode( // "BrainFuckJit", // 30000 // ) ); ((Runnable)aClass.newInstance()).run(); // Performance tests
It will be interesting to find out how smart the option we have turned out. For this there is a special program on Brainfuck, which has many nested loops and is good for performance testing.
>+>+>+>+>++<[>[<+++>- >>>>> >+>+>+>+>++<[>[<+++>- >>>>> >+>+>+>+>++<[>[<+++>- >>>>> >+>+>+>+>++<[>[<+++>- >>>>> +++[->+++++<]>[-]< <<<<< ]<<]>[-] <<<<< ]<<]>[-] <<<<< ]<<]>[-] <<<<< ]<<]>. This code is also suitable for the compiler performance test, at the end of the program a symbol with code 202 is output, if so, then everything is fine.
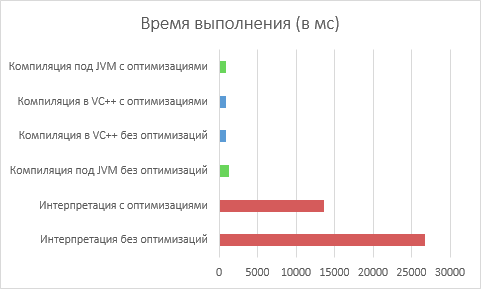
We will conduct 6 tests. Let's check the usual Brainfuck interpreter, JVM compiler and compilation in VC ++. Each test will be tested with and without optimization (from Brainfuck).
Test results (less is better):

As you can see, our efforts were not in vain. JIT compilation in Java VM did its job and brought the performance to the level of native execution.
Conclusion
Java VM is a very convenient platform for implementing your own languages. VM with a thoughtful set of instructions and a convenient API allow you to write your language in a fairly short time.
Although the lack of simple and understandable tutorials on ASM at first complicates understanding of how the library works and is able to guide you to various ancient rakes, while the library itself offers elegant solutions.
And the purpose of this article was to fill this gap and give the opportunity to start creating as soon as possible.
I hope I did it.
Thanks for attention!
Source: https://habr.com/ru/post/229267/
All Articles