Playing MIDI sounds in JAVA
Before getting to the point , I will tell you a little about computer sound.
There are two main formats for playing computer sounds:
digital (WAV-format) and synthesized ( MIDI ).
Digital sound is the main standard of computer sound today. It is the digitized sound you hear when playing songs in mp3 format or listening to CDs, watching a movie or playing computer games.
')
A digitized sound is a set of bits that sequentially describes the value of the amplitude level of a sound wave at each point in time of the sound. When it is played, the sound card only translates the “digital” sound into the usual “analog” form.
But there is another kind of computer sound - synthesized (MIDI)
The sound card can serve as a music synthesizer that can play sounds of up to 128 different musical instruments. The quality and principle of imitation tools depends on your sound card. She can try to simulate the sound of the instrument by a combination of several FM (frequency) oscillators of simple frequencies, each of which is given amplitude, frequency, phase and a bunch of other parameters. But more often she turns to the instrument data samples stored in her “data banks”.
Currently there are many sound cards that can work with SoundFont . These are just wav samples that can be loaded into a sound card and the sound of these instruments can be controlled in a midi-sequencer. SoundFont usually has the extension .sf2, they can also be called patches (patch) or programs (program). Several SoundFont are combined into sound banks (SoundFont Banks), which can contain up to 128 instruments and one drum kit.
Online, you can easily find professional libraries of instrument banks in SF2 format.
In order for the synthesizer to play the desired sound, you need to pass a special command to it. The combination of such commands is described by the MIDI standard.
MIDI is an acronym for Musical Instruments Digital Interface, which literally means the digital interface of musical instruments.
With the help of these commands, we can “tell” the sound card synthesizer with which instrument we want this or that note to play. For example, F-sharp on the piano or any other of the 128 instruments.
Let's say for some purpose you need to learn how to play notes from java. And you decided to find out how to make your sound card synthesizer do it. Having plunged into the information sea of the Internet by a search engine, you suddenly realize that it is not easy to find sensible information on this issue.
I will say that there are enough libraries to work with midi. And they all promise that with their help the process of music programming will be easier. I ran into two such: jfugue and jMusic. In YouTube there are visual guidelines on their application. Each of these libraries invented their own methods and rules. The more exotic the library, the less information and examples. You also have to trust the accuracy and accuracy of their work.
For many reasons, I think it is better to start studying and learn how to use the standard library at the beginning: javax / sound / midi
For those who first encounter this topic, my article is designed to help take the first steps. I will teach you the most basic skills of working with midi sound. And then you yourself will be able to expand their application and, if necessary, easily supplement the information from the library description and examples from the Internet.
So, all you need to start is to learn how to play notes.
Your desire includes some additional information - the name of the note (number) and the duration of the sound. As well as the instrument that you want to play it.
The desire is absolutely simple and clearly formulated: “I want this note to sound, a specific time and the chosen instrument.” However, immediately it will be difficult to find relevant information on how to do it. This is why this article is written - so that you don’t waste your time but immediately get what you need. And they began to apply.
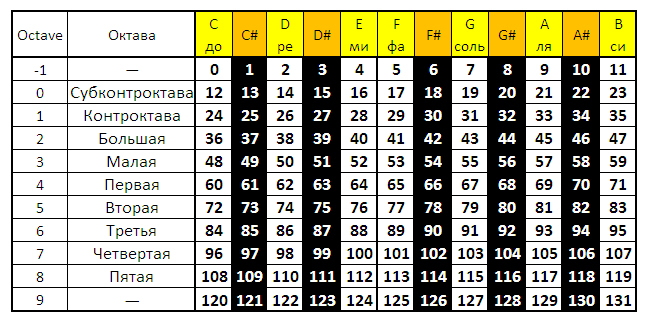
Note numbers can be identified by this table:
A number of tools can be found here.
Before direct programming reproduction will require some preparation. Namely, you will need to get a synthesizer object ( Synthesizer ) and open it. Then access his channels.
It may not be entirely clear, but in practice everything is simple:
The channel can be presented as a universal musician who is able to play on any of the 128 instruments. You have 16 such channels.
That's basically all the preparation. Next, you need to learn how to give commands to musicians.
Suppose you want the note of the Fa of the first octave to sound. To do this, looking at the table with the numbers of notes, find out that its number is 65. Choose one of the 16 musicians. Suppose number 0 ( channels [0] ). Playback occurs at the noteOn command .
It takes 2 parameters: MIDI note number (from 0 to 127) and sound volume (also up to 127)
It will look like this:
According to this command, the musician under the number “zero” will begin to play the note of the Fa of the first octave. 80 is the volume. It is possible to imagine that the musician pressed the synthesizer key and the sound flows.
I think you guessed that to stop the sound you also need to give a command. Those. so that this particular musician releases the pressed key - we execute the noteOff command.
In this way:
Between these teams should pause, on which will depend on the duration of the sound.
That's all. And do not need any third-party libraries. Everything you need now you can conveniently write for yourself. It remains to reveal to you the last secret - to teach the magic words that will force the "musicians" to take another muses. tool.
Let me remind you that you can choose a tool here . You can assign one of the 128 instruments to any of the 16 channels. By default, almost all channels use the piano.
This is how the instrument “violin” is assigned to the “zero” channel:
You will need to import the following standard packages:
So, the code that reproduces the sound will look like this:
Further, as already mentioned, the possibilities for programming sound extraction are limited only by your imagination.
For a primitive demonstration, we will create our own method of playing sounds, which will be executed by pressing, pause and release with one command. For this purpose, we will allocate a separate class, the structure and functionality of which do not need an explanation:
A synthesizer is created and opened in the class constructor. We get an array of channels and assign the violin tool to the first (zero) instrument.
The playSound method receives as input a channel number, duration of sound, volume and a sequence of notes that will sound simultaneously. The implementation is extremely simple - all incoming notes are played, the duration interval is held and then all are turned off.
Here is an example of using this class - four chords are played:
Well and finally, let's program some well-known beautiful melody for the experiment.
Just copy your code and, running it, hear “Jasper Forks - River Flows In You”:
In the array, pairs of numbers contain the duration of the sound and the note number. Pause, for the difference, we write down "minus one". The channel and volume will be the same for all notes - 0 and 80, respectively.
Well, I think you have not had difficulty understanding the material presented. I would be glad if this article will save you time and effort, allowing you to easily start programming the playback of MIDI sound on JAVA.
There are two main formats for playing computer sounds:
digital (WAV-format) and synthesized ( MIDI ).
Digital sound is the main standard of computer sound today. It is the digitized sound you hear when playing songs in mp3 format or listening to CDs, watching a movie or playing computer games.
')
A digitized sound is a set of bits that sequentially describes the value of the amplitude level of a sound wave at each point in time of the sound. When it is played, the sound card only translates the “digital” sound into the usual “analog” form.
But there is another kind of computer sound - synthesized (MIDI)
The sound card can serve as a music synthesizer that can play sounds of up to 128 different musical instruments. The quality and principle of imitation tools depends on your sound card. She can try to simulate the sound of the instrument by a combination of several FM (frequency) oscillators of simple frequencies, each of which is given amplitude, frequency, phase and a bunch of other parameters. But more often she turns to the instrument data samples stored in her “data banks”.
Currently there are many sound cards that can work with SoundFont . These are just wav samples that can be loaded into a sound card and the sound of these instruments can be controlled in a midi-sequencer. SoundFont usually has the extension .sf2, they can also be called patches (patch) or programs (program). Several SoundFont are combined into sound banks (SoundFont Banks), which can contain up to 128 instruments and one drum kit.
Online, you can easily find professional libraries of instrument banks in SF2 format.
In order for the synthesizer to play the desired sound, you need to pass a special command to it. The combination of such commands is described by the MIDI standard.
MIDI is an acronym for Musical Instruments Digital Interface, which literally means the digital interface of musical instruments.
With the help of these commands, we can “tell” the sound card synthesizer with which instrument we want this or that note to play. For example, F-sharp on the piano or any other of the 128 instruments.
Let's say for some purpose you need to learn how to play notes from java. And you decided to find out how to make your sound card synthesizer do it. Having plunged into the information sea of the Internet by a search engine, you suddenly realize that it is not easy to find sensible information on this issue.
I will say that there are enough libraries to work with midi. And they all promise that with their help the process of music programming will be easier. I ran into two such: jfugue and jMusic. In YouTube there are visual guidelines on their application. Each of these libraries invented their own methods and rules. The more exotic the library, the less information and examples. You also have to trust the accuracy and accuracy of their work.
For many reasons, I think it is better to start studying and learn how to use the standard library at the beginning: javax / sound / midi
For those who first encounter this topic, my article is designed to help take the first steps. I will teach you the most basic skills of working with midi sound. And then you yourself will be able to expand their application and, if necessary, easily supplement the information from the library description and examples from the Internet.
So, all you need to start is to learn how to play notes.
Your desire includes some additional information - the name of the note (number) and the duration of the sound. As well as the instrument that you want to play it.
The desire is absolutely simple and clearly formulated: “I want this note to sound, a specific time and the chosen instrument.” However, immediately it will be difficult to find relevant information on how to do it. This is why this article is written - so that you don’t waste your time but immediately get what you need. And they began to apply.
Note numbers can be identified by this table:
A number of tools can be found here.
Before direct programming reproduction will require some preparation. Namely, you will need to get a synthesizer object ( Synthesizer ) and open it. Then access his channels.
It may not be entirely clear, but in practice everything is simple:
Synthesizer synth = MidiSystem.getSynthesizer(); synth.open(); MidiChannel[] channels = synth.getChannels(); The channel can be presented as a universal musician who is able to play on any of the 128 instruments. You have 16 such channels.
That's basically all the preparation. Next, you need to learn how to give commands to musicians.
Suppose you want the note of the Fa of the first octave to sound. To do this, looking at the table with the numbers of notes, find out that its number is 65. Choose one of the 16 musicians. Suppose number 0 ( channels [0] ). Playback occurs at the noteOn command .
It takes 2 parameters: MIDI note number (from 0 to 127) and sound volume (also up to 127)
It will look like this:
channels[0].noteOn(65, 80); According to this command, the musician under the number “zero” will begin to play the note of the Fa of the first octave. 80 is the volume. It is possible to imagine that the musician pressed the synthesizer key and the sound flows.
I think you guessed that to stop the sound you also need to give a command. Those. so that this particular musician releases the pressed key - we execute the noteOff command.
In this way:
channels[0].noteOff(65); Between these teams should pause, on which will depend on the duration of the sound.
That's all. And do not need any third-party libraries. Everything you need now you can conveniently write for yourself. It remains to reveal to you the last secret - to teach the magic words that will force the "musicians" to take another muses. tool.
Let me remind you that you can choose a tool here . You can assign one of the 128 instruments to any of the 16 channels. By default, almost all channels use the piano.
This is how the instrument “violin” is assigned to the “zero” channel:
channels[0].programChange(41); You will need to import the following standard packages:
import javax.sound.midi.MidiChannel; import javax.sound.midi.MidiSystem; import javax.sound.midi.Synthesizer; So, the code that reproduces the sound will look like this:
try { Synthesizer synth = MidiSystem.getSynthesizer(); synth.open(); MidiChannel[] channels = synth.getChannels(); channels[0].programChange(41); channels[0].noteOn(65, 80); Thread.sleep(1000); // in milliseconds channels[0].noteOff(65); synth.close(); } catch (Exception e) { e.printStackTrace(); } Further, as already mentioned, the possibilities for programming sound extraction are limited only by your imagination.
For a primitive demonstration, we will create our own method of playing sounds, which will be executed by pressing, pause and release with one command. For this purpose, we will allocate a separate class, the structure and functionality of which do not need an explanation:
package music.player; import java.util.logging.Level; import java.util.logging.Logger; import javax.sound.midi.MidiChannel; import javax.sound.midi.MidiSystem; import javax.sound.midi.MidiUnavailableException; import javax.sound.midi.Synthesizer; public class Player { private MidiChannel[] channels = null; private Synthesizer synth = null; public Player() { try { synth = MidiSystem.getSynthesizer(); synth.open(); channels = synth.getChannels(); channels[0].programChange(41); } catch (MidiUnavailableException ex) { Logger.getLogger(Player.class.getName()).log(Level.SEVERE, null, ex); } } public void close() { synth.close(); } public void playSound(int channel, int duration, int volume, int... notes) { for (int note : notes) { channels[channel].noteOn(note, volume); } try { Thread.sleep(duration); } catch (InterruptedException ex) { Logger.getLogger(Player.class.getName()).log(Level.SEVERE, null, ex); } for (int note : notes) { channels[channel].noteOff(note); } } } A synthesizer is created and opened in the class constructor. We get an array of channels and assign the violin tool to the first (zero) instrument.
The playSound method receives as input a channel number, duration of sound, volume and a sequence of notes that will sound simultaneously. The implementation is extremely simple - all incoming notes are played, the duration interval is held and then all are turned off.
Here is an example of using this class - four chords are played:
Player player = new Player(); player.playSound(0, 1000, 80, 69, 72, 76); player.playSound(0, 1000, 80, 69, 74, 77); player.playSound(0, 1000, 80, 67, 71, 74); player.playSound(0, 1000, 80, 67, 72, 76); player.close(); Well and finally, let's program some well-known beautiful melody for the experiment.
Just copy your code and, running it, hear “Jasper Forks - River Flows In You”:
int notes[][] = {{470, 81}, {230, 80}, {470, 81}, {250, -1}, {230, 80}, {470, 81}, {230, 69}, {230, 76}, {470, 81}, {230, 69}, {470, 74}, {470, 73}, {470, 74}, {470, 76}, {470, 73}, {470, 71}, {970, -1}, {230, 69}, {230, 68}, {470, 69}, {730, -1}, {230, 64}, {230, 69}, {230, 71}, {470, 73}, {970, -1}, {230, 73}, {230, 74}, {470, 76}, {730, -1}, {230, 69}, {230, 74}, {230, 73}, {470, 71}, {1450, -1}, {470, 81}, {230, 80}, {470, 81}, {250, -1}, {230, 80}, {470, 81}, {230, 69}, {230, 76}, {470, 81}, {230, 69}, {470, 74}, {470, 73}, {470, 74}, {470, 76}, {470, 73}, {470, 71}, {970, -1}, {230, 69}, {230, 68}, {470, 69}, {730, -1}, {230, 64}, {230, 69}, {230, 71}, {470, 73}, {970, -1}, {230, 73}, {230, 74}, {470, 76}, {730, -1}, {230, 69}, {230, 74}, {230, 73}, {470, 71}, {250, -1}}; Player player = new Player(); for (int[] note : notes) { if (note[1] != -1) { player.playSound(0, note[0], 80, note[1]); } else { try { Thread.sleep(note[0]); } catch (InterruptedException ex) { Logger.getLogger(Music.class.getName()).log(Level.SEVERE, null, ex); } } } player.close(); In the array, pairs of numbers contain the duration of the sound and the note number. Pause, for the difference, we write down "minus one". The channel and volume will be the same for all notes - 0 and 80, respectively.
Well, I think you have not had difficulty understanding the material presented. I would be glad if this article will save you time and effort, allowing you to easily start programming the playback of MIDI sound on JAVA.
Source: https://habr.com/ru/post/211480/
All Articles