Basics of creating a 2D character in Unity 3D 4.3. Part 1: character preparation and animation of rest
Part 1: character preparation and animation of rest
Part 2: Running Character
Part 3: jumping (and falling)
Good day everyone. In a relatively recently released Unity 4.3 tools for creating 2D games appeared. Of course, such games could have been created before, but this was done with the help of additional tricks (here's an example from Habr). Now there is support for 2D "out of the box." I hope the developers will continue to develop it, but for now I want to talk about some of the techniques for working with new 2D tools.
For the basis of the lesson, I took the official video tutorial from Unity3d.com. It creates an animated controlled 2D character. He can stand, run, jump. All this is accompanied by appropriate animations. The lesson is quite long (almost an hour and a half) and contains a bit of “water”, so I decided to do some text translation. In this part we will discuss the very basics - we will create a static platform for our character, the character himself, and make the character a rest animation. Running and jumping will be discussed later, but we will create the basis for this now. I will try to describe all operations in detail, but you should have basic knowledge about the Unity interface. On the same official site of Unity there are good and fast lessons on the interface.
So, let's begin. Let's create a new project in Unity. Select the folder for the project location, we will not import additional packages. Be sure to indicate that we are creating a project that is configured for a 2D game ( Setup defaults for: 2D ).
')
Project created. In the Project window we should have one folder - Assets . Let's create in it a subfolder of Sprites , where we will store the sprites - the graphic files needed to display characters, background, gender, bonuses and other game objects. We need a sprite to display the platform on which our character will run. For this fit any rectangular image. At the end of the post I indicated a link to the archive with the sprites that were used in the lesson. This is a little sprites from the game Capitan Claw. The platform sprite file is called Platform.png . Copy it to the folder Sprites . Now we need to drag the Platform sprite onto the Scene window. Our project has a camera called Main Camera . It will display what we see in the game. Drag the sprite of the platform so that it appears in the lower corner of the camera's field of view (if you click on the camera, then a Camera Preview window will appear at the bottom of the scene, by which you can control what the camera is currently seeing). Unity will automatically create a game object with two components — Transform and Sprite Render . The first is responsible for the position of our platform, the second is responsible for its rendering. But we still need to prevent the character from falling through this platform, so we’ll add the Box Collider 2D component to the platform object from the Physics 2D section. So now we should have something like this:

Now let's take a character. Create an empty game object ( Game Object - Create Empty ) and drag it so that it hangs over the left side of the platform. Rename this object as Character and add the Rigidbody 2D component to it to give our character the physical properties of a solid body. In the Rigidbody 2D component, select the Fixed Angle checkbox to prevent accidental rotations of our character, for example, from colliding with other solid bodies. Then set Interpolate to Interpolate . Documentation Unity recommends setting this value for player-controlled characters, especially if it is followed by a camera. This is due to the synchronization of the calculation of physics and drawing graphics. Details in the documentation.
The next step is to add the Sprite Render component to draw the character. Why can not we just transfer the desired sprite, and get automatically generated Sprite Render , as is the case with platforms? Because our character, unlike platforms, will be drawn not with one, but with several sprites in order to get an animated character. To do this, we will have to perform a series of actions and the first of them is to get the appropriate sprite sheet ( Sprite Sheet ). A sprite is an image that contains animation frames for our character. I think it is no secret to anyone that the animation is a consistent and fast display of non-animated frames, each of which is slightly different from the previous one. Google on request Sprite Sheet , and you will immediately understand what it is. We need spriteshits for rest, running and jumping. In the archive with sprites there are files Idle.png , Run.png , and Jump.png . Copy them to the folder Sprites . At this stage there should be the following:

Let's start animating the character, and specifically - to animate the state of rest, when the character just stands and does nothing. More precisely, he does not do anything from the point of view of game logic, but he can shift from one foot to the other, blink, make gestures, showing that he is bored so easy to stand and so on. To animate the rest we need the file Idle from our folder Sprites . Highlight this file. The Inspector window displays the properties of this file. The Texture Type property is set as Sprite , and this is what we need, but the value of the Sprite Mode property must be changed from Single to Multiple . Thus, we have indicated that the file does not play the role of a single sprite, but is a collection of sprites. However, this collection still needs to be initialized. To do this, just click on the button Sprite Editor , which is all in the same Inspector window just below the Pixels To Units property. A new window will open. In it we see the contents of our spriteshit for the state of rest: several similar frames. We need to cut them into separate images. To do this, click on the Slice button in the upper left corner of the window. First, we need to set the method ( Type ) of cutting the image: Grid or Automatic . The first way is to cut our image with a mesh with customizable cell sizes ( Pixel Size - X ... Y ...). That is, in this mode, it is necessary to select such values so that all the frames fit in the cells normally, so that nothing extra is cut off, etc. In the second mode, cutting into frames will be performed automatically. The cutting itself will occur after pressing the Slice button. Try different cutting methods and see what comes out of it. In the case of my sprite, the Automatic method normally works. Even if some of the frames came out a bit unsuccessfully - it can be edited by clicking on it and changing the values of the height / width / location and other parameters in the corresponding window or using the mouse. Confirm the cutting by clicking on the Apply button in the upper right corner and close this window.

Now we need to find our imported Idle file in the Project window. There is a triangle on the right side of the file (or on the left, with the smallest mastabe icons). Clicking on a triangle, we expand the collection of images obtained as a result of cutting. They will have the names Idle_0 , Idle_1 , etc. Now, in the Hierarchy window, select our Character , and drag the image Idle_0 into the Sprite field of the Sprite Rende r component. Our character appears on stage. If it turned out small - you can increase its size to the required. Like this:
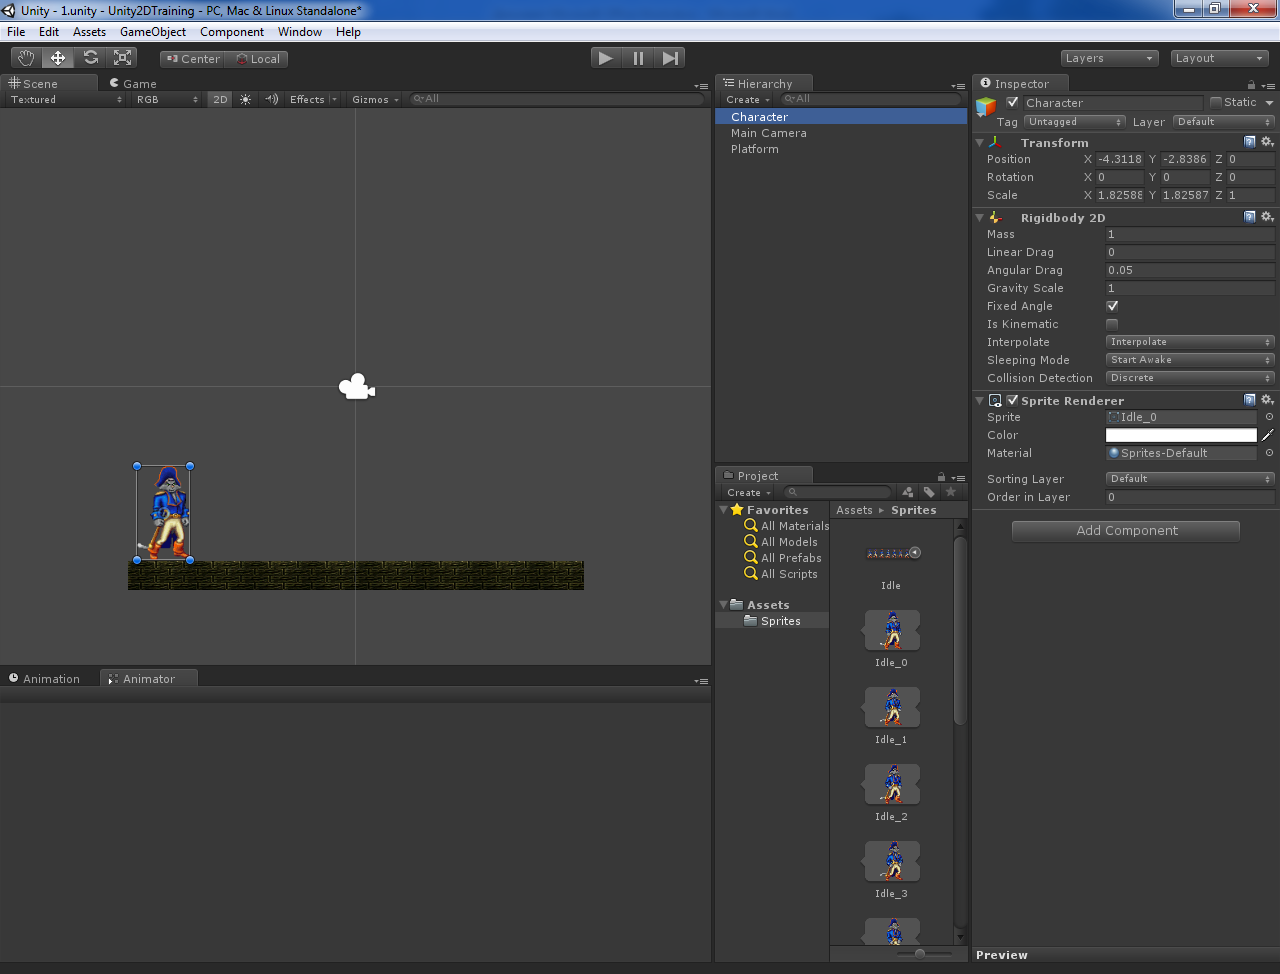
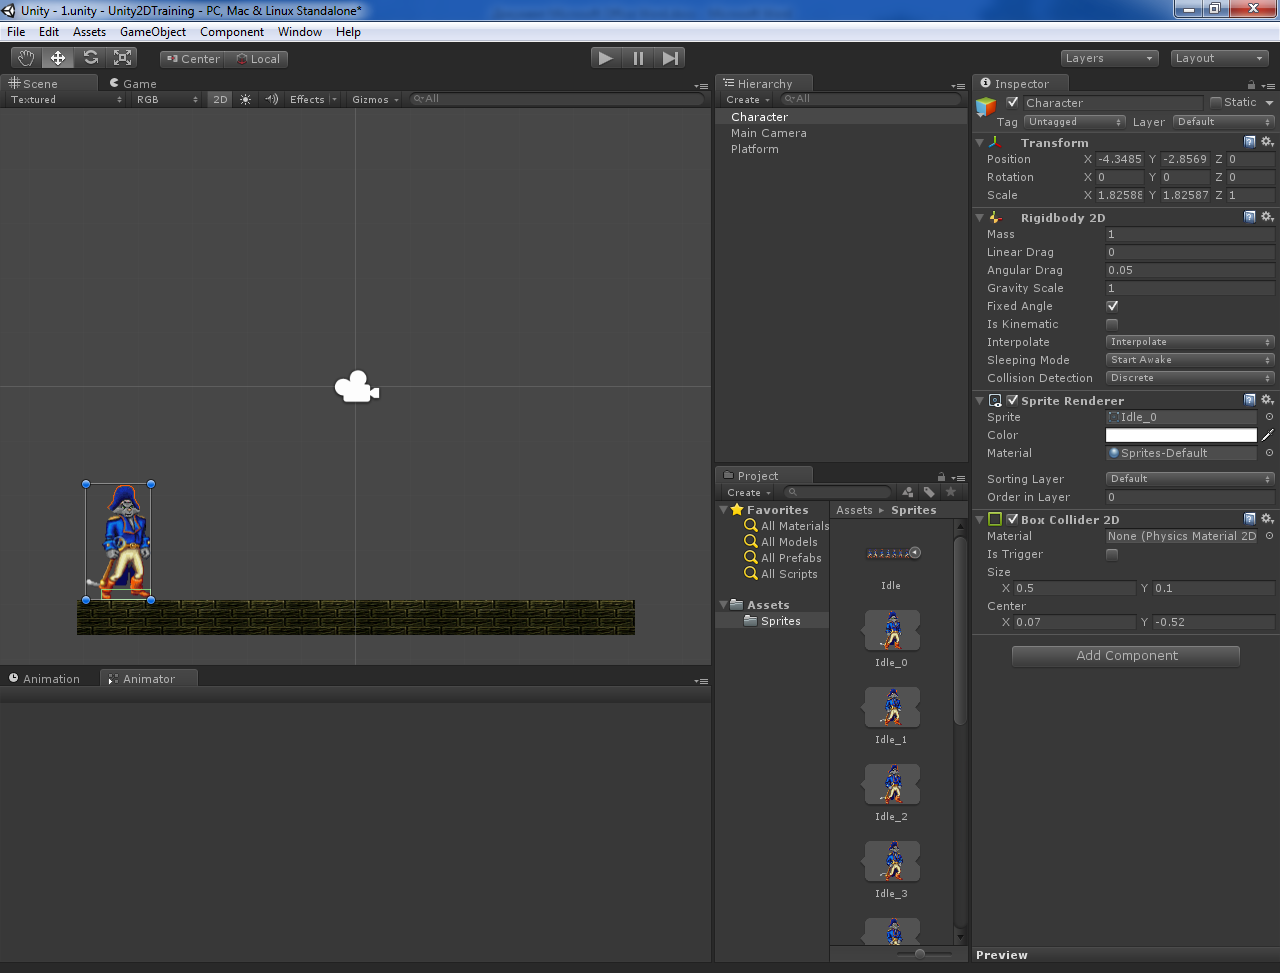
Let's immediately add to our character the Box Collider 2D component, which does not fall through the platform. At the same time, we will adjust the size and location of the collider so that it is not too large and is located at the level of the legs of the character. This is enough so that the character does not fall through the platform. You can start the game and check it out.
Let's return to the rest animation. To do this, we add to our Character another component - Animator (section Miscellaneous ). Change some of its properties - remove the flag from the Apply Root Motion and set the Anymate Physics flag. Apply Root Motion allows you to change the position of the object from the animation itself (which we do not need now), and the included flag Anymate Physics sets the animation to run in the physics calculation cycle, which is recommended for moving solids. Now we will create an Animator Controller file in the Assets folder. Let's call it CharacterController . In the Hierarchy window, select our Character and drag the CharacterController into the Controller field of the Animator component:
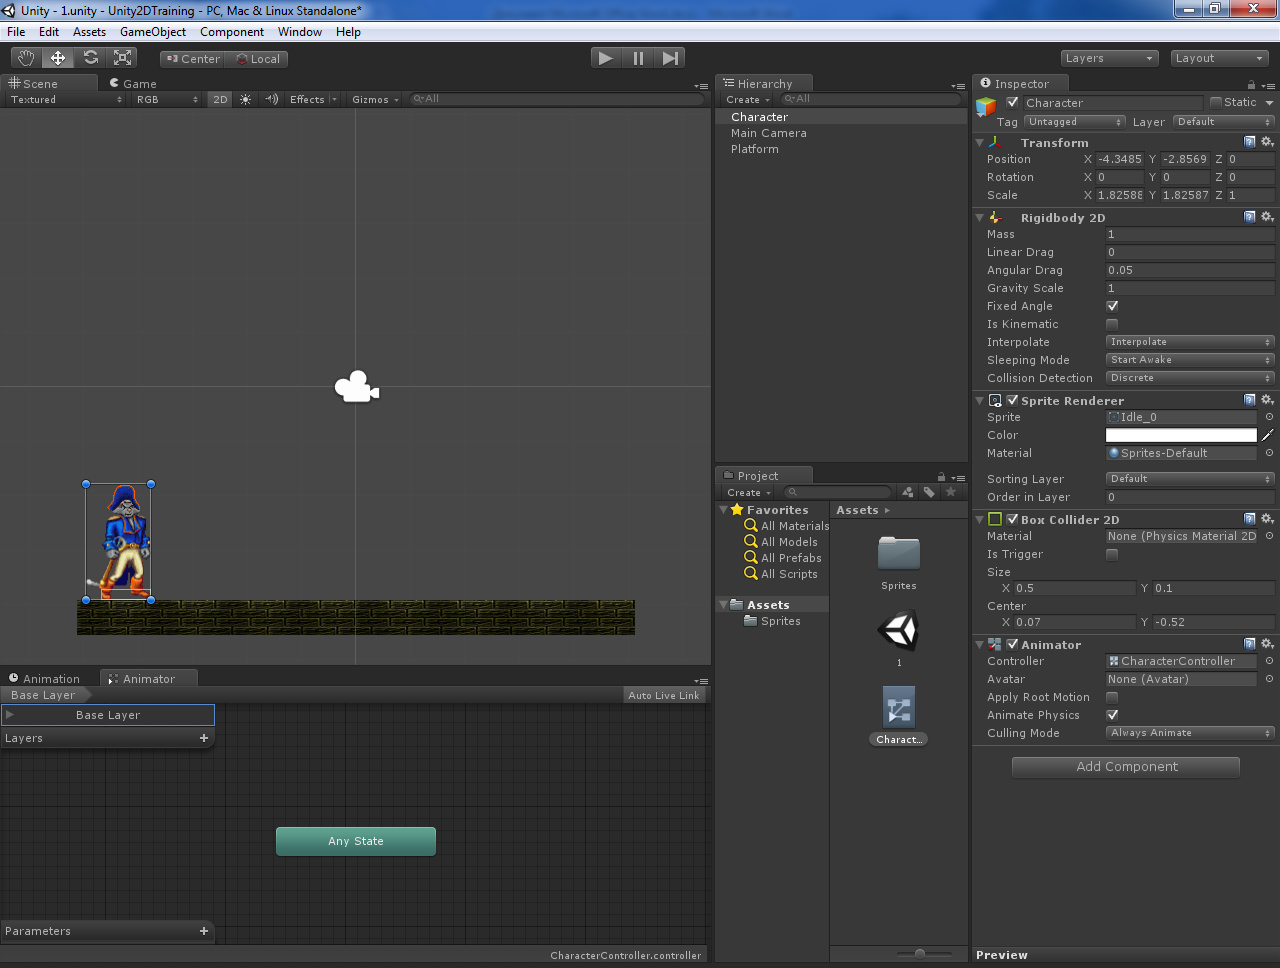
Double click on CharacterController - a new window Animator will open. In it, we will create different states of animation (rest, run, jump) and set the conditions for the transition between them. To create animations directly, we need an animation window. If you don’t see it yet, you can enable it from the Unity main menu ( Window - Animation ). Now select our Character Character in the Hierarchy window, and in the Animation window, click the button to create a new animation and select Create New Clip . In the screenshot below, I marked this button with a red circle:
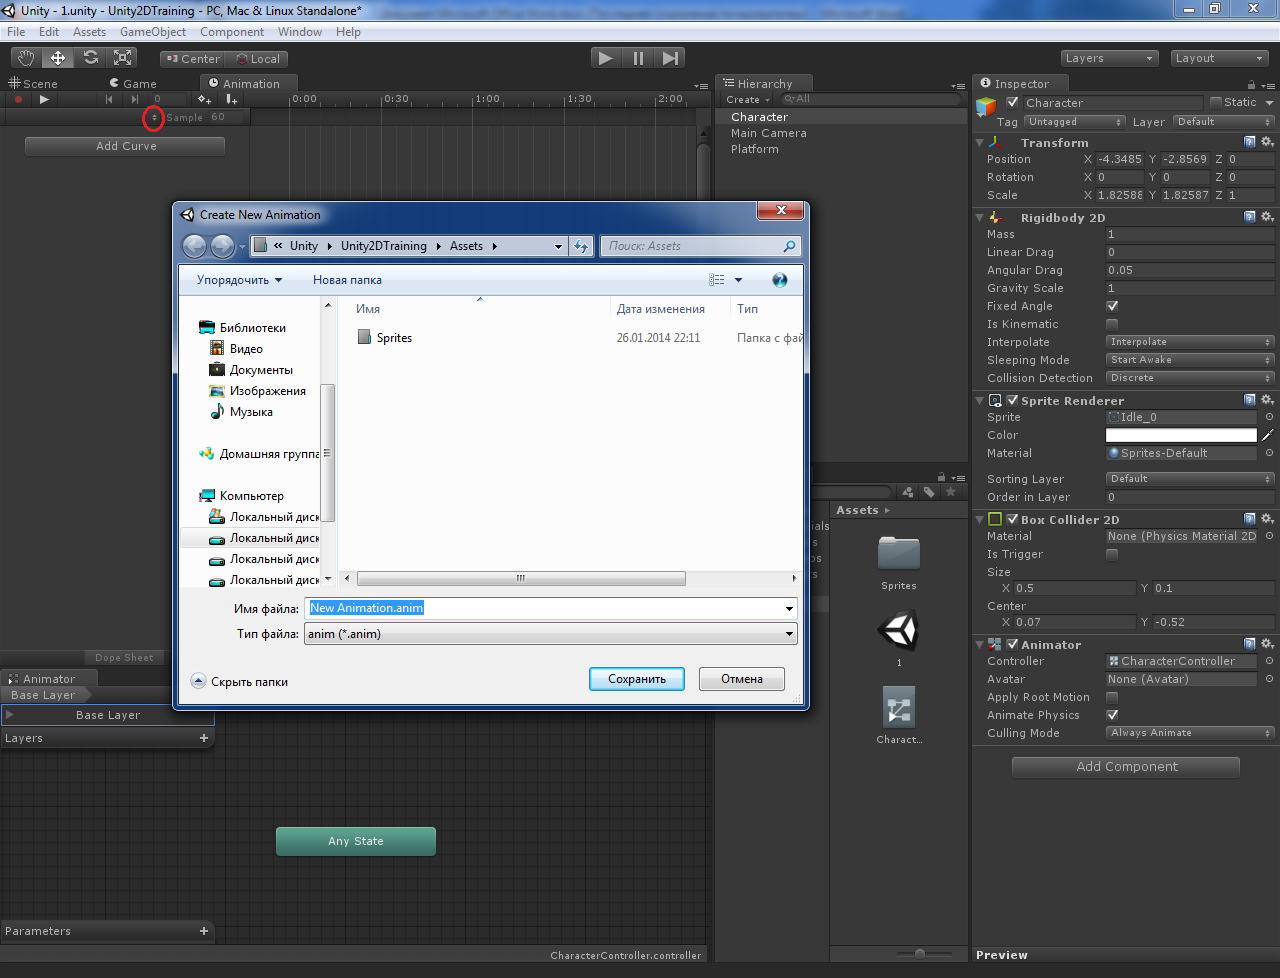
In the standard file save dialog, first create the Animations folder, and in it save our animation file, naming it I dle .

After saving, our Idle animation will appear in the Animator window as an orange rectangle. Orange color means that this will be the default animation - just what we need right now.
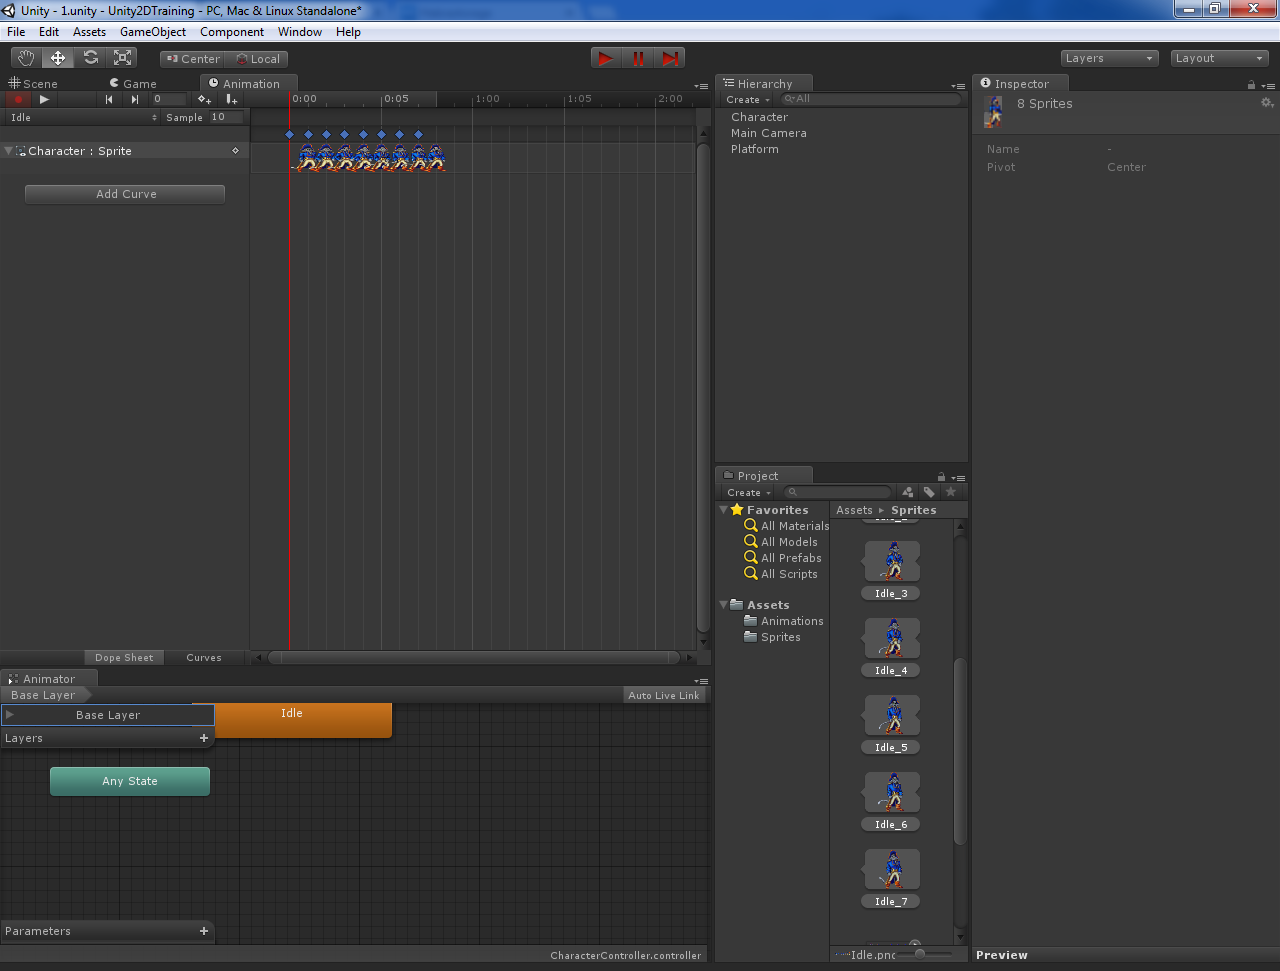
Only a couple of steps left. Go to the folder Sprites , expand the sprite Idle , select the first image Idle_0 , hold down the shift and select the last image Idle_7 . All selected images are transferred by mouse to the Animation window. Set the Sample value to 10 — this parameter indicates the number of frames of animation per second. As you know, for good animation it is necessary that it be displayed at a speed of at least 24 frames per second, however, in our case, the animation consists of a rather small number of frames and at a value of 24 it will be displayed too quickly.
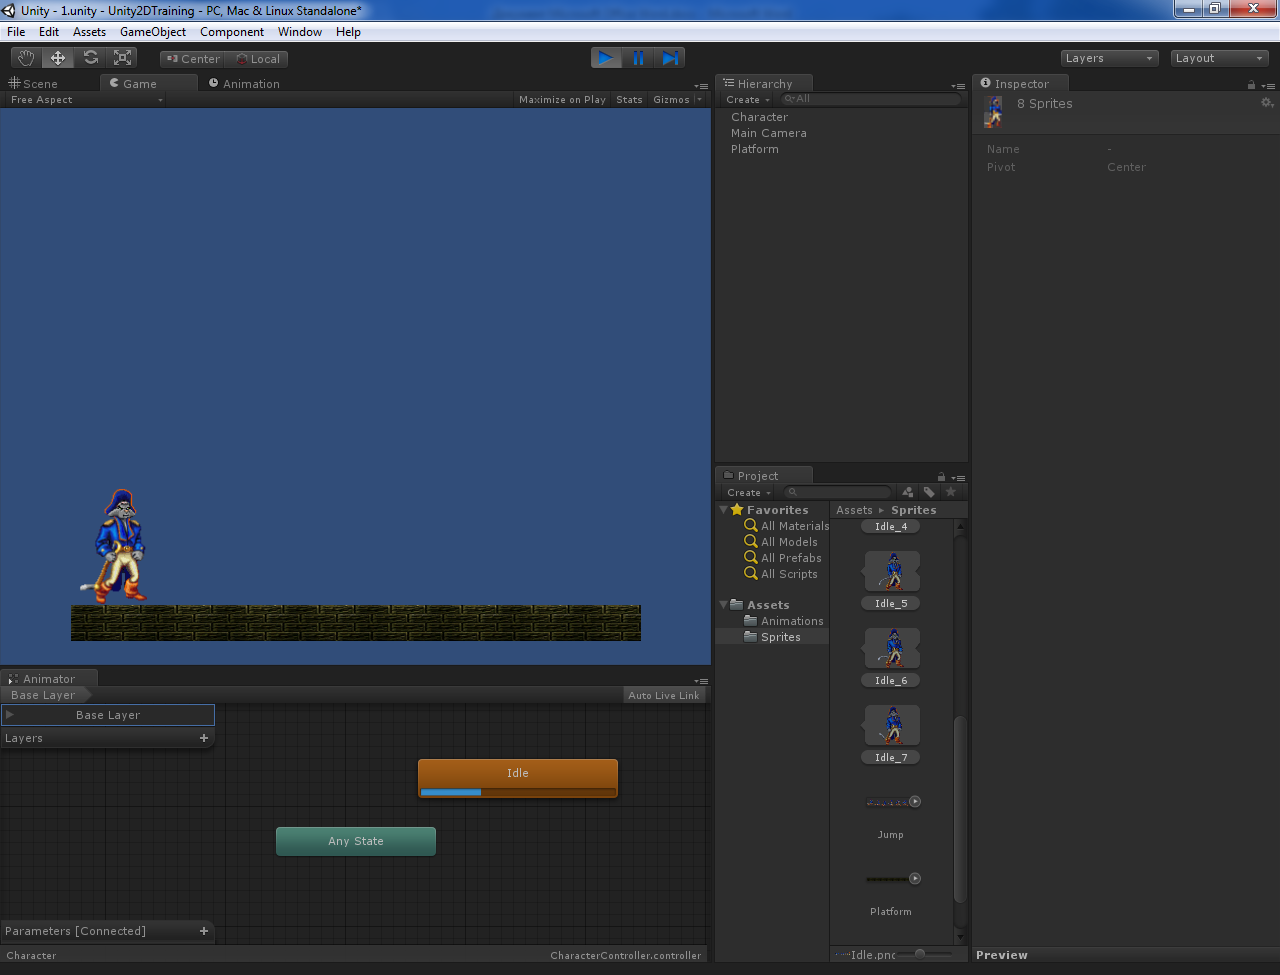
Run the game! If done correctly, our Captain Claw must stand on the platform, breathe, and wag his tail.
That's all for now. Next time we will talk about the implementation of the character running left and right and the corresponding animation.
Link to sprites.
Part 2: Running Character
Part 3: jumping (and falling)
Good day everyone. In a relatively recently released Unity 4.3 tools for creating 2D games appeared. Of course, such games could have been created before, but this was done with the help of additional tricks (here's an example from Habr). Now there is support for 2D "out of the box." I hope the developers will continue to develop it, but for now I want to talk about some of the techniques for working with new 2D tools.
For the basis of the lesson, I took the official video tutorial from Unity3d.com. It creates an animated controlled 2D character. He can stand, run, jump. All this is accompanied by appropriate animations. The lesson is quite long (almost an hour and a half) and contains a bit of “water”, so I decided to do some text translation. In this part we will discuss the very basics - we will create a static platform for our character, the character himself, and make the character a rest animation. Running and jumping will be discussed later, but we will create the basis for this now. I will try to describe all operations in detail, but you should have basic knowledge about the Unity interface. On the same official site of Unity there are good and fast lessons on the interface.
So, let's begin. Let's create a new project in Unity. Select the folder for the project location, we will not import additional packages. Be sure to indicate that we are creating a project that is configured for a 2D game ( Setup defaults for: 2D ).
')
Project created. In the Project window we should have one folder - Assets . Let's create in it a subfolder of Sprites , where we will store the sprites - the graphic files needed to display characters, background, gender, bonuses and other game objects. We need a sprite to display the platform on which our character will run. For this fit any rectangular image. At the end of the post I indicated a link to the archive with the sprites that were used in the lesson. This is a little sprites from the game Capitan Claw. The platform sprite file is called Platform.png . Copy it to the folder Sprites . Now we need to drag the Platform sprite onto the Scene window. Our project has a camera called Main Camera . It will display what we see in the game. Drag the sprite of the platform so that it appears in the lower corner of the camera's field of view (if you click on the camera, then a Camera Preview window will appear at the bottom of the scene, by which you can control what the camera is currently seeing). Unity will automatically create a game object with two components — Transform and Sprite Render . The first is responsible for the position of our platform, the second is responsible for its rendering. But we still need to prevent the character from falling through this platform, so we’ll add the Box Collider 2D component to the platform object from the Physics 2D section. So now we should have something like this:
Now let's take a character. Create an empty game object ( Game Object - Create Empty ) and drag it so that it hangs over the left side of the platform. Rename this object as Character and add the Rigidbody 2D component to it to give our character the physical properties of a solid body. In the Rigidbody 2D component, select the Fixed Angle checkbox to prevent accidental rotations of our character, for example, from colliding with other solid bodies. Then set Interpolate to Interpolate . Documentation Unity recommends setting this value for player-controlled characters, especially if it is followed by a camera. This is due to the synchronization of the calculation of physics and drawing graphics. Details in the documentation.
The next step is to add the Sprite Render component to draw the character. Why can not we just transfer the desired sprite, and get automatically generated Sprite Render , as is the case with platforms? Because our character, unlike platforms, will be drawn not with one, but with several sprites in order to get an animated character. To do this, we will have to perform a series of actions and the first of them is to get the appropriate sprite sheet ( Sprite Sheet ). A sprite is an image that contains animation frames for our character. I think it is no secret to anyone that the animation is a consistent and fast display of non-animated frames, each of which is slightly different from the previous one. Google on request Sprite Sheet , and you will immediately understand what it is. We need spriteshits for rest, running and jumping. In the archive with sprites there are files Idle.png , Run.png , and Jump.png . Copy them to the folder Sprites . At this stage there should be the following:
Let's start animating the character, and specifically - to animate the state of rest, when the character just stands and does nothing. More precisely, he does not do anything from the point of view of game logic, but he can shift from one foot to the other, blink, make gestures, showing that he is bored so easy to stand and so on. To animate the rest we need the file Idle from our folder Sprites . Highlight this file. The Inspector window displays the properties of this file. The Texture Type property is set as Sprite , and this is what we need, but the value of the Sprite Mode property must be changed from Single to Multiple . Thus, we have indicated that the file does not play the role of a single sprite, but is a collection of sprites. However, this collection still needs to be initialized. To do this, just click on the button Sprite Editor , which is all in the same Inspector window just below the Pixels To Units property. A new window will open. In it we see the contents of our spriteshit for the state of rest: several similar frames. We need to cut them into separate images. To do this, click on the Slice button in the upper left corner of the window. First, we need to set the method ( Type ) of cutting the image: Grid or Automatic . The first way is to cut our image with a mesh with customizable cell sizes ( Pixel Size - X ... Y ...). That is, in this mode, it is necessary to select such values so that all the frames fit in the cells normally, so that nothing extra is cut off, etc. In the second mode, cutting into frames will be performed automatically. The cutting itself will occur after pressing the Slice button. Try different cutting methods and see what comes out of it. In the case of my sprite, the Automatic method normally works. Even if some of the frames came out a bit unsuccessfully - it can be edited by clicking on it and changing the values of the height / width / location and other parameters in the corresponding window or using the mouse. Confirm the cutting by clicking on the Apply button in the upper right corner and close this window.
Now we need to find our imported Idle file in the Project window. There is a triangle on the right side of the file (or on the left, with the smallest mastabe icons). Clicking on a triangle, we expand the collection of images obtained as a result of cutting. They will have the names Idle_0 , Idle_1 , etc. Now, in the Hierarchy window, select our Character , and drag the image Idle_0 into the Sprite field of the Sprite Rende r component. Our character appears on stage. If it turned out small - you can increase its size to the required. Like this:
Let's immediately add to our character the Box Collider 2D component, which does not fall through the platform. At the same time, we will adjust the size and location of the collider so that it is not too large and is located at the level of the legs of the character. This is enough so that the character does not fall through the platform. You can start the game and check it out.
Let's return to the rest animation. To do this, we add to our Character another component - Animator (section Miscellaneous ). Change some of its properties - remove the flag from the Apply Root Motion and set the Anymate Physics flag. Apply Root Motion allows you to change the position of the object from the animation itself (which we do not need now), and the included flag Anymate Physics sets the animation to run in the physics calculation cycle, which is recommended for moving solids. Now we will create an Animator Controller file in the Assets folder. Let's call it CharacterController . In the Hierarchy window, select our Character and drag the CharacterController into the Controller field of the Animator component:
Double click on CharacterController - a new window Animator will open. In it, we will create different states of animation (rest, run, jump) and set the conditions for the transition between them. To create animations directly, we need an animation window. If you don’t see it yet, you can enable it from the Unity main menu ( Window - Animation ). Now select our Character Character in the Hierarchy window, and in the Animation window, click the button to create a new animation and select Create New Clip . In the screenshot below, I marked this button with a red circle:
In the standard file save dialog, first create the Animations folder, and in it save our animation file, naming it I dle .
After saving, our Idle animation will appear in the Animator window as an orange rectangle. Orange color means that this will be the default animation - just what we need right now.
Only a couple of steps left. Go to the folder Sprites , expand the sprite Idle , select the first image Idle_0 , hold down the shift and select the last image Idle_7 . All selected images are transferred by mouse to the Animation window. Set the Sample value to 10 — this parameter indicates the number of frames of animation per second. As you know, for good animation it is necessary that it be displayed at a speed of at least 24 frames per second, however, in our case, the animation consists of a rather small number of frames and at a value of 24 it will be displayed too quickly.
Run the game! If done correctly, our Captain Claw must stand on the platform, breathe, and wag his tail.
That's all for now. Next time we will talk about the implementation of the character running left and right and the corresponding animation.
Link to sprites.
Source: https://habr.com/ru/post/211472/
All Articles