Flexible cms for bold projects
In this article we will talk about the incredibly flexible content management system - Boolive, which combines power and simplicity.
The Boolive website creation and management system combines the best of modularity, versatility and flexibility. Programmers save from routine operations, focus on useful programming. Means of the administration section will allow you to create any data structure, set up work rules, create a website in strict accordance with the requirements. Whatever you do, everything is available for reuse. For managers, administrators, editors, site programmers - for all, the system tries to be simple with an intuitive, beautiful interface.
The idea of the Boolive project has become clear for several years in experiments, from practical applications and in fascinating discussions with diverse personalities.
The main desire is the freedom to create any data structures and logic with any purpose. The system should not impose artificial restrictions that are not related to security or integrity, but allow to create simply, flexibly, without limiting creativity.
')
Based on a hierarchy. The entire site is one large hierarchy of objects. How much it depends on the level of detail of the subject area and the appropriateness of detail. The more detail, the more flexibility. In the hierarchy all the information about the site, all its objects - the content, interface, users. To all a single approach.
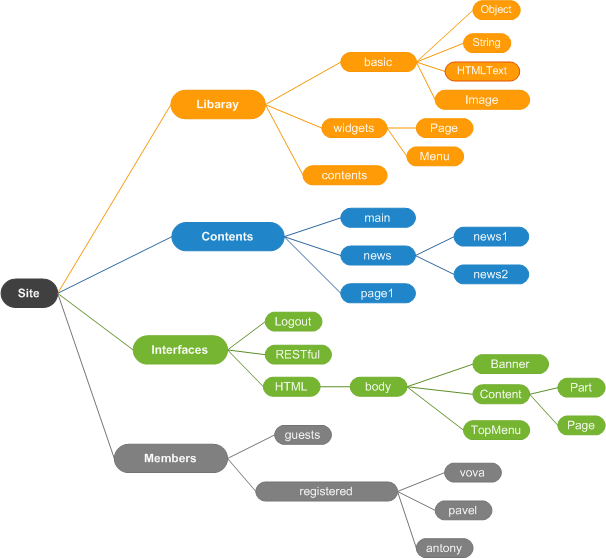
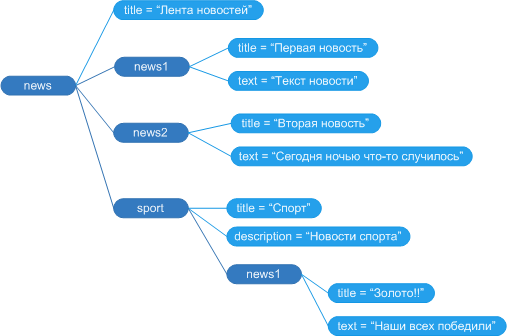
An object is a collection of data and logic. Each object has its own name, value and logic. Objects themselves are primitive. But they may have subordinate objects that form the hierarchy. Subordinate objects are used as properties of the parent object or simply to form a nested structure.
Since the objects are arranged in a hierarchy, they have an address - a URI. Actually as a file path. The address is used to access the object, including the browser string. Address - the main identifier of the object.
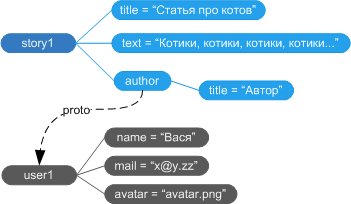
The freedom and ease of creating new objects will lead to the duplication of previously created objects. It is tiring to repeat the same type of operations for creating complex objects - consisting of several subordinates. Manually you need to observe the unity of the structure, naming, logic of the same type of objects. Prototyping is used to resolve this tedious complexity. This is the most important feature of the system. New objects are created on the basis of existing ones. In other words, one object inherits the value, logic and structure of another object. At the same time, it can redefine its meaning, logic, and have new subordinates or delete inherited ones. Prototyping optimizes the creation of complex objects, makes it possible to reuse. In addition, any object can be refined to fit your tasks without damaging existing objects oriented to other tasks, while maintaining feedback for updates. Objects remain connected to their prototype.

Each object is simultaneously in two hierarchies - in the hierarchy of the structure and in the hierarchy of inheritance. Only two hierarchies form an amazing flexibility to create complex data structures. If you want to associate one object with another, for example, to associate an article with a user, then prototyping is used. A new object is added to the submission, the prototype for it will be the object with which communication is needed.
The ability to create new objects based on existing ones suggests the existence of a library of objects. This is a branch of the site hierarchy in which objects are stored for reuse. You can reapply any object wherever it is located, but a library is a collection of various blanks and ready-made objects for creating a site from them. You can create your own library or package with objects for a specific project. Its standards of publications, product, user, widgets, ready-made sites and anything.
The logic is not alone, but is part of a flexible data structure. Each object can have its own unique logic or inherit the logic of the prototype. All possess the basic logic - the functions of checking, saving, accessing subordinates and others. Further objects are complemented by their logic. For example, widgets have display functions, images have scaling functions.
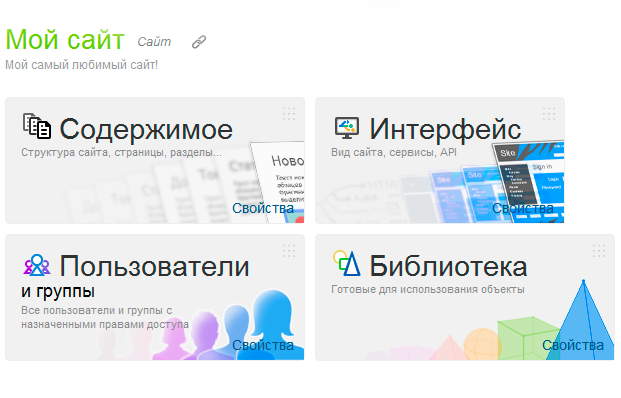
Getting started with the administration section (admin). The main task of the admin panel is to provide access to any site object, taking into account the rights of the user, and to perform the necessary operations with the object — create, modify, delete. Meaning in admin in a convenient graphical interface, to optimize the work on the site. For inexperienced users need to show the usual interface elements. For the advanced reveal all the flexibility of the system.
Work in the admin panel begins with the transition to the desired object, for example, to a page for later editing. In the central area the current object with its subordinate is displayed, you can go inside them. Above there is a menu of the path (address) of the current object for quick returns back. The left side displays bookmarks for quick transitions to frequently used objects. You can add a bookmark at any time to any object.
Since there is a lot of information about the object to place them on one screen, in the lower menu it is selected what exactly we are interested in about the object. Most often it is the structure of an object or its properties. For advanced users will be useful logic, the value of the object, as well as viewing the prototypes and the heirs of the object. When accessing an object, the structure is displayed by default.
The third type of navigation is the functions performed on objects. The function menu is located on the right side of the admin panel. The main functions are viewing an object, adding new ones, deleting and changing features. Available functions depend on the selected object, on the selected information and on some other states in the admin panel, for example, how many objects are simultaneously selected in the list, including access rights. The feature set is easy to expand. You can add your own browsers, editors of objects, assigning them to certain types of objects or other working conditions. With their help, the admin panel is endowed with more specific functions, honed under the convenience of a particular project. You can draw an analogy: the administration section as an operating system, site objects as files, and functions as programs.
It turns out that if we need to edit an existing page, we go to the content, find the page there, go to it and edit it. It should be easy!
Content includes everything that is supposed to be published on the site. For example: articles, news, sections, product, photos or project-specific content type. Usually, we deal with pages and sections. In the site hierarchy there is a special section "Content" for storing publications. But this does not mean that only in it you can store the pages of the site. The section is pre-made only for convenience and optimization, so as not to search the entire hierarchy.
To add a new page, you first need to go to the "Content" section. You can go to the page or subsection, if you need to add a new page inside them. After moving to the right menu, select the "Add" function. The quick selection list already offers a page. But we can choose any other site object. After adding the page is a sign of "draft". It is recommended that you first edit the page - fully prepare it for publication, and only then remove the sign of the draft.

Now we feel the flexibility. Add another text property to the page. While in the page editor, for example, add the “From Library” from the “Simple” package to the “HTML Text” object. When you click on "Add", the object selection window will appear. All site objects are available for selection, but we need text that is in the library.
The new text will appear in the editor and be displayed on the page of the site in accordance with its order.

In this example, the additional property "text" is added to only one page. If you want all the pages of the site to have an additional property, it is easier to change the prototype or create your own and use it.
Under the project it is better to create a package in the library, and collect prototypes in it with the specifics of the project. For example, to create a “car” object for a car interior site, immediately determining all the necessary properties of a car, and before that create prototypes “Body type”, “Manufacturer” and many others to use them in the car itself. In this way, prototypes are created for the project subject area. In the section "Content" cars of the salon, lists of manufacturers and so on are already added directly. Note that to the “car” we can add not only simple properties - “text”, “number”, but also complex - any site objects and form complex structures! Properties that are marked as required immediately appear in new objects. If the property is optional, then it is available as an add-on, i.e. it can be added later if desired.
To display the site in the browser widgets are used. A widget is an object with a display function that returns HTML code. A widget may itself display something, some static information, be a design element, display a specific object, for example, a news item, and also display subordinate widgets within itself.
From the widgets is built a branch of the hierarchy in the "Interface" section. Widgets are completely determined by the presentation and dynamics of the site in the browser. The root widget displays the basic structure of an HTML document. The result of displaying its subordinate widget is inserted into the body area, it is set to mark up the site, for example, a cap, side panels, basement, center. Subject widgets are inserted into each area, and so on. This is a typical structure, different options are possible, it is possible to show the whole site with one widget, but be aware - flexibility in detail.
Widgets have a work condition function, if it returns true, the widget works, otherwise it doesn't. The function checks incoming data, settings or system status. The widget can be configured to work at a specific address, for example, the admin panel works if the address starts with / admin. The widget will not work if it is in draft or there is no access to it. You can program any condition, for example, work only at night, check the type of the displayed object, check the parameters of the request. Most conditions can be set by the rule on incoming data.
When working with the widget in the admin panel, the “Logic” and “Value” modes will be useful for editing, respectively, the logic of the widget and its template. Logic is a file with php class, like all objects. Template is the value of the widget as a file, the type of the template depends on the file extension. Logic and pattern are also editable in your favorite IDE. The Boolive system itself performs the routine operations of creating files, you only need to specify in the admin area that the object needs its own logic or its own template. A class file with the procurement of the class itself will be created automatically. It will be necessary only to supplement the function with new logic or redefine other functions.
To create a site interface, it is easier to use ready-made widgets from the library, slightly changing their pattern, logic and styles. The library has navigation widgets, content widgets, sliders, forms, and new ones will appear. Thanks to prototyping, the widget can be added to different areas of the site and each instance can be customized in its own way. Not just to customize, but to change the logic, pattern, styles, scripts. The library also has ready layouts, actually ready sites. If in most CMS you choose the themes for the “standard” layout, then in Boolive with one choice the simplest site turns into a portal. Taking the finished layout from the library as a basis, you will be able to modify it, get your layout without damaging the original one.
Where universality is needed, universal widgets should be used. One of these is the content widget in the central area of the site. The content widget in subordination has various widgets for specific objects - the widget of the page, section, product, user. Each widget runs in turn until one of them works. Everyone has a working condition - checking whether the displayed object inherits a specific object. As a result, the page will be displayed by the page widget, the section by the section widget. You can make a unique display for a specific page.
Automation is also applicable to display the properties of an object. Examples are page, section, menu widgets, slider and many others, especially in the admin area. These widgets select object properties and select a widget from the list for each property.
Thanks to universality, we can insert any object into the page, even a widget. This is a practical application - the creation of feedback forms, authorization, calculators. First, create the Calculator widget, and then paste it into the text of any page. Another interesting example of universality is the display of photos in the slider (carousel). Instead of a photo, you can add a page to the list of slides. The most important thing is that it will not be a hack, we keep the convenience of editing the page in slides.
The Boolive system has a single entry point - the index.php file. Processing of all requests begins with it - the work of the site starts. The root object of the site is selected and its start () function is called. The latter in turn launches the Interface object, we see it when entering the admin area. The interface in turn starts all its subordinates. As a result, the request will be processed, depending on the structure of the Interface.
In the Interface, we already know the widget hierarchy (the HTML markup widget). Most of the requests are what it processes, returning the HTML document to the client. In addition to widgets, there are other handlers in the interface, each of them is launched under the conditions of its work. For example, the RESTful handler will work if the response format is specified in the request header - JSON. The form handler will work if the address parameter of the form that receives the request is specified. You can easily add your handler, for example for integration with external systems. The interface launches all its subordinates in turn, but since all have their own working conditions, only one will be executed. The process then depends on the handlers themselves.

The flexibility of the data model has spread to the structuring of users. You can create user groups, groups in groups, add users to them. The system will not prevent the user from adding another user, if it is suddenly needed for the unique functions of the site. Naturally, the user can have any properties in his profile. Site administrators need to decide what to disable or allow users.
Users and groups have the property “Permissions”.
Roles are used to structure rights. In the "Role" are added objects "actions", for example, "read", "write". You can add your actions - this is a normal object, whose name corresponds to the name of the action. Actions can have nested actions, for example, changing the value of an object, the logic of an object, the execution of object functions. By banning the recording, you can neither create nor modify the object. Condition objects are added to actions. Their task is to return a condition under which the corresponding action can or cannot be performed. Now two types of conditions are used - “Admission” and “Prohibition”, respectively, the admission determines which objects have the right to perform an action, and the prohibition determines which objects there is not. It is precisely in the conditions that the definition of rights is focused, since anything can be a condition. You can simply verify the identifiers of objects, whether they are included in the list of those that have objects that are subject to the object of admission. You can check inheritance, parents, subordinates, authorship, just check attributes, for example, the values of objects. You can not touch the general objects, but determine the tolerance by the state of the system, for example, by time. In general, the condition object returns a condition in the database query language (see below)
The rights of the user himself are complemented by the rights of all groups in which he is a member. Combining rights is a combination of conditions by logical operations "AND", "OR", so that the rights of a nested group or user have priority over the parent group. The root group can be banned for everything, and for nested groups or users to indicate that they are allowed. It is acceptable, on the contrary, to first allow everything, then prohibit a point.
When working with objects at the level of program code - when saving, deleting or searching for them, we do not care about where the objects are actually stored, in which DBMS. Work with objects is completely abstracted from the DBMS. We are accessing the data module, he himself understands from the configuration in which storage the object should be and refers to the module of the corresponding storage, for example, MySQLStrore.php. To store site objects can be used several storages, and of different types. Storage is determined by the object URI.
We conducted interesting experiments with external storage HTTPStrore.php. If the object URI begins with "http:", then it works. HTTP REST requests are made to another site, and if the site is also on Boolive 2, then we get the desired result. Yes, the system allows you to prototype objects between sites!
Since working with data is abstracted from a specific DBMS, and even sampling requests can be accessed over the network, we simply cannot use SQL. We need a query language, on the one hand, understandable and responsive to the features of the prototype data model, on the other hand, easily structured so that it can be represented as a string in the URL or in PHP arrays and quickly converted between formats.
Using nested arrays, the query looks a bit bloated, but is very simple for software processing. The request indicates where to choose, the depth of the sample, what to choose, sorting, restrictions and other parameters. The sampling conditions are also structured.
In the URL format, the from parameter is abbreviated - the result is a full URL with the resource indicated. This option fully satisfies RESTful and eliminates the need to invent its API for complex samples, although constraints must also be thought of.
It works like this:
The query language describes the conditions of user access rights, the conditions of the widgets and other conditions. Check whether the previously selected object meets the desired condition can be programmatically without accessing the database. And for storage, it is not difficult to convert structured conditions into your own language, for example, in SQL.
When installing the system or site objects (read modules), SQL dumps are not used. The entire site with all the data is exported to * .info JSON files. These files are used during installation. The function of exporting and installing objects is available in the admin panel. At any time, the entire site can be exported, transfer its files to another server and install. This is convenient for preparing special versions of systems for distribution or use in the studio for their standard projects, but also for the exchange of modules.
Using info files solves the problem of merging databases from different developers when working on a site or in team development of a Boolive system. In addition, the data in the form of info files fall into the version control system and it is used to resolve conflicts when combining different versions of data.

If the value of the object is a file or the object has its own logic or the object was exported to an info file, then we will find the folder under the object in the file system. The folder path matches the object URI. The folder structure in the file system is the same as the site data structure. But not necessarily for each object will have its own folder, even if the entire site is exported to info files. Because property objects do not create their info file, but are linked into their parent's info file.
So, to install the system, you need to transfer all its files to the server and access the site through a browser. In the config.php configuration file, there is an IS_INSTALL constant in case you want to reinstall the system.
All technical solutions will be disclosed in the documentation, and the most interesting is published on Habré in new articles. The Boolive project has been developing for several years, a lot of work has been done, but in order for the system to get stronger, to be safely used and to benefit, there are several more important steps to be taken. Provide your assistance with objective criticism, testing, direct participation in the development or by any other means. Give extra acceleration. We will be mutual.
If you can not wait to see the system in action, and you find it difficult to install it yourself, then contact me personally.
GitHub: https://github.com/Boolive/Boolive
Promo: http://boolive.ru
The Boolive website creation and management system combines the best of modularity, versatility and flexibility. Programmers save from routine operations, focus on useful programming. Means of the administration section will allow you to create any data structure, set up work rules, create a website in strict accordance with the requirements. Whatever you do, everything is available for reuse. For managers, administrators, editors, site programmers - for all, the system tries to be simple with an intuitive, beautiful interface.
The foundation of flexibility - two hierarchies
The idea of the Boolive project has become clear for several years in experiments, from practical applications and in fascinating discussions with diverse personalities.
The main desire is the freedom to create any data structures and logic with any purpose. The system should not impose artificial restrictions that are not related to security or integrity, but allow to create simply, flexibly, without limiting creativity.
')
Based on a hierarchy. The entire site is one large hierarchy of objects. How much it depends on the level of detail of the subject area and the appropriateness of detail. The more detail, the more flexibility. In the hierarchy all the information about the site, all its objects - the content, interface, users. To all a single approach.
An object is a collection of data and logic. Each object has its own name, value and logic. Objects themselves are primitive. But they may have subordinate objects that form the hierarchy. Subordinate objects are used as properties of the parent object or simply to form a nested structure.
Since the objects are arranged in a hierarchy, they have an address - a URI. Actually as a file path. The address is used to access the object, including the browser string. Address - the main identifier of the object.
The freedom and ease of creating new objects will lead to the duplication of previously created objects. It is tiring to repeat the same type of operations for creating complex objects - consisting of several subordinates. Manually you need to observe the unity of the structure, naming, logic of the same type of objects. Prototyping is used to resolve this tedious complexity. This is the most important feature of the system. New objects are created on the basis of existing ones. In other words, one object inherits the value, logic and structure of another object. At the same time, it can redefine its meaning, logic, and have new subordinates or delete inherited ones. Prototyping optimizes the creation of complex objects, makes it possible to reuse. In addition, any object can be refined to fit your tasks without damaging existing objects oriented to other tasks, while maintaining feedback for updates. Objects remain connected to their prototype.
Each object is simultaneously in two hierarchies - in the hierarchy of the structure and in the hierarchy of inheritance. Only two hierarchies form an amazing flexibility to create complex data structures. If you want to associate one object with another, for example, to associate an article with a user, then prototyping is used. A new object is added to the submission, the prototype for it will be the object with which communication is needed.
The ability to create new objects based on existing ones suggests the existence of a library of objects. This is a branch of the site hierarchy in which objects are stored for reuse. You can reapply any object wherever it is located, but a library is a collection of various blanks and ready-made objects for creating a site from them. You can create your own library or package with objects for a specific project. Its standards of publications, product, user, widgets, ready-made sites and anything.
The logic is not alone, but is part of a flexible data structure. Each object can have its own unique logic or inherit the logic of the prototype. All possess the basic logic - the functions of checking, saving, accessing subordinates and others. Further objects are complemented by their logic. For example, widgets have display functions, images have scaling functions.
Flexibility in business
Unusual admin panel
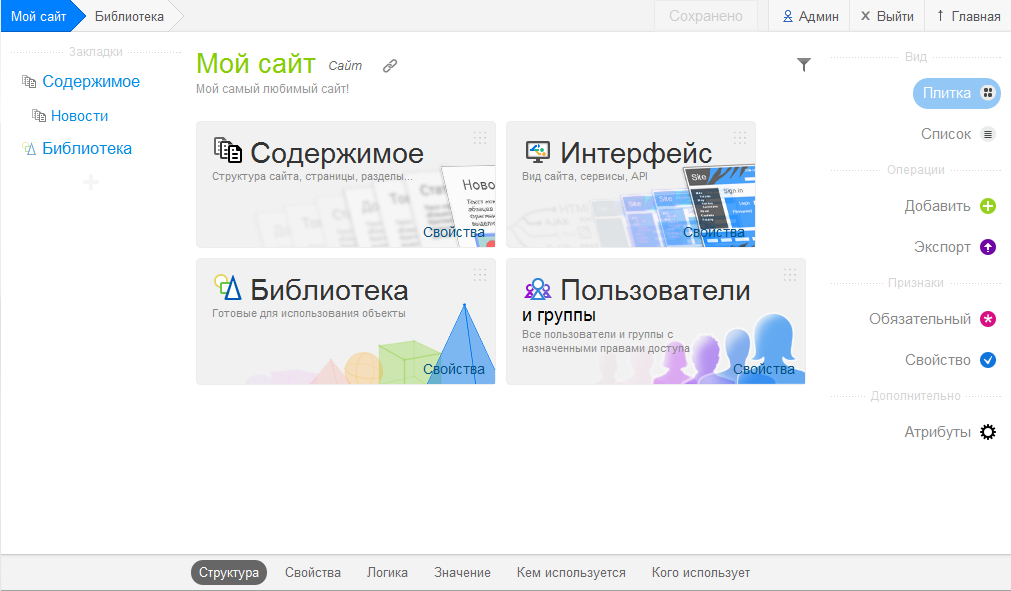
Getting started with the administration section (admin). The main task of the admin panel is to provide access to any site object, taking into account the rights of the user, and to perform the necessary operations with the object — create, modify, delete. Meaning in admin in a convenient graphical interface, to optimize the work on the site. For inexperienced users need to show the usual interface elements. For the advanced reveal all the flexibility of the system.
Work in the admin panel begins with the transition to the desired object, for example, to a page for later editing. In the central area the current object with its subordinate is displayed, you can go inside them. Above there is a menu of the path (address) of the current object for quick returns back. The left side displays bookmarks for quick transitions to frequently used objects. You can add a bookmark at any time to any object.
Since there is a lot of information about the object to place them on one screen, in the lower menu it is selected what exactly we are interested in about the object. Most often it is the structure of an object or its properties. For advanced users will be useful logic, the value of the object, as well as viewing the prototypes and the heirs of the object. When accessing an object, the structure is displayed by default.
The third type of navigation is the functions performed on objects. The function menu is located on the right side of the admin panel. The main functions are viewing an object, adding new ones, deleting and changing features. Available functions depend on the selected object, on the selected information and on some other states in the admin panel, for example, how many objects are simultaneously selected in the list, including access rights. The feature set is easy to expand. You can add your own browsers, editors of objects, assigning them to certain types of objects or other working conditions. With their help, the admin panel is endowed with more specific functions, honed under the convenience of a particular project. You can draw an analogy: the administration section as an operating system, site objects as files, and functions as programs.
It turns out that if we need to edit an existing page, we go to the content, find the page there, go to it and edit it. It should be easy!
Content - subject area of the project
Content includes everything that is supposed to be published on the site. For example: articles, news, sections, product, photos or project-specific content type. Usually, we deal with pages and sections. In the site hierarchy there is a special section "Content" for storing publications. But this does not mean that only in it you can store the pages of the site. The section is pre-made only for convenience and optimization, so as not to search the entire hierarchy.
To add a new page, you first need to go to the "Content" section. You can go to the page or subsection, if you need to add a new page inside them. After moving to the right menu, select the "Add" function. The quick selection list already offers a page. But we can choose any other site object. After adding the page is a sign of "draft". It is recommended that you first edit the page - fully prepare it for publication, and only then remove the sign of the draft.
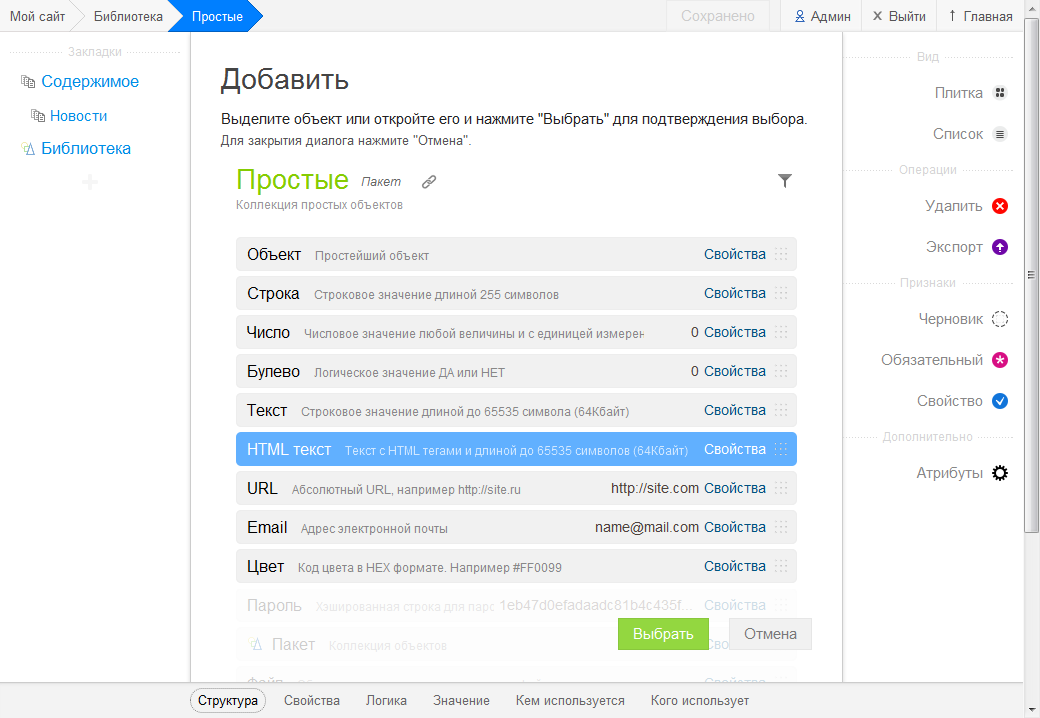
Now we feel the flexibility. Add another text property to the page. While in the page editor, for example, add the “From Library” from the “Simple” package to the “HTML Text” object. When you click on "Add", the object selection window will appear. All site objects are available for selection, but we need text that is in the library.
The new text will appear in the editor and be displayed on the page of the site in accordance with its order.
In this example, the additional property "text" is added to only one page. If you want all the pages of the site to have an additional property, it is easier to change the prototype or create your own and use it.
Under the project it is better to create a package in the library, and collect prototypes in it with the specifics of the project. For example, to create a “car” object for a car interior site, immediately determining all the necessary properties of a car, and before that create prototypes “Body type”, “Manufacturer” and many others to use them in the car itself. In this way, prototypes are created for the project subject area. In the section "Content" cars of the salon, lists of manufacturers and so on are already added directly. Note that to the “car” we can add not only simple properties - “text”, “number”, but also complex - any site objects and form complex structures! Properties that are marked as required immediately appear in new objects. If the property is optional, then it is available as an add-on, i.e. it can be added later if desired.
Widgets will display everything
To display the site in the browser widgets are used. A widget is an object with a display function that returns HTML code. A widget may itself display something, some static information, be a design element, display a specific object, for example, a news item, and also display subordinate widgets within itself.
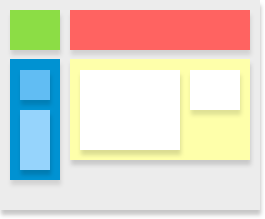
From the widgets is built a branch of the hierarchy in the "Interface" section. Widgets are completely determined by the presentation and dynamics of the site in the browser. The root widget displays the basic structure of an HTML document. The result of displaying its subordinate widget is inserted into the body area, it is set to mark up the site, for example, a cap, side panels, basement, center. Subject widgets are inserted into each area, and so on. This is a typical structure, different options are possible, it is possible to show the whole site with one widget, but be aware - flexibility in detail.
Widgets have a work condition function, if it returns true, the widget works, otherwise it doesn't. The function checks incoming data, settings or system status. The widget can be configured to work at a specific address, for example, the admin panel works if the address starts with / admin. The widget will not work if it is in draft or there is no access to it. You can program any condition, for example, work only at night, check the type of the displayed object, check the parameters of the request. Most conditions can be set by the rule on incoming data.
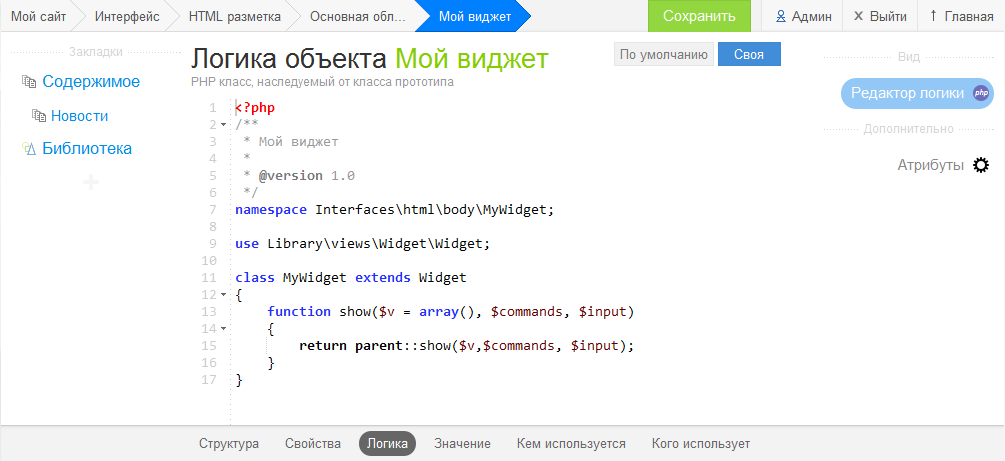
When working with the widget in the admin panel, the “Logic” and “Value” modes will be useful for editing, respectively, the logic of the widget and its template. Logic is a file with php class, like all objects. Template is the value of the widget as a file, the type of the template depends on the file extension. Logic and pattern are also editable in your favorite IDE. The Boolive system itself performs the routine operations of creating files, you only need to specify in the admin area that the object needs its own logic or its own template. A class file with the procurement of the class itself will be created automatically. It will be necessary only to supplement the function with new logic or redefine other functions.
To create a site interface, it is easier to use ready-made widgets from the library, slightly changing their pattern, logic and styles. The library has navigation widgets, content widgets, sliders, forms, and new ones will appear. Thanks to prototyping, the widget can be added to different areas of the site and each instance can be customized in its own way. Not just to customize, but to change the logic, pattern, styles, scripts. The library also has ready layouts, actually ready sites. If in most CMS you choose the themes for the “standard” layout, then in Boolive with one choice the simplest site turns into a portal. Taking the finished layout from the library as a basis, you will be able to modify it, get your layout without damaging the original one.
Where universality is needed, universal widgets should be used. One of these is the content widget in the central area of the site. The content widget in subordination has various widgets for specific objects - the widget of the page, section, product, user. Each widget runs in turn until one of them works. Everyone has a working condition - checking whether the displayed object inherits a specific object. As a result, the page will be displayed by the page widget, the section by the section widget. You can make a unique display for a specific page.
Automation is also applicable to display the properties of an object. Examples are page, section, menu widgets, slider and many others, especially in the admin area. These widgets select object properties and select a widget from the list for each property.
Thanks to universality, we can insert any object into the page, even a widget. This is a practical application - the creation of feedback forms, authorization, calculators. First, create the Calculator widget, and then paste it into the text of any page. Another interesting example of universality is the display of photos in the slider (carousel). Instead of a photo, you can add a page to the list of slides. The most important thing is that it will not be a hack, we keep the convenience of editing the page in slides.
Processing Any Request
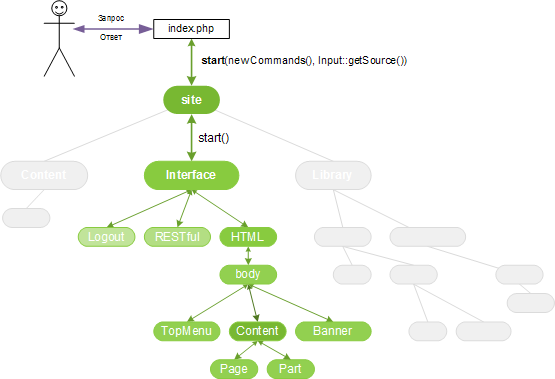
The Boolive system has a single entry point - the index.php file. Processing of all requests begins with it - the work of the site starts. The root object of the site is selected and its start () function is called. The latter in turn launches the Interface object, we see it when entering the admin area. The interface in turn starts all its subordinates. As a result, the request will be processed, depending on the structure of the Interface.
In the Interface, we already know the widget hierarchy (the HTML markup widget). Most of the requests are what it processes, returning the HTML document to the client. In addition to widgets, there are other handlers in the interface, each of them is launched under the conditions of its work. For example, the RESTful handler will work if the response format is specified in the request header - JSON. The form handler will work if the address parameter of the form that receives the request is specified. You can easily add your handler, for example for integration with external systems. The interface launches all its subordinates in turn, but since all have their own working conditions, only one will be executed. The process then depends on the handlers themselves.
Flexible configuration of user and group rights
The flexibility of the data model has spread to the structuring of users. You can create user groups, groups in groups, add users to them. The system will not prevent the user from adding another user, if it is suddenly needed for the unique functions of the site. Naturally, the user can have any properties in his profile. Site administrators need to decide what to disable or allow users.
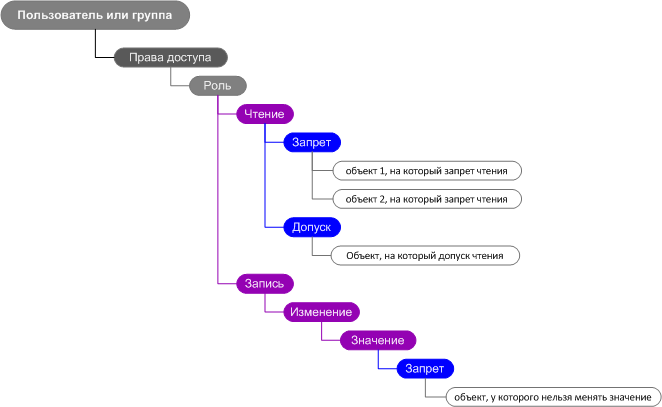
Users and groups have the property “Permissions”.
Roles are used to structure rights. In the "Role" are added objects "actions", for example, "read", "write". You can add your actions - this is a normal object, whose name corresponds to the name of the action. Actions can have nested actions, for example, changing the value of an object, the logic of an object, the execution of object functions. By banning the recording, you can neither create nor modify the object. Condition objects are added to actions. Their task is to return a condition under which the corresponding action can or cannot be performed. Now two types of conditions are used - “Admission” and “Prohibition”, respectively, the admission determines which objects have the right to perform an action, and the prohibition determines which objects there is not. It is precisely in the conditions that the definition of rights is focused, since anything can be a condition. You can simply verify the identifiers of objects, whether they are included in the list of those that have objects that are subject to the object of admission. You can check inheritance, parents, subordinates, authorship, just check attributes, for example, the values of objects. You can not touch the general objects, but determine the tolerance by the state of the system, for example, by time. In general, the condition object returns a condition in the database query language (see below)
Check in the program code:
// if ($object->isAccessible('write/change/value'){ echo ' '; } // – , // $cond = $user->getAccessCond('write/change'); The rights of the user himself are complemented by the rights of all groups in which he is a member. Combining rights is a combination of conditions by logical operations "AND", "OR", so that the rights of a nested group or user have priority over the parent group. The root group can be banned for everything, and for nested groups or users to indicate that they are allowed. It is acceptable, on the contrary, to first allow everything, then prohibit a point.
Where are the objects? Everywhere! Data warehouses
When working with objects at the level of program code - when saving, deleting or searching for them, we do not care about where the objects are actually stored, in which DBMS. Work with objects is completely abstracted from the DBMS. We are accessing the data module, he himself understands from the configuration in which storage the object should be and refers to the module of the corresponding storage, for example, MySQLStrore.php. To store site objects can be used several storages, and of different types. Storage is determined by the object URI.
We conducted interesting experiments with external storage HTTPStrore.php. If the object URI begins with "http:", then it works. HTTP REST requests are made to another site, and if the site is also on Boolive 2, then we get the desired result. Yes, the system allows you to prototype objects between sites!
Since working with data is abstracted from a specific DBMS, and even sampling requests can be accessed over the network, we simply cannot use SQL. We need a query language, on the one hand, understandable and responsive to the features of the prototype data model, on the other hand, easily structured so that it can be represented as a string in the URL or in PHP arrays and quickly converted between formats.
Request for arrays
Using nested arrays, the query looks a bit bloated, but is very simple for software processing. The request indicates where to choose, the depth of the sample, what to choose, sorting, restrictions and other parameters. The sampling conditions are also structured.
$cond = array( 'from' => '/Contents/news', // /Contents/news 'depth' => 3, // from. 'select' => 'children', // ? self, children, tree, heirs, parents, protos 'where' => array( // AND array('attr', 'uri', '=', '?'), // array('not', array( // array('attr', 'value', '=', '%?%') )), array('any', array( // , OR array('child', 'title', array( // title array('attr', 'value', '>', 10), array('attr', 'value', '<', 100), )), array('is', '/Library/basic/Number') // ? )) ), 'order' => array( // array('uri', 'DESC'), // uri array('childname', 'value', 'ASC') // value childname ), 'limit' => array(10, 15), // - 10- 15 'key' => 'name', // , ); Request in URL format
In the URL format, the from parameter is abbreviated - the result is a full URL with the resource indicated. This option fully satisfies RESTful and eliminates the need to invent its API for complex samples, although constraints must also be thought of.
$cond = " /Contents/news& depth=max& select=children& where=all( attr(uri,like,%25%25) not(attr(value,eq,m)) any( child(title,all( attr(value,gte,10) attr(value,lt,100) )) is(/Library/basic/Number) ) )& order=(uri,desc),(childname,value,asc)& limit=10,15 "; It works like this:
$result = Data::read($cond); // $result = Data::read("/Contents/news/news1"); // The query language describes the conditions of user access rights, the conditions of the widgets and other conditions. Check whether the previously selected object meets the desired condition can be programmatically without accessing the database. And for storage, it is not difficult to convert structured conditions into your own language, for example, in SQL.
No conflicts in the team. Your own versions
When installing the system or site objects (read modules), SQL dumps are not used. The entire site with all the data is exported to * .info JSON files. These files are used during installation. The function of exporting and installing objects is available in the admin panel. At any time, the entire site can be exported, transfer its files to another server and install. This is convenient for preparing special versions of systems for distribution or use in the studio for their standard projects, but also for the exchange of modules.
Using info files solves the problem of merging databases from different developers when working on a site or in team development of a Boolive system. In addition, the data in the form of info files fall into the version control system and it is used to resolve conflicts when combining different versions of data.
If the value of the object is a file or the object has its own logic or the object was exported to an info file, then we will find the folder under the object in the file system. The folder path matches the object URI. The folder structure in the file system is the same as the site data structure. But not necessarily for each object will have its own folder, even if the entire site is exported to info files. Because property objects do not create their info file, but are linked into their parent's info file.
So, to install the system, you need to transfer all its files to the server and access the site through a browser. In the config.php configuration file, there is an IS_INSTALL constant in case you want to reinstall the system.
Still
All technical solutions will be disclosed in the documentation, and the most interesting is published on Habré in new articles. The Boolive project has been developing for several years, a lot of work has been done, but in order for the system to get stronger, to be safely used and to benefit, there are several more important steps to be taken. Provide your assistance with objective criticism, testing, direct participation in the development or by any other means. Give extra acceleration. We will be mutual.
If you can not wait to see the system in action, and you find it difficult to install it yourself, then contact me personally.
GitHub: https://github.com/Boolive/Boolive
Promo: http://boolive.ru
Source: https://habr.com/ru/post/211488/
All Articles