Writing a platformer in Python using pygame
Immediately make a reservation that it is written for
I have long wanted to try myself as an igrodel, and recently I had a chance to learn Python and fulfill an old dream.
What is a platformer?
Platformer (platformer) - a genre of computer games in which the main feature of the gameplay is jumping on platforms, climbing stairs, picking up items that are usually necessary to complete a level.
Wiki
')
One of my favorite games of this genre are Super Mario Brothers and Super Meat Boy. Let's try to create something in between.
The most - the very beginning.
Attention! Using python branches 2.x, from 3.x problems with running the scripts described below were found!
Probably not only games, but all applications that use pygame start like this:
#!/usr/bin/env python # -*- coding: utf-8 -*- # pygame import pygame from pygame import * # WIN_WIDTH = 800 # WIN_HEIGHT = 640 # DISPLAY = (WIN_WIDTH, WIN_HEIGHT) # BACKGROUND_COLOR = "#004400" def main(): pygame.init() # PyGame, screen = pygame.display.set_mode(DISPLAY) # pygame.display.set_caption("Super Mario Boy") # bg = Surface((WIN_WIDTH,WIN_HEIGHT)) # # bg.fill(Color(BACKGROUND_COLOR)) # while 1: # for e in pygame.event.get(): # if e.type == QUIT: raise SystemExit, "QUIT" screen.blit(bg, (0,0)) # pygame.display.update() # if __name__ == "__main__": main() The game will “spin” in a loop (while 1), each iteration needs to redraw everything (background, platforms, monsters, digital messages, etc.). It is important to note that the drawing goes sequentially, i.e. if you first draw a hero, and then fill the background, then the hero will not be visible, consider this for the future.
Running this code, we will see a window filled with green color.

(The picture is clickable)
Well, a start, we go further.
Level.
And how without him? By the word “level” we will mean a limited area of virtual two-dimensional space, filled with all sorts of things, and along which our character will move.
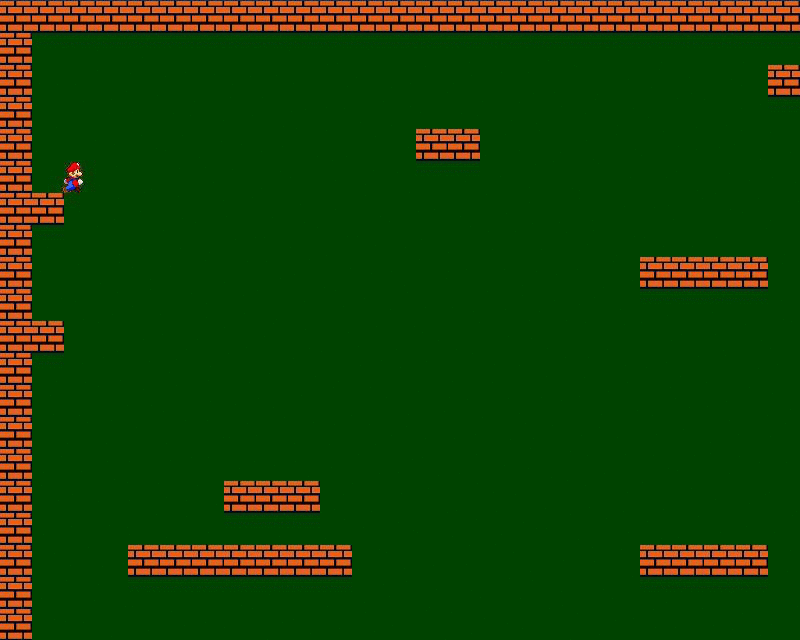
To build a level, create a two-dimensional array of m by n. Each cell (m, n) will be a rectangle. A rectangle can contain something, or it can be empty. We are in the rectangles will draw the platform.
Add more constants
PLATFORM_WIDTH = 32 PLATFORM_HEIGHT = 32 PLATFORM_COLOR = "#FF6262" Then add a level declaration to the main function.
level = [ "-------------------------", "- -", "- -", "- -", "- -- -", "- -", "-- -", "- -", "- --- -", "- -", "- -", "- --- -", "- -", "- ----------- -", "- -", "- - -", "- -- -", "- -", "- -", "-------------------------"] And add the following to the main loop:
x=y=0 # for row in level: # for col in row: # if col == "-": # , pf = Surface((PLATFORM_WIDTH,PLATFORM_HEIGHT)) pf.fill(Color(PLATFORM_COLOR)) screen.blit(pf,(x,y)) x += PLATFORM_WIDTH # y += PLATFORM_HEIGHT # x = 0 # Those. We iterate over the two-dimensional level array, and if we find the “-” character, then by coordinates (x * PLATFORM_WIDTH, y * PLATFORM_HEIGHT), where x, y is the index in the level array
Running, we will see the following:

Character
Just cubes on the background - it is very boring. We need our character who will run and jump on the platforms.
Create a class of our hero.
For convenience, we will keep our character in a separate file player.py
#!/usr/bin/env python # -*- coding: utf-8 -*- from pygame import * MOVE_SPEED = 7 WIDTH = 22 HEIGHT = 32 COLOR = "#888888" class Player(sprite.Sprite): def __init__(self, x, y): sprite.Sprite.__init__(self) self.xvel = 0 # . 0 - self.startX = x # , self.startY = y self.image = Surface((WIDTH,HEIGHT)) self.image.fill(Color(COLOR)) self.rect = Rect(x, y, WIDTH, HEIGHT) # def update(self, left, right): if left: self.xvel = -MOVE_SPEED # = x- n if right: self.xvel = MOVE_SPEED # = x + n if not(left or right): # , self.xvel = 0 self.rect.x += self.xvel # xvel def draw(self, screen): # screen.blit(self.image, (self.rect.x,self.rect.y)) What's so interesting?
To begin with, we create a new class, inheriting from the pygame.sprite.Sprite class, thereby inheriting all the characteristics of the sprite.
A sprite is a moving bitmap. It has a number of useful methods and properties.
self.rect = Rect (x, y, WIDTH, HEIGHT) , in this line we create the actual borders of our character, a rectangle along which we will not only move the hero, but also check him for collisions. But more about that below.
The update method (self, left, right)) is used to describe the behavior of an object. Overrides the parent update (* args) → None . May be called in groups of sprites.
The draw (self, screen) method is used to display a character on the screen. Next, we remove this method and use a more interesting way to display the hero.
Let's add our hero to the main part of the program.
Before determining the level, we will add a definition of the hero and its movement variables.
hero = Player(55,55) # (x,y) left = right = False # — In the event check we add the following:
if e.type == KEYDOWN and e.key == K_LEFT: left = True if e.type == KEYDOWN and e.key == K_RIGHT: right = True if e.type == KEYUP and e.key == K_RIGHT: right = False if e.type == KEYUP and e.key == K_LEFT: left = False Those. If you press the "left" key, then go left. If you let go - stop. Also with the "right" button
The movement itself is invoked as follows: (add after redrawing the background and platforms)
hero.update(left, right) # hero.draw(screen) # 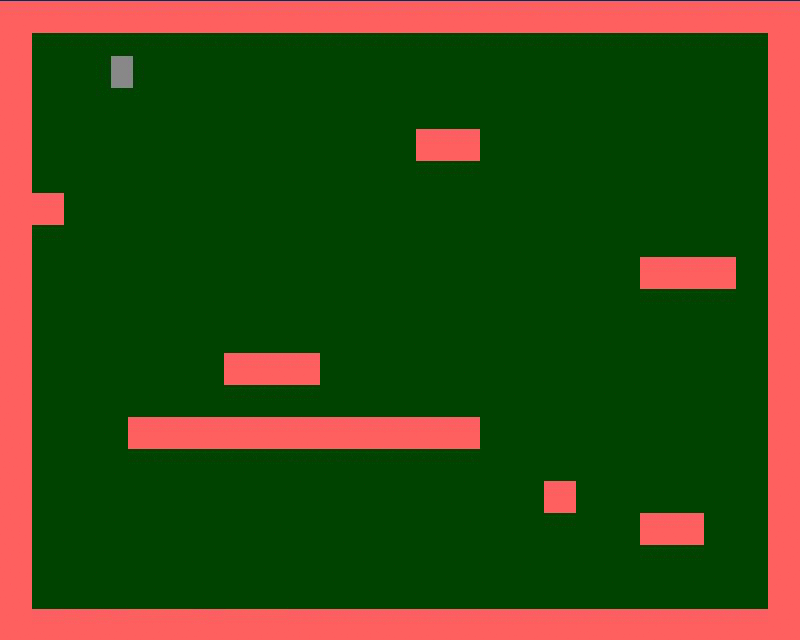
But, as we see, our gray block moves too quickly, we add a limit in the number of frames per second. To do this, after determining the level, add a timer.
timer = pygame.time.Clock() And at the beginning of the main loop, add the following:
timer.tick(60) Hung in the air
Yes, our hero is in a hopeless situation, he is frozen in the air.
Add gravity and the ability to jump.
And so, we work in the file player.py
Add more constants
JUMP_POWER = 10 GRAVITY = 0.35 # , Add the following lines to the _init_ method:
self.yvel = 0 # self.onGround = False # ? Add an input argument to the update method
def update (self, left, right, up):
And at the beginning of the method add:
if up: if self.onGround: # , self.yvel = -JUMP_POWER And before the line self.rect.x + = self.xvel
Add
if not self.onGround: self.yvel += GRAVITY self.onGround = False; # , (( self.rect.y += self.yvel And add to the main part of the program:
After the line left = right = False
Add a variable up
up = false In the event check we add
if e.type == KEYDOWN and e.key == K_UP: up = True if e.type == KEYUP and e.key == K_UP: up = False And change the call to the update method by adding a new argument up :
hero.update (left, right )
on
hero.update(left, right, up) Here we have created the force of gravity, which will pull us down, constantly increasing speed, if we do not stand on the ground, and we do not know how to jump in flight. And we still can not firmly stand on something, so the next animation, our hero falls far beyond the limits of visibility.

Stand with both feet on your land.
How to know that we are on the ground or another solid surface? The answer is obvious - use the check for intersection, but for this we will change the creation of platforms.
Let's create another file.py , and transfer the platform description to it.
PLATFORM_WIDTH = 32 PLATFORM_HEIGHT = 32 PLATFORM_COLOR = "#FF6262" Next, create a class, inheriting from pygame.sprite.Sprite
class Platform(sprite.Sprite): def __init__(self, x, y): sprite.Sprite.__init__(self) self.image = Surface((PLATFORM_WIDTH, PLATFORM_HEIGHT)) self.image.fill(Color(PLATFORM_COLOR)) self.rect = Rect(x, y, PLATFORM_WIDTH, PLATFORM_HEIGHT) There is not anything we do not already know, go ahead.
We make changes in the main file, before adding the level array we add
entities = pygame.sprite.Group() # platforms = [] # , entities.add(hero) Group sprites will use entities to display all elements of this group.
We will use the platforms array to check for intersection with the platform.
Next, block
if col == "-": # , pf = Surface((PLATFORM_WIDTH,PLATFORM_HEIGHT)) pf.fill(Color(PLATFORM_COLOR)) screen.blit(pf,(x,y)) Replace with
if col == "-": pf = Platform(x,y) entities.add(pf) platforms.append(pf) Those. create an instance of the Platform class, add it to the group of sprites entities and the array of platforms . In entities , for each block not to write display logic. In platforms added to then check the array of blocks at the intersection with the player.
Further, we remove all level generation code from the loop.
And the same line
hero.draw (screen) # display
Replace with
entities.draw(screen) # Running, we will see that nothing has changed. Right. After all, we do not check our hero for collisions. Let's start this fix.
We work in the file player.py
Remove the draw method, we no longer need it. And add a new collide method
def collide(self, xvel, yvel, platforms): for p in platforms: if sprite.collide_rect(self, p): # if xvel > 0: # self.rect.right = p.rect.left # if xvel < 0: # self.rect.left = p.rect.right # if yvel > 0: # self.rect.bottom = p.rect.top # self.onGround = True # - self.yvel = 0 # if yvel < 0: # self.rect.top = p.rect.bottom # self.yvel = 0 # In this method there is a check for the intersection of the coordinates of the hero and the platforms, if there is one, then the above described logic takes place.
Well, and for this to happen, you need to call this method.
Change the number of arguments for the update method, now it looks like this:
update(self, left, right, up, platforms) And do not forget to change his call in the main file.
And lines
self.rect.y += self.yvel self.rect.x += self.xvel # xvel Replace with:
self.rect.y += self.yvel self.collide(0, self.yvel, platforms) self.rect.x += self.xvel # xvel self.collide(self.xvel, 0, platforms) Those. they moved the hero vertically, checked the intersection vertically, moved horizontally, again checked the intersection horizontally.
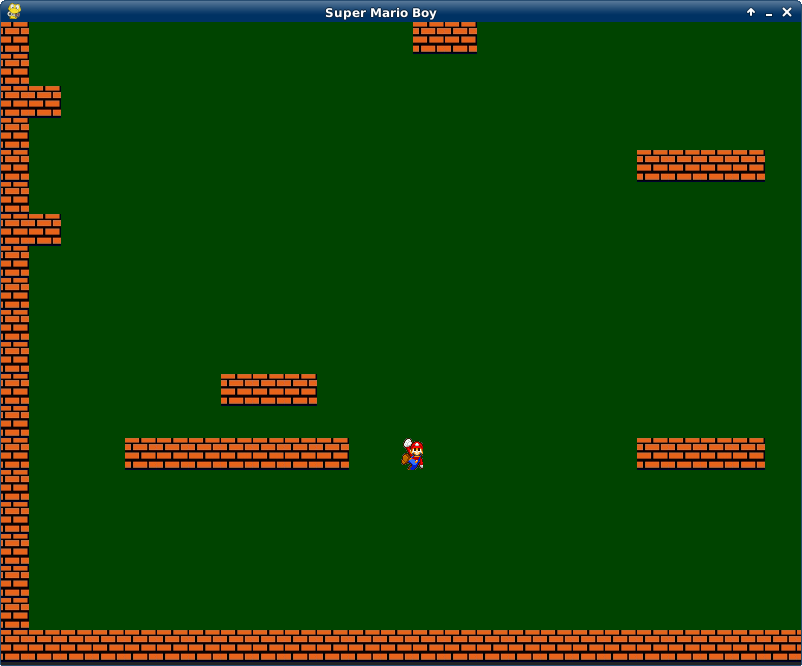
That's what happens when we run.
Fu [y]! A moving rectangle is not beautiful!
Let's embellish our MarioBoy a bit .
Let's start with the platforms. To do this, in the blocks.py file we will make small changes.
Replace the fill color with a picture, for this line
self.image.fill (Color (PLATFORM_COLOR))
Replace with
self.image = image.load("blocks/platform.png") We upload a picture instead of a solid color. Of course, the file “platform.png” should be located in the “blocks” folder, which should be located in the directory with source codes .
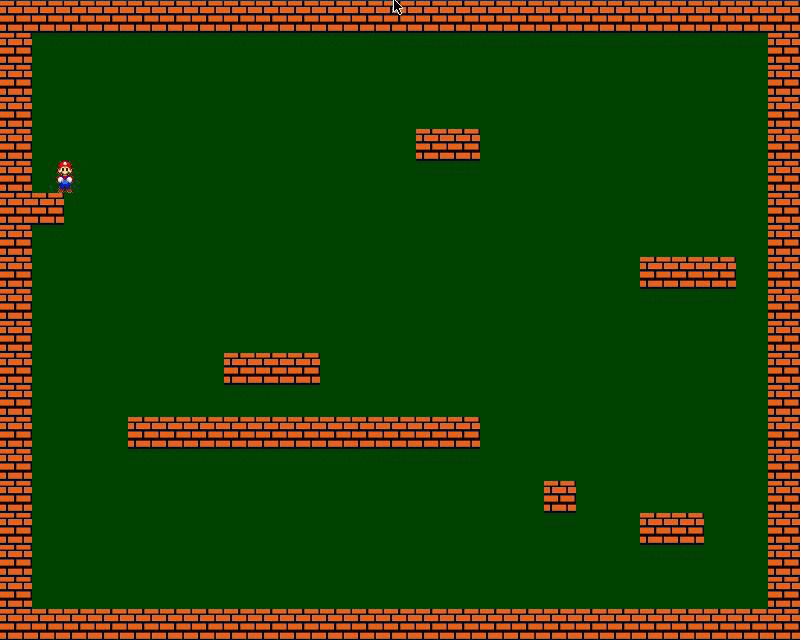
That's what happened

Now go to our hero. For a moving object, you need not a static picture, but an animation. In order to facilitate this task, let us use the wonderful library pyganim . Let's get started
First we add constants to the block.
ANIMATION_DELAY = 0.1 # ANIMATION_RIGHT = [('mario/r1.png'), ('mario/r2.png'), ('mario/r3.png'), ('mario/r4.png'), ('mario/r5.png')] ANIMATION_LEFT = [('mario/l1.png'), ('mario/l2.png'), ('mario/l3.png'), ('mario/l4.png'), ('mario/l5.png')] ANIMATION_JUMP_LEFT = [('mario/jl.png', 0.1)] ANIMATION_JUMP_RIGHT = [('mario/jr.png', 0.1)] ANIMATION_JUMP = [('mario/j.png', 0.1)] ANIMATION_STAY = [('mario/0.png', 0.1)] Here, I think, clearly, animation of different actions of the hero.
Now add the following to the __init__ method
self.image.set_colorkey(Color(COLOR)) # # boltAnim = [] for anim in ANIMATION_RIGHT: boltAnim.append((anim, ANIMATION_DELAY)) self.boltAnimRight = pyganim.PygAnimation(boltAnim) self.boltAnimRight.play() # boltAnim = [] for anim in ANIMATION_LEFT: boltAnim.append((anim, ANIMATION_DELAY)) self.boltAnimLeft = pyganim.PygAnimation(boltAnim) self.boltAnimLeft.play() self.boltAnimStay = pyganim.PygAnimation(ANIMATION_STAY) self.boltAnimStay.play() self.boltAnimStay.blit(self.image, (0, 0)) # -, self.boltAnimJumpLeft= pyganim.PygAnimation(ANIMATION_JUMP_LEFT) self.boltAnimJumpLeft.play() self.boltAnimJumpRight= pyganim.PygAnimation(ANIMATION_JUMP_RIGHT) self.boltAnimJumpRight.play() self.boltAnimJump= pyganim.PygAnimation(ANIMATION_JUMP) self.boltAnimJump.play() Here for each action we create a set of animations, and turn them on (that is, turn on frame changes).
for anim in ANIMATION_LEFT: boltAnim.append((anim, ANIMATION_DELAY ))Each frame has a picture and a show time.
It remains at the right time to show the desired animation.
Add a animation change to the update method .
if up: if self.onGround: # , self.yvel = -JUMP_POWER self.image.fill(Color(COLOR)) self.boltAnimJump.blit(self.image, (0, 0)) if left: self.xvel = -MOVE_SPEED # = x- n self.image.fill(Color(COLOR)) if up: # self.boltAnimJumpLeft.blit(self.image, (0, 0)) else: self.boltAnimLeft.blit(self.image, (0, 0)) if right: self.xvel = MOVE_SPEED # = x + n self.image.fill(Color(COLOR)) if up: self.boltAnimJumpRight.blit(self.image, (0, 0)) else: self.boltAnimRight.blit(self.image, (0, 0)) if not(left or right): # , self.xvel = 0 if not up: self.image.fill(Color(COLOR)) self.boltAnimStay.blit(self.image, (0, 0)) Voila!
More, need more space
We will overcome the size limit of the window by creating a dynamic camera .
To do this, create a class Camera
class Camera(object): def __init__(self, camera_func, width, height): self.camera_func = camera_func self.state = Rect(0, 0, width, height) def apply(self, target): return target.rect.move(self.state.topleft) def update(self, target): self.state = self.camera_func(self.state, target.rect) Next, add the initial configuration of the camera.
def camera_configure(camera, target_rect): l, t, _, _ = target_rect _, _, w, h = camera l, t = -l+WIN_WIDTH / 2, -t+WIN_HEIGHT / 2 l = min(0, l) # l = max(-(camera.width-WIN_WIDTH), l) # t = max(-(camera.height-WIN_HEIGHT), t) # t = min(0, t) # return Rect(l, t, w, h) Create an instance of the camera, add before the main loop:
total_level_width = len(level[0])*PLATFORM_WIDTH # total_level_height = len(level)*PLATFORM_HEIGHT # camera = Camera(camera_configure, total_level_width, total_level_height) What have we done?
We created inside a large rectangle whose dimensions are calculated as follows:
total_level_width = len(level[0])*PLATFORM_WIDTH # total_level_height = len(level)*PLATFORM_HEIGHT # smaller rectangle, identical in size to the window size.
The smaller rectangle is centered relative to the main character ( update method), and all objects are drawn in a smaller rectangle ( apply method), thereby creating the impression of camera movement.
For the above, you need to change the drawing objects.
Replace the line
entities.draw (screen) # display
On
for e in entities: screen.blit(e.image, camera.apply(e)) And before it we add
camera.update(hero) # Now we can change the level.
level = [ "----------------------------------", "- -", "- -- -", "- -", "- -- -", "- -", "-- -", "- -", "- ---- --- -", "- -", "-- -", "- -", "- --- -", "- -", "- -", "- --- -", "- -", "- ------- ---- -", "- -", "- - -", "- -- -", "- -", "- -", "----------------------------------"] This is the result.
The result can be downloaded, a link to GitHub
In the next part, if it is claimed by the community, we will create our own level generator
upd pygame can be downloaded from here , thank you, Chris_Griffin for the comment
upd1 second part
Source: https://habr.com/ru/post/193888/
All Articles