Development using the Model-View-ViewModel design pattern on the example of the Twitter client step by step
Introduction
The article is devoted to working with MVVM and WPF. It describes the development process of the twitter client. The development process is divided into steps. At the end of each step, the reader in parallel writing the application must have a working application. Each subsequent step adds some functionality to what was written in the previous step. Used by the thirdparty library TweetSharp . A link to the source code, as well as the original article, written by me in English, can be found here .
This article is intended for beginners in WPF development. But it is assumed that the reader has some initial experience with WPF, in particular, has mastered data binding.
I will not write why I need to use MVVM - I think that this is well written in the article “WPF Applications with a Model-View-Model-View Model” from Josh Smith. If you do not want to read this article - just trust me - the wrong designed GUI in the case of WPF turns into a big headache.
Preview client twitter analysis
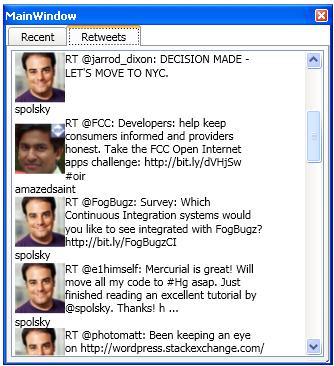
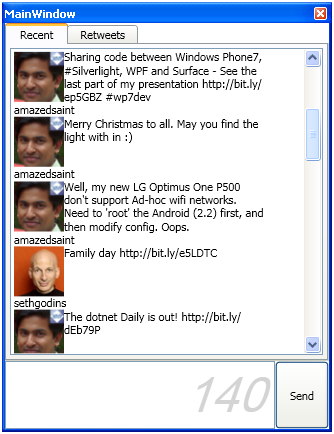
Before we proceed to the design of our client's design, let's take a look at the GUI of some existing client in order to understand what functionality we need to provide to the user:

The user uses several bookmarks at the top of the page - recent, replies, user, and so on. Depending on the selected bookmark, different information is displayed in the main window space. For example, when you click on Recent, the latest tweets from your subscription are displayed, and when you click on Messages, your direct messages will appear in the main window.
After thinking a little more, we understand that it is wise to use TabControl.
MVVM in brief
I'll start with an example. Suppose you need to write a UserControl that will display tweets. You click to add a UserControl, and you will add the necessary controls to xaml. Next, you will create a property in code behind where you will store tweets. Then add the event handler to the same code behind - for example, clicking on the UserPicture on Twitter. In general, everything is the same as if you did this control using previous technologies like WinForms. Take a closer look at this control - it has a description of the part visible to the user - those xaml. And there is also code behind.
Now let's say you receive the first feature request - the user wanted to display other tweets, but in the same exact control. You can make the appropriate flag in code behind or, if you are more experienced in software design, you will use GoF's strategy. After some time, the second feature request comes - every tweet contains too much unnecessary information from the user’s view and you need to make a new look to your control, but at the same time you don’t want to offend old users and leave the possibility of working with the old visual presentation. And so on - the requirements are coming all new, you use various tricks and ingenious solutions to implement them.
Stop! Let's go back in time - to the situation when there was only one control. What if you break the code behind and the control class itself? Those split the entity into two. One to call View is what the user sees, those class inherited from UserControl. And the second to call the ViewModel is the data directly related to what is shown to the user through the View, as well as event handler functions, like clicking on an avatar. Then it will be easy to solve the first feature request - you just write the ViewModel and assign the old View to it. It will also be easy to solve the first feature request - you can associate different View with one ViewModel. Good idea - you think.
But how to make the connection between View and ViewModel? Data binding is used for this - a key tool in WPF. You specify View one way or another which DataContext to use, tell them where to get the data, and continue to reach the data in almost the same way as in the case of the code behind. I deliberately omit the technical details here - they will be told further.
This is a typical class diagram for an application written using MVVM:
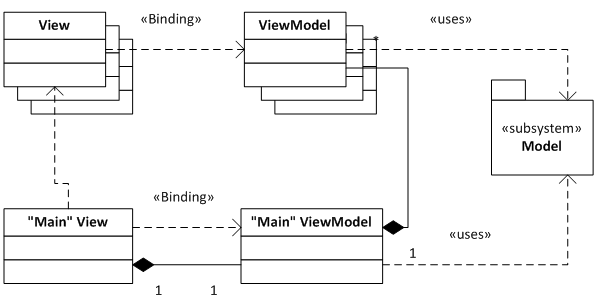
There are View classes, they use data from ViewModel, but they know nothing about the model (in our case, the model is implemented in the TweetSharp library). The ViewModel, in turn, does not know which View uses them, but can take information from the Model.
Usually there are also some major View and ViewModel that aggregate the rest of the View and ViewModel.
')
Step 1. Application framework
First, create an application with TabControl, which contains only one TabItem - Recent. We will act in accordance with MVVM.
Create a new WPF application. In the MainWindow window add TabControl:
<TabControl Height="400"
HorizontalAlignment="Left"
Name="Tabs"
VerticalAlignment="Top" Width="300">
/>
This window will be the main element of the View. It will display all other elements (tabItems). It must correspond to the corresponding class ViewModel, which will be central in its field. It is in it, and not in MainWindow's code behind, that we will store data and describe event handler functions. Create a new public class, SimpleTwitterClientViewModel. Let it be empty for now. Now we need to specify the window class so that it searches for data not in the code behind, but in SimpleTwitterClientViewModel. Those we need to set the DataContext. To do this, add the ViewModel field to code behind, add a property to the name of the window, and define the DataContext:
<Window x:Class="SimpleTwitterClient.MainWindow"
x:Name="MainWindowInstance"
xmlns:view="clr-namespace:SimpleTwitterClient.View"
xmlns:viewModel="clr-namespace:SimpleTwitterClient.ViewModel"
DataContext="{BindingViewModel,ElementName=MainWindowInstance}">
public partial class MainWindow : Window
{
private SimpleTwitterClientViewModel _viewModel;

public SimpleTwitterClientViewModel ViewModel
{
get { return _viewModel; }
set { _viewModel = value; }
}

public MainWindow()
{
_viewModel = new SimpleTwitterClientViewModel();
InitializeComponent();
}
}
Now we will create Recent's View and ViewModel. RecentView - it will be just UserControl with empty code behind. Add some control to it to distinguish it from the empty TabItem that is now. Let RecentViewModel be empty.
SimpleTwitterClientViewModel will be the class that will hold the ViewModel for our TabItems. So far we have only Recent. So write this code:
public class SimpleTwitterClientViewModel
{
RecentViewModel _recentPage = new RecentViewModel();

public RecentViewModel RecentPage
{
get { return _recentPage; }
set { _recentPage = value; }
}
}
If we launch our application now, we will see that so far nothing has changed. We still need to specify our TabItem, so that it displays RecentView. How to do it? Here is a subtle but important point - first, we need to set Content to RecentPage:
/>Second, you need to create a mapping from ViewModel to View. Those code that would check that if TabItem's Content is RecentViewModel, then you need to display RecentView. Here is the code:
<Window.Resources>
<DataTemplateDataType="{x:TypeviewModel:RecentViewModel}">
<view:RecentView />
</Window.Resources>
As a result of all these actions, we have the following application:

Why so difficult? This is just the beginning, then when the application becomes more complex, you will appreciate the advantages of MVVM.
Step 2. First tweets
Fill in our RecentPage data with the latest tweets. For this we will use the TweetSharp library. Add it to the list of assemblies.
In order to use our application with the Twitter API, it is necessary to do a number of frauds.
1. ConsumerKey and ConsumerSecret. Go to http://dev.twitter.com/ and click register. After that, a page with information about your application will appear, take the ConsumerKey and ConsumerSecret from there and save them in settings.
2. PIN (oauth_verifier). When your application is launched for the first time, it should send a request containing the ConsumerSecret and ConsumerKey to the server:
FluentTwitter.SetClientInfo(
new TwitterClientInfo
{
ConsumerKey = Settings.Default.ConsumerKey,
ConsumerSecret = Settings.Default.ConsumerSecret
});

var twit = FluentTwitter.CreateRequest().Authentication.GetRequestToken();

var response = twit.Request();

var RequestToken = response.AsToken();
twit = twit.Authentication.AuthorizeDesktop(RequestToken.Token);
The last line will open your default browser. There will be a question about whether to allow the application to use the service, click Allow and enter the PIN in the application dialog. I invoke this dialog in the getPinFromUser method:
string verifier = getPinFromUser();3. AccesToken. Now send a request containing consumerKey, consumerSecret and Pin. The service will return AccessToken which will be used later:
twit.Authentication.GetAccessToken(RequestToken.Token, verifier);
var response2 = twit.Request();
4. Refresh your AccessToken. After some time, the service may ask to update AccessToken.
Add the OAuthHandler class to the Model folder. There add UserControl AskPinFromUserDialog. And in the resources of your application, add ConsumerKey, ConsumerSecret, received from Twitter, when you registered your application. There add OauthInfoFileName in which write the path to the configuration file for our application. There will be stored keys received from twitter. Not very safe, but simple. Finally, add the creation of an object of this class to the main ViewModel:
Model.OAuthHandler _oauthHandler = newModel.OAuthHandler();Now you can start working with RecentPage. First, add a container for storing tweets to the RecentPage class:
public ObservableCollection Tweets
{
get; set;
}

ObservableCollection, - List View, .
. - _oauthHandler ViewModel. RecentViewModel, _oauthHandler .
, _oauthHandler , .
. LoadTweets RecentViewModel:
public void LoadTweets()
{
TwitterResult response = FluentTwitter
.CreateRequest()
.AuthenticateWith(
Settings.Default.ConsumerKey,
Settings.Default.ConsumerSecret,
Model.OAuthHandler.Token,
Model.OAuthHandler.TokenSecret)
.Statuses()
.OnHomeTimeline().AsJson().Request());

var statuses = response.AsStatuses();
foreach (TwitterStatus status in statuses)
{
Tweets.Add(status);
}
}

RecentViewModel:
public RecentViewModel(Model.OAuthHandleroauthHandler)
{
_oauthHandler = oauthHandler;
Tweets = newObservableCollection();
LoadTweets();
}

ListBox :
<ListBoxx:Name="RecentTweetList"
ItemsSource="{Binding Path=Tweets}"
IsSynchronizedWithCurrentItem="True"/>

, TweetStatus.ToString(). , ListBox , TweetStatus. , , DataTemplate UserControl.Resources. DataTemplate , TweetStatus. , TweetStatus Text, Binding Path=Text.
DataTemplate:

<DataTemplate x:Key="TweetItemTemplate">
<Grid x:Name="TTGrid">
<Grid.RowDefinitions>
/>
/>
</Grid.RowDefinitions>
<Grid.ColumnDefinitions>
/>
/>
/>
</Grid.ColumnDefinitions>
<Image Source="{Binding Path=User.ProfileImageUrl}"
Name="UserAvatarImage" />
<TextBlock
Name="ScreenNameTextBlock"
Text="{Binding Path=User.ScreenName}"
Grid.Row="1"Grid.ColumnSpan="2"/>
<TextBlock
Text="{Binding Path=Text}"
TextWrapping="Wrap"Grid.Column="1"Grid.ColumnSpan="2" />
Now we will tell our ListBox to use the declared DataTemplate:
ItemTemplate="{StaticResourceTweetItemTemplate}"Now our application should look like this:

Step 3. New pages
The Recent tab displays the latest tweets that you follow, as well as your own tweets. In terms of TweetSharp, this is HomeTimeline. But this is not all tweets that may interest you. If you go to the TwitterStatusesExtensions class, in which the OnHomeTimeline method is declared, you will see other methods that return a list of tweets grouped by various criteria: OnFriendsTimeline, OnListTimeline, RetweetedByMe ...
Create a page that will contain retweets of users you follow. Similar to the creation of Recent, create a RetweetsViewModel. I will not describe their code in detail, leaving the reader as an exercise exercise. Are you thinking of writing View as well? Hmm, but the information displayed in Recent and Retweets is structurally the same. MVVM and WPF allow you to minimize copy-past - in this case, do not think about RetweetsView. At the end of Step 3 you will see that this is unnecessary.
Now we need to add the object of the RetweetsViewModel class to the main ViewModel. If we have only two pages, then this is a normal solution. But we want to make many pages. So this solution is not the best. It is better to store in the main ViewModel container with different ViewModel. We notice that RetweetsViewModel is very similar to RecentViewModel and you can easily apply Extract Interface from class. We will also move OauthHandler into properties and will not initialize it in the constructor, but do it in the base class. Let's call the IPageBase interface:
public interface IPageBase
{
void LoadTweets();
ObservableCollection Tweets { get; set; }
}


ViewModel:
ObservableCollection _pages;

public ObservableCollection Pages
{
get { return _pages; }
set { _pages = value; }
}

public SimpleTwitterClientViewModel()
{
_pages = new ObservableCollection();
_pages.Add(new RecentViewModel());
_pages.Add(new RetweetsViewModel());
foreach (var page in _pages)
{
page.LoadTweets();
}
}

View DataTemplate RetweetsPage. TabItem – tabItem ViewModel RecentPage:
/>
TabItems Pages. TabControl ItemsSource. Pages TabItems – Pages. – TabItems Header. header TabItems? Name IPageBase. -. , TabItem Header:

<TabControlName="Tabs"
ItemsSource="{Binding Pages}">
<TabControl.ItemContainerStyle>

</TabControl.ItemContainerStyle>


– RetweetsViewModel View. RetweetsView. RecentView! MVVM!
<DataTemplateDataType="{x:TypeviewModel:RetweetsViewModel}">
<view:RecentView />


. :

DataTemplate – ViewModel .
– follower & following.

4. ICommand
, . MVVM – OnMouseClick. . , . TextBox , :

code behind – EnterTweetTextBox.Text. MVVM . ViewModel , Send. , .
, EnterTweetTextBox . SimpleTwitterClientViewModel – Message. Text:
<TextBoxName="EnterTweetTextBox"
Text="{BindingMessage}"/>

SendTweet SimpleTwitterClientViewModel:
private void SendTweet()
{
var twitter = FluentTwitter.CreateRequest();
twitter.AuthenticateWith(
Settings.Default.ConsumerKey,
Settings.Default.ConsumerSecret,
OAuthHandler.Token,
OAuthHandler.TokenSecret);
twitter.Statuses().Update(Message);

var response = twitter.Request();
//you can verify the response here
}

– ? – Button Command, . ICommand. SendMessage, , . ? – -adapter ICommand. Josh Smith:
internal class RelayCommand : ICommand
{
#region Fields

readonly Action _execute;
readonly Func _canExecute;

#endregion

#region Constructors

public RelayCommand(Action execute)
: this(execute, null)
{
}

public RelayCommand(Action execute, Func canExecute)
{
if (execute == null)
throw new ArgumentNullException("execute");

_execute = execute;
_canExecute = canExecute;
}

#endregion // Constructors

#region ICommand Members

[DebuggerStepThrough]
public bool CanExecute(object parameter)
{
return _canExecute == null ? true : _canExecute();
}

public event EventHandler CanExecuteChanged
{
add
{
if (_canExecute != null)
CommandManager.RequerySuggested += value;
}
remove
{
if (_canExecute != null)
CommandManager.RequerySuggested -= value;
}
}

public void Execute(object parameter)
{
_execute();
}

#endregion // ICommand Members
}

RelayCoommand ICommand. , SendTweet ICommand:
RelayCommand _sendCommand;
public ICommand SendCommand
{
get
{
if (_sendCommand == null)
{
_sendCommand = new RelayCommand(() => this.SendTweet());
}
return _sendCommand;
}
}

, SendButton , SendCommand:
<Button Name="SendTweetButton"
Command="{Binding SendCommand}"/>
, ? :

, – .
, feature: userpicture, TabItem . TabItem , .
public interface IPageBase
{
void LoadTweets();
ObservableCollection Tweets { get; set; }
}
ViewModel:
ObservableCollection _pages;
public ObservableCollection Pages
{
get { return _pages; }
set { _pages = value; }
}
public SimpleTwitterClientViewModel()
{
_pages = new ObservableCollection();
_pages.Add(new RecentViewModel());
_pages.Add(new RetweetsViewModel());
foreach (var page in _pages)
{
page.LoadTweets();
}
}
View DataTemplate RetweetsPage. TabItem – tabItem ViewModel RecentPage:
/>
TabItems Pages. TabControl ItemsSource. Pages TabItems – Pages. – TabItems Header. header TabItems? Name IPageBase. -. , TabItem Header:
<TabControlName="Tabs"
ItemsSource="{Binding Pages}">
<TabControl.ItemContainerStyle>
</TabControl.ItemContainerStyle>
– RetweetsViewModel View. RetweetsView. RecentView! MVVM!
<DataTemplateDataType="{x:TypeviewModel:RetweetsViewModel}">
<view:RecentView />
. :
DataTemplate – ViewModel .
– follower & following.
4. ICommand
, . MVVM – OnMouseClick. . , . TextBox , :
code behind – EnterTweetTextBox.Text. MVVM . ViewModel , Send. , .
, EnterTweetTextBox . SimpleTwitterClientViewModel – Message. Text:
<TextBoxName="EnterTweetTextBox"
Text="{BindingMessage}"/>
SendTweet SimpleTwitterClientViewModel:
private void SendTweet()
{
var twitter = FluentTwitter.CreateRequest();
twitter.AuthenticateWith(
Settings.Default.ConsumerKey,
Settings.Default.ConsumerSecret,
OAuthHandler.Token,
OAuthHandler.TokenSecret);
twitter.Statuses().Update(Message);
var response = twitter.Request();
//you can verify the response here
}
– ? – Button Command, . ICommand. SendMessage, , . ? – -adapter ICommand. Josh Smith:
internal class RelayCommand : ICommand
{
#region Fields
readonly Action _execute;
readonly Func _canExecute;
#endregion
#region Constructors
public RelayCommand(Action execute)
: this(execute, null)
{
}
public RelayCommand(Action execute, Func canExecute)
{
if (execute == null)
throw new ArgumentNullException("execute");
_execute = execute;
_canExecute = canExecute;
}
#endregion // Constructors
#region ICommand Members
[DebuggerStepThrough]
public bool CanExecute(object parameter)
{
return _canExecute == null ? true : _canExecute();
}
public event EventHandler CanExecuteChanged
{
add
{
if (_canExecute != null)
CommandManager.RequerySuggested += value;
}
remove
{
if (_canExecute != null)
CommandManager.RequerySuggested -= value;
}
}
public void Execute(object parameter)
{
_execute();
}
#endregion // ICommand Members
}
RelayCoommand ICommand. , SendTweet ICommand:
RelayCommand _sendCommand;
public ICommand SendCommand
{
get
{
if (_sendCommand == null)
{
_sendCommand = new RelayCommand(() => this.SendTweet());
}
return _sendCommand;
}
}
, SendButton , SendCommand:
<Button Name="SendTweetButton"
Command="{Binding SendCommand}"/>
, ? :
, – .
, feature: userpicture, TabItem . TabItem , .
Source: https://habr.com/ru/post/111105/
All Articles