Learning to cook: Spring 3 MVC + Spring Security + Hibernate
Good day! My name is Anton Shchastny.
This is my next article on the development of web applications in Java. I want to suggest that you make a small client accounting system, written using the Spring framework and the Hibernate library.
There will be a simple contact manager that allows you to add new entries to the database, view existing ones, delete unnecessary ones. The information will be stored in a database. Access to the application - via the web, with user authentication and authorization.
')
Infrastructure:
In my previous article on Spring MVC , I missed a number of points about using annotations in Java code and using Maven to build a project. In this article I tried to correct the omission.
The purpose of the article is to show beginner web developers how to use various technologies of the Java platform.
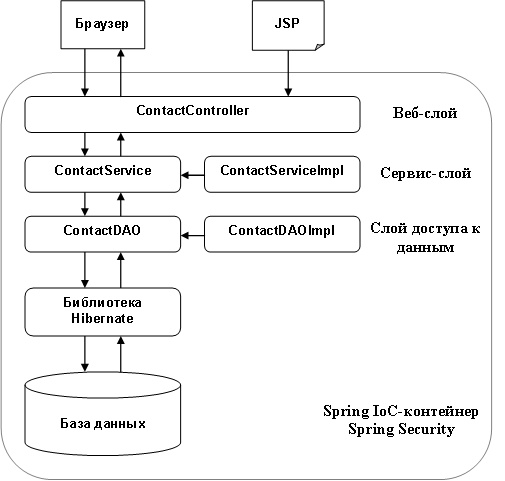
Architecture of the developed application.
The project will be developed in the SpringSource Tool Suite (STS) - a handy editor based on the Eclipse IDE.
After installing the STS, create a template project:
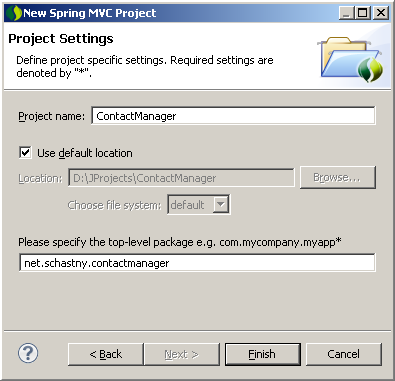
File> New> Spring Template Project> Spring MVC Project.
Project name: ContactManager
Top level package: net.schastny.contactmanager
The editor will create a template web project with basic settings, which has the following structure:
Let's change in the project settings (pom.xml) the Spring version from 3.0.4.RELEASE to 3.0.5.RELEASE .
Note: how to create Maven projects outside the IDE read here .
Note: the controller class created by the editor can be deleted.
Do not forget to add methods getters and setters for bean properties.
Add the project dependencies to the pom.xml file. Note that the class from the domain model will not depend on either Spring or Hibernate.
Explanation of annotations used.
Interface and practical implementation of the object of data access.
Update the project dependencies in the pom.xml file. Add Hiberneit.
Explanation of annotations used.
We describe the user interface with the system.
The practical implementation of the service interface is the class ContactServiceImpl.java.
Update the project dependencies in the pom.xml file. Add transaction support.
Explanation of annotations used.
Setting up a web application will start with the most important thing - with the darkness of xml-files. In a large application it is very convenient to store various settings in different files.
After the xml-spoilers, write a simple controller.
Settings files can be found at the links below.
spring / security.xml
Explanation of used bins.
Files:
/src/main/resources/messages_en.properties
/src/main/resources/messages_en.properties
/src/main/resources/hibernate.cfg.xml
WEB-INF / jdbc.properties
Explanation of annotations used.
/src/main/webapp/WEB-INF/views/contact.jsp
Before starting the system, we need to do two more things:
First, create a database for the application and the user for it in accordance with the settings of the jdbc.properties file:
Second, update the dependencies in pom.xml .
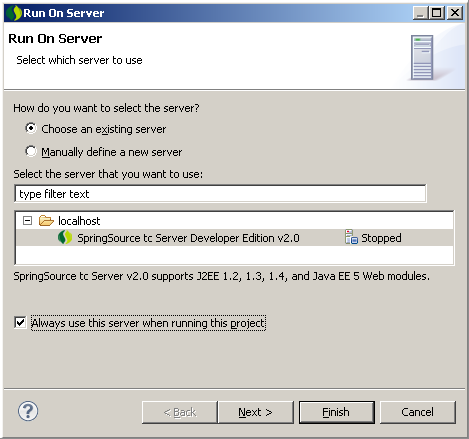
Now we run the application on the server: ContactManager> Run As> Run on Server> SpringSource tc Server Developer Edition v2.0 .
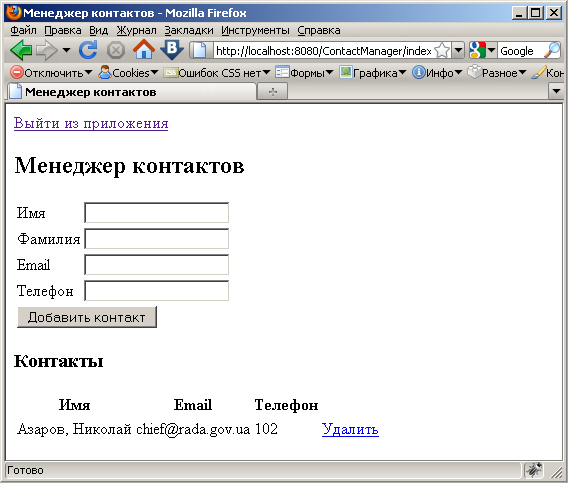
Open http: // localhost: 8080 / ContactManager in your browser.
Note: Check the encoding of the database, tables in the database, connections to the database, the project encoding in the editor, because instead of native Cyrillic letters in the browser, cracks may appear.
To debug Hibernate's work, you can add the following line to the src / main / resources / log4j.xml file:
Update the project dependencies in the pom.xml file. Add Spring Security modules.
Add a security filter to the web.xml that applies to the entire application.
For security reasons, the login page should not be placed inside the WEB-INF folder , so we will place it in the root of the web application - in the webapp folder.
webapp / login.jsp
In the same place we will place an error page 403: webapp / error403.jsp
Edit the security.xml file.
security.xml
We select in the application three groups of users (user roles):
We delimit access to the application:
You can directly in the configuration file, if they are few. It is possible in the database, it is possible in the LDAP storage.
An example of a record ( security.xml ) when using a database for storing passwords.
Explanation of some elements.
That's all! It remains to fasten the design, ryushechki on jQuery ( article for beginners ) and sell crafts for money. But this, my dear readers, is another story.
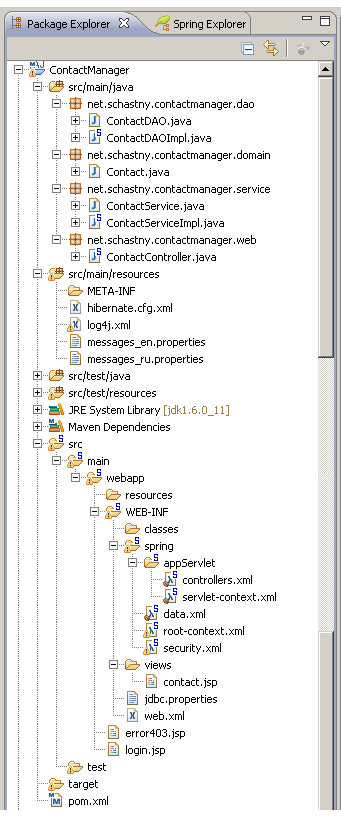
After performing all the manipulations, you should have the following project structure:
I would be grateful for these errors and inaccuracies in the article.
1. Spring Recipes: Problem-Solution Approach, Second Edition, Gary Mak, Ken Sipe, Josh Long, Daniel Rubio.
2. Create Spring 3 MVC Hibernate 3 Example using Maven in Eclipse ,
3. The Spring Framework Reference Documentation,
4. Mastering Spring MVC 3 by Keith Donald .
You can download the finished project here , and the database for the project here .
This is my next article on the development of web applications in Java. I want to suggest that you make a small client accounting system, written using the Spring framework and the Hibernate library.
What will be in the application:
There will be a simple contact manager that allows you to add new entries to the database, view existing ones, delete unnecessary ones. The information will be stored in a database. Access to the application - via the web, with user authentication and authorization.
')
What we will use:
- Spring MVC web framework
- Spring Security framework
- ORM library Hibernate,
- MySQL as a DBMS.
Infrastructure:
- SpringSource Tool Suite editor
- Maven Project Collector,
- Log4j logging system
- permanent internet connection.
In my previous article on Spring MVC , I missed a number of points about using annotations in Java code and using Maven to build a project. In this article I tried to correct the omission.
The purpose of the article is to show beginner web developers how to use various technologies of the Java platform.
Content
- Creating a new project in the IDE.
- Creating a package structure.
- Adding an entity class to a domain model.
- Data access layer
- Service layer
- Adding web.
- Controller.
- View.
- Application launch.
- Security.
- Conclusion
Architecture of the developed application.
1. Creating a new project in the IDE
The project will be developed in the SpringSource Tool Suite (STS) - a handy editor based on the Eclipse IDE.
After installing the STS, create a template project:
File> New> Spring Template Project> Spring MVC Project.
Project name: ContactManager
Top level package: net.schastny.contactmanager
The editor will create a template web project with basic settings, which has the following structure:
| src / main / java | Java classes of the application. |
| src / main / resources | All other files (resources) necessary for operation: for example, the log4j.xml logger settings file, the META-INF folder. |
| src / test / java | JUnit test folder. |
| src / test / resources | Folder of unit tests. |
| src / main / webapp | The folder in which the files of the web component of the contact manager are located: application deployment descriptor web.xml, xml files with the Spring framework settings, jsp pages. Attention, static application resources: images, css, js-scripts are in the resources folder. |
| pom.xml | The project settings file for Maven contains the project name and a list of project dependencies on third-party libraries. |
Let's change in the project settings (pom.xml) the Spring version from 3.0.4.RELEASE to 3.0.5.RELEASE .
Note: how to create Maven projects outside the IDE read here .
2. Creating package structure
| net.schastny.contactmanager.dao | Data access layer In it we will place Data Access Objects - objects of data access. |
| net.schastny.contactmanager.domain | Domain layer. This is where the POJO-classes are located, which describe the entity-entities of the system. In our case, this is the class Contact. |
| net.schastny.contactmanager.service | Service layer of the application. Contains interfaces that describe application functionality. Also contains one or more practical implementations of these interfaces. |
| net.schastny.contactmanager.web | Web layer application. Here are the controller classes that describe the order of user interaction with the system through the web. |
Note: the controller class created by the editor can be deleted.
3. Adding an entity class to the domain model
package net.schastny.contactmanager.domain; import javax.persistence.Column; import javax.persistence.Entity; import javax.persistence.GeneratedValue; import javax.persistence.Id; import javax.persistence.Table; @Entity @Table(name = "CONTACTS") public class Contact { @Id @Column(name = "ID") @GeneratedValue private Integer id; @Column(name = "FIRSTNAME") private String firstname; @Column(name = "LASTNAME") private String lastname; @Column(name = "EMAIL") private String email; @Column(name = "TELEPHONE") private String telephone; // Getters and setters } Do not forget to add methods getters and setters for bean properties.
Add the project dependencies to the pom.xml file. Note that the class from the domain model will not depend on either Spring or Hibernate.
<dependency> <groupId>javax.persistence</groupId> <artifactId>persistence-api</artifactId> <version>1.0</version> </dependency> Explanation of annotations used.
@Entity | A class represents an object to be stored for a long time. |
@Table(name = "CONTACTS") | Class properties will be stored in the CONTACTS table. |
@Column(name = "FIRSTNAME") | This property will be stored in the firstname column. |
@Id | This field is unique for objects, that is, we will search for objects using it. |
@GeneratedValue | The value of this field will not be assigned by us, but generated automatically. |
4. Data Access Layer
Interface and practical implementation of the object of data access.
package net.schastny.contactmanager.dao; import java.util.List; import net.schastny.contactmanager.domain.Contact; public interface ContactDAO { public void addContact(Contact contact); public List<Contact> listContact(); public void removeContact(Integer id); } package net.schastny.contactmanager.dao; import java.util.List; import net.schastny.contactmanager.domain.Contact; import org.hibernate.SessionFactory; import org.springframework.beans.factory.annotation.Autowired; import org.springframework.stereotype.Repository; @Repository public class ContactDAOImpl implements ContactDAO { @Autowired private SessionFactory sessionFactory; public void addContact(Contact contact) { sessionFactory.getCurrentSession().save(contact); } @SuppressWarnings("unchecked") public List<Contact> listContact() { return sessionFactory.getCurrentSession().createQuery("from Contact") .list(); } public void removeContact(Integer id) { Contact contact = (Contact) sessionFactory.getCurrentSession().load( Contact.class, id); if (null != contact) { sessionFactory.getCurrentSession().delete(contact); } } } Update the project dependencies in the pom.xml file. Add Hiberneit.
<dependency> <groupId>org.hibernate</groupId> <artifactId>hibernate-core</artifactId> <version>3.3.2.GA</version> </dependency> <dependency> <groupId>org.hibernate</groupId> <artifactId>hibernate-annotations</artifactId> <version>3.3.1.GA</version> </dependency> <dependency> <groupId>org.hibernate</groupId> <artifactId>hibernate-commons-annotations</artifactId> <version>3.3.0.ga</version> </dependency> Explanation of annotations used.
@Repository | The summary shows that the class functions as a repository and requires a transparent translation of exceptions. The advantage of exceptions translation is that the service layer will deal with the general hierarchy of exceptions from Spring (DataAccessException) regardless of the data access technologies used in the DAO layer. |
@Autowired | Annotation allows you to automatically set the value of the SessionFactory field. |
5. Service layer
We describe the user interface with the system.
package net.schastny.contactmanager.service; import java.util.List; import net.schastny.contactmanager.domain.Contact; public interface ContactService { public void addContact(Contact contact); public List<Contact> listContact(); public void removeContact(Integer id); } The practical implementation of the service interface is the class ContactServiceImpl.java.
package net.schastny.contactmanager.service; import java.util.List; import org.springframework.beans.factory.annotation.Autowired; import org.springframework.stereotype.Service; import org.springframework.transaction.annotation.Transactional; import net.schastny.contactmanager.dao.ContactDAO; import net.schastny.contactmanager.domain.Contact; @Service public class ContactServiceImpl implements ContactService { @Autowired private ContactDAO contactDAO; @Transactional public void addContact(Contact contact) { contactDAO.addContact(contact); } @Transactional public List<Contact> listContact() { return contactDAO.listContact(); } @Transactional public void removeContact(Integer id) { contactDAO.removeContact(id); } } Update the project dependencies in the pom.xml file. Add transaction support.
<dependency> <groupId>org.springframework</groupId> <artifactId>spring-tx</artifactId> <version>${org.springframework-version}</version> </dependency> <dependency> <groupId>org.springframework</groupId> <artifactId>spring-orm</artifactId> <version>${org.springframework-version}</version> </dependency> Explanation of annotations used.
| @Service | We use this annotation to declare that this class represents a service — a component of the service layer. Service is a subtype of the @Component class. Using this annotation will allow you to search for bin services automatically (see later in root-context.xml). |
| @Transactional | Before executing the method marked with this annotation, the transaction begins, after the method is executed, the transaction commits, and when thrown, RuntimeException is rolled back. |
6. Adding a web
Setting up a web application will start with the most important thing - with the darkness of xml-files. In a large application it is very convenient to store various settings in different files.
After the xml-spoilers, write a simple controller.
Settings files can be found at the links below.
| web.xml | This is the deployment descriptor . A file that describes the application deployment settings on the server. |
| spring / root-context.xml | Root Context . The context of the entire application. The beans described here will be available to all servlets and filters. Also here you should describe the security and data access beans (in our configuration, they are in separate files). |
| spring / data.xml | The file with the settings of resources for working with data . |
| spring / security.xml | File with security settings . |
| spring / appServlet / servlet-context.xml | DispatcherServlet Context . Defines single servlet and bean settings that are available only to this servlet. |
| spring / appServlet / controllers.xml | File with controller settings for this servlet. |
spring / security.xml
<beans:beans xmlns="http://www.springframework.org/schema/security" xmlns:beans="http://www.springframework.org/schema/beans" xmlns:xsi="http://www.w3.org/2001/XMLSchema-instance" xsi:schemaLocation="http://www.springframework.org/schema/beans http://www.springframework.org/schema/beans/spring-beans-3.0.xsd http://www.springframework.org/schema/security http://www.springframework.org/schema/security/spring-security-3.0.xsd"> </beans:beans> Explanation of used bins.
| messageSource | Bean to ensure the internationalization of the application. Below we will create the files messages_en.properties and messages_ru.properties with localized messages in Russian and English. |
| propertyConfigurer | To download the file with the database settings jdbc.properties . |
| dataSource | Datasors , used to connect to the database. We provide the jdbc driver class, username, password, and other settings. |
| sessionFactory | This is a Hibernate configuration bin. The hibernate.cfg.xml file will contain mappings for entity classes. |
| transactionManager | Bean set up transaction manager . We use a transaction manager to manage application transactions. |
Files:
/src/main/resources/messages_en.properties
/src/main/resources/messages_en.properties
/src/main/resources/hibernate.cfg.xml
WEB-INF / jdbc.properties
7. Controller
package net.schastny.contactmanager.web; import java.util.Map; import net.schastny.contactmanager.domain.Contact; import net.schastny.contactmanager.service.ContactService; import org.springframework.beans.factory.annotation.Autowired; import org.springframework.stereotype.Controller; import org.springframework.validation.BindingResult; import org.springframework.web.bind.annotation.ModelAttribute; import org.springframework.web.bind.annotation.PathVariable; import org.springframework.web.bind.annotation.RequestMapping; import org.springframework.web.bind.annotation.RequestMethod; @Controller public class ContactController { @Autowired private ContactService contactService; @RequestMapping("/index") public String listContacts(Map<String, Object> map) { map.put("contact", new Contact()); map.put("contactList", contactService.listContact()); return "contact"; } @RequestMapping("/") public String home() { return "redirect:/index"; } @RequestMapping(value = "/add", method = RequestMethod.POST) public String addContact(@ModelAttribute("contact") Contact contact, BindingResult result) { contactService.addContact(contact); return "redirect:/index"; } @RequestMapping("/delete/{contactId}") public String deleteContact(@PathVariable("contactId") Integer contactId) { contactService.removeContact(contactId); return "redirect:/index"; } } Explanation of annotations used.
| @Controller | The annotation is used to magically transform any java class into a controller class. This class is a component similar to a regular servlet (HttpServlet) (working with HttpServletRequest and HttpServletResponse objects), but with advanced application capabilities in MVC applications. |
| @RequestMapping | The annotation is used for mapping the URL address of the request to the specified method or class. The request can be mapped both on the class method and on the whole class. It is allowed to specify a specific HTTP method that will be processed (GET / POST), transfer request parameters. |
| @ModelAttribute | An annotation connecting the method parameter or the return value of the method with the model attribute that will be used when displaying a jsp page. |
| @PathVariable | An annotation that indicates that the method parameter must be associated with a variable from the url address. |
8. View
/src/main/webapp/WEB-INF/views/contact.jsp
9. Run the application
Before starting the system, we need to do two more things:
First, create a database for the application and the user for it in accordance with the settings of the jdbc.properties file:
CREATE USER contactmanager@localhost identified BY '1234'; GRANT usage ON *.* TO contactmanager@localhost identified BY '1234'; CREATE DATABASE IF NOT EXISTS contactmanager; GRANT ALL privileges ON contactmanager.* TO contactmanager@localhost; USE contactmanager; CREATE TABLE CONTACTS ( id INT PRIMARY KEY AUTO_INCREMENT, firstname VARCHAR(30), lastname VARCHAR(30), telephone VARCHAR(15), email VARCHAR(30), created TIMESTAMP DEFAULT NOW() ); Second, update the dependencies in pom.xml .
<dependency> <groupId>mysql</groupId> <artifactId>mysql-connector-java</artifactId> <version>5.1.6</version> </dependency> Now we run the application on the server: ContactManager> Run As> Run on Server> SpringSource tc Server Developer Edition v2.0 .
Open http: // localhost: 8080 / ContactManager in your browser.
Note: Check the encoding of the database, tables in the database, connections to the database, the project encoding in the editor, because instead of native Cyrillic letters in the browser, cracks may appear.
To debug Hibernate's work, you can add the following line to the src / main / resources / log4j.xml file:
<!--org.hibernate.SQL logger--> <logger name="org.hibernate"> <level value="info"/> </logger> 10. Security
Update the project dependencies in the pom.xml file. Add Spring Security modules.
<dependency> <groupId>org.springframework.security</groupId> <artifactId>spring-security-web</artifactId> <version>${org.springframework-version}</version> </dependency> <dependency> <groupId>org.springframework.security</groupId> <artifactId>spring-security-config</artifactId> <version>${org.springframework-version}</version> </dependency> <dependency> <groupId>org.springframework.security</groupId> <artifactId>spring-security-core</artifactId> <version>${org.springframework-version}</version> </dependency> Add a security filter to the web.xml that applies to the entire application.
<filter> <filter-name>springSecurityFilterChain</filter-name> <filter-class>org.springframework.web.filter.DelegatingFilterProxy</filter-class> </filter> <filter-mapping> <filter-name>springSecurityFilterChain</filter-name> <url-pattern>/*</url-pattern> </filter-mapping> For security reasons, the login page should not be placed inside the WEB-INF folder , so we will place it in the root of the web application - in the webapp folder.
webapp / login.jsp
In the same place we will place an error page 403: webapp / error403.jsp
Edit the security.xml file.
security.xml
Explanation of the settings made in the security.xml file
We select in the application three groups of users (user roles):
- anonymous user (ROLE_ANONYMOUS),
- just user (ROLE_USER),
- administrator (ROLE_ADMIN).
We delimit access to the application:
- We make it possible to view contacts available to all categories of users.
- Add new contacts can only registered users.
- Only admin can delete entries.
Where to store user data
You can directly in the configuration file, if they are few. It is possible in the database, it is possible in the LDAP storage.
An example of a record ( security.xml ) when using a database for storing passwords.
<authentication-manager> <authentication-provider> <jdbc-user-service data-source-ref="dataSource" /> </authentication-provider> </authentication-manager> Explanation of some elements.
| Multisession support. After restarting the browser does not need to re-login. |
| Defining an anonymous user and endowing him with roles so that you can work with him as with an ordinary user of the application. |
| Storing passwords in encrypted form. In our application is not used. |
11. Conclusion
That's all! It remains to fasten the design, ryushechki on jQuery ( article for beginners ) and sell crafts for money. But this, my dear readers, is another story.
After performing all the manipulations, you should have the following project structure:
I would be grateful for these errors and inaccuracies in the article.
Resources used:
1. Spring Recipes: Problem-Solution Approach, Second Edition, Gary Mak, Ken Sipe, Josh Long, Daniel Rubio.
2. Create Spring 3 MVC Hibernate 3 Example using Maven in Eclipse ,
3. The Spring Framework Reference Documentation,
4. Mastering Spring MVC 3 by Keith Donald .
You can download the finished project here , and the database for the project here .
Source: https://habr.com/ru/post/111102/
All Articles