jQuery for beginners

jQuery is a great JavaScript framework that impresses with its simplicity and ease of use. But the study must begin with something, and my personal opinion is that it is best to start with illustrative examples, and they go further ...
')
How does jQuery still work?
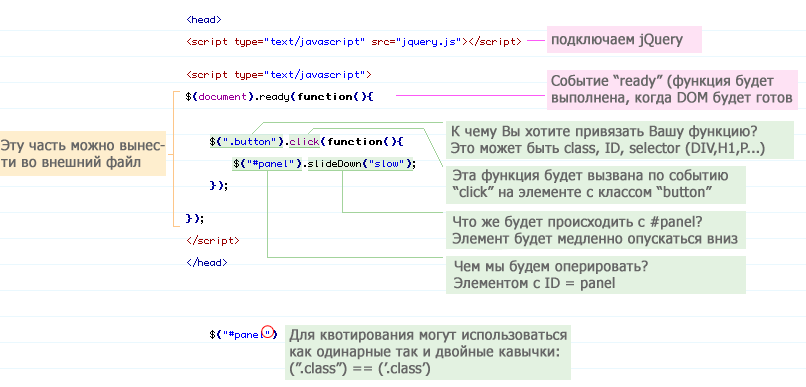
Well, first you need the framework itself, you can download it from the project’s home page , then initialize it:
 <head>
 <script type = "text / javascript" src = "jquery.js"> </ script>
 </ head>
And the following points will help you to understand the main points:

How to get an item using jQuery?
In order to understand how the selector works, you still need a basic knowledge of CSS, since it is from the principles of CSS that the jQuery selector pushes away:
- $ ("# header") - getting element with id = "header"
- $ ("H3") - get all <h3> elements
- $ ("Div # content .photo") - get all elements with class = "photo" that are in the div element with id = "content"
- $ ("Ul li") - get all <li> elements from the <ul> list
- $ ("Ul li: first") - get only the first <li> element from the <ul> list
Sliding panel
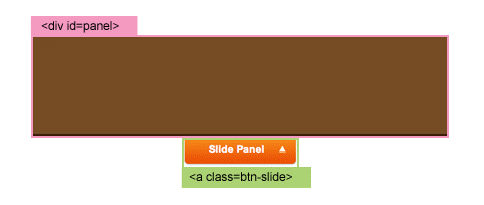
Let's start with a simple example - a slide panel, it will move up / down with a click on the link (see example )

We implement it as follows, by clicking on the link, we will switch its class (between “active” and “btn-slide”), and the panel with id = “panel” will move forward / hide. (the class “active” changes the position of the background image, see the CSS file in the attachment).
 $ (document) .ready (function () {
     $ (". btn-slide"). click (function () {
         $ ("# panel"). slideToggle ("slow");
         $ (this) .toggleClass ("active");
     });
 });
Magical extinction
This example will show how

When we click on the <img class = "delete"> image, the parent <div class = "pane"> element will be found, and its transparency will slowly change from opacity = 1.0 to opacity = hide:
 $ (document) .ready (function () {

     $ (". pane .delete"). click (function () {
         $ (this) .parents (". pane"). animate ({opacity: "hide"}, "slow");
     });

 });
Related animation
Now the example is more complicated, but it will help you to better understand jQuery. Just a few lines of code will make the square move, change its size and transparency. (see example ):

Line 0: when the page is loaded (DOM is ready for manipulation)
Line 1: bind to the click event for the <a class=rirun® element
Line 2: manipulate the element <div id = "box"> - reduce its transparency to 0.1, increase the left position by another 400px, at a speed of 1200 (milliseconds)
Line 3: then slowly change the following parameters: opacity = 0.4, top = 160px, height = 20, width = 20; the animation speed is indicated by the second parameter: “slow”, “normal”, “fast” or in milliseconds
Line 4: then opacity = 1, left = 0, height = 100, width = 100, speed - "slow"
Line 5: then opacity = 1, left = 0, height = 100, width = 100, speed - “slow”
Line 6: then top = 0, speed - “fast”
Line 7: then slideUp (with default animation speed - “normal”)
Line 8: then slideDown, speed - “slow”
Line 9: return false to prevent the browser from following the link
 $ (document) .ready (function () {
     $ (". run"). click (function () {

         $ ("# box"). animate ({opacity: "0.1", left: "+ = 400"}, 1200)
         .animate ({opacity: "0.4", top: "+ = 160", height: "20", width: "20"}, "slow")
         .animate ({opacity: "1", left: "0", height: "100", width: "100"}, "slow")
         .animate ({top: "0"}, "fast")
         .slideUp ()
         .slideDown ("slow")
         return false;
     });
 });
Harmonica # 1
An example of the implementation of "harmonica". (see example )

Now let's proceed to the debriefing:
The first line we add the class “active” to the first element <h3> inside <div class = “accordion”> (the class “active” is responsible for positioning the background image - the icon with the arrow). In the second line, we hide all not the first <p> elements inside <div class = "accordion">.
When the <h3> header is clicked, the slideToggle effect will be applied to the next <p> element in it, then the slideUp effect will be applied to all other <p> elements. The following action changes the class of the header to “active”, then look for all the other <h3> headers and remove the class “active” from them
 $ (document) .ready (function () {
     $ (". accordion h3: first"). addClass ("active");
     $ (". accordion p: not (: first)"). hide ();

     $ (". accordion h3"). click (function () {

         $ (this) .next ("p"). slideToggle ("slow")
         .siblings ("p: visible"). slideUp ("slow");
         $ (this) .toggleClass ("active");
         $ (this) .siblings ("h3"). removeClass ("active");
 });

 });
Harmonica # 2
This example is similar to the previous one, only it differs in that we specify the panel opened by default. (see example )
In CSS, we have specified for all <p> display: none elements. Now we need to open the third panel. To do this, we can write the following $ (". Accordion2 p"). Eq (2) .show (), where eq denotes equality. Remember that indexing starts from scratch:
 $ (document) .ready (function () {

     $ (". accordion2 h3"). eq (2) .addClass ("active");
     $ (". accordion2 p"). eq (2) .show ();

     $ (". accordion2 h3"). click (function () {
         $ (this) .next ("p"). slideToggle ("slow")
         .siblings ("p: visible"). slideUp ("slow");
         $ (this) .toggleClass ("active");
         $ (this) .siblings ("h3"). removeClass ("active");
     });

 });
Animation for hover event # 1
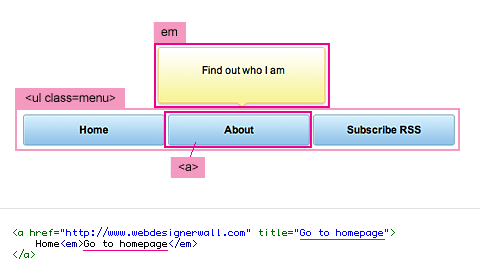
This example will help you create a very beautiful animation for a hover event (I hope you know what it is ?), (See example ):

When you mouse over a menu item (mouseover), the next <em> element is searched for, and its transparency and location are animated:
 $ (document) .ready (function () {
     $ (". menu a"). hover (function () {
         $ (this) .next ("em"). animate ({opacity: "show", top: "-75"}, "slow");
     }, function () {
         $ (this) .next ("em"). animate ({opacity: "hide", top: "-85"}, "fast");
     });
 });
Animation for hover event # 2
This example is a little bit more complicated than the previous example: the linktitle attribute is used to create the tooltip (see example )

First of all, add the <em> tag to each <a> element. When the mouseover event occurs, we will take the text from the “thetitle” attribute and store it in the “hoverText” variable, then this text will be inserted into the <em> tag:
 $ (document) .ready (function () {

     $ (". menu2 a"). append ("<em> </ em>");

     $ (". menu2 a"). hover (function () {
         $ (this) .find ("em"). animate ({opacity: "show", top: "-75"}, "slow");
         var hoverText = $ (this) .attr ("title");
         $ (this) .find ("em"). text (hoverText);
     }, function () {
         $ (this) .find ("em"). animate ({opacity: "hide", top: "-85"}, "fast");
     });

 });
Clickable blocks
This example demonstrates how to make a clickable block with text, and not just a link (see example ):

Let's create a list <ul> with class class = "pane-list" and we want to make the <li> elements clickable. To begin with, we will bind to the click event for the element ".pane-list li"; when the user clicks the list item, our function will search for the <a> tag and redirect to the page specified in the href attribute.
 $ (document) .ready (function () {

     $ (". pane-list li"). click (function () {
         window.location = $ (this) .find ("a"). attr ("href");  return false;
     });

 });
Folding sockets
Well, now let's slightly combine the previous examples and create a number of folding panels (like inbox, like in Gmail). (see example )

- hide all <div class = "message_body"> elements after the first one.
- hide all <li> elements after the fifth
- click on <p class = "message_head"> - calls the slideToggle method for the next element <div class = "message_body">
- click on <a class=callpase_all_message"> - calls the slideUp method for all <div class = "message_body">
- click on <a class=wr_all_message"> - hides the item, and displays <a class=callshow_recent_only">, the slideDown method is also called for all <li> after the fifth
- click on <a class=wu_recent_only „> - hides the item, and displays <a class= amongshow_all_message">, also the slideUp method is called for all <li> after the fifth
 $ (document) .ready (function () {

     // hide message_body after the first one
     $ (". message_list .message_body: gt (0)"). hide ();

     // hide message li after the 5th
     $ (". message_list li: gt (4)"). hide ();

     // toggle message_body
     $ (". message_head"). click (function () {
         $ (this) .next (". message_body"). slideToggle (500)
         return false;
     });

     // collapse all messages
     $ (". collpase_all_message"). click (function () {
         $ (". message_body"). slideUp (500)
         return false;
     });

     // show all messages
     $ (". show_all_message"). click (function () {
         $ (this) .hide ()
         $ (". show_recent_only"). show ()
         $ (". message_list li: gt (4)"). slideDown ()
         return false;
     });

     // show recent messages only
     $ (". show_recent_only"). click (function () {
         $ (this) .hide ()
         $ (". show_all_message"). show ()
         $ (". message_list li: gt (4)"). slideUp ()
         return false;
     });

 });
Imitation Backend'a Wordpress'a
I think many of the readers have come across the admin part of wordpress, more precisely with the editing of comments. Let's try to do something like that. To animate the background color, we need the appropriate jQuery plugin . (see example )

- add the class "alt" to each even element of <div class = "pane"> (this class changes the background color of the element)
- clicking on <a class=labtn-delete"> triggers the appearance of a message (alert), as well as animating the background color and transparency (backgroundColor and opacity) for <div class = "pane">
- clicking on <a class=labtn-unapprove"> causes the <div class = "pane"> background animation (the color changes to yellow and back) and adds the "spam" class
- click on <a class= videosbtn-approve"> - causes background div animation <div class = "pane"> (color changes to green and back) and deletes the "spam" class
- click on <a class=labtn-spam"> - causes background animation in <div class = "pane"> (the color changes to red), and changes the "opacity" parameter to "hide"
// don't forget to include the Color Animations plugin $ (document) .ready (function () {$ (". pane: even"). addClass ("alt"); $ (". pane .btn-delete" ) .click (function () {alert ("This comment will be deleted!"); $ (this) .parents (". pane"). animate ({backgroundColor: "# fbc7c7"}, "fast") .animate ({opacity: "hide"}, "slow") return false;}); $ (". pane .btn-unapprove"). click (function () {$ (this) .parents (". pane"). animate ({backgroundColor: "# fff568"}, "fast") .animate ({backgroundColor: "#ffffff"}, "slow") .addClass ("spam") return false;}); $ (". pane. btn-approve "). click (function () {$ (this) .parents (". pane "). animate ({backgroundColor:" # dafda5 "}," fast ") .animate ({backgroundColor:" #ffffff " }, "slow") .removeClass ("spam") return false;}); $ (". pane .btn-spam"). click (function () {$ (this) .parents (". pane"). animate ({backgroundColor: "# fbc7c7"}, "fast"). animate ({opacity: "hide"}, "slow") return false;});}); Image Gallery
The simplest example of the implementation of the gallery, without reloading the page. (see example )

To begin, add the <em> tag to the <h2> headers
By clicking on the images in <p class = thumbs> we perform the following actions:
- save the value of the "href" attribute in the variable "largePath"
- save the value of the attribute "title" in the variable "largeAlt"
- replace in the <img id = "largeImg"> element the value of the attribute "scr" and "alt" with the values from the variables "largePath" and "largeAlt"
- we also assign to the h2 em element a value from largeAlt
 $ (document) .ready (function () {

     $ ("h2"). append ('<em> </ em>')

     $ (". thumbs a"). click (function () {

         var largePath = $ (this) .attr ("href");
         var largeAlt = $ (this) .attr ("title");

         $ ("# largeImg"). attr ({src: largePath, alt: largeAlt});

         $ ("h2 em"). html ("(" + largeAlt + ")");  return false;
     });

 });
Styling links
Most normal browsers easily understand when we want to get them to style links for different types of files, for this purpose you can use the following CSS rule: a [href $ = '. Pdf'] {...}. But as usual, IE6 is different in intelligence and wit, for this reason we will put crutches on it using jQuery. (see example )

To begin, add a class for each link, in accordance with the type of file.
Then select all <a> elements that do not contain a link to " http://www.webdesignerwall.com " and not starting with "#" in "href", then add the class "external" to them and set target = "_blank".
 $ (document) .ready (function () {

     $ ("a [@ href $ = pdf]"). addClass ("pdf");

     $ ("a [@ href $ = zip]"). addClass ("zip");

     $ ("a [@ href $ = psd]"). addClass ("psd");

     $ ("a: not ([@ href * = http: //www.webdesignerwall.com])") .not ("[href ^ = #]")
	   .addClass ("external")
	   .attr ({target: "_blank"});

 });
You can also view all the examples or download jQuery tutorial for beginners .
Free translation: http://www.webdesignerwall.com/tutorials/jquery-tutorials-for-designers/
There are also many useful jQuery links on the following page: http://blog.termit.name/jquery/
Who else can useful jQuery-PHP library
Original article: jQuery for beginners
Source: https://habr.com/ru/post/38208/
All Articles