How to do a search for users on GitHub on WebAssembly
Hello! On August 24, 2018, Go version 1.11 was released with experimental support for WebAssembly (Wasm). The technology is interesting and I immediately had a desire to experiment. To write "Hello World" is boring (and by the way it is in the documentation), especially the trend of last summer is an article from the series "How to search for users on GitHub <insert your favorite JS framework>"
So, this article is a continuation of the cycle. Here are the previous chapters:
How to search for users on GitHub using React + RxJS 6 + Recompose
How to search for users on GitHub without React + RxJS 6 + Recompose
How to search for users on GitHub using Vue
How to do a search for users on Github using Angular
How to search for users on Github using VanillaJS
Task: it is necessary to implement a search for users on GitHub with login input and dynamic HTML generation. As previous publications show, this is done elementarily, but in our case we will not use JavaScript. It should be this:
Attention! This article does not call to throw JS and rewrite all web applications on Go, but only shows the possibilities of working with JS API from WASM.
Installation
First of all, it is worth upgrading to the latest version of Go (at the time of writing of article 1.11)
Copy two files with HTML & JS support into your project
cp $(go env GOROOT)/misc/wasm/wasm_exec.{html,js} . Hello World and the basic HTTP server settings I’ll skip, details can be found on the Go Wiki
DOM interaction
It is carried out through the syscall/js package
The article will use the following functions and methods for managing JavaScript:
// , JavaScript js.Value // JavaScript, `window` func Global() Value // func (v Value) Call(m string, args ...interface{}) Value // func (v Value) Get(p string) Value // func (v Value) Set(p string, x interface{}) All methods have analogues in JS, and will become clearer in the course of the article.
Entry field
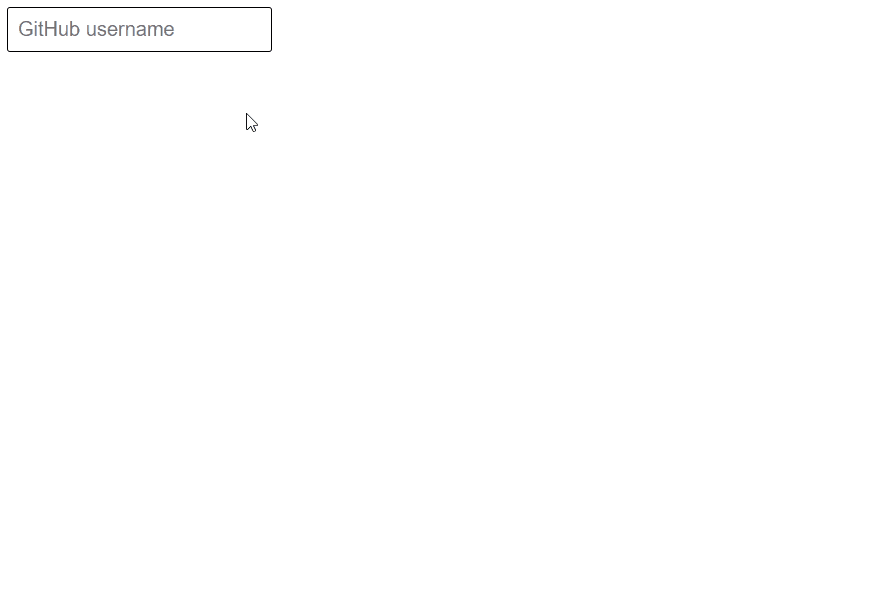
To begin with, we will create a field in which the user will enter a login for the search, this will be a classic input tag with placeholder .
In the future, we will need to create another tag, so we immediately write the HTML element constructor.
type Element struct { tag string params map[string]string } The structure of the HTML element contains the tag name of the tag (for example, input , div , etc.) and additional params parameters (for example: placeholder , id , etc.)
The constructor itself looks like this:
func (el *Element) createEl() js.Value { e := js.Global().Get("document").Call("createElement", el.tag) for attr, value := range el.params { e.Set(attr, value) } return e } e := js.Global().Get("document").Call("createElement", el.tag) is an analogue of var e = document.createElement(tag) in JSe.Set(attr, value) analogue of e.setAttribute(attr, value)
This method only creates elements, but does not add them to the page.
To add an element to a page, you need to define the place of its insertion In our case, this is a div with id="box" (in wasm_exec.html string <div id="box"></div> )
type Box struct { el js.Value } box := Box{ el: js.Global().Get("document").Call("getElementById", "box"), } In box.el there is a link to the main container of our application.js.Global().Get("document").Call("getElementById", "box") in JS is document.getElementById('box')
The method of creating the input element itself:
func (b *Box) createInputBox() js.Value { // el := Element{ tag: "input", params: map[string]string{ "placeholder": "GitHub username", }, } // input := el.createEl() // div id="box" b.el.Call("appendChild", input) return input } This method returns a link to the created item.
<input placeholder="GitHub username"> Output Container
The results should be displayed on the page, let's add a div c id="search_result" by analogy with input
func (b *Box) createResultBox() js.Value { el := Element{ tag: "div", params: map[string]string{ "id": "search_result", }, } div := el.createEl() b.el.Call("appendChild", div) return div } A container is created and the element reference is returned.
<div id="search_result"></div> It's time to define the structure for our entire Web application.
type App struct { inputBox js.Value resultBox js.Value } a := App{ inputBox: box.createInputBox(), resultBox: box.createResultBox(), } inputBox and resultBox are links to previously created <input placeholder="GitHub username"> and <div id="search_result"></div> respectively
Fine! We have added two elements to the page. Now the user can enter data into the input and look at the empty div , not bad, but so far our application is not interactive. Let's fix it.
Input event
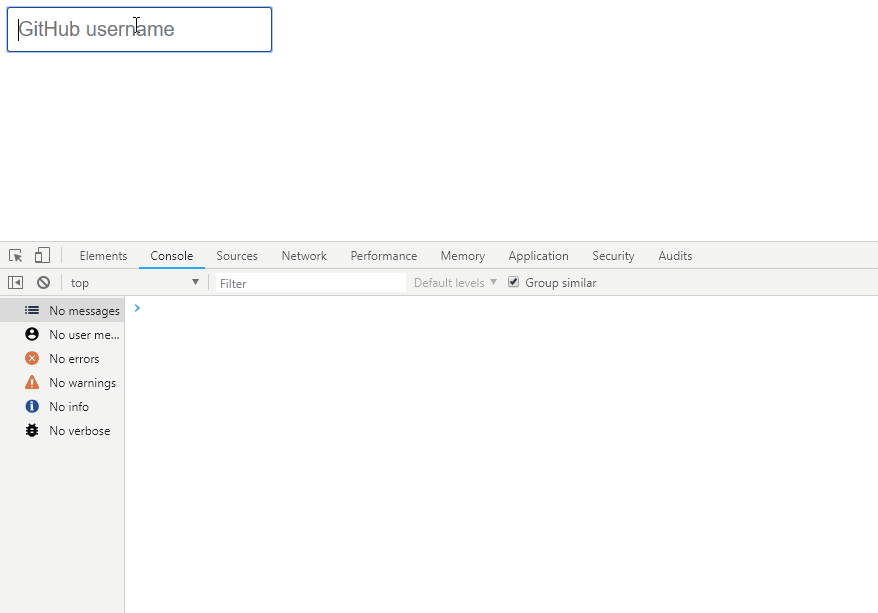
We need to track when the user enters the login in input and receive this data, for this we subscribe to the keyup event, to make it very simple
func (a *App) userHandler() { a.input.Call("addEventListener", "keyup", js.NewCallback(func(args []js.Value) { e := args[0] user := e.Get("target").Get("value").String() println(user) })) } e.Get("target").Get("value") - getting the value of input , analogue of event.target.value in JS, println(user) normal console.log(user)
Thus, we will consolidate all user actions on entering a login into input .
Now we have data with which we can form a request to the GitHub API
GitHub API Requests
We will request information on registered users: get-request for https://api.github.com/users/:username
But first, let's define the response structure of the GitHub API.
type Search struct { Response Response Result Result } type Response struct { Status string }` `type Result struct { Login string `json:"login"` ID int `json:"id"` Message string `json:"message"` DocumentationURL string `json:"documentation_url"` AvatarURL string `json:"avatar_url"` Name string `json:"name"` PublicRepos int `json:"public_repos"` PublicGists int `json:"public_gists"` Followers int `json:"followers"` } Response - contains the server's response, for our application only the Status string is needed - it will be required for output on the error page.Result - the response body in abbreviated form, only the required fields.
Requests themselves are formed through the standard net/http package
func (a *App) getUserCard(user string) { resp, err := http.Get(ApiGitHub + "/users/" + user) if err != nil { log.Fatal(err) } defer resp.Body.Close() b, err := ioutil.ReadAll(resp.Body) if err != nil { log.Fatal(err) } var search Search json.Unmarshal(b, &search.Result) search.Response.Status = resp.Status a.search <- search } Now that we have a method for retrieving user information from the GitHub API, let's modify userHandler() and in the meantime expand the structure of the App Web application by adding a chan Search channel to transfer data from the getUserCard()
type App struct { inputBox js.Value resultBox js.Value search chan Search } a := App{ inputBox: box.createInputBox(), resultBox: box.createResultBox(), search: make(chan Search), } func (a *App) userHandler() { a.input.Call("addEventListener", "keyup", js.NewCallback(func(args []js.Value) { e := args[0] user := e.Get("target").Get("value").String() go a.getUserCard(user) })) } Template engine
Perfectly! We received user information and we have a container for insertion. Now we need an HTML template and, of course, some simple template engine. In our application we will use mustache - this is a popular template engine with simple logic.
Installation: go get github.com/cbroglie/mustache
The user.mustache HTML template user.mustache is located in the tmpl directory of our application and looks like this:
<div class="github-card user-card"> <div class="header User" /> <a class="avatar" href="https://github.com/{{Result.Login}}"> <img src="{{Result.AvatarURL}}&s=80" alt="{{Result.Name}}" /> </a> <div class="content"> <h1>{{Result.Name}}</h1> <ul class="status"> <li> <a href="https://github.com/{{Result.Login}}?tab=repositories"> <strong>{{Result.PublicRepos}}</strong>Repos </a> </li> <li> <a href="https://gist.github.com/{{Result.Login}}"> <strong>{{Result.PublicGists}}</strong>Gists </a> </li> <li> <a href="https://github.com/{{Result.Login}}/followers"> <strong>{{Result.Followers}}</strong>Followers </a> </li> </ul> </div> </div> All styles are written in web/style.css
The next step is to get the template as a string and drop it into our application. To do this, again expand the App structure by adding the required fields there.
type App struct { inputBox js.Value resultBox js.Value userTMPL string errorTMPL string search chan Search } a := App{ inputBox: box.createInputBox(), resultBox: box.createResultBox(), userTMPL: getTMPL("user.mustache"), errorTMPL: getTMPL("error.mustache"), search: make(chan Search), } userTMPL is a user.mustache user information output template. errorTMPL - error.mustache error handling template
To get the template from the application, use the usual Get-request
func getTMPL(name string) string { resp, err := http.Get("tmpl/" + name) if err != nil { log.Fatal(err) } defer resp.Body.Close() b, err := ioutil.ReadAll(resp.Body) if err != nil { log.Fatal(err) } return string(b) } There is a template, there is data. Now we are trying to render an HTML representation.
func (a *App) listResults() { var tmpl string for { search := <-a.search switch search.Result.ID { case 0: // TMPL for Error page tmpl = a.errorTMPL default: tmpl = a.userTMPL } data, _ := mustache.Render(tmpl, search) // Output the resultBox to a page a.resultBox.Set("innerHTML", data) } } This is a horutin that expects data from the <-a.search channel and renders HTML. Conventionally, we assume that if there is a user ID search.Result.ID in the data from the GitHub API, then the result is correct, otherwise we return an error page.data, _ := mustache.Render(tmpl, search) - renders ready HTML, and a.resultBox.Set("innerHTML", data) displays HTML on the page
Debounce
Works! But there is one problem - if you look at the console, we see that a request to the GitHub API is sent to every keystroke, in this situation, we will quickly rest in limits.
The solution is Debounce. This is a function that defers a call to another function for a specified time. That is, when a user clicks a button, we must postpone the request to the GitHub API for X milliseconds, and if another event is triggered by pressing the button, the request is postponed for another X milliseconds.
Debounce in Go is implemented using channels. The working version took from the article debounce function for golang
func debounce(interval time.Duration, input chan string, cb func(arg string)) { var item string timer := time.NewTimer(interval) for { select { case item = <-input: timer.Reset(interval) case <-timer.C: if item != "" { cb(item) } } } } Rewrite the method (a *App) userHandler() with Debounce:
func (a *App) userHandler() { spammyChan := make(chan string, 10) go debounce(1000*time.Millisecond, spammyChan, func(arg string) { // Get Data with github api go a.getUserCard(arg) }) a.inputBox.Call("addEventListener", "keyup", js.NewCallback(func(args []js.Value) { e := args[0] user := e.Get("target").Get("value").String() spammyChan <- user println(user) })) } The keyup event is keyup triggered, but requests are sent only 1000ms after the last event is completed.
Polish
And finally, we will slightly improve our UX by adding the loading indicator "Loading ..." and emptying the container in the case of an empty input
func (a *App) loadingResults() { a.resultBox.Set("innerHTML", "<b>Loading...</b>") } func (a *App) clearResults() { a.resultBox.Set("innerHTML", "") } The final version of the (a *App) userHandler() method looks like this:
func (a *App) userHandler() { spammyChan := make(chan string, 10) go debounce(1000*time.Millisecond, spammyChan, func(arg string) { // Get Data with github api go a.getUserCard(arg) }) a.inputBox.Call("addEventListener", "keyup", js.NewCallback(func(args []js.Value) { // Placeholder "Loading..." a.loadingResults() e := args[0] // Get the value of an element user := e.Get("target").Get("value").String() // Clear the results block if user == "" { a.clearResults() } spammyChan <- user println(user) })) } Done! Now we have a full search for users on GitHub without a single line on JS. In my opinion it's cool.
Conclusion
Writing a Web application that works with the DOM on wasm is possible, but is it a question whether it should be done. Firstly, it’s not yet clear how to test the code, secondly, in some browsers it’s not working stably (for example, in Chrome it fell with an error once, in FF it’s better), thirdly, all work with DOM is done through the JS API what should have an impact on performance (though I didn’t do measurements, that's why everything is subjective)
By the way, most of the examples are working with graphics on canvas and performing heavy calculations, most likely wasm was designed specifically for these tasks. Although ... time will tell.
Build and Run
Clone the repository
cd work_dir git clone https://github.com/maxchagin/gowasm-example ./gowasm-example cd gowasm-example Assembly
GOARCH=wasm GOOS=js go build -o web/test.wasm main.go Server startup
go run server.go View
http://localhost:8080/web/wasm_exec.html ')
Source: https://habr.com/ru/post/369785/
All Articles