On the topic of the day: a cross-platform client for Telegram on .NET Core and Avalonia
In this article I will explain how to implement a cross-platform application on .NET Core and Avalonia. The subject of the Telegram is very popular lately - the more interesting it will be to make the client application for it.

The article touches on quite basic concepts of development on Avalonia. However, we will not write "Hello, World". Instead, it is proposed to consider the real application. We will study both the general architecture of the application and individual components.
In order not to overuse the reader’s attention, in some cases it will be necessary to deliberately omit some details, simplifying the description and implementation. The real code can always be viewed on GitHub .
The text of the article is educational in nature, but the project itself is quite real. The aim of the project is to create a client, designed to be used as a working tool. A lot of ideas are borrowed from other instant messengers and shifted to the Telegram model.
The project is under development and is currently not suitable for everyday use. This article, the author, including, expects to attract like-minded people to the development.
Introduction
At the core of our application will be the Avalonia framework. We will actively use the MVVM and Rx.NET pattern. XAML is used as a markup language for building the user interface. For communication with the Telegram API, the library will use TDLib and automatically generated bindings for .NET .
Reactive programming will be widely used in development. In general, the application follows the approach adopted in modern UI frameworks. If you are familiar with WPF, it will be relatively easy for you to switch to Avalonia. Getting to know things like React.js doesn't hurt either.

Avalonia hides from the developer implementation details specific to a single platform. The programmer usually deals with top-level components. So, for example, in order to create a new application, you need to put the Avalonia, Avalonia.Desktop packages and write the following lines in the Main function:
AppBuilder .Configure(new App()) .UsePlatformDetect() .UseReactiveUI() .Start<MainWindow>(() => context); This is a typical Builder, familiar to everyone who dealt with .NET Core and ASP.NET Core. The key line is UsePlatformDetect. Avalonia takes over the definition of the environment in which the program is running and configures the backend for drawing the UI. App and MainWindow here are classes inherited from Avalonia. Application and Avalonia. Window respectively, their purpose should be approximately clear from the names, we will return to them later.
If you use the extension for VisualStudio , it will provide a template that will contain the implementation of these classes. Let's use the extension, and create a project. We will find that the project will contain the following files:
./App.xaml ./App.xaml.cs ./MainWindow.xaml ./MainWindow.xaml.cs As you can see, these are the same App and MainWindow classes, mentioned earlier, and supplemented with XAML files. Each of these classes will contain a call: AvaloniaXamlLoader.Load (this). We will not go into details now, we will say only that this method loads the XAML file of the same name and converts it into .NET objects, “filling” the target object passed as an argument.
If there is a need to understand the details of the XAML, they can be obtained from other sources - any book on WPF will do. For simple cases, this is not necessary, it will be enough to learn how to work with the components that Avalonia provides out of the box.
Similarly, controls are implemented in Avalonia (i.e.), i.e. XAML files are inherently needed for a declarative description of a certain hierarchy, which is then converted into ordinary objects in the application's memory. An example of such a hierarchy: a button attached to a form, which, in turn, is located inside the window.
<Window> <Panel> <Button> <TextBlock>Foo Bar</TextBlock> </Button> </Panel> </Window> Avalonia contains a predefined set of controls, such as TextBlock, Button, and Image. For their composition into more complex structures, control containers are used: Grid, Panel, ListBox, etc. All these controls work in the same way as they are implemented in WPF, that is, despite the small amount of documentation available, it is almost always possible to refer to materials for WPF.
MVVM implementation
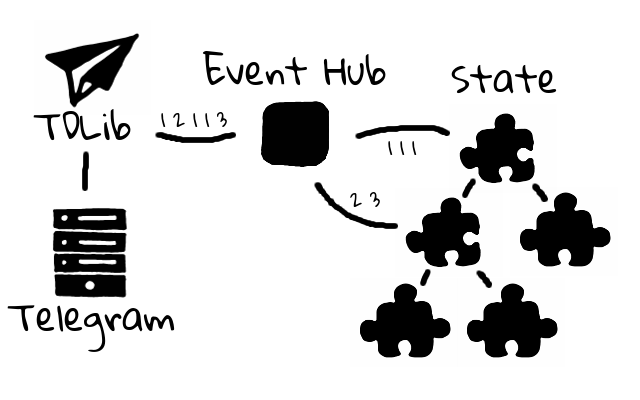
We will try to separate the internal state of the application and its display. The state will be stored in a certain hierarchy of objects (View Model). The view will respond to changes to the View Model and rebuild the UI. And the View Model, in turn, will be able to change under the influence of two factors: user or external events. Clicking a button is an example of a custom event from View, but a new message in the chat is an external event.
In Avalonii, the View Model is inextricably linked with the term Data Context or simply “context”. I will use all the terms interchangeably.

The View Model hierarchy will often be similar to the View structure, at least as a first approximation. View we fully give up control of Avalonia, i.e. The logic of our application will control the state, and reacting to these changes and redrawing the interface is already the responsibility of the framework.
The top-level structure of the View Model looks like this (pseudocode):
App { ... Index # int ... Auth { ... Phone # string Password # string } Main { Nav { ... Contacts # ReactiveList<Contact> } Chat { ... Messages # ReactiveList<Message> } } } The parent context manages the life cycle of the child contexts, and its responsibilities include creating and releasing nested contexts. The root DataContext is passed to the Builder when the MainWindow object is created (see above), later it will control the entire View Model hierarchy.
View establishes a context for nested controls through a binding mechanism (Binding). In practice, this is needed to set values for properties of objects, and subscribe to their changes.
Notice how the bindings are used to set:
- SelectedIndex properties of the Carousel control (determines which page the application displays - authorization form or chat)
- Text properties for TextBox (links the value in the model with the text of the phone number and password entry form)
- All nested contexts
<Window DataContext="{Binding App}"> <Carousel SelectedIndex="{Binding Index}"> <Panel DataContext="{Binding Auth}"> <TextBox Text="{Binding Phone, Mode=TwoWay}" /> <TextBox Text="{Binding Password, Mode=TwoWay}" /> </Panel> <Grid DataContext="{Binding Main}"> <Panel DataContext="{Binding Nav}"> <ListBox Items="{Binding Contacts}" /> </Panel> <Panel DataContext="{Binding Chat}"> <ListBox Items="{Binding Messages}" /> </Panel> </Grid> </Carousel> </Window> In this example, the AppContext contains two child contexts: MainContext and AuthContext. AppContext manages the life cycle of nested contexts: it is responsible for their initialization and release.
In practice, it looks like this: after starting the application, AppContext checks if the user is authorized, and if not, initializes the child AuthContext. An application GUI responds to the creation of an AuthContext by showing an authorization form. The user enters the credentials, is authorized, the AppContext is signed to the authorization event, he releases the AuthContext and at the same moment the MainContext is initialized. SelectedIndex switches from 0 to 1 to remove the login form and show the chat.
MainContext, in turn, contains two more contexts: ChatContext and NavigationContext. The navigation context will be created during the initialization of MainContext, since at this time we already know that the user is authorized, and we have the opportunity to upload contacts.
Everything is a little more interesting with ChatContext: its creation (and at the same time the release of the previous context) occurs at the moment when the user selects a chat in the navigation menu. ChatContext itself will be subscribed to external events, such as: adding, editing and deleting messages. The display, accordingly, will react by drawing messages, or by deleting them. In this case, the context should subscribe to events only for the selected chat, since We are not interested in the events of another chat. The chat context also responds to user events, such as entering a new message.
Nested models usually do not contain references to the parent context, but they have the ability to interact with external components in order to receive events from them or make calls (as an example, a wrapper over TDLib).
Asynchrony
As with most GUI frameworks, Avalonia allows you to perform actions on user interface elements only from a UI stream. On this thread, it is desirable to perform a minimum of work so that the application remains responsive. With the advent of async / await, delegating work to other threads has become much easier. The RX.NET approach is very similar to async / await, but it also makes it easy to work with a series of events.
The application makes extensive use of Observable features to ensure asynchrony. Consider an example - loading user contacts. After downloading the application, the user should see a list of their contacts. In our case, the contact itself is the name of the user and his photo.
The download itself is a typical request for data over the network, i.e. such an action is best performed outside the UI flow. A simple solution would be to use async / await: the main thread initiates the download, and when it completes, it receives a notification and shows the contacts. Even at boot time, you can show the progress bar, so that the user knows that some work is happening in the background.
It would seem that with this approach there are no problems. But, upon closer inspection, it will be possible to see that only 10% of the time (approximate figures) the application fulfilled the request for a list of contacts, the remaining 90% of the time interval was occupied by loading and decoding images. All this time, the user was waiting. Is there a better approach? Why do not we show the list of contacts immediately after the first request, and the image is loaded with the "second wave"?
This task, in principle, is solved by means of TPL, but the use of Rx.NET is better placed on such a scenario. The idea is very simple: we delegate data loading to another class in the same way, but this time we expect Observable instead of Task in response. This will allow us to subscribe to a series of events, instead of one: the first event will be the uploaded list of contacts, and each subsequent one will carry some Update (uploaded photo, for example).
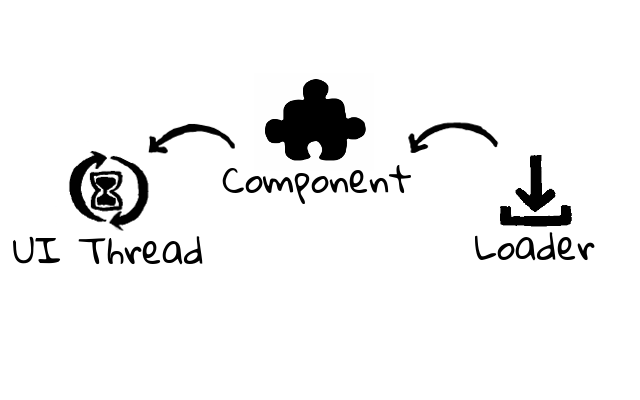
Consider the loading of contacts by example. The context task includes a subscription to the result of executing LoadContacts. Note the call to the ObserveOn method — this is the instruction for Rx.NET to execute the code passed to the Subscribe on the Avalonia scheduler thread. Without this instruction, we do not have the right to modify the Contacts property, since the code will run on a thread other than the UI thread.
// NavContext.cs class NavContext : ReactiveObject { private ReactiveList<Contact> _contacts; public ReactiveList<Contact> Contacts { get => _contacts; set => this.RaiseAndSetIfChanged(ref _contacts, value); } public NavContext(ContactLoader contactLoader) { contactLoader.LoadContacts() .ObserveOn(AvaloniaScheduler.Instance) .Subscribe(x => { Contacts = new ReactiveList(x.Contacts); x.Updates .ObserveOn(AvaloniaScheduler.Instance) .Subscribe(u => { u.Contact.Avatar = u.Avatar; }); }); } } ContactLoader is responsible for performing the network request. As soon as the request is executed, another Observable is created, which is responsible for delivering updates to subscribers. Immediately after that, we will be ready to give up the list of contacts, without waiting for the photo to load. Updates will be delivered as they are downloaded.
// ContactLoader.cs class ContactLoader { IObservable<Load> LoadContacts() { return Observable.Create(async observer => { var contacts = await GetContactsAsync(); // networking var updates = Observable.Create(async o => { foreach (var contact in contacts) { // load avatar from remote server // ... var avatar = await GetAvatarAsync(); // networking o.OnNext(new Update(avatar)); } o.OnComplete(); }); observer.OnNext(new Load(contacts, updates)); observer.OnComplete(); }) } } The sequence of events can be controlled: combine, filter, transform, etc. This is very convenient with a large number of sources of events and the events themselves. Rx.NET allows you to work effectively with Observable.
A small example: if you cache photos on a disk, the download will speed up significantly, however, such acceleration can lead to the problem of a large number of updates in a short period of time, which will complicate the work of the scheduler and may lead to loss of responsiveness of the application. To avoid this, we will use buffering: we will process all updates that happened within a hundred milliseconds at a time, and for one we will filter entries that do not contain a photo (for any reason).
x.Updates .Where(u => u.Avatar != null) .Buffer(TimeSpan.FromMilliseconds(100)) .ObserveOn(AvaloniaScheduler.Instance) .Subscribe(list => { foreach (var u in list) { u.Contact.Avatar = u.Avatar; } }); Conclusion
It is impossible for one article to tell in detail about each technology used. I tried to choose the most interesting, and set out in a condensed form. Also, many components of the application itself were not affected, but all components are similar, and are based on the same principles. For further study I recommend to visit the following links:
')
Source: https://habr.com/ru/post/354646/
All Articles