React Native: from simple animation to interactive at 60 FPS
The need for data exchange between UI and JS processes in React Native inevitably affects the performance of preventing the execution of JavaScript animation with a high frame rate. Modern libraries, such as Animated, solve this problem by minimizing the number of messages transmitted through the bridge. The next step is the controls that continuously respond to the user's gestures. How can we animate them at 60 frames per second?
Crossing the last mile
React Native is quite an attractive tool for developing modern mobile applications. Its main advantage is a significant increase in developer productivity. Simply put, you develop an application much faster. Partly due to the fact that you can finally reuse the same code on different platforms.
However, there are a couple issues of concern. Will React Native allow me to cross the last mile? Will my application match the best of those developed using native tools?
I must admit that this concern is justified. About a year ago, at wix.com, we switched from using native tools with a separate code base for iOS and Android to React Native. The first 95% of the development went like clockwork. We noticed that we are moving almost 4 times faster than before. But the remaining 5% were a bit more complicated. And these same 5%, which I call the last mile, are still not so easy to implement using React Native.
Our goal, as a community, is to fix this.
What makes the app outstanding?
So how do the best apps differ from mediocre ones? When using mobile applications, we are accustomed to the fact that objects no longer appear on the screen just like that. We expect all their movements to be beautifully animated.
Smooth animation at 60 frames per second is an important part of the remaining five percent. For a long time, animation was a big problem in React Native. This issue was resolved with the help of Animated , an excellent library that is part of the core.
But let's look a little further than simple animation - realistic, dynamic user interaction. Such interaction occurs when the user makes a gesture over an element and the element continuously and physically realistically reacts to it.
To better understand what we are talking about, let's look at a few real life examples. I walked on my phone and gathered some great examples of interaction from my favorite applications:
- Actions on the line in the list (ListView row actions) - On the left we have the official app from Apple - the Mail App and the Inbox for Gmail from Google. As the user shifts the row of the list, the buttons of possible actions gradually appear.
- Swipeable cards - The second on the left is the Google Now app from Google and Flic from Lifehack Labs with a Tinder-like interface. As the user shifts the cards, they change their appearance, and if they are moved strongly enough, they fly away from the screen.
- Collapsible views — Airbnb and Cal from Any.DO are shown second right. Both of these applications have areas that the user can collapse depending on the state. For example, switching from filters to searching in Airbnb, or switching from displaying the month to displaying the week in Cal.
- Sliding panels & drawers - On the right, we have the official iOS notification panel and the iOS Maps application from Apple. The user can pull out these panels to view additional controls that are hidden in the normal state. Just like in the popular navigation drawer / side menu.
What unites all these examples? Their animation is physically realistic. Elements have speeds that change when dragging and dropping. Pay attention to little things like the notification bar bounces off the bottom of the screen after it has been pushed with enough force.
Implementation using javascript
Using React Native, we naturally try to implement these animations using JavaScript. Let's look at this implementation. In fact, the first example from the above (ListView row actions) is already implemented in React Native under the name SwipeableRow .
This implementation contains all the latest and greatest. It focuses on performance and uses the Animated library. Let's look at the very implementation of the interaction.
_handlePanResponderMove(event: Object, gestureState: Object): void { if (this._isSwipingExcessivelyRightFromClosedPosition(gestureState)) { return; } this.props.onSwipeStart(); if (this._isSwipingRightFromClosed(gestureState)) { this._swipeSlowSpeed(gestureState); } else { this._swipeFullSpeed(gestureState); } }, _isSwipingRightFromClosed(gestureState: Object): boolean { const gestureStateDx = IS_RTL ? -gestureState.dx : gestureState.dx; return this._previousLeft === CLOSED_LEFT_POSITION && gestureStateDx > 0; }, _swipeFullSpeed(gestureState: Object): void { this.state.currentLeft.setValue(this._previousLeft + gestureState.dx); }, _swipeSlowSpeed(gestureState: Object): void { this.state.currentLeft.setValue( this._previousLeft + gestureState.dx / SLOW_SPEED_SWIPE_FACTOR, ); }, _isSwipingExcessivelyRightFromClosedPosition(gestureState: Object): boolean { const gestureStateDx = IS_RTL ? -gestureState.dx : gestureState.dx; return ( this._isSwipingRightFromClosed(gestureState) && gestureStateDx > RIGHT_SWIPE_THRESHOLD ); }, This implementation relies on the PanResponder to compute all changes that have occurred to the elements between touch events. What performance can we expect from this solution?
In order to analyze the performance, we need to look under the hood of React Native. And there are two areas (realm) that work independently of each other: the area of JavaScript — here we implement the business logic of our application and the UI (native) area — where controls live. Communication between these two areas takes place with the help of a bridge. And since serialization is needed to send data over the bridge, frequent communication is expensive.
Touch events are native constructs of the platform and they occur in areas of the UI. For each frame of the interaction animation, these events are sent over the bridge for processing by the _handlePanResponderMove method in the JavaScript process. As soon as the business logic computes the response, the value is set to Animated Value . And since the elements are updated in the UI area, we need to send the data over the bridge again.
As you can see, each frame serializes the data to be sent across the bridge. If your application is busy with other calculations, you will see that this overhead will not allow the animation to run at 60 frames per second.
Implementation using native tools
While working on the Wix application, we started to implement all the interactions in JavaScript. But when the performance was lower than we expected, we began to port some scripts into native code.
This means implementing everything twice. Once on Objective-C for iOS and one more on Java for Android. As a rule, it is easier to achieve 60 FPS performance when writing with the use of native tools because we exclude the transfer of data across the bridge, as well as store business logic and elements in the UI process.
Since we open almost all of our native code, we have several react-native-swipe-view libraries that implement shifted cards and a react-native-action-view for actions on the list line. Obviously, without a common solution, each new use case turns into such a highly specialized library.
The main problem of this approach is that it requires, as a rule, two programmers with experience in developing native applications. For these purposes, we in Wix have about 10% of frontend developers with Objective-C / Swift or Java skills.
But this is not enough. We must strive for the best and find an elegant general-purpose solution.
Learning from animations
In fact, simple animations have similar problems. A simple implementation would change the properties of objects from frame to frame in the JavaScript area. This would create a lot of "noise on the bridge" and would lead to a loss of performance. But as we know, the Animated library has become a 60 FPS animation solution for React Native. How does she work?
The main idea behind this library is the declarative API for describing animations. If we can describe the entire animation from the beginning to the end in advance, then the whole description can be serialized and sent across the bridge only once. And then the general purpose animation driver simply executes it frame by frame.
The first version of the driver for Animated was developed in JavaScript. Later, a native driver was introduced that can perform animations and update objects in the UI area without sending data over the bridge.
This method reduces the amount of data transmitted through the bridge to the data required for initialization. And he leads us to an interesting conclusion:
The declarative interface is what allows us to cross the last mile.
This is a very powerful concept. This is the type of library that we should think about. Whenever we stand at the React Native performance limit, this is the way to expand it. All we have to do is find a few usage scenarios and create a declarative interface covering them all. That is what we will do now.
Declarative interface for user interactions
In order to create a good interface, we need to define several goals:
- Our API should be general purpose. In order to verify this, we must make sure that it covers all 8 scenarios from our examples.
- Our API should be simple. The description of each interaction should not exceed 3-5 lines of code.
Before turning to the details, I want to mention one very interesting work that is being done in the Animated library and is aimed at user interaction. One of the interesting additions is Animated.ScrollView and it allows you to interpolate the properties of the scroll pane based on the ScrollView position. Another interesting development in progress from Krzysztof Magiera is the react-native-gesture-handler and it allows you to interpolate the properties of an object depending on user gestures.
Our approach is a little different. We will take the 8 UX scripts from our examples and create the simplest high-level API that can describe them all.
Stage One: Define the API
After analyzing our examples, we will see that some objects can move horizontally, and some vertically. Thus, specifying the direction (direction) will be a good starting point for our API.
Another observation is that objects can move freely while dragging. But as soon as the user releases them, they, as a rule, tend and are fixed at a certain point (snap). As an example, the side menu can be either closed or open.
And the last. To make the fixing function realistic, we need to use a spring-like curve for the animation. And since we don't want our spring to jump forever, we need to add friction (or attenuation).
Thus, at the first stage, our API will have the following properties:
- horizontal / vertical
- snap points
- friction
Now let's try using our API to describe the first two scenarios of our examples. ListView row actions and swipeable cards

<Interactable.View horizontalOnly={true} snapPoints={[ {x: 0}, {x: 100} ]} friction={0.7} /> // swipeable cards <Interactable.View horizontalOnly={true} snapPoints={[ {x: -360}, {x: 0}, {x: 360} ]} friction={0.6} /> In order for the cards to fly away when brushing, we simply pointed out the snap points outside the screen (-360 and 360 logical pixels). Please note that at the moment we are using pixels to simplify. Later we can add support for units of measure that are more suitable for different screen resolutions, such as percentages.
Not bad for a start, but the design of the declarative interface is only the first half. The second half is the implementation of the native driver. This we now do.
Implementing a native driver: First try
After the data for describing the interaction is formed in the JavaScript area, it is serialized and sent once to the UI area. Our native general-purpose driver accepts them and performs all interactions only in the native area. There will no longer be any bridge transfers for rendering each frame of interaction, which will allow for smooth animation at a speed of 60 FPS.
Let's start with a simple implementation on Objective-C. We will move our object using UIPanGestureRecognizer and when the move gesture is over, we will find the closest anchor point and smoothly move the object to it using the spring curve of the animation.
- (void)handlePan:(UIPanGestureRecognizer *)pan { CGPoint translation = [pan translationInView:self]; self.center = CGPointMake(self.initialPanCenter.x + translation.x, self.initialPanCenter.y + translation.y); if (pan.state == UIGestureRecognizerStateEnded) { InteractablePoint *snapPoint = [self findClosestPoint:self.snapTo toPoint:self.center]; if (snapPoint) { [UIView animateWithDuration:0.8 delay:0 usingSpringWithDamping:0.7 initialSpringVelocity:0 options:nil animations:^{ self.center = [snapPoint positionWithOrigin:self.origin]; } completion:^(BOOL finished) {}]; } } } This implementation works pretty well. But there is one problem. We emulate physics by animation. What happens if a user swipes an object at some initial speed? The animation function that we use can only move an object in a certain direction using the dynamics of the spring. But what happens if the user swipes the object in the other direction? Our model is not universal enough.
Implementing a native driver: second attempt
Let's look at more advanced models for managing interactions. If you plunge into the native SDK and see how Apple advises making complex and physically realistic interactions, then you will come across UIKit Dynamics .
This crazy API was introduced in iOS 7. It uses a full-featured physics engine under the hood and allows us to operate with such physical properties as mass, speed and apply various forces to the object. The physical parameters of the scene are determined by the applied behavior models (behavior). We can easily change the previous implementation:
if (pan.state == UIGestureRecognizerStateEnded) { CGPoint velocity = [pan velocityInView:self.superview]; InteractablePoint *snapPoint = [self findClosestPoint:self.snapTo toPoint:self.center]; if (snapPoint) { // UIDynamicItemBehavior *itemBehaviour = [[UIDynamicItemBehavior alloc] initWithItems:@[self]]; [itemBehaviour addLinearVelocity:velocity forItem:self]; [self.animator addBehavior:itemBehaviour]; // UISnapBehavior *snapBehaviour = [[UISnapBehavior alloc] initWithItem:self snapToPoint:[snapPoint positionWithOrigin: self.origin]]; snapBehaviour.damping = 0.8f; [self.animator addBehavior:snapBehaviour]; } } This is closer, but still not enough. There are two major drawbacks to using UIKit Dynamics. Firstly, there is no possibility to use it on Android. There is nothing in the Android SDK that we could use as a replacement. And, secondly, some features, such as binding, do not provide enough control. There is no way to specify the force with which the object will be fixed.
Implementing a native driver: Third attempt
Let's add some craziness. Why not implement UIKit Dynamics yourself? Ultimately, physical forces are expressed by relatively simple mathematical equations. Developing a physics engine from scratch should not be too complicated.
We can adapt behaviors from UIKit Dynamics. Let's take, for example, the function of snapping an object. We can implement it using a spring. But how should this spring behave? It is time to remember a little physics .

No need to worry too much about math. This is what the library will do under the hood. Articles on Wikipedia under the Newton and Hooke Laws will give you all the information you need.
We will have to calculate the strength and speed of each frame of our animation. In order to achieve this, we need a high-precision timer that will ensure the execution of the code at a speed of 60 frames per second. Fortunately, we just have a native API created specifically for this purpose - CADisplayLink . Putting it all together we get:
self.displayLink = [CADisplayLink displayLinkWithTarget:self selector:@selector(displayLinkUpdated)]; [self.displayLink addToRunLoop:[NSRunLoop mainRunLoop] forMode:NSRunLoopCommonModes]; - (void)displayLinkUpdated { CFTimeInterval deltaTime = 0.0; CFTimeInterval currentTime = [self.displayLink timestamp]; if (self.lastFrameTime > 0.0) deltaTime = currentTime - self.lastFrameTime; self.lastFrameTime = currentTime; [self animateFrameWithDeltaTime:deltaTime]; } - (void)executeFrameWithDeltaTime:(CFTimeInterval)deltaTime onObject:(PhysicsObject*)object { CGFloat dx = self.target.center.x - self.anchorPoint.x; CGFloat ax = (-self.tension * dx) / object.mass; CGFloat vx = object.velocity.x + deltaTime * ax; CGFloat dy = self.target.center.y - self.anchorPoint.y; CGFloat ay = (-self.tension * dy) / object.mass; CGFloat vy = object.velocity.y + deltaTime * ay; object.velocity = CGPointMake(vx, vy); } Now it feels right, but it pushes one interesting thought ...
We are writing a declarative physics engine for React Native.
And it's damn cool!
Finally, we have a native driver that is completely under our control. It's time to use this powerful engine and add some new features to our declarative interface.
Expanding API with new properties.
Our declarative interface is a good foundation for further improvements, but it still lacks the functionality to implement all the tricky interactions from the 8 UX examples. Let's look at the notification panel from iOS. When the user pulls the panel with enough force, it jumps off the bottom of the screen.
We can easily add support for this behavior to our interface. Restrict the movement of the object to the frame and add a rebound from the edges:

// <Interactable.View verticalOnly={true} snapPoints={[ {y: 50}, {y: 667} ]} initialPosition={{y: 50}} boundaries={{bottom: 667, bounce: 2}} friction={0.7} /> Let's look at a more complex scenario, this time with actions for rows of lists. Some lines have action buttons on one side only. In such a case, a common behavior would be to allow the line to move freely in the direction to show the buttons, but when moving in the opposite direction, the movement should experience increasing resistance.
We can add resistance to the movement of the string by tying one of its sides to the edge of the screen using a constant spring . Unlike the anchor points, this spring will be active while dragging.
Then we will need to solve another problem. The line should move freely to the left (to display the action buttons) and experience resistance when moving to the right. We can achieve this behavior by adding to the interface for each applied force, such as a spring, an optional influence area.
When an object is outside the area of influence, no force is applied to it.
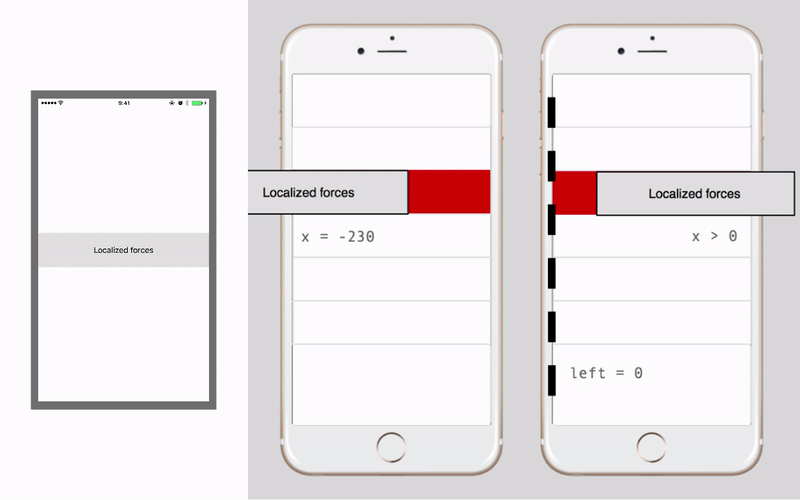
<Interactable.View horizontalOnly={true} snapPoints={[ {x: 0}, {x: -230} ]} springPoints={[ {x: 0, tension: 6000, damping: 0.5, influenceArea: {left: 0}} ]} friction={0.7} /> As you can see, when new scenarios appear, we can simply add generalized properties to our interface that can describe them.
Extend the API by interacting with Animated
We still lack a big piece of the puzzle. Let's return to actions with a line of the list. As you move the line, action buttons gradually appear from under it. A common scenario is a smooth change in their size and transparency as they appear.
You can see this behavior in the picture below (action buttons are indicated in blue):
Also note that the objects that we want to animate (blue buttons) are different from the object with which the user interacts (the gray row of the list).
This effect is not so simple to implement as the animation steps now depend on the horizontal position of the line, and not on the timer. Nevertheless, it is still an animation where the properties of the object (size and transparency) are consistently changed. And we already have a powerful tool for animating properties - the Animated library. Let's see how we can use it for our purposes.
Animation of object properties in Animated is done declaratively, defining interpolations using Animated.Value:
this._animValue = new Animated.Value(0); <Animated.View style={{ transform: [{ scale: this._animValue.interpolate({ inputRange: [-150, 0], outputRange: [0.3, 1] }) }] }}> ... </Animated.View> Since the animation depends on the horizontal position of the line, can we try to pass this position through Animated.Value? This will allow us to specify interpolations, based on the position of the interaction object, to change other objects that are not directly associated with it (for example, buttons).
How, then, would it work with our interface? We can achieve this behavior by passing Animated.Value as a property (animatedValueX):
// Animated this._deltaX = new Animated.Value(0); <Animated.View style={{ transform: [{ scale: this._deltaX.interpolate({ inputRange: [-150, 0], outputRange: [0.3, 1] }) }] }}> ... </Animated.View> // API <Interactable.View horizontalOnly={true} snapPoints={[{x: 0}, {x: -230}]} animatedValueX={this._deltaX} /> The native driver will do the actual transfer under the hood. You can do this with Animated.events . New versions of Animated support control of Animated.events using the native driver . And this means that the entire animation, starting from the transfer of the position to the interpolation and updating of the objects, will take place in the native area without the need to send data through the bridge. This is great news if we want to run an animation at 60 FPS.
Expanding API: Final touches
If we already set about developing our own physics engine, let's add other forces. We already have springs, let's add gravity and magnetism. This will give developers the necessary flexibility to create any crazy physical interactions.
We also need event support so that our JavaScript code knows when the interaction is completed or when the object has reached the anchor point. And while we're still here, it would be great to add tactile feedback. So that the phone can vibrate slightly when objects collide. These nuances add gloss to the application, which is so necessary for pleasant use.
Time to sum up ...
I want to show you the full power of what we have created here. Take a look at this description. Can you say what it implements?
<Interactable.View snapPoints={[{x: 140}, {x: -140}]} gravityPoints={[{x: 0, y: 200, strength: 8000, falloff: 40, damping: 0.5, haptics: true}]} dragWithSpring={{tension: 2000, damping: 0.5}} onStop={this.onStopInteraction} animatedValueX={this._deltaX} animatedValueY={this._deltaY} /> Our mysterious object is fixed at the left or right edge of the screen. A gravity well at the bottom of the screen will tighten our object if it gets too close. Also note that we did not restrict the movement of objects, providing them with the ability to move in any direction.
We got a full implementation of "chat heads" in just 7 lines of code!

Does it really work at 60 frames per second?
Watching video is not the same as self-interaction on a real device. Note that even the simulator does not allow you to feel the real interaction as it can skip animation frames.
So is this done on a real device at 60 frames per second? Judge for yourself. 8 , . Apple App Store Google Play .
, iOS Android, GitHub .
, , . , , React Native, .
React Native , . - ( ), , , .
.
')
Source: https://habr.com/ru/post/336010/
All Articles