Isomorphic Application with React and Redux
So, I know that you like Todo lists, that is, that you really like to write Todo lists, so I want you to create one of them, using a new, delicious and nutritious (“nutritious” note.) Flux framework, Redux ! I wish you only the best.
In this article you will learn how to design your own Redux application, not limited to, but also including.
')
If this is similar to what you want in this life, forward under the cat, if not, then do not bother.
I want to tell you ... It will not be a super small tutorial, so fasten yourself and get ready for the thorny path, do not put out your hands and feet and all that ...
Oh, I'm glad you asked!
Redux is a new Flux framework from Danil Abramov , which removes many unnecessary difficulties. You can read why this framework was created here or see , in general, TL: DR Redux keeps the state of your application in one place, and defines the minimal, but powerful enough way to interact with this state (state orig.) .
If you are familiar with traditional Flux frameworks , then the biggest difference you'll notice is the lack of Storage (Stores orig.) , And the presence of "Reducers" (Reducers orig.) .
In Redux , the entire state of the application lives in one place (an instance of Redux), instead of being divided into separate repositories (which may slightly oppose isomorphism).
“Reducer” is a description of how the state will change, it doesn’t change anything in essence, and it looks like this:
How? You will see later.
You probably think that Redux looks more like a solution than a framework. This is the minimum base that contains all the best Flux ideas. I hope this article will teach you how to use it successfully, thrive and go with minimal mutations.
We will use Webpack and Babel to tie our application together, because we are cool, smart and joyful, and because they give us the ability to reload the code on the fly and the latest ES6 / 7 chips.
First we need to create a directory and put some files there.
Here is the package.json that I prepared in advance:
and
and .babelrc (for 'ES7' sugar)
Frankly, these files are not so remarkable, just created a reasonable dev environment for themselves.
Well, now you need to run
The basic structure of the application will look like this:
All the main parts of the code will be in the
just a file to run server.jsx , so now we can use ES6 / JSX.
Server functions will perform Express , because it is easier, and there is a chance that you already know it.
Pretty standard bullshit. We set up an Express server with global middleware, but do not process anything, just an empty web page that will help us look into the void of existence. Let's fix it.
You probably think that with Express routing and templating it will be easy. Unfortunately, you're wrong, because we want to share as much logic as possible between the server and the client. We will use React Router , as it can route on the client and on the server.
So, we have the root component
here children will then turn into a tree of components, which will give us a router after its dependency magic. There is nothing special here, just display everything as it is.
Next we need to determine the route to
Here we just say React Router will display our
Now we will do the same on the server.
Here we import a couple of new toys and tell the router to send the request into the hands of express. Hopefully we’ll go back to the
If we run

You will notice that there are a couple of errors in the console, that the router needs several values. This is because the client is trying to load
It looks awesome, and I am sure that your brain has already broken, but now we just have a static page. In order to get all the juicy flesh from React, we need to implement routing on the client.
So go ahead, open
We told React to insert the Router component into the react-view div, and passed the corresponding parameters to it. A history object that we have not seen in the server part, a necessary part of the React Router configuration (when displayed directly), and describes how the URL looks. And we want a good and clean object! Therefore, we will use the HTML5 History API with BrowserHistory , although for older browsers we could use HashHistory and get the
Now we can run our application
Redux looks very similar to Flux, except, as I said earlier, that we use gearboxes instead of repositories. First, we will write a few simple steps to change the Todo sheet.
As you can see, in Redux, action creators of orig. Are just functions that return successively formatted objects. No magic, then we need redushers to process them.
It's simple again. Here we can use the Immutable List object to store an immutable state in the repository (although it may be more difficult in larger applications) and return a new version of the state depending on the action.
Redux is not so stubborn, he has only two expectations from his reducer.
As you can see, the last one fits well with Immuatable.js
Here we use a simple switch construction, but if you don’t like it, feel free to write a blank, which will introduce a bit of abstraction.
Redux is not limited to the use of a single reducer, for ease of retrieval, you can create
Since we all have one, we do not really need it, but we will need it in the future.
Talking about redusers and actions is good, but our application knows nothing about it! It's time to change that.
We need to forward a Redux instance through the component tree to start all this processing and link all these things together!
NPM of the
We create an instance of the Redux storage component for each request and forward it through the entire component tree (available as <component> .context.redux , if you ever need access to it) by wrapping the root component in
We also need to give the client the initial state so that he can hydrogenate his storage facilities.
Just ask the state of Redux:
And add a couple of lines to our HTML template:
After that, we will have access to the status on the client through the
What we are left to do now is transform everything into the Immutable.js collection. And give them Redux when we instantiate a new repository.
This is identical to the initialization of the state on the server, except that we hydrogenate the repository with the state passed to us from the server.
We are truly approaching the end of our application, there are a couple of components left to connect all the dots.
We will use three components to display information that may seem a bit superfluous (most likely it is), but this will show the differences in Redux between the “smart” and “stupid” components, which is very important in large applications.
Smart components subscribe to storage Redux events (for example, using the decorator syntax), and forward it down the tree to other components through properties. Which can be at any point in the tree, but when developing more complex applications, it usually reaches the lowest layers.
Here we will use only one
Next, we write two "stupid" components, but first, let's see what happens here.
If you are not familiar with decorators ( @connector section), then the best way to understand this is to think that this is the same as the mixins in the components. You probably met similar constructions in other languages, for example in Python.
If not, in javascript these are just functions that in some way modify other functions (here “class”).
The @connect decorator wraps our class with another component (
Finally, we use the
This means that in child components, we can call action creators directly, without wrapping them in the
We look
Here we display each todo element in the repository, next to the delete and change buttons that are associated with our action creators.
Also, please note that we use the “arrow” functions in the definition of a class whose context is associated with the class constructor (since these functions inherit the context from the executor). If we use the usual functions of the ES6 class (as render), then we have to link them to the context ourselves, which is sometimes tedious.
Finally, we define
It is also a “dumb” component that allows you to simply add todo to the repository.
It now remains for us to determine the route to

And voilà, go to http: // localhost: 8080 / home and look at the running application
I know what you're thinking.
It's impossible.
And I say possible!
Another good feature of Redux is to define your middleware with the dispatcher, which will allow you to change your actions (asynchronously). I'm sure you noticed from the Redux theme that it works with functions with certain signatures.
We are going to use our Redux middleware to make our actions in the application more simple, and to make our action creators synchronous, which will give us the opportunity to use delicious and brilliant ES6 promises.
This means that we can simply determine the promise key of our action so that it automatically comes to the resolved or rejected state.
We can also optionally track redushers for auto-generated <TYPE> _REQUEST and <TYPE> _FAILURE if we need to trace the state mutation.
And to use them, we need to change a couple of lines in client / index.jsx and server.jsx
Just do not forget to forward initialState along with the reducer
And now we can write the createTodo magic action for our action creator, for example
After a small change in the reducer.
Todo is now saved to my external database. If we want them to load at the start of our application, simply add the getTodos creator to the action.
We catch it in the reduser
And we can call it when TodosView is initialized.
When the middleware triggers an action for the initial request or possible failure, you can take a look at how we could catch all this in the reducers and update the state of the application accordingly, at boot time or error, respectively.
Yes. Let's fix it!
The problem is that we added asynchronous actions, but do not wait for them to complete before sending the status to the client. You may think that it doesn’t matter, as we can display a loading screen on the client. Better than hanging on the server, right?
Well, it depends on many factors. The main benefit of server rendering is that we can guarantee a good connection to our backend (which can be in the same datacenter!). If a user tries to download our site through a missing mobile connection, for example, it is much better that he waits for our server to get the initial state, rather than that he receives it from various resources on his own.
The solution to this problem in the current situation is not so difficult. You can do this in several ways, the way I do, is far from being:
We determine what data the component needs as an array of action creators. We can use a static property in the class definition:
You also need a function that will catch all promise calls, collect data and send them.
Note that we also need to check the WrappedComponent key, since the aforementioned smart components will be wrapped in the Connector component.
Now we set up the server so that it responds only when it has all the data.

Be sure to delete the action creator from onComponentMount to avoid repeated calls, and restart
That the world is beautiful!
Much more can be done and much has been done. In an application with a large number of routs, you probably want to use the React Router onLeave handler to load all the data needed by the component (like here ), and catch other actions with asynchronous API.
Despite all this, I hope you allowed yourself to enjoy the epic quest to a great functional future.
You can also see the final result on Github and read more about Redux here.
In this article you will learn how to design your own Redux application, not limited to, but also including.
- Whole grain server rendering
- Advanced routing rich in Omega-3
- Oily asynchronous data loading
- Smooth functional aftertaste
')
If this is similar to what you want in this life, forward under the cat, if not, then do not bother.
I want to tell you ... It will not be a super small tutorial, so fasten yourself and get ready for the thorny path, do not put out your hands and feet and all that ...
Wait, wait, what is Redux?
Oh, I'm glad you asked!
Redux is a new Flux framework from Danil Abramov , which removes many unnecessary difficulties. You can read why this framework was created here or see , in general, TL: DR Redux keeps the state of your application in one place, and defines the minimal, but powerful enough way to interact with this state (state orig.) .
If you are familiar with traditional Flux frameworks , then the biggest difference you'll notice is the lack of Storage (Stores orig.) , And the presence of "Reducers" (Reducers orig.) .
In Redux , the entire state of the application lives in one place (an instance of Redux), instead of being divided into separate repositories (which may slightly oppose isomorphism).
“Reducer” is a description of how the state will change, it doesn’t change anything in essence, and it looks like this:
function exampleReducer(state, action) { return state.changedBasedOn(action) } How? You will see later.
You probably think that Redux looks more like a solution than a framework. This is the minimum base that contains all the best Flux ideas. I hope this article will teach you how to use it successfully, thrive and go with minimal mutations.
Make yourself comfortable
We will use Webpack and Babel to tie our application together, because we are cool, smart and joyful, and because they give us the ability to reload the code on the fly and the latest ES6 / 7 chips.
First we need to create a directory and put some files there.
Here is the package.json that I prepared in advance:
package.json
{ "name": "isomorphic-redux", "version": "1.0.0", "description": "Basic isomorphic redux application", "main": "index.js", "scripts": { "start": "NODE_PATH=$NODE_PATH:./shared node .", "dev": "npm run start & webpack-dev-server --progress --color" }, "author": "<your-name> <<your-email>>", "license": "MIT", "dependencies": { "axios": "^0.5.4", "express": "^4.13.2", "immutable": "^3.7.4", "object-assign": "^3.0.0", "react": "^0.13.3", "react-redux": "^0.2.2", "react-router": "^1.0.0-beta3", "redux": "^1.0.0-rc" }, "devDependencies": { "babel": "^5.8.20", "babel-eslint": "^4.0.5", "babel-loader": "^5.3.2", "eslint": "^1.0.0", "eslint-plugin-react": "^3.1.0", "react-hot-loader": "^1.2.8", "webpack": "^1.10.5", "webpack-dev-server": "^1.10.1" } } and
webpack.config.js
var path = require('path'); var webpack = require('webpack'); module.exports = { entry: [ 'webpack-dev-server/client?http://localhost:8080/', 'webpack/hot/only-dev-server', './client' ], output: { path: path.join(__dirname, 'dist'), filename: 'bundle.js' }, resolve: { modulesDirectories: ['node_modules', 'shared'], extensions: ['', '.js', '.jsx'] }, module: { loaders: [ { test: /\.jsx?$/, exclude: /node_modules/, loaders: ['react-hot', 'babel'] } ] }, plugins: [ new webpack.HotModuleReplacementPlugin(), new webpack.NoErrorsPlugin() ], devtool: 'inline-source-map', devServer: { hot: true, proxy: { '*': 'http://localhost:' + (process.env.PORT || 3000) } } }; and .babelrc (for 'ES7' sugar)
{ "optional": ["es7.decorators", "es7.classProperties", "es7.objectRestSpread"] } Frankly, these files are not so remarkable, just created a reasonable dev environment for themselves.
Well, now you need to run
npm i to download all the dependent modules, and you can start.Give me Seymour
The basic structure of the application will look like this:
client/ shared/ index.js server.jsx All the main parts of the code will be in the
shared directory, but you need some gluing code to separate the client and server parts.index.js
'use strict'; require('babel/register')({}); var server = require('./server'); const PORT = process.env.PORT || 3000; server.listen(PORT, function () { console.log('Server listening on', PORT); }); just a file to run server.jsx , so now we can use ES6 / JSX.
Server functions will perform Express , because it is easier, and there is a chance that you already know it.
server.jsx
import express from 'express'; const app = express(); app.use((req, res) => { const HTML = ` <DOCTYPE html> <html> <head> <meta charset="utf-8"> <title>Isomorphic Redux Demo</title> </head> <body> <div id="react-view"></div> <script type="application/javascript" src="/bundle.js"></script> </body> </html> `; res.end(HTML); }); export default app; Pretty standard bullshit. We set up an Express server with global middleware, but do not process anything, just an empty web page that will help us look into the void of existence. Let's fix it.
Rotate how about
You probably think that with Express routing and templating it will be easy. Unfortunately, you're wrong, because we want to share as much logic as possible between the server and the client. We will use React Router , as it can route on the client and on the server.
So, we have the root component
shared/components/index.jsx , which integrates our React Router. In this way, we can add aesthetics to the entire application (cap and basement, for example), good architecture for a brilliant SPA.shared / components / index.jsx
import React from 'react'; export default class AppView extends React.Component { render() { return ( <div id="app-view"> <h1>Todos</h1> <hr /> {this.props.children} </div> ); } } here children will then turn into a tree of components, which will give us a router after its dependency magic. There is nothing special here, just display everything as it is.
Next we need to determine the route to
shared / routes.jsx
import React from 'react'; import { Route } from 'react-router'; import App from 'components'; export default ( <Route name="app" component={App} path="/"> </Route> ); Here we just say React Router will display our
components/index along the path '/'. Sounds good!Now we will do the same on the server.
server.jsx
import React from 'react'; import { Router } from 'react-router'; import Location from 'react-router/lib/Location'; import routes from 'routes'; app.use((req, res) => { const location = new Location(req.path, req.query); Router.run(routes, location, (err, routeState) => { if (err) return console.error(err); const InitialComponent = ( <Router {...routeState} /> ); const componentHTML = React.renderToString(InitialComponent); const HTML = `...`; res.end(HTML); }); }); Here we import a couple of new toys and tell the router to send the request into the hands of express. Hopefully we’ll go back to the
routeState variable and be able to display the route we’re asking for. Then we can use the deft method renderToString from React , which will output our component to an HTML string, which we will give to the client in the react-view div we wrote earlier. <div id="react-view">${componentHTML}</div> If we run
npm start we will see here http: // localhost: 3000 / that the route is inserted into HTML.You will notice that there are a couple of errors in the console, that the router needs several values. This is because the client is trying to load
bundle.js , but we have not yet set the entry point for webpack, which is why such a garbage.It looks awesome, and I am sure that your brain has already broken, but now we just have a static page. In order to get all the juicy flesh from React, we need to implement routing on the client.
So go ahead, open
client/index.jsx and write something:client / index.jsx
import React from 'react'; import { Router } from 'react-router'; import { history } from 'react-router/lib/BrowserHistory'; import routes from 'routes'; React.render( <Router children={routes} history={history} />, document.getElementById('react-view') ); We told React to insert the Router component into the react-view div, and passed the corresponding parameters to it. A history object that we have not seen in the server part, a necessary part of the React Router configuration (when displayed directly), and describes how the URL looks. And we want a good and clean object! Therefore, we will use the HTML5 History API with BrowserHistory , although for older browsers we could use HashHistory and get the
/# URL from the address.Now we can run our application
npm run dev and the Webpack will handle our bundle.js . It looks not so interesting, but going to http: // localhost: 8080 / should all work without errors. Routing is done, and we are ready for the Redux action.Reduce, Reuse, Redux
Redux looks very similar to Flux, except, as I said earlier, that we use gearboxes instead of repositories. First, we will write a few simple steps to change the Todo sheet.
shared / actions / TodoActions.js
export function createTodo(text) { return { type: 'CREATE_TODO', text, date: Date.now() } } export function editTodo(id, text) { return { type: 'EDIT_TODO', id, text, date: Date.now() }; } export function deleteTodo(id) { return { type: 'DELETE_TODO', id }; } As you can see, in Redux, action creators of orig. Are just functions that return successively formatted objects. No magic, then we need redushers to process them.
shared / reducers / TodoReducer.js
import { List } from 'immutable'; const defaultState = new List(); export default function todoReducer(state = defaultState, action) { switch(action.type) { case 'CREATE_TODO': return state.concat(action.text); case 'EDIT_TODO': return state.set(action.id, action.text); case 'DELETE_TODO': return state.delete(action.id); default: return state; } } It's simple again. Here we can use the Immutable List object to store an immutable state in the repository (although it may be more difficult in larger applications) and return a new version of the state depending on the action.
Redux is not so stubborn, he has only two expectations from his reducer.
- It must have a signature
(state, action) => newState. - The reducer does not change the status transferred to it, but returns its new version.
As you can see, the last one fits well with Immuatable.js
Here we use a simple switch construction, but if you don’t like it, feel free to write a blank, which will introduce a bit of abstraction.
Redux is not limited to the use of a single reducer, for ease of retrieval, you can create
reducers/index.js export { default as todos } from './TodoReducer'; Since we all have one, we do not really need it, but we will need it in the future.
Iiiiii ... Action!
Talking about redusers and actions is good, but our application knows nothing about it! It's time to change that.
We need to forward a Redux instance through the component tree to start all this processing and link all these things together!
NPM of the
react-redux has several react-redux that will help us with this.server.jsx
import { createStore, combineReducers } from 'redux'; import { Provider } from 'react-redux'; import * as reducers from 'reducers'; app.use((req, res, next) => { const location = new Location(req.path, req.query); const reducer = combineReducers(reducers); const store = createStore(reducer); Router.run(routes, location, (err, routeState) => { if (err) return console.error(err); const InitialView = ( <Provider store={store}> {() => <Router {...routeState} /> } </Provider> ); We create an instance of the Redux storage component for each request and forward it through the entire component tree (available as <component> .context.redux , if you ever need access to it) by wrapping the root component in
Provider .We also need to give the client the initial state so that he can hydrogenate his storage facilities.
Just ask the state of Redux:
const initialState = store.getState(); And add a couple of lines to our HTML template:
<title>Redux Demo</title> <script type="application/javascript"> window.__INITIAL_STATE__ = ${JSON.stringify(initialState)}; </script> After that, we will have access to the status on the client through the
window.__INITIAL_STATE__ , not bad, huh?What we are left to do now is transform everything into the Immutable.js collection. And give them Redux when we instantiate a new repository.
client / index.jsx
import { createStore, combineReducers } from 'redux'; import { Provider } from 'react-redux'; import * as reducers from 'reducers'; import { fromJS } from 'immutable'; let initialState = window.__INITIAL_STATE__; // Transform into Immutable.js collections, // but leave top level keys untouched for Redux Object .keys(initialState) .forEach(key => { initialState[key] = fromJS(initialState[key]); }); const reducer = combineReducers(reducers); const store = createStore(reducer, initialState); React.render( <Provider store={store}> {() => <Router children={routes} history={history} /> } </Provider>, document.getElementById('react-view'); ); This is identical to the initialization of the state on the server, except that we hydrogenate the repository with the state passed to us from the server.
We are truly approaching the end of our application, there are a couple of components left to connect all the dots.
Connect all points
We will use three components to display information that may seem a bit superfluous (most likely it is), but this will show the differences in Redux between the “smart” and “stupid” components, which is very important in large applications.
Smart components subscribe to storage Redux events (for example, using the decorator syntax), and forward it down the tree to other components through properties. Which can be at any point in the tree, but when developing more complex applications, it usually reaches the lowest layers.
Here we will use only one
shared / components / Home.jsx
import React from 'react'; import TodosView from 'components/TodosView'; import TodosForm from 'components/TodosForm'; import { bindActionCreators } from 'redux'; import * as TodoActions from 'actions/TodoActions'; import { connect } from 'react-redux'; @connect(state => ({ todos: state.todos })) export default class Home extends React.Component { render() { const { todos, dispatch } = this.props; return ( <div id="todo-list"> <TodosView todos={todos} {...bindActionCreators(TodoActions, dispatch)} /> <TodosForm {...bindActionCreators(TodoActions, dispatch)} /> </div> ); } } Next, we write two "stupid" components, but first, let's see what happens here.
If you are not familiar with decorators ( @connector section), then the best way to understand this is to think that this is the same as the mixins in the components. You probably met similar constructions in other languages, for example in Python.
If not, in javascript these are just functions that in some way modify other functions (here “class”).
The @connect decorator wraps our class with another component (
<Connector> ) that gives access to the requested parts of the state as component properties, therefore we can use todos , which we do. It also gives access to the dispatch function from Redux, with which we can process our actions, like this: dispatch(actionCreator()); Finally, we use the
bindActionCreators function from Redux to forward the associated action creators.This means that in child components, we can call action creators directly, without wrapping them in the
dispatch() function.We look
components / TodosView.jsx
import React from 'react'; export default class TodosView extends React.Component { handleDelete = (e) => { const id = Number(e.target.dataset.id); // Equivalent to `dispatch(deleteTodo())` this.props.deleteTodo(id); } handleEdit = (e) => { const id = Number(e.target.dataset.id); const val = this.props.todos.get(id).text // For cutting edge UX let newVal = window.prompt('', val); this.props.editTodo(id, newVal); } render() { return ( <div id="todo-list"> { this.props.todos.map( (todo, index) => { return ( <div key={index}> <span>{todo}</span> <button data-id={index} onClick={this.handleDelete}> X </button> <button data-id={index} onClick={this.handleEdit}> Edit </button> </div> ); }) } </div> ); } } Here we display each todo element in the repository, next to the delete and change buttons that are associated with our action creators.
Also, please note that we use the “arrow” functions in the definition of a class whose context is associated with the class constructor (since these functions inherit the context from the executor). If we use the usual functions of the ES6 class (as render), then we have to link them to the context ourselves, which is sometimes tedious.
Note that you can also use React.createClass to avoid problems, and use mixins, although I prefer to use the ES6 classes for cleanliness and consistency.
Finally, we define
components / TodosForm.jsx
import React from 'react'; export default class TodosForm extends React.Component { handleSubmit = () => { let node = this.refs['todo-input'].getDOMNode(); this.props.createTodo(node.value); node.value = ''; } render() { return ( <div id="todo-form"> <input type="text" placeholder="type todo" ref="todo-input" /> <input type="submit" value="OK!" onClick={this.handleSubmit} /> </div> ); } } It is also a “dumb” component that allows you to simply add todo to the repository.
It now remains for us to determine the route to
shared / routes.jsx
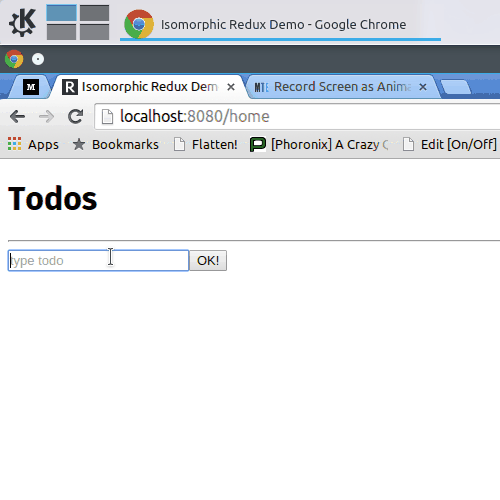
import Home from 'components/Home'; export default ( <Route name="app" component={App} path="/"> <Route component={Home} path="home" /> </Route> ); And voilà, go to http: // localhost: 8080 / home and look at the running application
Last Frontier: Asynchronous Actions
I know what you're thinking.
It's impossible.
And I say possible!
Another good feature of Redux is to define your middleware with the dispatcher, which will allow you to change your actions (asynchronously). I'm sure you noticed from the Redux theme that it works with functions with certain signatures.
We are going to use our Redux middleware to make our actions in the application more simple, and to make our action creators synchronous, which will give us the opportunity to use delicious and brilliant ES6 promises.
shared / lib / promiseMiddleware.js
export default function promiseMiddleware() { return next => action => { const { promise, type, ...rest } = action; if (!promise) return next(action); const SUCCESS = type; const REQUEST = type + '_REQUEST'; const FAILURE = type + '_FAILURE'; next({ ...rest, type: REQUEST }); return promise .then(res = > { next({ ...rest, res, type: SUCCESS }); return true; }) .catch(error => { next({ ...rest, error, type: FAILURE }); // Another benefit is being able to log all failures here console.log(error); return false; }); }; } This means that we can simply determine the promise key of our action so that it automatically comes to the resolved or rejected state.
We can also optionally track redushers for auto-generated <TYPE> _REQUEST and <TYPE> _FAILURE if we need to trace the state mutation.
And to use them, we need to change a couple of lines in client / index.jsx and server.jsx
... import { applyMiddleware } from 'redux'; import promiseMiddleware from 'lib/promiseMiddleware'; ... const store = applyMiddleware(promiseMiddleware)(createStore)(reducer); Just do not forget to forward initialState along with the reducer
And now we can write the createTodo magic action for our action creator, for example
import request from 'axios'; const BACKEND_URL = 'https://webtask.it.auth0.com/api/run/wt-milomord-gmail_com-0/redux-tutorial-backend?webtask_no_cache=1'; export function createTodo(text) { return { type: 'CREATE_TODO', promise: request.post(BACKEND_URL, { text }) } } After a small change in the reducer.
return state.concat(action.res.data.text); Todo is now saved to my external database. If we want them to load at the start of our application, simply add the getTodos creator to the action.
export function getTodos() { return { type: 'GET_TODOS', promise: request.get(BACKEND_URL) } } We catch it in the reduser
case 'GET_TODOS': return state.concat(action.res.data); And we can call it when TodosView is initialized.
componentDidMount() { this.props.getTodos(); } When the middleware triggers an action for the initial request or possible failure, you can take a look at how we could catch all this in the reducers and update the state of the application accordingly, at boot time or error, respectively.
Wait ... Did we break the rehydration of the condition?
Yes. Let's fix it!
The problem is that we added asynchronous actions, but do not wait for them to complete before sending the status to the client. You may think that it doesn’t matter, as we can display a loading screen on the client. Better than hanging on the server, right?
Well, it depends on many factors. The main benefit of server rendering is that we can guarantee a good connection to our backend (which can be in the same datacenter!). If a user tries to download our site through a missing mobile connection, for example, it is much better that he waits for our server to get the initial state, rather than that he receives it from various resources on his own.
The solution to this problem in the current situation is not so difficult. You can do this in several ways, the way I do, is far from being:
We determine what data the component needs as an array of action creators. We can use a static property in the class definition:
static needs = [ TodoActions.getTodos ] You also need a function that will catch all promise calls, collect data and send them.
shared / lib / fetchComponentData.js
export default function fetchComponentData(dispatch, components, params) { const needs = components.reduce( (prev, current) => { return (current.needs || []) .concat((current.WrappedComponent ? current.WrappedComponent.needs : []) || []) .concat(prev); }, []); const promises = needs.map(need => dispatch(need(params))); return Promise.all(promises); } Note that we also need to check the WrappedComponent key, since the aforementioned smart components will be wrapped in the Connector component.
Now we set up the server so that it responds only when it has all the data.
import fetchComponentData from 'lib/fetchComponentData'; Router.run(routes, location, (err, routeState) => { if (err) return console.error(err); function renderView() { // ... Rest of the old code goes here return HTML; } // Check this is rendering *something*, for safety if(routeState) fetchComponentData(store.dispatch, routeState.components, routeState.params) .then(renderView) .then(html => res.end(html)) .catch(err => res.end(err.message)); }); Be sure to delete the action creator from onComponentMount to avoid repeated calls, and restart
npm run dev to update the changes on the server.What have we learned?
That the world is beautiful!
Much more can be done and much has been done. In an application with a large number of routs, you probably want to use the React Router onLeave handler to load all the data needed by the component (like here ), and catch other actions with asynchronous API.
Despite all this, I hope you allowed yourself to enjoy the epic quest to a great functional future.
You can also see the final result on Github and read more about Redux here.
Source: https://habr.com/ru/post/264423/
All Articles