HTML page on Canvas
Canvas is an interesting and perspective HTML5 element. It is well suited as an auxiliary element on an HTML page, for example, for drawing some simple plot of a dynamic splash screen. However, the implementation of functionally complete integrated solutions with a focus on the Canvas task is not so simple.
Purpose of the article:
Strengths:
Weak sides:
The best way to figure it out is to make out a simple but illustrative example. The example was compiled as a partial generalization of knowledge that can be obtained in a disparate form by reading the materials on the links:
')
Canvas Reference
Canvas training
Canvas examples
Interesting article part 1
Interesting article part 2
Sample code on GitHab-e (just open the htm file in the browser from the disk)
Demo example (quickly see the result)
Development environment:
FF (Windows, Linux Mint) is used as the main browser.
To check the compatibility of CR and IE (Windows).
Next - available gadgets (about this at the end).
IDE under Widows - Visual Studio Community, Notepad. The studio is free, it formats the code well, accepts auto-additions acceptably and finds obvious errors (for example, the parenthesis is missing).
Linux IDE - gedit.
Architectural approach:
Frontend, static server.
Native API without external libraries. The absence of libraries is not an end in itself, just as long as you can do without them.
Code structure:
The code could be pushed into a single file (not so much code). But, to make it clearer, it is better to spread it by file:
HTML page: html_page_on_canvas.htm
Common code: html_page_on_canvas_main.js
Model management code: html_page_on_canvas_model.js
Canvas drawing control code: html_page_on_canvas_canva.js
Global variables:
Global variables are bad. Without a global scope, it is difficult to live. As a compromise, a global APELSERG object was created, in which all functions and global variables are stored:
MAIN: general functions
MODEL: model change functions
MODEL.DATA: model data
CANVA: model rendering functions
CONFIG: global variables
The basic structure of the operation is based on the classic MVC pattern:
The role of Model is performed by MODEL.DATA data.
The role of View is performed by CANVA functions.
The role of the Controller is performed by the MODEL function.
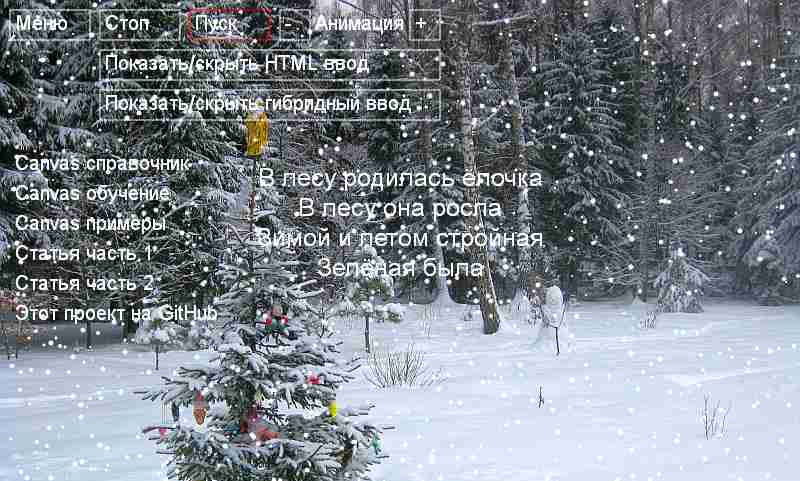
Let's start implementing the page objects. To whom both, and I always liked it when it is snowing on advertising banners. I wish the snow was all over the page. Now it can be implemented. In general, there is no magic in this - Canvas and is designed to implement this kind of tasks.
Each snowflake is an object:
Here it is important to consider that the possibility of dynamics is laid inside the object - changing the properties of X and Y.
To organize the snowfall, an array of snowflakes is created:
For clarity, the content will also be dynamic. To do this, each line will be stored as a separate object:
Here in the dynamics, in addition to movement, laid the possibility of changing the size of the font - the property FontHeight. Alternatively, you can store words and even letters separately. So you can simulate a variety of dynamic visual effects.
For content selected nursery rhymes on winter themes:
In fairness, I must say that storing content in a function is not good. This approach is used solely as an example. In the working environment, dynamic content can be loaded, for example, from a web service.
For animation in modern browsers there is a special function - window.requestAnimationFrame. This is a typical code for its activation:
From the example it can be seen that the requestAnimationFrame, in a functional basis, simply starts on a timeout 60 times per second. But it’s good because, unlike setTimeout, it is synchronized with browser redraw cycles and can adjust to the resources of the device on which it is running. Read more about requestAnimationFrame here .
Among the shortcomings, it should be noted that this is a resource-intensive task for the CPU, since the Canvas will be redrawn regardless of whether something has changed in the model or not. A large model is not always possible to recalculate and draw in the allotted period of time.
Using the CONFIG.SET.CntHandle variable, a simple mechanism is implemented to separate the processes of changing the model and drawing over different requestAnimationFrame cycles. The mechanism is not perfect, but easily controlled. The quality criterion is subjective visual perception: if it looks comfortable, then everything is fine. It remains to find the correct value for CONFIG.SET.CntHandle.
In the example, window.requestAnimationFrame is used without a compatibility wrapper. The result is a function to control all animation processes:
A few notes:
Criteria for animation of snow and content - simplicity and compactness of the code.
Snowflake animation (model change):
Content animation (model change):
After changing the model, it is drawn on the Canvas. The background can be any suitable photo. All the rendering is done by one simple function:
Functional buttons and links are also dynamic objects (similar to snow and content). But the dynamics of these objects is not movement, but a change in color when you hover or click on them.
Object describing the command:
Object describing the link:
Although the objects are similar in structure, for convenience, they are described as different entities.
When the mouse moves, its coordinates are stored in global variables:
When processing the model, the mouse coordinates are compared with the location of the reference object or command:
If the mouse cursor hits the object, then the SelectName property is set:
Similarly, a click is processed:
If the click is on an object, then the SelectCnt property is set:
SelectCnt sets the number of animation cycles during which the frame will be highlighted.
After it was determined on which element was pressed, execute the desired command or click on the link is no longer difficult.
It makes sense to briefly describe the implementation of the stop and resume animation cycle.
At the very beginning, the animation loop starts when the form loads (APELSERG.MAIN.Animation () in the function APELSERG.MAIN.OnLoad ()). To stop, you simply need to stop resuming the animation loop as requestedAnimationFrame. Stopping occurs when the APELSERG.CONFIG.PROC.Stop flag is set. It does not make sense to cancel cancelAnimationFrame, in a single cycle with requestAnimationFrame, since it cancels an already running cycle, which is meaningless (the new cycle starts anyway). In order to resume the animation loop, you need to reset the APELSERG.CONFIG.PROC.Stop flag and start APELSERG.MAIN.Animation (). This happens by double clicking the mouse or “F2” on the keyboard.
If you press "F1" in the animation mode, it will also stop, but using cancelAnimationFrame without setting the APELSERG.CONFIG.PROC.Stop flag. Resuming a double-click animation will not succeed, this will be prevented by the reset flag APELSERG.CONFIG.PROC.Stop. The animation resumption mechanism, for this case, is provided only by pressing "F2". The stop for “F1” was added specifically to demonstrate the mechanism of work cancelAnimationFrame:
With controls that are responsible for data entry, everything is not so clear. A simple element, for example, increasing / decreasing the value, can be implemented as described above (in the example, these are the "+" and "-" buttons).
But, if the question is about a full-fledged input element - a drop-down list or a data line entry, then the implementation of such a task within Canvas is much more complicated.
In this case, the so-called “hybrid” approach can help. That is, for data entry, in addition to Canvas, standard HTML DOM elements are used. Elements can be created statically and hidden under Canvas using absolute positioning and Z indexing. Or create dynamically at the time of entry. The example shows the dynamic creation of two input elements. One input element is located on top of the Canvas (the APELSERG.MAIN.ShowSettingsTextSpeed () function). The other is outside the Canvas (the APELSERG.MAIN.ShowSettingsThemeSelect () function). Functionally, both options work, but the element that is located on top of the Canvas has problems when scaling (Ctrl +, Ctrl-).
After the basic example (Snowfall) was developed, it seemed not very interesting. Therefore, the example is expanded by topics. For the background of the themes, photos of different sizes were specially selected to check and debug the dynamics of the Canvas.
The function is responsible for the dynamics:
The function works according to a simple algorithm - if the background photo is smaller than the window size (taking into account the scrolling elements), the Canvas is set to the size of the photo, otherwise the Canvas is set to the window size.
Canvas (like HTML5 in general) is a relatively new element and not all devices and browsers support it. And the HTML page should be displayed always, everywhere and so that it is convenient to work with it. Compatibility implies not only technological support for the next new feature. The decisive factors may be, for example, the size and / or resolution of the screen, the presence of controls (there is only a touchscreen), processor performance. Not until new technologies and beauty, when the basic functions can not be performed.
When designing an HTML page, mechanisms should be provided to ensure the necessary level of compatibility. This statement applies not only to HTML5 and Canvas.
The example shows the mechanism of another display of the model - in the form of a classic HTML page. Everything is done very simply, since this does not apply to the main topic of the article.
First, during the boot process, the key signs of compatibility are determined:
And, if the display of the Canvas is impossible or undesirable, a simple HTML page is formed with the function APELSERG.MODEL.ContentAsHtmlText ().
Canvas periodically "lag". Lags appear even at low load. Subjectively - the time and frequency of lags depend on the specific device, operating system and browser. The essence of the problem, apparently, lies in the single-threaded event loop and / or in the garbage collector.
Purpose of the article:
- Consider the implementation mechanism based on Canvas full HTML pages with support for dynamic content, links and controls.
- Understand whether it is possible to use this mechanism, and whether the game is worth the candle.
Strengths:
- Canvas is easily embedded in the HTML DOM, since it is a typical HTML element.
- Canvas is fast because it has a low-level API and supports the usual raster format.
Weak sides:
- Canvas does not support the HTML DOM inside itself, so you cannot simply put useful content, links and controls on the Canvas.
- Low-level API is too simple, and the use of JavaScript libraries leads to inevitable loss of performance, which ultimately limits the range of Canvas.
The best way to figure it out is to make out a simple but illustrative example. The example was compiled as a partial generalization of knowledge that can be obtained in a disparate form by reading the materials on the links:
')
Canvas Reference
Canvas training
Canvas examples
Interesting article part 1
Interesting article part 2
Sample code on GitHab-e (just open the htm file in the browser from the disk)
Demo example (quickly see the result)
Work environment
Development environment:
FF (Windows, Linux Mint) is used as the main browser.
To check the compatibility of CR and IE (Windows).
Next - available gadgets (about this at the end).
IDE under Widows - Visual Studio Community, Notepad. The studio is free, it formats the code well, accepts auto-additions acceptably and finds obvious errors (for example, the parenthesis is missing).
Linux IDE - gedit.
Architectural approach:
Frontend, static server.
Native API without external libraries. The absence of libraries is not an end in itself, just as long as you can do without them.
Code structure:
The code could be pushed into a single file (not so much code). But, to make it clearer, it is better to spread it by file:
HTML page: html_page_on_canvas.htm
Common code: html_page_on_canvas_main.js
Model management code: html_page_on_canvas_model.js
Canvas drawing control code: html_page_on_canvas_canva.js
Global variables:
Global variables are bad. Without a global scope, it is difficult to live. As a compromise, a global APELSERG object was created, in which all functions and global variables are stored:
MAIN: general functions
MODEL: model change functions
MODEL.DATA: model data
CANVA: model rendering functions
CONFIG: global variables
Model
The basic structure of the operation is based on the classic MVC pattern:
The role of Model is performed by MODEL.DATA data.
The role of View is performed by CANVA functions.
The role of the Controller is performed by the MODEL function.
Let's start implementing the page objects. To whom both, and I always liked it when it is snowing on advertising banners. I wish the snow was all over the page. Now it can be implemented. In general, there is no magic in this - Canvas and is designed to implement this kind of tasks.
Each snowflake is an object:
APELSERG.MODEL.Flake = function (flakeX, flakeY, flakeSize, flakeColor) { this.BaseX = flakeX; this.X = flakeX; this.Y = flakeY; this.Size = flakeSize; this.Color = flakeColor; } Here it is important to consider that the possibility of dynamics is laid inside the object - changing the properties of X and Y.
To organize the snowfall, an array of snowflakes is created:
APELSERG.MODEL.MakeFlakes = function (flakeNum) { var flakes = []; var color = "white"; for(var n = 0; n < flakeNum; n++) { var x = Math.round(Math.random() * APELSERG.CONFIG.SET.PicWidth); var y = Math.round(Math.random() * APELSERG.CONFIG.SET.PicHeight); var s = n % APELSERG.CONFIG.SET.FlakesSize; var flake = new APELSERG.MODEL.Flake(x, y, s, color); flakes.push(flake); } return flakes; } For clarity, the content will also be dynamic. To do this, each line will be stored as a separate object:
APELSERG.MODEL.ContentLine = function (text, textX, textY, textColor) { this.Text = text; this.X = textX; this.Y = textY; this.Color = textColor; this.FontHeight = 0; } Here in the dynamics, in addition to movement, laid the possibility of changing the size of the font - the property FontHeight. Alternatively, you can store words and even letters separately. So you can simulate a variety of dynamic visual effects.
For content selected nursery rhymes on winter themes:
ROOT.MODEL.MakeContent = function () { var color = "white"; var pointX = 0; var pointY = ROOT.CONFIG.PROC.CanvaID.height; // var addY = 30; // var Cnt = 0; // var content = []; content.push(new ROOT.MODEL.ContentLine(" ", pointX, pointY + addY * Cnt++, color)); content.push(new ROOT.MODEL.ContentLine(" ", pointX, pointY + addY * Cnt++, color)); content.push(new ROOT.MODEL.ContentLine(" ", pointX, pointY + addY * Cnt++, color)); content.push(new ROOT.MODEL.ContentLine(" ", pointX, pointY + addY * Cnt++, color)); return content; } In fairness, I must say that storing content in a function is not good. This approach is used solely as an example. In the working environment, dynamic content can be loaded, for example, from a web service.
Animation
For animation in modern browsers there is a special function - window.requestAnimationFrame. This is a typical code for its activation:
//-- window.MyRequestAnimationFrame = (function (callback) { return window.requestAnimationFrame || window.webkitRequestAnimationFrame || window.mozRequestAnimationFrame || window.oRequestAnimationFrame || window.msRequestAnimationFrame || function (callback) { window.setTimeout(callback, 1000 / 60); }; })(); //-- MyAnimation = function () { //-- //-- Canvas //-- window.MyRequestAnimationFrame(function () { MyAnimation(); }); } From the example it can be seen that the requestAnimationFrame, in a functional basis, simply starts on a timeout 60 times per second. But it’s good because, unlike setTimeout, it is synchronized with browser redraw cycles and can adjust to the resources of the device on which it is running. Read more about requestAnimationFrame here .
Among the shortcomings, it should be noted that this is a resource-intensive task for the CPU, since the Canvas will be redrawn regardless of whether something has changed in the model or not. A large model is not always possible to recalculate and draw in the allotted period of time.
Using the CONFIG.SET.CntHandle variable, a simple mechanism is implemented to separate the processes of changing the model and drawing over different requestAnimationFrame cycles. The mechanism is not perfect, but easily controlled. The quality criterion is subjective visual perception: if it looks comfortable, then everything is fine. It remains to find the correct value for CONFIG.SET.CntHandle.
In the example, window.requestAnimationFrame is used without a compatibility wrapper. The result is a function to control all animation processes:
APELSERG.MAIN.Animation = function () { (APELSERG.CONFIG.SET.CntHandle > APELSERG.CONFIG.PROC.CntHandle) ? (APELSERG.CONFIG.PROC.CntHandle++) : (APELSERG.CONFIG.PROC.CntHandle = 0); if (APELSERG.CONFIG.PROC.CntHandle == 0) APELSERG.CANVA.Rewrite(); if (APELSERG.CONFIG.PROC.CntHandle == 1) APELSERG.MODEL.UpdateContent(); if (APELSERG.CONFIG.PROC.CntHandle == 2) APELSERG.MODEL.UpdateFlakes(); window.requestAnimationFrame(function () { APELSERG.MAIN.Animation(); }); } A few notes:
- The criterion for the next drawing is always a change in the model. That is, if the model has not changed, then there is no need to redraw the Canvas. For example, it makes sense to animate a chess game only after the next move. If this is taken into account, then, in some cases, you can significantly unload the CPU.
- RequestAnimationFrame is designed so that it does not guarantee the time between calls, as it is intended, first of all, to ensure the visibility of the animation process. And for the model it is often the stability of time intervals that is important. The model change cycle can be implemented at setTimeout (not shown in the example).
Criteria for animation of snow and content - simplicity and compactness of the code.
Snowflake animation (model change):
APELSERG.MODEL.UpdateFlakes = function () { for (var n = 0 in APELSERG.MODEL.DATA.Flakes) { var flake = APELSERG.MODEL.DATA.Flakes[n]; var dir = 1; if (Math.round(Math.random() * 100) % 2 == 0) dir = -1; var shift = Math.round(Math.random() * 100) % 3; var move = Math.round(Math.random() * 100) % 2 + APELSERG.CONFIG.SET.FlakesMove; // if (((flake.X + shift * dir) < (flake.BaseX + 10)) && ((flake.X + shift * dir) > (flake.BaseX - 10))) { flake.X += shift * dir; } // flake.Size += dir; if (flake.Size > APELSERG.CONFIG.SET.FlakesSize) flake.Size = APELSERG.CONFIG.SET.FlakesSize; if (flake.Size < 0) flake.Size = 0; // flake.Y += move; if (flake.Y > APELSERG.CONFIG.SET.PicHeight) flake.Y = 1; } } Content animation (model change):
APELSERG.MODEL.UpdateContent = function () { for (var n = 0; APELSERG.MODEL.DATA.Content.length > n; n++) { var contentLine = APELSERG.MODEL.DATA.Content[n]; // contentLine.Y -= APELSERG.CONFIG.SET.ContentMove; // if (contentLine.Y > 150 && contentLine.Y < APELSERG.CONFIG.PROC.CanvaID.height - 50) { if (contentLine.FontHeight < APELSERG.CONFIG.SET.ContentFontSize) { contentLine.FontHeight++; } } else { if (contentLine.FontHeight > 0) contentLine.FontHeight--; } } } After changing the model, it is drawn on the Canvas. The background can be any suitable photo. All the rendering is done by one simple function:
APELSERG.CANVA.Rewrite = function () { var ctx = APELSERG.CONFIG.PROC.Ctx; // ctx.drawImage(APELSERG.CONFIG.PROC.Img, 0, 0); // for (var n = 0 in APELSERG.MODEL.DATA.Content) { var content = APELSERG.MODEL.DATA.Content[n]; if (content.X >= 0 && content.Y >= 0 && content.FontHeight > 0) { ctx.font = content.FontHeight.toString() + "px Arial"; ctx.textAlign = "center"; ctx.fillStyle = content.Color; ctx.fillText(content.Text, APELSERG.CONFIG.PROC.CanvaID.width / 2, content.Y); } } // ( ) for (var n = 0 in APELSERG.MODEL.DATA.Flakes) { var flake = APELSERG.MODEL.DATA.Flakes[n]; ctx.beginPath(); ctx.arc(flake.X, flake.Y, flake.Size / 2, 0, 2 * Math.PI); ctx.fillStyle = flake.Color; ctx.fill(); } } Adding functional buttons and links
Functional buttons and links are also dynamic objects (similar to snow and content). But the dynamics of these objects is not movement, but a change in color when you hover or click on them.
Object describing the command:
APELSERG.MODEL.Command = function (cmdCode, cmdName, cmdX, cmdY, lengthX, lengthY, cmdColor) { this.Code = cmdCode; this.Name = cmdName; this.X = cmdX; this.Y = cmdY; this.LengthX = lengthX; this.LengthY = lengthY; this.Color = cmdColor; this.SelectColor = 'red'; this.SelectCnt = 0; this.SelectName = false; this.ShowBorder = true; this.FontHeight = 20; } Object describing the link:
APELSERG.MODEL.Link = function (linkUrl, linkName, linkX, linkY, lengthX, lengthY, linkColor) { this.Url = linkUrl; this.Name = linkName; this.X = linkX; this.Y = linkY; this.LengthX = lengthX; this.LengthY = lengthY; this.Color = linkColor; this.SelectColor = 'lightblue'; this.SelectCnt = 0; this.SelectName = false; this.ShowBorder = false; this.FontHeight = 20; } Although the objects are similar in structure, for convenience, they are described as different entities.
When the mouse moves, its coordinates are stored in global variables:
APELSERG.CONFIG.PROC.CanvaID.addEventListener('mousemove', function (event) { APELSERG.CONFIG.PROC.MouseMoveX = event.clientX - APELSERG.CONFIG.PROC.CanvaID.offsetLeft - APELSERG.CONFIG.SET.PicBorder; APELSERG.CONFIG.PROC.MouseMoveY = event.clientY - APELSERG.CONFIG.PROC.CanvaID.offsetTop - APELSERG.CONFIG.SET.PicBorder; }); When processing the model, the mouse coordinates are compared with the location of the reference object or command:
APELSERG.MODEL.CheckMoveFrame = function (frame) { if ((APELSERG.CONFIG.PROC.MouseMoveX > frame.X) && (APELSERG.CONFIG.PROC.MouseMoveX < frame.X + frame.LengthX) && (APELSERG.CONFIG.PROC.MouseMoveY > frame.Y) && (APELSERG.CONFIG.PROC.MouseMoveY < frame.Y + frame.LengthY)) { return true; } return false; } If the mouse cursor hits the object, then the SelectName property is set:
command.SelectName = APELSERG.MODEL.CheckMoveFrame(command); Similarly, a click is processed:
APELSERG.CONFIG.PROC.CanvaID.addEventListener('click', function (event) { APELSERG.CONFIG.PROC.MouseClickX = event.clientX - APELSERG.CONFIG.PROC.CanvaID.offsetLeft - APELSERG.CONFIG.SET.PicBorder; APELSERG.CONFIG.PROC.MouseClickY = event.clientY - APELSERG.CONFIG.PROC.CanvaID.offsetTop - APELSERG.CONFIG.SET.PicBorder; }); APELSERG.MODEL.CheckClickFrame = function (frame) { if ((APELSERG.CONFIG.PROC.MouseClickX > frame.X) && (APELSERG.CONFIG.PROC.MouseClickX < frame.X + frame.LengthX) && (APELSERG.CONFIG.PROC.MouseClickY > frame.Y) && (APELSERG.CONFIG.PROC.MouseClickY < frame.Y + frame.LengthY)){ return true; } return false; } If the click is on an object, then the SelectCnt property is set:
if (APELSERG.MODEL.CheckClickFrame(command)) command.SelectCnt = APELSERG.CONFIG.SET.CntSelect; SelectCnt sets the number of animation cycles during which the frame will be highlighted.
After it was determined on which element was pressed, execute the desired command or click on the link is no longer difficult.
It makes sense to briefly describe the implementation of the stop and resume animation cycle.
At the very beginning, the animation loop starts when the form loads (APELSERG.MAIN.Animation () in the function APELSERG.MAIN.OnLoad ()). To stop, you simply need to stop resuming the animation loop as requestedAnimationFrame. Stopping occurs when the APELSERG.CONFIG.PROC.Stop flag is set. It does not make sense to cancel cancelAnimationFrame, in a single cycle with requestAnimationFrame, since it cancels an already running cycle, which is meaningless (the new cycle starts anyway). In order to resume the animation loop, you need to reset the APELSERG.CONFIG.PROC.Stop flag and start APELSERG.MAIN.Animation (). This happens by double clicking the mouse or “F2” on the keyboard.
If you press "F1" in the animation mode, it will also stop, but using cancelAnimationFrame without setting the APELSERG.CONFIG.PROC.Stop flag. Resuming a double-click animation will not succeed, this will be prevented by the reset flag APELSERG.CONFIG.PROC.Stop. The animation resumption mechanism, for this case, is provided only by pressing "F2". The stop for “F1” was added specifically to demonstrate the mechanism of work cancelAnimationFrame:
APELSERG.CONFIG.PROC.CanvaID.addEventListener('dblclick', function (event) { if (APELSERG.CONFIG.PROC.Stop) { APELSERG.CONFIG.PROC.Stop = false; APELSERG.CONFIG.PROC.ShowCommands = false; //-- APELSERG.MAIN.Animation(); } }); window.addEventListener('keydown', function (event) { if (event.keyCode == APELSERG.CONFIG.KEY.F1) { window.cancelAnimationFrame(APELSERG.CONFIG.PROC.TimeoutID); } if (event.keyCode == APELSERG.CONFIG.KEY.F2) { APELSERG.CONFIG.PROC.Stop = true; window.cancelAnimationFrame(APELSERG.CONFIG.PROC.TimeoutID); if(APELSERG.CONFIG.PROC.Stop) { APELSERG.CONFIG.PROC.Stop = false; APELSERG.CONFIG.PROC.ShowCommands = false; //-- APELSERG.MAIN.Animation(); } } }); Adding data entry controls
With controls that are responsible for data entry, everything is not so clear. A simple element, for example, increasing / decreasing the value, can be implemented as described above (in the example, these are the "+" and "-" buttons).
But, if the question is about a full-fledged input element - a drop-down list or a data line entry, then the implementation of such a task within Canvas is much more complicated.
In this case, the so-called “hybrid” approach can help. That is, for data entry, in addition to Canvas, standard HTML DOM elements are used. Elements can be created statically and hidden under Canvas using absolute positioning and Z indexing. Or create dynamically at the time of entry. The example shows the dynamic creation of two input elements. One input element is located on top of the Canvas (the APELSERG.MAIN.ShowSettingsTextSpeed () function). The other is outside the Canvas (the APELSERG.MAIN.ShowSettingsThemeSelect () function). Functionally, both options work, but the element that is located on top of the Canvas has problems when scaling (Ctrl +, Ctrl-).
Dynamic adaptability
After the basic example (Snowfall) was developed, it seemed not very interesting. Therefore, the example is expanded by topics. For the background of the themes, photos of different sizes were specially selected to check and debug the dynamics of the Canvas.
The function is responsible for the dynamics:
APELSERG.MAIN.CanvasSize = function () { if (APELSERG.CONFIG.SET.PicWidth < Math.round(window.innerWidth * 0.9) && APELSERG.CONFIG.PROC.CanvaID.width != APELSERG.CONFIG.SET.PicWidth) { APELSERG.CONFIG.PROC.CanvaID.width = APELSERG.CONFIG.SET.PicWidth; } else if (APELSERG.CONFIG.SET.PicWidth > Math.round(window.innerWidth * 0.9) && APELSERG.CONFIG.PROC.CanvaID.width != Math.round(window.innerWidth * 0.9)) { APELSERG.CONFIG.PROC.CanvaID.width = Math.round(window.innerWidth * 0.9); } if (APELSERG.CONFIG.SET.PicHeight < Math.round(window.innerHeight * 0.8) && APELSERG.CONFIG.PROC.CanvaID.height != APELSERG.CONFIG.SET.PicHeight) { APELSERG.CONFIG.PROC.CanvaID.height = APELSERG.CONFIG.SET.PicHeight; } else if (APELSERG.CONFIG.SET.PicHeight > Math.round(window.innerHeight * 0.8) && APELSERG.CONFIG.PROC.CanvaID.height != Math.round(window.innerHeight * 0.8)) { APELSERG.CONFIG.PROC.CanvaID.height = Math.round(window.innerHeight * 0.8) } } The function works according to a simple algorithm - if the background photo is smaller than the window size (taking into account the scrolling elements), the Canvas is set to the size of the photo, otherwise the Canvas is set to the window size.
Compatibility
Canvas (like HTML5 in general) is a relatively new element and not all devices and browsers support it. And the HTML page should be displayed always, everywhere and so that it is convenient to work with it. Compatibility implies not only technological support for the next new feature. The decisive factors may be, for example, the size and / or resolution of the screen, the presence of controls (there is only a touchscreen), processor performance. Not until new technologies and beauty, when the basic functions can not be performed.
When designing an HTML page, mechanisms should be provided to ensure the necessary level of compatibility. This statement applies not only to HTML5 and Canvas.
The example shows the mechanism of another display of the model - in the form of a classic HTML page. Everything is done very simply, since this does not apply to the main topic of the article.
First, during the boot process, the key signs of compatibility are determined:
APELSERG.MAIN.CheckCompatible = function () { if (!window.requestAnimationFrame || screen.width < 1000) { APELSERG.CONFIG.SET.CompatibleType = 1; } } And, if the display of the Canvas is impossible or undesirable, a simple HTML page is formed with the function APELSERG.MODEL.ContentAsHtmlText ().
Canvas problems
Canvas periodically "lag". Lags appear even at low load. Subjectively - the time and frequency of lags depend on the specific device, operating system and browser. The essence of the problem, apparently, lies in the single-threaded event loop and / or in the garbage collector.
Source: https://habr.com/ru/post/258331/
All Articles