The controller for an aquarium without Arduino
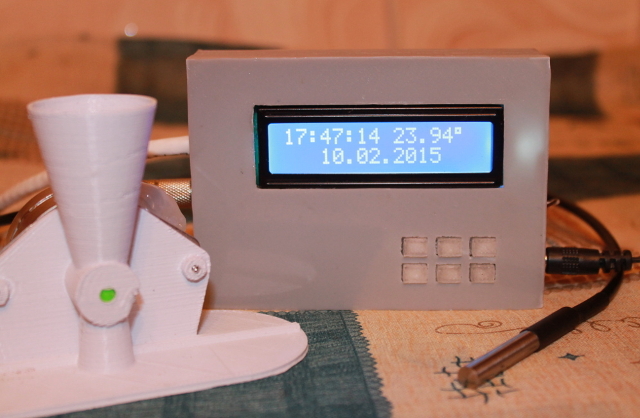
My father asked me to make an automatic aquarium feeder. He didn’t want to go home every day in summer in order to feed the fish. At first I went with him to Chinese shops, there you can buy such a thing for $ 10, but he didn’t choose anything and had to do the feeding itself.
It was assumed that the fish need to be fed twice a day - at 7 and 16 hours. Once you need to know the time, you need to make a clock, in the end I applied the RTC DS1302 module. Food needs to somehow pour in certain doses, then I chose a unipolar stepping motor and Darlington assembly ULN2003 to twist it. To control had to connect the display and keyboard. Later, I wanted to implement a thermostat, for which the DS18B20 sensor was purchased. To save pins, I slapped another shift register 74HC595N through which I connected the LCD display.
I was a little misleading, having used the words “without arduino” in the title of the topic, in fact, I collected a mock-up on it.
')

Thus, I tested the basic functionality of the program.
listing
#include <Stepper.h>
#include <EEPROM.h>
#include <MenuSystem.h>
#include <LiquidCrystal595.h>
#include <DS1302.h>
#include <OneWire.h>
#define SECS_PER_MIN (60UL)
#define SECS_PER_HOUR (3600UL)
#define SECS_PER_DAY (SECS_PER_HOUR * 24UL)
#define DAYS_PER_WEEK (7UL)
#define SECS_PER_WEEK (SECS_PER_DAY * DAYS_PER_WEEK)
#define SECS_PER_YEAR (SECS_PER_WEEK * 52UL)
#define SECS_YR_2000 (946684800UL) // the time at the start of y2k
#define LEAP_YEAR (Y) (((1970 + Y)> 0) &&! ((1970 + Y)% 4) && (((1970 + Y)% 100) ||! ((1970 + Y)% 400) ))
static const uint8_t monthDays [] = {31,28,31,30,31,30,31,31,30,31,30,31}; // API starts
// Initialization of clock pins
DS1302 rtc (2, 3, 4);
//temperature sensor
OneWire ds (5);
// Initialize screen pins
LiquidCrystal595 lcd (6,7,8);
// pins of a stepper motor
const int Step1Pin = 9;
const int Step2Pin = 10;
const int Step3Pin = 11;
const int Step4Pin = 12;
Stepper motor (100, Step1Pin, Step2Pin, Step3Pin, Step4Pin);
int key = 0;
int show_time = 1;
int CurS = 0; // current tunable parameter (hour / min / sec)
long timestamp;
long timestamp_eeprom;
char k;
int ArrT [3]; // time
int ArrD [3]; // date
Time t;
int counter1 = 100;
int counter2 = 1;
int counter3 = 300;
int counter4 = 30; // backlight off counter
int temp1 = 0;
int ttemp = 0;
byte thermostat = 0;
byte i;
byte data [12];
byte present = 0;
float celsius = 0;
// menu
MenuSystem ms;
Menu mm ("------ Menu ------");
MenuItem mm_mi1 ("Feed Now");
MenuItem mm_mi2 ("Time Setup");
MenuItem mm_mi3 ("Date Setup");
MenuItem mm_mi4 ("Thermostat Setup");
void setup ()
{
// buttons
pinMode (A0, INPUT);
// step
pinMode (Step1Pin, OUTPUT);
pinMode (Step2Pin, OUTPUT);
pinMode (Step3Pin, OUTPUT);
pinMode (Step4Pin, OUTPUT);
motor.setSpeed (40);
// Run the clock
rtc.halt (false);
rtc.writeProtect (false);
// read the temperature settings from the EEPROM
int TEMP_EEPROM = 0;
TEMP_EEPROM = EEPROM_int_read (4);
if ((TEMP_EEPROM> = 0) && (TEMP_EEPROM <= 100)) {
temp1 = TEMP_EEPROM;
}
// Launch the screen with the number of characters and lines
lcd.setLED2Pin (HIGH);
lcd.begin (16, 2);
lcd.clear ();
mm.add_item (& mm_mi1, & feed_now_selected);
mm.add_item (& mm_mi2, & time_setup_selected);
mm.add_item (& mm_mi3, & date_setup_selected);
mm.add_item (& mm_mi4, & thermostat_setup_selected);
// mm.add_menu (& mu1);
// mu1.add_item (& mu1_mi1, & on_item3_selected);
ms.set_root_menu (& mm);
}
void loop () {
// read the temperature
byte addr [8];
if (ds.search (addr)) {
ds.reset ();
ds.select (addr);
ds.write (0x44, 1); // start conversion, with parasite power on at the end
delay (1); // 1000
present = ds.reset ();
ds.select (addr);
ds.write (0xBE); // Read Scratchpad
for (i = 0; i <9; i ++) {// we need 9 bytes
data [i] = ds.read ();
}
int16_t raw = (data [1] << 8) | data [0];
byte cfg = (data [4] & 0x60);
// at the lower bits
if (cfg == 0x00) raw = raw & ~ 7; // 9 bit resolution, 93.75 ms
else if (cfg == 0x20) raw = raw & ~ 3; // 10 bit res, 187.5 ms
else if (cfg == 0x40) raw = raw & ~ 1; // 11 bit res, 375 ms
// default is 12 bit resolution, 750 ms conversion time
celsius = (float) raw / 16.0;
}
if (show_time == 1) {
//lcd.clear ();
counter2--;
if (counter2 == 0) {
if (counter4> 0) {
counter4--;
lcd.setLED2Pin (HIGH);
} else {
lcd.setLED2Pin (LOW);
}
counter2 = 10;
lcd.setCursor (0, 0); // Set the cursor to print the time in the top row
lcd.print (rtc.getTimeStr ()); // Print time
lcd.setCursor (9.0);
lcd.print (celsius);
lcd.print ((char) 223); // celsius simvol
// lcd.print ("C");
lcd.setCursor (3, 1);
// timestamp = getEpochTime (rtc.getTime ());
//lcd.print (timestamp);
lcd.print (rtc.getDateStr ()); // Print the date
}
}
// check once per ... seconds
counter1--;
if (counter1 == 0) {
counter1 = 100;
// thermostat
if (temp1> 0 && celsius> 0) {// if the settings are not 0 and the sensor outputs more than 0
if (thermostat == 0) {
if (celsius <temp1-1) {
thermostat = 1;
lcd.setLED1Pin (LOW); // on
}
} else {
if (celsius> temp1 + 1) {
thermostat = 0;
lcd.setLED1Pin (HIGH); // off
}
}
}
// feeder
t = rtc.getTime ();
int H = t.hour;
if ((H == 0) || (H == 8) || (H == 16)) {
timestamp_eeprom = EEPROMReadlong (0);
timestamp = getEpochTime (t);
if (timestamp_eeprom + 3600 <timestamp) {
lcd.clear ();
lcd.setCursor (4,0);
lcd.print ("Feed Now!");
EEPROMWritelong (0, timestamp);
motor.step (100);
motor_stop ();
lcd.clear ();
}
}
}
if (keyboard ()! = 0) {
show_time = 0;
}
menu ();
delay (100); // Pause and everything is new!
}
void motor_stop () {
digitalWrite (Step1Pin, 0);
digitalWrite (Step2Pin, 0);
digitalWrite (Step3Pin, 0);
digitalWrite (Step4Pin, 0);
}
// display menu function
void displayMenu () {
lcd.clear ();
lcd.setCursor (0,0);
// Display the menu
Menu const * cp_menu = ms.get_current_menu ();
//lcd.print(Current menu name: „);
lcd.print (cp_menu-> get_name ());
lcd.setCursor (0,1);
lcd.print (cp_menu-> get_selected () -> get_name ());
delay (100);
}
char keyboard () {
key = analogRead (0);
// debug
//lcd.setCursor (10, 1);
//lcd.print (key);
// Esc / Cancel
if ((key> 350) && (key <360)) {
return 'c';
}
// up
if ((key> 210) && (key <230)) {
return 'u';
}
// right
if ((key> 560) && (key <590)) {
return 'r';
}
// down
if ((key> 510) && (key <540)) {
return 'd';
}
// left
if ((key> 440) && (key <470)) {
return 'l';
}
// Enter
if (key <20) {
return 'e';
}
return 0;
}
void menu () {
k = keyboard ();
if (k == 0) {
counter3--;
if (counter3 == 0) {
counter3 = 300;
k = 'c';
}
} else {
lcd.setLED2Pin (HIGH);
counter4 = 30;
}
switch (k) {
case 'c':
ms.back ();
lcd.clear ();
show_time = 1;
break;
case 'u':
ms.prev ();
displayMenu ();
break;
case 'd':
ms.next ();
displayMenu ();
break;
case 'e':
ms.select ();
displayMenu ();
break;
}
}
// feed now
void feed_now_selected (MenuItem * p_menu_item)
{
lcd.clear ();
lcd.setCursor (4,0);
lcd.print (“Feed Now!”);
motor.step (100);
motor_stop ();
lcd.clear ();
}
void thermostat_setup_selected (MenuItem * p_menu_item)
{
lcd.clear ();
lcd.setCursor (0,0);
lcd.print ("Temperature:");
ttemp = temp1;
delay (300);
while (k! = 'c') {
delay (1);
k = keyboard ();
if (k == 'e') {
temp1 = ttemp;
EEPROM_int_write (4, temp1);
k = 'c'; //output
}
if (k == 'u') {incrTemp ();}
if (k == 'd') {decrTemp ();}
lcd.setCursor (0,1);
lcd.print (ttemp);
lcd.print ("");
}
}
// function increases temp1
void incrTemp () {
if (ttemp <30) {
ttemp ++;
}
delay (200);
}
void decrTemp () {
if (ttemp> 0) {
ttemp--;
}
delay (200);
}
// Date setup
void date_setup_selected (MenuItem * p_menu_item)
{
lcd.clear ();
lcd.setCursor (0,0);
lcd.print ("Date setup");
delay (300);
int Flash = 0; // or draw numbers or spaces, blinking the selected item
int FC = 0; // counter for flash
t = rtc.getTime ();
ArrD [0] = t.date;
ArrD [1] = t.mon;
ArrD [2] = t.year;
while (k! = 'c') {
delay (1);
k = keyboard ();
// flash
FC ++;
if (fc == 30) {
if (Flash == 0) {
Flash = 1;
} else {
Flash = 0;
}
FC = 0;
}
if (k! = 0) {
Flash = 1;
}
// end flash
lcd.setCursor (0,1);
flashPrintDate (Flash, 0);
lcd.print ('.');
flashPrintDate (Flash, 1);
lcd.print ('.');
flashPrintDate (Flash, 2);
if (k == 'u') {incrD ();}
if (k == 'd') {decrD ();}
if (k == 'r') {
if (CurS <2) {
CurS ++;
} else {
CurS = 0;
}
delay (300);
}
if (k == 'l') {
if (CurS> 0) {
CurS--;
} else {
CurS = 2;
}
delay (300);
}
if (k == 'e') {
rtc.setDate (ArrD [0], ArrD [1], ArrD [2]); // Date.
k = 'c'; //output
}
}
}
// Time setup
void time_setup_selected (MenuItem * p_menu_item)
{
lcd.clear ();
lcd.setCursor (0,0);
lcd.print ("Time setup");
delay (300);
int Flash = 0; // or draw numbers or spaces, blinking the selected item
int FC = 0; // counter for flash
t = rtc.getTime ();
ArrT [0] = t.hour;
ArrT [1] = t.min;
ArrT [2] = t.sec;
while (k! = 'c') {
delay (1);
k = keyboard ();
// flash
FC ++;
if (fc == 30) {
if (Flash == 0) {
Flash = 1;
} else {
Flash = 0;
}
FC = 0;
}
if (k! = 0) {
Flash = 1;
}
// end flash
lcd.setCursor (0,1);
flashPrint (Flash, 0);
lcd.print (':');
flashPrint (Flash, 1);
lcd.print (':');
flashPrint (Flash, 2);
// change the value
if (k == 'u') {incr ();}
if (k == 'd') {decr ();}
if (k == 'r') {
if (CurS <2) {
CurS ++;
} else {
CurS = 0;
}
delay (300);
}
if (k == 'l') {
if (CurS> 0) {
CurS--;
} else {
CurS = 2;
}
delay (300);
}
if (k == 'e') {
rtc.setTime (ArrT [0], ArrT [1], ArrT [2]); // Hours, minutes, seconds 24-hour format.
k = 'c'; //output
}
}
}
// function displays hh or mm or cc
void flashPrint (int Flash, int CT) {
if ((CurS == CT) && (Flash == 0)) {
lcd.print ("");
} else {
if (ArrT [CT] <10) {
lcd.print ('0');
}
lcd.print (ArrT [CT]);
}
}
// function displays day, month or year
void flashPrintDate (int Flash, int CT) {
if ((CurS == CT) && (Flash == 0)) {
if (CurS == 2) {
lcd.print ("");
} else {
lcd.print ("");
}
} else {
if (ArrD [CT] <10) {
lcd.print ('0');
}
lcd.print (ArrD [CT]);
}
}
// function increments selected item by 1
void incr () {
int limit = 59;
if (CurS == 0) {
limit = 23;
}
if (ArrT [CurS] <limit) {
ArrT [CurS] ++;
} else {
ArrT [CurS] = 0;
}
delay (200);
}
// function reduces the selected item by 1 for the date
void decr () {
int limit = 59;
if (CurS == 0) {
limit = 23;
}
if (ArrT [CurS]> 0) {
ArrT [CurS] -;
} else {
ArrT [CurS] = limit;
}
delay (200);
}
// function increments selected item by 1 for date
void incrD () {
int limit = 31;
if (CurS == 1) {
limit = 12;
}
if (CurS == 2) {
limit = 5079;
}
if (ArrD [CurS] <limit) {
ArrD [CurS] ++;
} else {
ArrD [CurS] = 1;
}
delay (200);
}
// function reduces the selected item by 1 for the date
void decrD () {
int limit = 31;
if (CurS == 1) {
limit = 12;
}
if (CurS == 2) {
limit = 5079;
}
if (ArrD [CurS]> 1) {
ArrD [CurS] -;
} else {
ArrD [CurS] = limit;
}
delay (200);
}
// timestamp
uint32_t getEpochTime (Time tm) {
int i;
uint32_t seconds;
int year = tm.year - 1970;
// seconds from 1970 till 1 jan 00:00:00 of the given year
seconds = year * (SECS_PER_DAY * 365);
for (i = 0; i <year; i ++) {
if (LEAP_YEAR (i)) {
seconds + = SECS_PER_DAY; // add extra days for leap years
}
}
// add days for this year, months start from 1
for (i = 1; i <tm.mon; i ++) {
if ((i == 2) && LEAP_YEAR (year)) {
seconds + = SECS_PER_DAY * 29;
} else {
seconds + = SECS_PER_DAY * monthDays [i-1]; // monthDay array starts from 0
}
}
seconds + = (tm.date-1) * SECS_PER_DAY;
seconds + = tm.hour * SECS_PER_HOUR;
seconds + = tm.min * SECS_PER_MIN;
seconds + = tm.sec;
return seconds;
}
// eeprom int
void EEPROM_int_write (int p_address, int p_value)
{
byte lowByte = ((p_value >> 0) & 0xFF);
byte highByte = ((p_value >> 8) & 0xFF);
EEPROM.write (p_address, lowByte);
EEPROM.write (p_address + 1, highByte);
}
unsigned int EEPROM_int_read (int p_address)
{
byte lowByte = EEPROM.read (p_address);
byte highByte = EEPROM.read (p_address + 1);
return ((lowByte << 0) & 0xFF) + ((highByte << 8) & 0xFF00);
}
// eeprom long int
void EEPROMWritelong (int address, long value)
{
// Decomposition from a long to 4 bytes by using bitshift.
// One = Most significant -> Four = Least significant byte
byte four = (value & 0xFF);
byte three = ((value >> 8) & 0xFF);
byte two = ((value >> 16) & 0xFF);
byte one = ((value >> 24) & 0xFF);
// Write the 4 bytes into the eeprom memory.
EEPROM.write (address, four);
EEPROM.write (address + 1, three);
EEPROM.write (address + 2, two);
EEPROM.write (address + 3, one);
}
long EEPROMReadlong (long address)
{
// Read the 4 bytes from the eeprom memory.
long four = EEPROM.read (address);
long three = EEPROM.read (address + 1);
long two = EEPROM.read (address + 2);
long one = EEPROM.read (address + 3);
// Return the recomposed long by using bitshift.
return ((four << 0) & 0xFF) + ((three << 8) & 0xFFFF) + ((two << 16) & 0xFFFFFF) + ((one << 24) & 0xFFFFFFFF);
}
I am not a programmer, so don’t blame the program very much, I know myself that there is a jamb on the joint.
But Arduino UNO itself is a big fee, besides its a pity. It was decided to make a feeder on a clean Atmega328. As a result, I developed a board in Sprint-Layout:
In this version of the board, the DS1302 watch is already divorced right on the board, as well as minor errors have been fixed.
Printed circuit board manufactured by LUT method and tinned with Rose alloy
The keyboard board was also made, it can be seen on the photo of the layout.
The keyboard board was also made, it can be seen on the photo of the layout.
Then he soldered all the details:

I have no interface for programming, so I upload all changes to the Arduino, and then simply rearrange the controller in the socket on the board.
The body painted in OpenSCAD and printed on a 3D printer

On the housing cover there are two ears, in case someone wants to fix it directly on the glass of the aquarium.


On the housing cover there are two ears, in case someone wants to fix it directly on the glass of the aquarium.
I also painted and printed out the hull for the trough itself.
Inside this thing should spin such a cylinder with slots:

Inside this thing should spin such a cylinder with slots:
Keyboard and watch module fixed with hot melt:

And he collected everything to the heap:

Here you can see the result of the work:
I tried, everything works. I gave the device to my father for testing. Surely there will be shortcomings when we test - accomplish your goal.
about results and corrections.
After everything was done, I drew a diagram:
Do not kick the very first time using the Eagle
R1, R2 - 10 kOhm, R3 - 3 kOhm, resistors on the buttons of 2.2 kOhm, C1, C2 - 20 pF, the electrolyte C3 is 5 μF, the electrolyte also costs about 1000 microfarads. Quartz for the microcontroller 16 MHz, any npn transistor.
According to the results, you can estimate the estimate:
1. Atmega328 microcontroller - $ 1.8;
2. 16x2 LCD screen - $ 2.3;
3. Thermal sensor DS18B20 - $ 3;
4. The RTC DS1302 clock module is $ 3.5;
5. ABS plastic for 3d printing 84g. - $ 2.5
6. Stepper motor, quartz, resistors, Conder, textolite, etc. - $ 1, as if such a good enough.
Total: ~ $ 14 .
What I would like to do in the future
1. Russify the interface. To do this, you need to deal with the LiquidCrystal595Rus.h library;
2. Make a setting for adjusting the dose of feed;
3. Make the setting for selecting the feeding time;
4. You can control the light and the compressor, for this there are free pins and legs ULN2003;
5. If the motor is switched to analog pins, then there will be a place to connect the Wi-Fi module, thus it can be linked to OpenHAB to see temperature graphs and always know if the device is working, even when abroad.
In conclusion, I want to add that all the source code is uploaded to github .
There are also boards in layout, and openscad, stl, source program files.
That's all, thank you for your attention.
Source: https://habr.com/ru/post/250417/
All Articles