Creating and configuring a WCF service in a Silverlight 4 application
In this article we will learn:
We will study with an example: “Drawing and sending greeting cards to a friend”
Pictures
To work with Silverlight 4 in Visual Studio 2010, you need to download and install Silverlight 4 Tools . Expression Blend 4 can immediately work with Silverlight 4, and it also has all sorts of interesting examples. After installing Silverlight 4 Tools in VS2010, it will be possible to open SL4 projects and it will be possible to create and edit SL4 applications in the designer.
When you create an application that works with data, it is important to begin by creating the data model with which the application is going to work. We will use InkPresenter as a panel for drawing postcards.
We will create a business object that will be used by Silverlight as part of our application and in ASP.NET. Finally, we will create a business object in the ASP.NET part that will define the data contract and provide it to the WCF service.
')
Open a studio and create a Silverlight Application project.
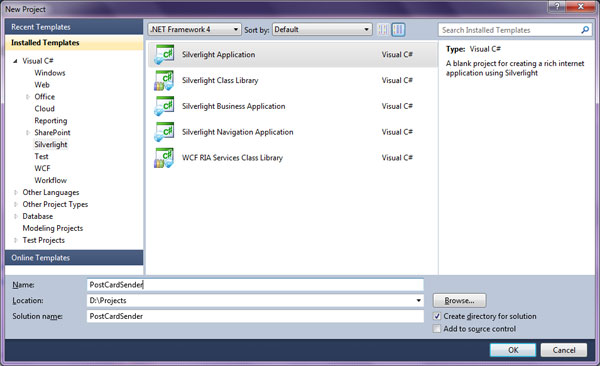
The project creation wizard will offer us to create a site for hosting the Silverlight application.

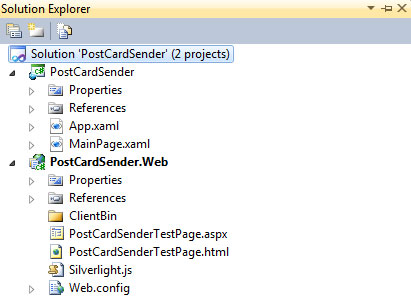
We agree. And in the end it turns out such a project:
The [DataContract] and [DataMember] attributes will be used by WCF for serialization and data transfer. Without these attributes there will be no WCF. In order to access them, we add a link to the System.Runtime.Serialization assembly in an ASP.NET project. By default, the System.Runtime.Serialization.DataContractSerializer will be used to serialize the data contract classes to XML. In .NET, there are classes for serializing data to JSON.
Create a PostCard class for WCF service:
Windows Communication Foundation provides an easy way to create applications that use the “service oriented programming model.”
Service-oriented applications represent a scalable and extensible software model that allows applications to provide limited and controlled functionality to various clients, such as web sites, industrial applications, Silverlight applications, etc.
When a WCF service is created, the interface is usually defined and the attributes describing the operation of the service are defined. Using the interface allows you to separate the implementation and contract. This is a common practice of creating WCF services.
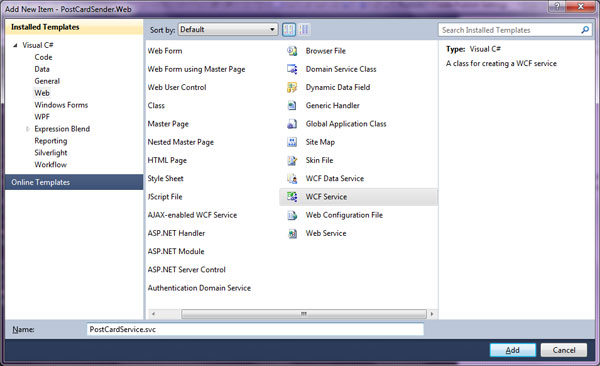
Create WCF service PostCardService
We define the interface of our service. To begin with, it will contain only one void method SendPostCard (PostCard card).
PostCardService.svc.cs will contain the interface implementation. We will not pull with it, and immediately write a small piece of code.
Having completed the creation of the service, we look at what the service itself is responsible for (the PCM on the View in Browser service)

In the Silverlight project, add a link to the service (Add Service Reference ...)
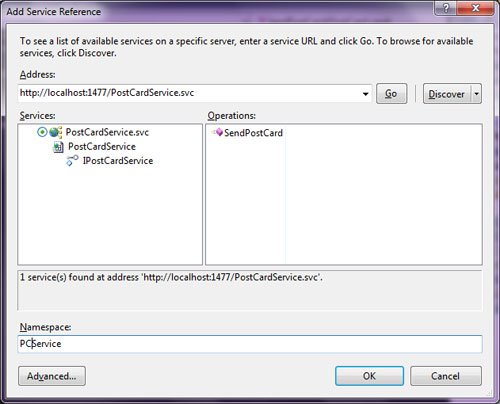
First, click Discover - the wizard searches for services in the solution. VS will find the PostCardService service. Change namespace name and add link. VS has added new links and files and created a ServiceReferences.ClientConfig , which contains the service binding settings.
In this example there will be a very simple drawing artist. We will use the Grid as the main panel.
Here is a block for drawing and sending greeting cards turned out. You can change styles and make it beautiful, but this is beyond the scope of this article. By creating event handlers and writing their implementation, you can run the project and see what happened there.
By clicking the "Send" button and received a positive message, we look at what has been saved on the server. And there all our data is in xml format.

Now you can safely create WCF services using Silverlight and embed them into your sites and corporate business applications. Silverlight is a great helper for creating large corporate portals.
- Create WCF service and business objects for data processing
- Create a form on Silverlight 4 to send data.
We will study with an example: “Drawing and sending greeting cards to a friend”
Pictures
Training
To work with Silverlight 4 in Visual Studio 2010, you need to download and install Silverlight 4 Tools . Expression Blend 4 can immediately work with Silverlight 4, and it also has all sorts of interesting examples. After installing Silverlight 4 Tools in VS2010, it will be possible to open SL4 projects and it will be possible to create and edit SL4 applications in the designer.
When you create an application that works with data, it is important to begin by creating the data model with which the application is going to work. We will use InkPresenter as a panel for drawing postcards.
Creating a project
We will create a business object that will be used by Silverlight as part of our application and in ASP.NET. Finally, we will create a business object in the ASP.NET part that will define the data contract and provide it to the WCF service.
')
Open a studio and create a Silverlight Application project.
The project creation wizard will offer us to create a site for hosting the Silverlight application.
We agree. And in the end it turns out such a project:
Creating a data model
The [DataContract] and [DataMember] attributes will be used by WCF for serialization and data transfer. Without these attributes there will be no WCF. In order to access them, we add a link to the System.Runtime.Serialization assembly in an ASP.NET project. By default, the System.Runtime.Serialization.DataContractSerializer will be used to serialize the data contract classes to XML. In .NET, there are classes for serializing data to JSON.
Create a PostCard class for WCF service:
using System.Runtime.Serialization;

namespace PostCardSender.Web
{
/// <summary>
///
/// </summary>
[DataContract]
public class PostCard
{
/// <summary>
///
/// </summary>
[DataMember]
public string Name { get ; set ; }

/// <summary>
/// Email
/// </summary>
[DataMember]
public string Email { get ; set ; }

/// <summary>
///
/// </summary>
[DataMember]
public CardStroke[] Strokes { get ; set ; }
}

/// <summary>
/// ()
/// </summary>
[DataContract]
public class CardStroke
{
/// <summary>
///
/// </summary>
[DataMember]
public double Width { get ; set ; }

/// <summary>
///
/// </summary>
[DataMember]
public double Height { get ; set ; }

/// <summary>
///
/// </summary>
[DataMember]
public StrokePoint[] Points { get ; set ; }
}

/// <summary>
///
/// </summary>
[DataContract]
public class StrokePoint
{
/// <summary>
/// X
/// </summary>
[DataMember]
public double X { get ; set ; }

/// <summary>
/// Y
/// </summary>
[DataMember]
public double Y { get ; set ; }
}
}

* This source code was highlighted with Source Code Highlighter .
Creation of WCF service
Windows Communication Foundation provides an easy way to create applications that use the “service oriented programming model.”
Service-oriented applications represent a scalable and extensible software model that allows applications to provide limited and controlled functionality to various clients, such as web sites, industrial applications, Silverlight applications, etc.
When a WCF service is created, the interface is usually defined and the attributes describing the operation of the service are defined. Using the interface allows you to separate the implementation and contract. This is a common practice of creating WCF services.
Create WCF service PostCardService
We define the interface of our service. To begin with, it will contain only one void method SendPostCard (PostCard card).
using System.ServiceModel;

namespace PostCardSender.Web
{
// NOTE: You can use the "Rename" command on the "Refactor" menu to change the interface name "IPostCardService" in both code and config file together.
[ServiceContract]
public interface IPostCardService
{
/// <summary>
///
/// </summary>
[OperationContract]
void SendPostCard(PostCard card);
}
}

* This source code was highlighted with Source Code Highlighter .
PostCardService.svc.cs will contain the interface implementation. We will not pull with it, and immediately write a small piece of code.
using System.Xml;

namespace PostCardSender.Web
{
// NOTE: You can use the "Rename" command on the "Refactor" menu to change the class name "PostCardService" in code, svc and config file together.
public class PostCardService : IPostCardService
{
#region IPostCardService Members

public void SendPostCard(PostCard card)
{
if (card == null )
return ;

/// , xml .
string fileName = @"D:\Projects\PostCardSender\PostCardSender.Web\App_Data\{0}.xml" ;

XmlWriter writer = XmlWriter.Create( string .Format(fileName, card.Name));
writer.WriteStartDocument();

writer.WriteStartElement( "user" );
writer.WriteAttributeString( "name" , card.Name);
writer.WriteAttributeString( "email" , card.Email);

writer.WriteStartElement( "strokes" );
if (card.Strokes != null && card.Strokes.Length > 0)
{
foreach (CardStroke stroke in card.Strokes)
{
writer.WriteStartElement( "stroke" );

writer.WriteAttributeString( "width" , stroke.Width.ToString());
writer.WriteAttributeString( "height" , stroke.Height.ToString());

if (stroke.Points != null && stroke.Points.Length > 0)
{
writer.WriteStartElement( "points" );
foreach (StrokePoint point in stroke.Points)
{
writer.WriteStartElement( "point" );
writer.WriteAttributeString( "x" , point.X.ToString());
writer.WriteAttributeString( "y" , point.Y.ToString());
writer.WriteEndElement();
}
writer.WriteEndElement();
}

//stroke
writer.WriteEndElement();
}
}
//end strokes
writer.WriteEndElement();

//end user
writer.WriteEndElement();

writer.WriteEndDocument();
writer.Flush();
writer.Close();
}

#endregion
}
}

* This source code was highlighted with Source Code Highlighter .
Having completed the creation of the service, we look at what the service itself is responsible for (the PCM on the View in Browser service)
Silverlight
In the Silverlight project, add a link to the service (Add Service Reference ...)
First, click Discover - the wizard searches for services in the solution. VS will find the PostCardService service. Change namespace name and add link. VS has added new links and files and created a ServiceReferences.ClientConfig , which contains the service binding settings.
Creating a postcard drawing panel
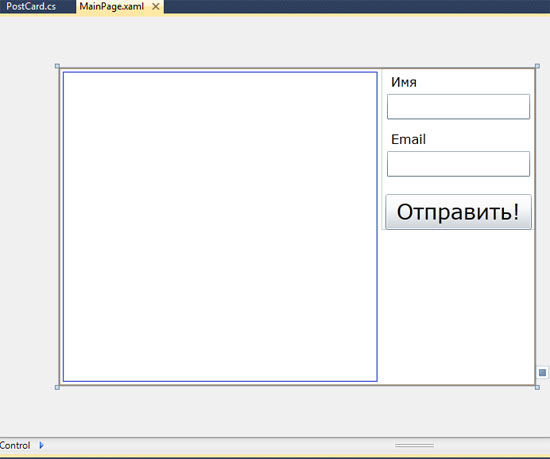
In this example there will be a very simple drawing artist. We will use the Grid as the main panel.
< UserControl x:Class ="PostCardSender.MainPage" xmlns ="http://schemas.microsoft.com/winfx/2006/xaml/presentation" xmlns:x ="http://schemas.microsoft.com/winfx/2006/xaml" xmlns:d ="http://schemas.microsoft.com/expression/blend/2008" xmlns:mc ="http://schemas.openxmlformats.org/markup-compatibility/2006" mc:Ignorable ="d" d:DesignHeight ="300" d:DesignWidth ="400" Width ="600" Height ="400" BorderBrush ="#FF700404" BorderThickness ="1" >
< Grid x:Name ="LayoutRoot" Background ="White" >
< Grid.ColumnDefinitions >
< ColumnDefinition />
< ColumnDefinition Width ="Auto" />
</ Grid.ColumnDefinitions >
< StackPanel VerticalAlignment ="Top" Grid . Column ="1" >
< TextBlock Text ="" Margin ="12,7,7,2" FontSize ="16" />
< TextBox x:Name ="textBoxName" TextWrapping ="Wrap" Width ="180" Margin ="7,0,7,7" FontSize ="16" Foreground ="#FF700404" FontWeight ="Bold" />
< TextBlock TextWrapping ="Wrap" Text ="Email" d:LayoutOverrides ="Width" Margin ="12,7,7,2" FontSize ="16" />
< TextBox x:Name ="textBoxEmail" TextWrapping ="Wrap" Width ="180" Margin ="7,0,7,7" FontSize ="16" Foreground ="#FF700404" FontWeight ="Bold" />
< Button x:Name ="buttonSend" Content ="!" Margin ="5,15,5,0" FontSize ="26.667" Click ="ButtonSendClick" />
</ StackPanel >
< Border BorderBrush ="#FF0010FF" BorderThickness ="1" Margin ="5" >
< InkPresenter x:Name ="inkPostCard" MouseLeftButtonDown ="InkPostCardMouseLeftButtonDown" MouseLeftButtonUp ="InkPostCardMouseLeftButtonUp" MouseMove ="InkPostCardMouseMove" Background ="#FFCEF9FF" />
</ Border >
</ Grid >
</ UserControl >
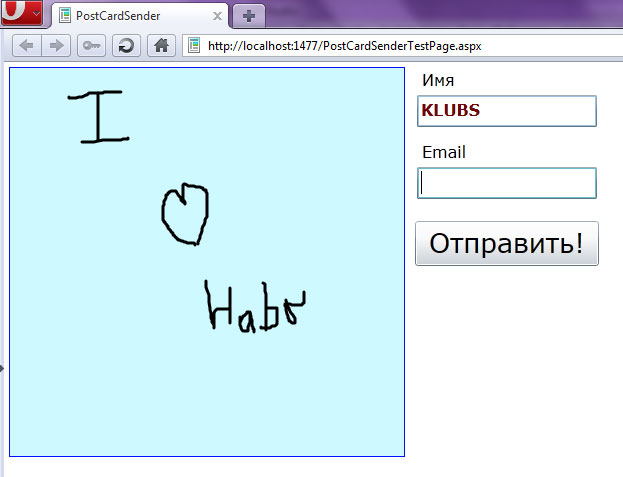
* This source code was highlighted with Source Code Highlighter .Here is a block for drawing and sending greeting cards turned out. You can change styles and make it beautiful, but this is beyond the scope of this article. By creating event handlers and writing their implementation, you can run the project and see what happened there.
By clicking the "Send" button and received a positive message, we look at what has been saved on the server. And there all our data is in xml format.
Summary
Now you can safely create WCF services using Silverlight and embed them into your sites and corporate business applications. Silverlight is a great helper for creating large corporate portals.
Literature
Source: https://habr.com/ru/post/99464/
All Articles