NerdDinner. Step 3: Build a Model
This is the third step of the free NerdDinner tutorial , which shows how to build a small but full-fledged web application using ASP. NET MVC.
In a model-view-controller type framework, the term “model” refers to objects that represent application data, as does the corresponding domain logic that integrates validation and business rules. In many cases, the model is the “heart” of the MVC application and, as we will see later, controls its basic behavior.
ASP.NET MVC framework supports the use of any data access technology; therefore, developers can choose from various options for implementing their model, including: LINQ to Entities, LINQ to SQL, NHibernate, LLBLGen Pro, SubSonic, WilsonORM, or direct access via ADO.NET DataReader and DataSet .
')
For our NerdDinner application, we will use LINQ to SQL to create a simple model that is almost similar to the database structure, and also add some validation logic and business rules. Later, we will implement a storage class that will help abstract the constant implementation of storing data from the rest of the application and make it easy to perform unit tests with it.
LINQ to SQL is ORM (Object Relational Projection), which is supplied as part of .NET 3.5.
LINQ to SQL provides an easy way to associate database tables with .NET classes. For our NerdDinner applications we will use to link the Dinners tables and RSVP and the classes Dinner and RSVP. The columns of the Dinners and RSVP tables will correspond to the properties of the Dinner and RSVP classes. Each Dinner and RSVP object will represent a separate line in the Dinner or RSVP tables in the database.
LINQ to SQL allows you to avoid manually building SQL queries to receive or update Dinner and RSVP objects with data in the database. Instead, we declare Dinner RSVP classes, how they connect to the database and define the connections between them. LINQ to SQL will take care of creating appropriate SQL logic for use while working with objects.
We can use the LINQ language supported in VB and C # to write queries that return Dinner and RSVP objects from the database. This minimizes the size of the code that we need to write and allows us to build really clean applications.
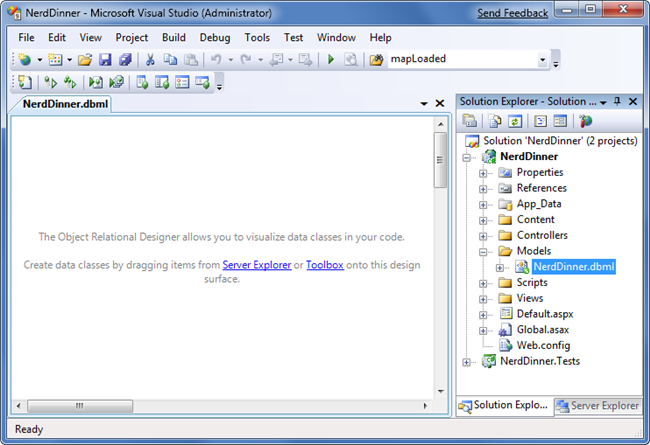
We will start by pressing the right button on the “Models” folder in the project and select Add> New Item :

In the “Add New Item” window, filter by the “Data” category and select the “LINQ to SQL Classes” template:

Name the element “NerdDinner” and add it. Visual Studio will add the NerdDinner.dbml file to the \ Models directory and open the link constructor for the LINQ to SQL object:
LINQ to SQL allows us to quickly create data model classes from an existing database schema. To do this, open the NerdDinner database in Server Explorer and select the tables for which you need to create a model:

Next, drag tables into the LINQ to SQL constructor. Once we do this, LINQ to SQL will automatically create the Dinner and RSVP classes using the table schema, including class properties that are associated with the columns of the database table:
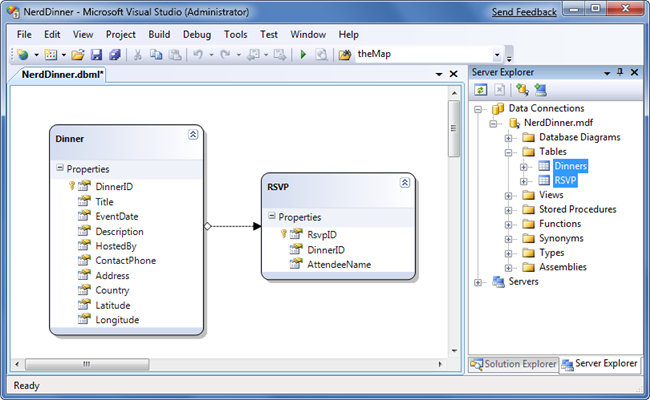
By default, the LINQ to SQL constructor automatically processes the plural in table names and column names during class creation. For example: the “Dinners” table becomes the “Dinner” class. This class naming helps the model to adhere to compatibility with the .NET naming rules, and even when you add a large number of tables, this is convenient. If you do not like the name of the class or property that the constructor generated, you can always change it to a more appropriate one through editing in the constructor or in the properties.
Also by default, the LINQ to SQL constructor finds the primary and foreign keys of the tables and, based on them, automatically creates links between different classes of models. For example, when we dragged the Dinners and RSVP tables onto the LINQ to SQL designer, a one-to-many relationship was created because the RSVP table contains a foreign key to the Dinners table (indicated by the arrow in the designer):
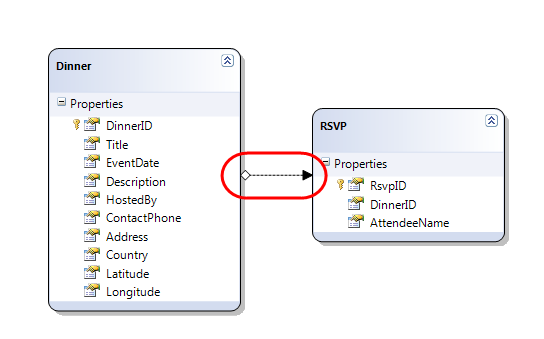
This link will allow LINQ to SQL to add the strongly typed “Dinner” property to the RSVP class, which developers can use to access Dinner bound to RSVP. It will also allow the Dinner class to contain a collection of RSVP properties, which gives developers the ability to get or modify RSVP objects bound to Dinner.
Below is an example of intellisense in VisualStudio when we create a new RSVP object and add it to the RSVP collection of an object of the Dinner class. Notice how LINQ to SQL automatically added an RSVP collection of objects to an object of class Dinner:
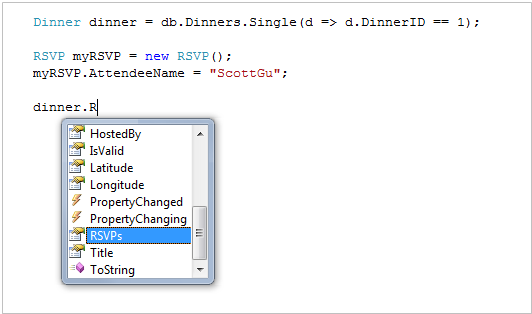
By adding an RSVP object to the RSVP collection of the Dinner object, we tell LINQ to SQL to link the string Dinner and RSVP in the database via a foreign key:
If you, again, do not like the way the designer called the relationship between the tables, then you can change that. Just click on the link arrow in the constructor and rename / delete / change it. For our application, the default communication rules are great for the data model class.
Visual Studio automatically creates .NET classes that represent models and relationships using the LINQ to SQL constructor. Also, a DataContext class is created for each file created by the LINQ to SQL constructor. Since we called our LINQ to SQL class “NerdDinner”, the DataContext class will be named “NerdDinnerDataContext”, which directly interacts with the database.
The NerdDinnerDataContext class contains two properties, “Dinners” and “RVSPs”, which represent the two tables that we created in the database. We can use C # to write LINQ queries with these properties, to get Dinner and RSVP objects from the database.
The following code demonstrates the operation of the NerdDinnerDataContext object with a LINQ request to get a queue of upcoming dinners (Dinners). Visual Studio provides full intellisense support while writing LINQ queries. The objects that returned the query are strongly typed:
In addition, the NerdDinnerDataContext automatically tracks any changes in Dinner and RSVP objects. You can use this functionality to easily save changes to the database, without the need to write SQL UPDATE code.
For example, let's consider how to use a LINQ query to get a single object of the Dinner class from the database, change two Dinner properties and then save the changes back to the database:
The NerdDinnerDataContext object automatically tracks the changes we made to the properties of the resulting Dinner object. When we call the “SubmitChanges ()” method, it will execute the corresponding SQL “UPDATE” query to save the changes to the database.
For small applications, it is sometimes convenient when the controllers work directly with the LINQ to SQL DataContext class and LINQ queries reside in controllers. But with the growth of the application, this campaign becomes cumbersome and inconvenient for testing. We will also encounter LINQ code duplication in different places.
But there is an approach that will facilitate the support and testing of the project - this is the design pattern of the Repository. The class of the repository helps to encapsulate data requests and logic, abstracts the implementation details of the data from the application. In addition, for cleaner code, the use of the repository pattern allows you to change the implementation of the data warehouse in the future, as well as facilitates unit testing of the application, since it does not require a real database.
For our NerdDinner project, we will declare a DinnerRepositary class with the following signature:
Later we will extract the IDinnerRepository interface from this class to allow dependency injection with it in our controllers. But first we will work directly with the DinnerRepository class .
To implement this class, right-click on the “Models” folder and select Add> New Item . In the opened window, select the “Class” template and name the file “DinnerRepository.cs”:
Next, we fill our DinnerRepository class with the following code:
Now that we have created the DinnerRepository class, let's take a look at a few examples that demonstrate the implementation of common tasks:
The following code returns one dinner (Dinner) using the DinnerID value:
The code below returns all upcoming dinners and loops through each one:
The following code demonstrates the addition of two new dinners. Any additions or changes to the repository are not applied until we call the “Save ()” method. LINQ to SQL automatically wraps all changes into a database transaction, hence either all changes or none are executed:
The code below returns an existing Dinner object and changes its two properties. Properties are saved to the database after calling the “Save ()” repository method:
The following code returns dinner and adds RSVP to it. It does this through the RSVP Dinner object collection, which was created by LINQ to SQL (based on foreign keys). These changes will be sent to the database as a new line of the RSVP table when we call the “Save ()” method:
The code below returns an existing Dinner object and then marks it as deleted. When we call the “Save ()” method it will be removed from the database:
A key part of any application that works with data is the integration of checks and business logic rules.
When model classes are declared using the LINQ to SQL constructor, the data types of the model class properties correspond to the data types of the database table. For example: if the “EventData” column in the Dinners table is of the “datetime” type, then the data model class created by LINQ to SQL will be of the “DateTime” type, which is the native data type in .NET. As a result, we will get errors at the compilation stage if we try to assign an integer or bool to this property, or an error occurs if you try to implicitly convert a string of an incorrect format during program execution.
LINQ to SQL also automatically handles escape sequences, helping to protect the application from SQL injection.
Validation of the scheme is useful as the first stage, but this is not enough. Many real-world situations require the ability to define a more detailed algorithm for validation, which may include several properties, the execution of a specific code, the receipt of information from the model about the state (for example, it was created / changed / deleted or, according to the domain specification, “archived”) . There are many different patterns and frameworks that can be used to define and apply validation rules for a model class, all of which are implemented by third-party .NET-based components. You can use any of these in ASP.NET MVC applications.
The goal of our NerdDinner application will be to use a fairly simple and easy-to-understand pattern, where we will extend the IsValid property and the GetRuleViolations () method of our object model Dinner. The IsValid property will return true or false, depending on the success of passing validation and business rules. The GetRuleViolations () method will return a list of errors that occurred.
We implement IsValid and GetRuleViolations () for the Dinner model, adding a partial class to our project. Partial classes are used to add methods / properties / events for classes that are controlled by a VS-constructor (like the Dinner class generated by the LINQ to SQL constructors) and help avoid chaos in our code. We can add a new partial class to our project by right-clicking on the \ Models folder, selecting the "Add New Item" item. Next, select the template “Class” and name it Dinner.cs.
By clicking on the "Add" button, the Dinner.cs file is added to our project and opened in the IDE. Next, we define the basic rules and validation framework using the following code:
A few notes on the code:
This approach provides a simple framework that integrates validation rules and business rules. And now, let's add rules to our GetRuleViolations () method:
We use C # “yield return” to return any RuleViolations sequence. The first six rules check and prescribe that Dinner string properties cannot be null or empty. The last rule is more interesting, it calls the auxiliary method PhoneValidator.IsValidNumber (), which we can add to our project to match the ContactPhone number format to the country where lunch is located.
To check the phone number, we can also use regular expressions. Below is a simple implementation of PhoneValidator, which allows you to check your phone via Regex:
By adding validation and business logic rules to the code, each time creating or changing a Dinner object, our validation rules will be enforced in the validation process.
Developers can write code as shown below, determining in advance the valid Dinner object and getting a list of all violations without any exceptions:
If we try to save Dinner with an invalid state, then after calling the Save () method, an exception is thrown in the DinnerRepository. This will happen because LINQ to SQL will call our partial Dinner.OnValidate () method before the changes are saved, and earlier we added an exception to this method if there are violations of the rules in the Dinner object. We can intercept this exception and instantly return the list of violations for correction:
Our business rules and validation rules are implemented at the model level, and not at the level of the graphical interface, they will be applied and used under any circumstances in our application. Later we can change or add any business rules and be sure that they will be unconditionally applied in every corner of the application.
Having gained flexibility in managing business rules, eliminating the need to change their logic in the entire application where they are used, we achieved a properly written application. All this thanks to the help of the MVC framework.
We have a model that can be used to get and change data in the database.
Let's now add some controllers and views to the project.
In a model-view-controller type framework, the term “model” refers to objects that represent application data, as does the corresponding domain logic that integrates validation and business rules. In many cases, the model is the “heart” of the MVC application and, as we will see later, controls its basic behavior.
ASP.NET MVC framework supports the use of any data access technology; therefore, developers can choose from various options for implementing their model, including: LINQ to Entities, LINQ to SQL, NHibernate, LLBLGen Pro, SubSonic, WilsonORM, or direct access via ADO.NET DataReader and DataSet .
')
For our NerdDinner application, we will use LINQ to SQL to create a simple model that is almost similar to the database structure, and also add some validation logic and business rules. Later, we will implement a storage class that will help abstract the constant implementation of storing data from the rest of the application and make it easy to perform unit tests with it.
LINQ to SQL
LINQ to SQL is ORM (Object Relational Projection), which is supplied as part of .NET 3.5.
LINQ to SQL provides an easy way to associate database tables with .NET classes. For our NerdDinner applications we will use to link the Dinners tables and RSVP and the classes Dinner and RSVP. The columns of the Dinners and RSVP tables will correspond to the properties of the Dinner and RSVP classes. Each Dinner and RSVP object will represent a separate line in the Dinner or RSVP tables in the database.
LINQ to SQL allows you to avoid manually building SQL queries to receive or update Dinner and RSVP objects with data in the database. Instead, we declare Dinner RSVP classes, how they connect to the database and define the connections between them. LINQ to SQL will take care of creating appropriate SQL logic for use while working with objects.
We can use the LINQ language supported in VB and C # to write queries that return Dinner and RSVP objects from the database. This minimizes the size of the code that we need to write and allows us to build really clean applications.
Adding LINQ to SQL classes to a project
We will start by pressing the right button on the “Models” folder in the project and select Add> New Item :
In the “Add New Item” window, filter by the “Data” category and select the “LINQ to SQL Classes” template:
Name the element “NerdDinner” and add it. Visual Studio will add the NerdDinner.dbml file to the \ Models directory and open the link constructor for the LINQ to SQL object:
Creating Data Model Classes with LINQ to SQL
LINQ to SQL allows us to quickly create data model classes from an existing database schema. To do this, open the NerdDinner database in Server Explorer and select the tables for which you need to create a model:
Next, drag tables into the LINQ to SQL constructor. Once we do this, LINQ to SQL will automatically create the Dinner and RSVP classes using the table schema, including class properties that are associated with the columns of the database table:
By default, the LINQ to SQL constructor automatically processes the plural in table names and column names during class creation. For example: the “Dinners” table becomes the “Dinner” class. This class naming helps the model to adhere to compatibility with the .NET naming rules, and even when you add a large number of tables, this is convenient. If you do not like the name of the class or property that the constructor generated, you can always change it to a more appropriate one through editing in the constructor or in the properties.
Also by default, the LINQ to SQL constructor finds the primary and foreign keys of the tables and, based on them, automatically creates links between different classes of models. For example, when we dragged the Dinners and RSVP tables onto the LINQ to SQL designer, a one-to-many relationship was created because the RSVP table contains a foreign key to the Dinners table (indicated by the arrow in the designer):
This link will allow LINQ to SQL to add the strongly typed “Dinner” property to the RSVP class, which developers can use to access Dinner bound to RSVP. It will also allow the Dinner class to contain a collection of RSVP properties, which gives developers the ability to get or modify RSVP objects bound to Dinner.
Below is an example of intellisense in VisualStudio when we create a new RSVP object and add it to the RSVP collection of an object of the Dinner class. Notice how LINQ to SQL automatically added an RSVP collection of objects to an object of class Dinner:
By adding an RSVP object to the RSVP collection of the Dinner object, we tell LINQ to SQL to link the string Dinner and RSVP in the database via a foreign key:
If you, again, do not like the way the designer called the relationship between the tables, then you can change that. Just click on the link arrow in the constructor and rename / delete / change it. For our application, the default communication rules are great for the data model class.
Class NerdDinnerDataContext
Visual Studio automatically creates .NET classes that represent models and relationships using the LINQ to SQL constructor. Also, a DataContext class is created for each file created by the LINQ to SQL constructor. Since we called our LINQ to SQL class “NerdDinner”, the DataContext class will be named “NerdDinnerDataContext”, which directly interacts with the database.
The NerdDinnerDataContext class contains two properties, “Dinners” and “RVSPs”, which represent the two tables that we created in the database. We can use C # to write LINQ queries with these properties, to get Dinner and RSVP objects from the database.
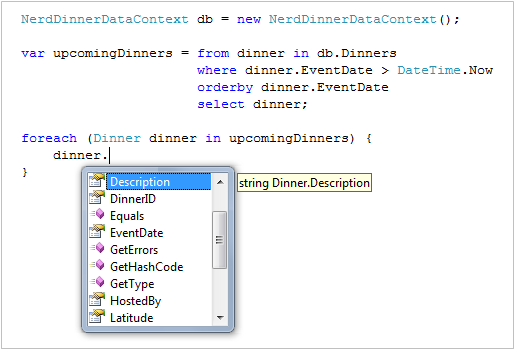
The following code demonstrates the operation of the NerdDinnerDataContext object with a LINQ request to get a queue of upcoming dinners (Dinners). Visual Studio provides full intellisense support while writing LINQ queries. The objects that returned the query are strongly typed:
In addition, the NerdDinnerDataContext automatically tracks any changes in Dinner and RSVP objects. You can use this functionality to easily save changes to the database, without the need to write SQL UPDATE code.
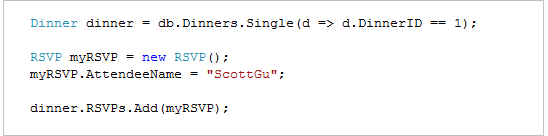
For example, let's consider how to use a LINQ query to get a single object of the Dinner class from the database, change two Dinner properties and then save the changes back to the database:
NerdDinnerDataContext db = new NerdDinnerDataContext();

// Dinner, DinnerID 1
Dinner dinner = db.Dinners.Single(d => d.DinnerID == 1);

// Dinner
dinner.Title = "Changed Title" ;
dinner.Description = "This dinner will be fun" ;

//
db.SubmitChanges();
The NerdDinnerDataContext object automatically tracks the changes we made to the properties of the resulting Dinner object. When we call the “SubmitChanges ()” method, it will execute the corresponding SQL “UPDATE” query to save the changes to the database.
Create a class DinnerRepository
For small applications, it is sometimes convenient when the controllers work directly with the LINQ to SQL DataContext class and LINQ queries reside in controllers. But with the growth of the application, this campaign becomes cumbersome and inconvenient for testing. We will also encounter LINQ code duplication in different places.
But there is an approach that will facilitate the support and testing of the project - this is the design pattern of the Repository. The class of the repository helps to encapsulate data requests and logic, abstracts the implementation details of the data from the application. In addition, for cleaner code, the use of the repository pattern allows you to change the implementation of the data warehouse in the future, as well as facilitates unit testing of the application, since it does not require a real database.
For our NerdDinner project, we will declare a DinnerRepositary class with the following signature:
public class DinnerRepository {
//
public IQueryable<Dinner> FindAllDinners();
public IQueryable<Dinner> FindUpcomingDinners();
public Dinner GetDinner( int id);

// /
public void Add(Dinner dinner);
public void Delete(Dinner dinner);

//
public void Save();
}
Later we will extract the IDinnerRepository interface from this class to allow dependency injection with it in our controllers. But first we will work directly with the DinnerRepository class .
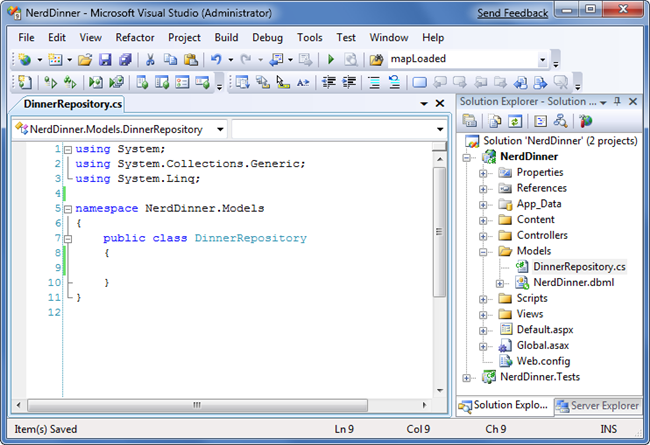
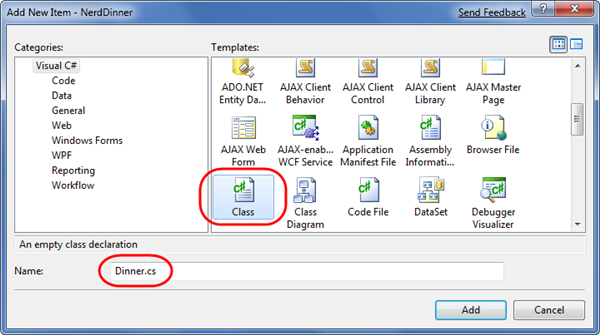
To implement this class, right-click on the “Models” folder and select Add> New Item . In the opened window, select the “Class” template and name the file “DinnerRepository.cs”:
Next, we fill our DinnerRepository class with the following code:
public class DinnerRepository {
private NerdDinnerDataContext db = new NerdDinnerDataContext();

//
//
public IQueryable<Dinner> FindAllDinners() {
return db.Dinners;
}

public IQueryable<Dinner> FindUpcomingDinners() {
return from dinner in db.Dinners
where dinner.EventDate > DateTime .Now
orderby dinner.EventDate
select dinner;
}

public Dinner GetDinner( int id) {
return db.Dinners.SingleOrDefault(d => d.DinnerID == id);
}

//
// Insert/Delete
public void Add(Dinner dinner) {
db.Dinners.InsertOnSubmit(dinner);
}

public void Delete(Dinner dinner) {
db.RSVPs.DeleteAllOnSubmit(dinner.RSVPs);
db.Dinners.DeleteOnSubmit(dinner);
}

//
//
public void Save() {
db.SubmitChanges();
}
}
Retrieving, modifying, adding, and deleting data using the DinnerRepository class
Now that we have created the DinnerRepository class, let's take a look at a few examples that demonstrate the implementation of common tasks:
Query examples
The following code returns one dinner (Dinner) using the DinnerID value:
DinnerRepository dinnerRepository = new DinnerRepository();

// DinnerID
Dinner dinner = dinnerRepository.GetDinner(5);
The code below returns all upcoming dinners and loops through each one:
DinnerRepository dinnerRepository = new DinnerRepository();

//
var upcomingDinners = dinnerRepository.FindUpcomingDinners();

//
foreach (Dinner dinner in upcomingDinners) {
Response.Write( "Title" + dinner.Title);
}

* This source code was highlighted with Source Code Highlighter .
Add and remove example
The following code demonstrates the addition of two new dinners. Any additions or changes to the repository are not applied until we call the “Save ()” method. LINQ to SQL automatically wraps all changes into a database transaction, hence either all changes or none are executed:
DinnerRepository dinnerRepository = new DinnerRepository();

//
Dinner newDinner1 = new Dinner();
newDinner1.Title = "Dinner with Scott" ;
newDinner1.HostedBy = "ScotGu" ;
newDinner1.ContactPhone = "425-703-8072" ;

//
Dinner newDinner2 = new Dinner();
newDinner2.Title = "Dinner with Bill" ;
newDinner2.HostedBy = "BillG" ;
newDinner2.ContactPhone = "425-555-5151" ;

//
dinnerRepository.Add(newDinner1);
dinnerRepository.Add(newDinner2);

//
dinnerRepository.Save();
The code below returns an existing Dinner object and changes its two properties. Properties are saved to the database after calling the “Save ()” repository method:
DinnerRepository dinnerRepository = new DinnerRepository();

// DinnerID
Dinner dinner = dinnerRepository.GetDinner(5);

// Dinner
dinner.Title = "Update Title" ;
dinner.HostedBy = "New Owner" ;

//
dinnerRepository.Save();
The following code returns dinner and adds RSVP to it. It does this through the RSVP Dinner object collection, which was created by LINQ to SQL (based on foreign keys). These changes will be sent to the database as a new line of the RSVP table when we call the “Save ()” method:
DinnerRepository dinnerRepository = new DinnerRepository();

// DinnerID
Dinner dinner = dinnerRepository.GetDinner(5);

// RSVP
RSVP myRSVP = new RSVP();
myRSVP.AttendeeName = "ScottGu" ;

// RSVP RSVP Dinner
dinner.RSVPs.Add(myRSVP);

//
dinnerRepository.Save();
Deletion example
The code below returns an existing Dinner object and then marks it as deleted. When we call the “Save ()” method it will be removed from the database:
DinnerRepository dinnerRepository = new DinnerRepository();

// DinnerID
Dinner dinner = dinnerRepository.GetDinner(5);

//
dinnerRepository.Delete(dinner);

//
dinnerRepository.Save();
Integrating business logic checks and rules into model classes
A key part of any application that works with data is the integration of checks and business logic rules.
Check schema
When model classes are declared using the LINQ to SQL constructor, the data types of the model class properties correspond to the data types of the database table. For example: if the “EventData” column in the Dinners table is of the “datetime” type, then the data model class created by LINQ to SQL will be of the “DateTime” type, which is the native data type in .NET. As a result, we will get errors at the compilation stage if we try to assign an integer or bool to this property, or an error occurs if you try to implicitly convert a string of an incorrect format during program execution.
LINQ to SQL also automatically handles escape sequences, helping to protect the application from SQL injection.
Validation and rules of business logic
Validation of the scheme is useful as the first stage, but this is not enough. Many real-world situations require the ability to define a more detailed algorithm for validation, which may include several properties, the execution of a specific code, the receipt of information from the model about the state (for example, it was created / changed / deleted or, according to the domain specification, “archived”) . There are many different patterns and frameworks that can be used to define and apply validation rules for a model class, all of which are implemented by third-party .NET-based components. You can use any of these in ASP.NET MVC applications.
The goal of our NerdDinner application will be to use a fairly simple and easy-to-understand pattern, where we will extend the IsValid property and the GetRuleViolations () method of our object model Dinner. The IsValid property will return true or false, depending on the success of passing validation and business rules. The GetRuleViolations () method will return a list of errors that occurred.
We implement IsValid and GetRuleViolations () for the Dinner model, adding a partial class to our project. Partial classes are used to add methods / properties / events for classes that are controlled by a VS-constructor (like the Dinner class generated by the LINQ to SQL constructors) and help avoid chaos in our code. We can add a new partial class to our project by right-clicking on the \ Models folder, selecting the "Add New Item" item. Next, select the template “Class” and name it Dinner.cs.
By clicking on the "Add" button, the Dinner.cs file is added to our project and opened in the IDE. Next, we define the basic rules and validation framework using the following code:
public partial class Dinner {

public bool IsValid {

get { return (GetRuleViolations().Count() == 0); }

}

public IEnumerable <RuleViolation> GetRuleViolations() {

yield break ;

}

partial void OnValidate(ChangeAction action) {

if (!IsValid)

throw new ApplicationException( "Rule violations prevent saving" );

}

}

public class RuleViolation {

public string ErrorMessage { get ; private set ; }

public string PropertyName { get ; private set ; }

public RuleViolation( string errorMessage, string propertyName) {

ErrorMessage = errorMessage;

PropertyName = propertyName;

}

}
A few notes on the code:
- The Dinner class starts with the “partial” keyword - this means that the code placed in it will be combined with the class generated by the LINQ to SQL designer and compiled into a single class.
- The RuleViolation class is an auxiliary class that allows us to provide more details about rule violations.
- The Dinner.GetRuleViolations () method allows you to evaluate whether all the rules and business logic have been followed (we will implement it in just a couple of minutes). It returns a sequence of RuleViolation objects that provide us with more detailed information about any violation of the rules.
- Dinner.IsValid is a handy auxiliary property that indicates whether RuleViolation is active or not. The developer can check it through the Dinner object at any time (it will not cause any exceptions).
This approach provides a simple framework that integrates validation rules and business rules. And now, let's add rules to our GetRuleViolations () method:
public IEnumerable <RuleViolation> GetRuleViolations() {

if ( String .IsNullOrEmpty(Title))
yield return new RuleViolation( "Title required" , "Title" );

if ( String .IsNullOrEmpty(Description))
yield return new RuleViolation( "Description required" , "Description" );

if ( String .IsNullOrEmpty(HostedBy))
yield return new RuleViolation( "HostedBy required" , "HostedBy" );

if ( String .IsNullOrEmpty(Address))
yield return new RuleViolation( "Address required" , "Address" );

if ( String .IsNullOrEmpty(Country))
yield return new RuleViolation( "Country required" , "Country" );

if ( String .IsNullOrEmpty(ContactPhone))
yield return new RuleViolation( "Phone# required" , "ContactPhone" );

if (!PhoneValidator.IsValidNumber(ContactPhone, Country))
yield return new RuleViolation( "Phone# does not match country" , "ContactPhone" );

yield break ;
}
We use C # “yield return” to return any RuleViolations sequence. The first six rules check and prescribe that Dinner string properties cannot be null or empty. The last rule is more interesting, it calls the auxiliary method PhoneValidator.IsValidNumber (), which we can add to our project to match the ContactPhone number format to the country where lunch is located.
To check the phone number, we can also use regular expressions. Below is a simple implementation of PhoneValidator, which allows you to check your phone via Regex:
public class PhoneValidator {

static IDictionary< string , Regex> countryRegex = new Dictionary< string , Regex>() {
{ "USA" , new Regex( "^[2-9]\\d{2}-\\d{3}-\\d{4}$" )},
{ "UK" , new Regex( "(^1300\\d{6}$)|(^1800|1900|1902\\d{6}$)|(^0[2|3|7|8]{1}[0-9]{8}$)|(^13\\d{4}$)|(^04\\d{2,3}\\d{6}$)" )},
{ "Netherlands" , new Regex( "(^\\+[0-9]{2}|^\\+[0-9]{2}\\(0\\)|^\\(\\+[0-9]{2}\\)\\(0\\)|^00[0-9]{2}|^0)([0-9]{9}$|[0-9\\-\\s]{10}$)" )},
};

public static bool IsValidNumber( string phoneNumber, string country) {

if (country != null && countryRegex.ContainsKey(country))
return countryRegex[country].IsMatch(phoneNumber);
else
return false ;
}

public static IEnumerable < string > Countries {
get {

return countryRegex.Keys;
}
}
}
Handling validation and business logic violations
By adding validation and business logic rules to the code, each time creating or changing a Dinner object, our validation rules will be enforced in the validation process.
Developers can write code as shown below, determining in advance the valid Dinner object and getting a list of all violations without any exceptions:
Dinner dinner = dinnerRepository.GetDinner(5);

dinner.Country = "USA" ;
dinner.ContactPhone = "425-555-BOGUS" ;

if (!dinner.IsValid) {
var errors = dinner.GetRuleViolations();
//
}
If we try to save Dinner with an invalid state, then after calling the Save () method, an exception is thrown in the DinnerRepository. This will happen because LINQ to SQL will call our partial Dinner.OnValidate () method before the changes are saved, and earlier we added an exception to this method if there are violations of the rules in the Dinner object. We can intercept this exception and instantly return the list of violations for correction:
Dinner dinner = dinnerRepository.GetDinner(5);

try {
dinner.Country = "USA" ;
dinner.ContactPhone = "425-555-BOGUS" ;
dinnerRepository.Save();
}
catch {
var errors = dinner.GetRuleViolations();
//
}
Our business rules and validation rules are implemented at the model level, and not at the level of the graphical interface, they will be applied and used under any circumstances in our application. Later we can change or add any business rules and be sure that they will be unconditionally applied in every corner of the application.
Having gained flexibility in managing business rules, eliminating the need to change their logic in the entire application where they are used, we achieved a properly written application. All this thanks to the help of the MVC framework.
Next step
We have a model that can be used to get and change data in the database.
Let's now add some controllers and views to the project.
Source: https://habr.com/ru/post/99107/
All Articles