Making the boot and installation flash drive
After the post about the restoration of flash drives , it turned out that many now have workers, orphan flash drives, which must be used. Why not make them bootable flash drives with the distributions of the necessary OS? This can be useful when installing / reinstalling operating systems on netbooks where there are no optical media drives. And sometimes it can even speed up the installation process and make it much quieter on the computer where the drive is.
Although on Habré already described the options for creating bootable flash drives, but the option that I propose is too simple and universal in order to get around it.

To create a bootable flash drive, we need the WinSetupFromUSB utility, the latest version of which can be downloaded here . Utility updates the author puts in the appropriate forum thread on the website msfn.org . At the moment there is a stable version, dated July 2009 and there is a fairly fresh, sixth beta version, which is compiled in March of this year. The program looks like this:
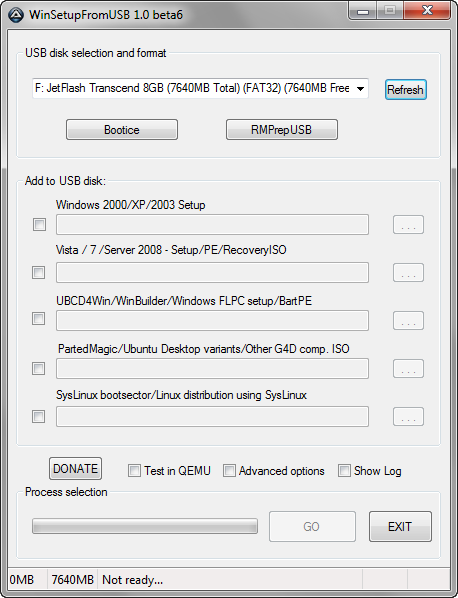
')
After starting the program will try to identify all flash drives connected to the computer.
To do this, the program has two ways: Bootice and RMPrepUSB. The first seemed to me more simple and understandable, and we will use it. After clicking on the Bootice button, we need to select Perform Format:

In the next window, you can select partitions or format the entire flash drive for boot needs. I chose the USB-HDD Mode (Single Partition) option and clicked on Next Step:

In the next window we will be offered to choose our flash drive's file system and partition label. I recommend using NTFS, because it often increases the speed of reading from a flash drive. After clicking on the OK button, the utility will warn us several times that in the process of creating a bootable USB flash drive, all information from it will be deleted. Since we voluntarily go to this step, we agree. After not long-term actions, the utility will tell us, most likely, about the success of the operation and the usability of our flash drive will be ready!
The next step is to copy the installation operating system to our bootable USB flash drive. All we need is to select the operating system in the main window of the program that we want to place on the flash drive and specify the disk with the OS or the directory of the unpacked ISO image. We press the GO button and wait about 10-15 minutes (it all depends on the amount of copied information and the speed of the flash drive). If you like to follow all the actions, before starting the process, tick the Show Log box.
After a successful operation, you can immediately try your child by booting from a flash drive. If you did everything correctly, the GRUB4DOS bootloader screen will appear:

You can experiment with the settings of the utility, as it provides ample opportunities in creating bootable flash drives. A full description of all the functions you can find in the same topic of the author of the program.
Although on Habré already described the options for creating bootable flash drives, but the option that I propose is too simple and universal in order to get around it.
To create a bootable flash drive, we need the WinSetupFromUSB utility, the latest version of which can be downloaded here . Utility updates the author puts in the appropriate forum thread on the website msfn.org . At the moment there is a stable version, dated July 2009 and there is a fairly fresh, sixth beta version, which is compiled in March of this year. The program looks like this:
')
After starting the program will try to identify all flash drives connected to the computer.
Making a USB flash drive
To do this, the program has two ways: Bootice and RMPrepUSB. The first seemed to me more simple and understandable, and we will use it. After clicking on the Bootice button, we need to select Perform Format:
In the next window, you can select partitions or format the entire flash drive for boot needs. I chose the USB-HDD Mode (Single Partition) option and clicked on Next Step:
In the next window we will be offered to choose our flash drive's file system and partition label. I recommend using NTFS, because it often increases the speed of reading from a flash drive. After clicking on the OK button, the utility will warn us several times that in the process of creating a bootable USB flash drive, all information from it will be deleted. Since we voluntarily go to this step, we agree. After not long-term actions, the utility will tell us, most likely, about the success of the operation and the usability of our flash drive will be ready!
Copy OS installation files
The next step is to copy the installation operating system to our bootable USB flash drive. All we need is to select the operating system in the main window of the program that we want to place on the flash drive and specify the disk with the OS or the directory of the unpacked ISO image. We press the GO button and wait about 10-15 minutes (it all depends on the amount of copied information and the speed of the flash drive). If you like to follow all the actions, before starting the process, tick the Show Log box.
After a successful operation, you can immediately try your child by booting from a flash drive. If you did everything correctly, the GRUB4DOS bootloader screen will appear:
Lastly
You can experiment with the settings of the utility, as it provides ample opportunities in creating bootable flash drives. A full description of all the functions you can find in the same topic of the author of the program.
Source: https://habr.com/ru/post/98954/
All Articles