Fido For Dummies. Part one
This article is the result of throwing, in which I have fallen by reading the article History of a Point and How I Became a Node The first material became the starting point for me - for the first time in the last ten years, I remembered that Fido was still moving, and very well. The second essentially worked as a catalyst - I again wanted to Fido.
It is said? Done? As if not so.
The last time I used Fido, barely went to school - yes, gentlemen, I am a shkolota, and I’m in Fido, forgive me - and therefore I hardly remembered the terminology, could not imagine anything about the process of setting up software, and about other underwater stones. The articles that recently appeared on Habré contained a theory and basic prerequisites - but nothing more was said about a specific software in a volume more than a couple of words - and in fact, setting up software is one of the most important stages of entering Fido .
In general, having briefly talked with the boss of my node - yes, that 2: 5020/2140 (Sergey, you become popular, yy), I decided to write this something; a story about stuffed cones, which is written, albeit a noob, but a noob that has already more or less dealt with GoldED hotkeys, learned to search for live ehi and subscribe to them, and already slightly penetrated into the general spirit of the Network of Friends - because the materials posted on many sites The nodes are for reference only, and are aimed at experienced users. For newbies on the net, my material, I hope, can be very useful.
All actions described in this article are valid primarily for node 2: 5020/2140, because they were performed on it using the method of scientific tying and smoking manuals. I admit that your node may not have a transport via NNTP or something else. Otherwise, I suppose, the material is universal.
')
Also, I highly doubt that someone from Habrovites will go to Fido through a daylap - therefore I will describe the process of entering the network exactly Point-Over-IP. Looking ahead, I will say that we will work under Windows and the fidoip soup set, which includes the GoldED-NSF processor, the binkd mailer and other difference.
Suppose you have already contacted the boss of your node, and got your hands on a beautiful, or not, point address. Wondering what to do with it? I'll tell you.
First of all, we need to figure out what software is required for the operation of our point. There is a lot of software - both multiplatform, for example, the GoldED echo processor, the binkd mailer, and other attached things, as well as purely Win-solutions - for example, hypertext, great and terrible HellED . Honestly, I, unlike the author of the article “The Story of One Point,” did not have the patience to cut out all the frosts from Hella, straighten the curvature of the native interface and clean out all the trash left from the author of the program, so I sighed, rolled up my sleeves, and went to pack fidoip is such a soup set consisting of the binkd mailer, the GoldED-NSF echo processor, and other things that are no less necessary for the life of the software.
The installation of the point-set itself is quite simple - we grab it, unpack it to the root of any logical drive, and edit the file /usr/setup_config.vbs, which is the initial point-configuration autoconfiguration program. So, opening this file in any text editor, we will see something like this:
'---------------------------------
const yourFullName = "Yakov Uvarov"
const yourFTNAddress = "2: 5020 / 2140.42"
const yourStationName = "EmmaussOnline"
const yourLocation = "Tver, Russia"
const yourUplinkName = "Sergey Poziturin"
const uplinkFTNAddress = "2: 5020/2140"
const uplinkServerName = "vp.propush.ru"
const yourPassword = "your_password"
'---------------------------------
So, I describe constants in more detail, if something still remains unclear from their name:
yourFullName - your name in Latin, in the same form that you sent to your boss when registering a point
yourFTNAdress - your point address; you should give it to your boss
yourStationName - any name of your station you wish
YourLocation - Your location of the format "City, Country" - of course, in Latin
yourUplinkName is the name of the boss of your node in the Latin alphabet - in my case this is, as you can see, Sergey Poziturin
uplinkFTNAdress - FTN-address of your node
uplinkServerName - IP address or domain name of your node; do this with your boss
yourPassword - well, it's already obvious
Now all you need is to save setup_config.vbs and run it. After rustling, he will give you a message about the successful (or vice versa - unsuccessful) configuration of the kit, and in principle, it can now be used. How to use it?
Well, first you should describe how a typical session of any Fido user looks. First of all, since you are a new point, you need to run the /usr/bin/rs.bat bat file, which will launch the binkd mailer - it will contact the node, ask for a list of the echoes that you subscribe to in one way or another, and give this information to the echo processor GoldEd. Next, we run /usr/bin/ge.bat, and in front of us comes GoldED itself, great and terrible, which will look something like this:
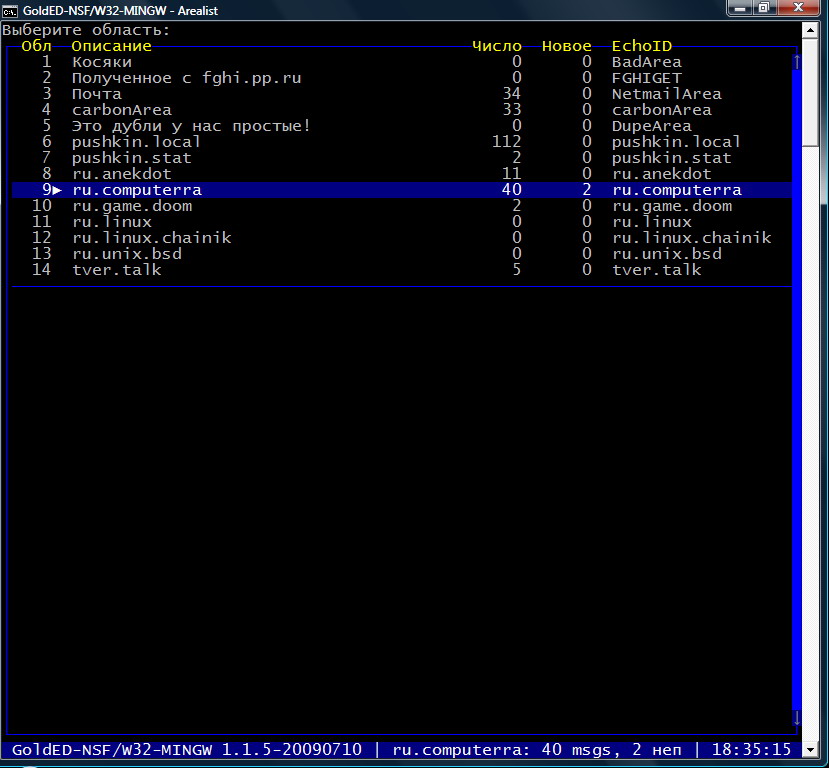
Before us is the so-called list of zones (Arealist), i.e. all oh you are currently subscribed to. Navigation is done with cursors and the Enter key; Also, if you wish, you can enter the name of the desired ehi manually - just type it and press Enter.
Now we will try to write to any conference, for example, to a local conference of the node, pushkin.local, some message. To do this, we select the desired echo (now they are empty), and press the Insert key:
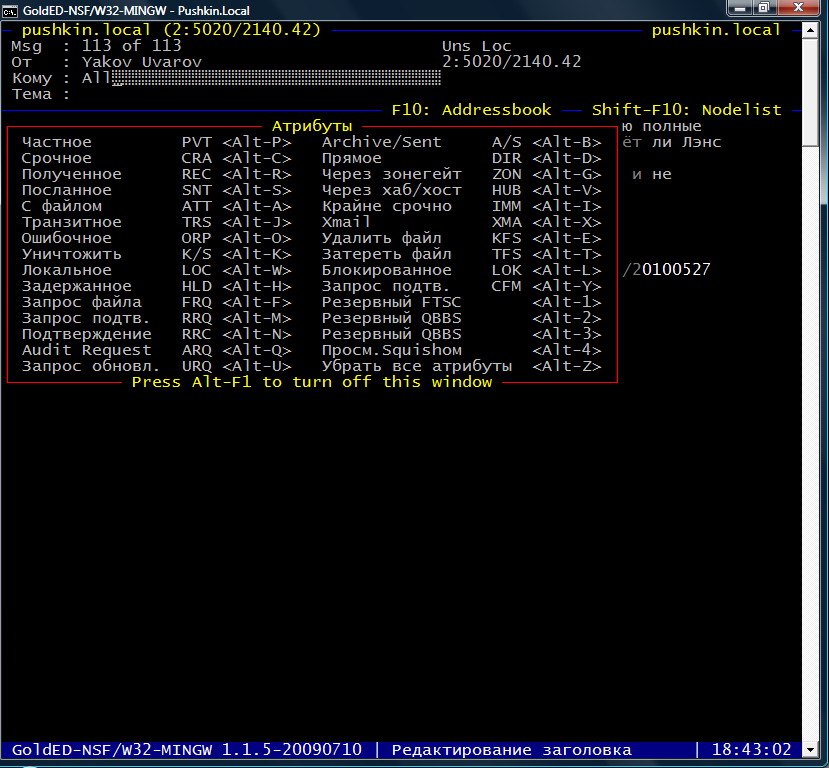
Now you need to indicate to whom exactly you are writing this message - given that you are a beginner, you probably want to greet the inhabitants of the node - so, perhaps, leave “All” in the “To” field. Now use the cursor keys or Enter to go to the next field, and specify the subject of the message - while it is desirable to specify it in as much detail as possible and understandable to others - this is not Chat Crib, after all. Is it done? Well, press Enter to confirm the parameters, and start typing the first echomail :)
Finished? Now press F2 and write the message to the queue:

Now you just have to get out of GoldED by pressing Esc twice, responding positively to the exit question, or simply by pressing Ctrl + Q.
Since our echomail is already ready to be sent, we run rs.bat again - now binkd will not only check if the node has a netmail or echomail for us, but also sends our composed message to the desired echo, and then it will automatically close.
This is how an approximate session of an ordinary point looks like - first request information about the presence or absence of a new mail, launch the editor, read the received message and reply to it, or write a new letter, and then launch the mailer again to send its messages. Everything. For convenience, simply pull the labels from the batch file we need on the desktop or in some launcher, and enjoy life.
Due to the fact that in modern NT-systems that most modern Windows users use anyway, DOS doesn’t exist as such, GoldED doesn’t look particularly good. Since you will not be able to go to fullscreen * , I advise you to expand the processor to full screen (well, or rather, half the screen) by double-clicking on the window title, having previously specified a font of type Luicida Console of at least 16th point in the shortcut properties - otherwise You just break your eyes.
* Will not succeed on Windows Vista and above. On 9x \ ME, the full screen works as it should work, but on XP it works at least somehow. In any case, in the window at 5.1 and above, GoldED looks more presentable :)
In addition, returning to the roots of the processor, the main difficulty attributed to GoldED, and which I have to agree with, is managing 99% of the program’s functions exclusively through hotkeys. Thus, a newbie who is usually confused about being lazy to read many, many manuals will at first be rather difficult to figure out with program management. Therefore, I think this list of hotkeys will make life easier for the user, who is too lazy to read the README to GoldED.
F1 - help, yes not simple, but context-sensitive. Depending on which mode the editor will be in - whether in letter editing mode, viewing the list of echoes, or origin changes, the contents of the issued help will differ. Closes the help window for the same F1
F2 - letter editing menu; allows you to edit other people's letters on your machine if necessary, and allows you to manage the saving for the subsequent sending of your letters, their deletion, or return to editing the header of the letter.
F3 - quick response to an open letter without quoting
F4, Shift + Q - the answer to the currently open letter with full quotation
F5, Alt + N / Alt + B - a quick response to an open letter in the required echo (with full quoting)
F6 - Search
F7 - save letter to text file or print it
F8 - displaying the hierarchy of responses to the currently open letter
F9 - display of all available messages in the currently open echo
F10 - search for node with output of information about it available from the nodelist
Ctrl + Insert - copy selected text
Shift + Insert - paste text from the clipboard
Alt + ' - display all valid links present in an open message (when you select the desired one using the cursors, it will be opened in the default browser, if it is http, and directly in the GED, if it is an area)
Alt + D - delete the currently opened message.
Alt + D in edit mode - delete the line
Alt + M - transfer / copy / format
Alt + I - info about the letter
Alt + V - letter letters
Cursors: up and down - navigation between menu items; left-right - sequential movement between letters in echo
PageUp \ Down - scrolling messages one screen up and down
Enter - confirmation of the data entered in the field and automatic transition to the next
Tab - standard, navigation between fields for input; when editing a message - “red lines”
Shift + cursor up / down - select text in an open message to delete or move
Ctrl + Q - instant forced exit from the program
I admit that the list of keys is incomplete, because in many respects it is clarified by typing.
Any constructive additions are welcome.
On this, perhaps, the first article of the cycle is completed.
Today we learned how to install a point-kit, configure it to work with a specific node, and even sent the first message to a local echo. In the next article we will talk about how in our time you can find a live and at the same time an interesting echo conference, about the rules of etiquette and behavior in echoes, as well as how you can still read and write in Fido.
All the best, your 2: 5020 / 2140.42 :)
I am very grateful to Sergey Poziturin, boss of node 2: 5020/2140, Ivan Agarkov, boss of node 2: 5020/848, and also all users of pushkin.local ehi for helping to prepare this material.
It is said? Done? As if not so.
The last time I used Fido, barely went to school - yes, gentlemen, I am a shkolota, and I’m in Fido, forgive me - and therefore I hardly remembered the terminology, could not imagine anything about the process of setting up software, and about other underwater stones. The articles that recently appeared on Habré contained a theory and basic prerequisites - but nothing more was said about a specific software in a volume more than a couple of words - and in fact, setting up software is one of the most important stages of entering Fido .
In general, having briefly talked with the boss of my node - yes, that 2: 5020/2140 (Sergey, you become popular, yy), I decided to write this something; a story about stuffed cones, which is written, albeit a noob, but a noob that has already more or less dealt with GoldED hotkeys, learned to search for live ehi and subscribe to them, and already slightly penetrated into the general spirit of the Network of Friends - because the materials posted on many sites The nodes are for reference only, and are aimed at experienced users. For newbies on the net, my material, I hope, can be very useful.
Disclaimer
All actions described in this article are valid primarily for node 2: 5020/2140, because they were performed on it using the method of scientific tying and smoking manuals. I admit that your node may not have a transport via NNTP or something else. Otherwise, I suppose, the material is universal.
')
Also, I highly doubt that someone from Habrovites will go to Fido through a daylap - therefore I will describe the process of entering the network exactly Point-Over-IP. Looking ahead, I will say that we will work under Windows and the fidoip soup set, which includes the GoldED-NSF processor, the binkd mailer and other difference.
The very beginning
Suppose you have already contacted the boss of your node, and got your hands on a beautiful, or not, point address. Wondering what to do with it? I'll tell you.
First of all, we need to figure out what software is required for the operation of our point. There is a lot of software - both multiplatform, for example, the GoldED echo processor, the binkd mailer, and other attached things, as well as purely Win-solutions - for example, hypertext, great and terrible HellED . Honestly, I, unlike the author of the article “The Story of One Point,” did not have the patience to cut out all the frosts from Hella, straighten the curvature of the native interface and clean out all the trash left from the author of the program, so I sighed, rolled up my sleeves, and went to pack fidoip is such a soup set consisting of the binkd mailer, the GoldED-NSF echo processor, and other things that are no less necessary for the life of the software.
The installation of the point-set itself is quite simple - we grab it, unpack it to the root of any logical drive, and edit the file /usr/setup_config.vbs, which is the initial point-configuration autoconfiguration program. So, opening this file in any text editor, we will see something like this:
'---------------------------------
const yourFullName = "Yakov Uvarov"
const yourFTNAddress = "2: 5020 / 2140.42"
const yourStationName = "EmmaussOnline"
const yourLocation = "Tver, Russia"
const yourUplinkName = "Sergey Poziturin"
const uplinkFTNAddress = "2: 5020/2140"
const uplinkServerName = "vp.propush.ru"
const yourPassword = "your_password"
'---------------------------------
So, I describe constants in more detail, if something still remains unclear from their name:
yourFullName - your name in Latin, in the same form that you sent to your boss when registering a point
yourFTNAdress - your point address; you should give it to your boss
yourStationName - any name of your station you wish
YourLocation - Your location of the format "City, Country" - of course, in Latin
yourUplinkName is the name of the boss of your node in the Latin alphabet - in my case this is, as you can see, Sergey Poziturin
uplinkFTNAdress - FTN-address of your node
uplinkServerName - IP address or domain name of your node; do this with your boss
yourPassword - well, it's already obvious
Now all you need is to save setup_config.vbs and run it. After rustling, he will give you a message about the successful (or vice versa - unsuccessful) configuration of the kit, and in principle, it can now be used. How to use it?
We write our first echomail
Well, first you should describe how a typical session of any Fido user looks. First of all, since you are a new point, you need to run the /usr/bin/rs.bat bat file, which will launch the binkd mailer - it will contact the node, ask for a list of the echoes that you subscribe to in one way or another, and give this information to the echo processor GoldEd. Next, we run /usr/bin/ge.bat, and in front of us comes GoldED itself, great and terrible, which will look something like this:
Before us is the so-called list of zones (Arealist), i.e. all oh you are currently subscribed to. Navigation is done with cursors and the Enter key; Also, if you wish, you can enter the name of the desired ehi manually - just type it and press Enter.
Now we will try to write to any conference, for example, to a local conference of the node, pushkin.local, some message. To do this, we select the desired echo (now they are empty), and press the Insert key:
Now you need to indicate to whom exactly you are writing this message - given that you are a beginner, you probably want to greet the inhabitants of the node - so, perhaps, leave “All” in the “To” field. Now use the cursor keys or Enter to go to the next field, and specify the subject of the message - while it is desirable to specify it in as much detail as possible and understandable to others - this is not Chat Crib, after all. Is it done? Well, press Enter to confirm the parameters, and start typing the first echomail :)
Finished? Now press F2 and write the message to the queue:
Now you just have to get out of GoldED by pressing Esc twice, responding positively to the exit question, or simply by pressing Ctrl + Q.
Since our echomail is already ready to be sent, we run rs.bat again - now binkd will not only check if the node has a netmail or echomail for us, but also sends our composed message to the desired echo, and then it will automatically close.
This is how an approximate session of an ordinary point looks like - first request information about the presence or absence of a new mail, launch the editor, read the received message and reply to it, or write a new letter, and then launch the mailer again to send its messages. Everything. For convenience, simply pull the labels from the batch file we need on the desktop or in some launcher, and enjoy life.
Now about the pitfalls ...
Due to the fact that in modern NT-systems that most modern Windows users use anyway, DOS doesn’t exist as such, GoldED doesn’t look particularly good. Since you will not be able to go to fullscreen * , I advise you to expand the processor to full screen (well, or rather, half the screen) by double-clicking on the window title, having previously specified a font of type Luicida Console of at least 16th point in the shortcut properties - otherwise You just break your eyes.
* Will not succeed on Windows Vista and above. On 9x \ ME, the full screen works as it should work, but on XP it works at least somehow. In any case, in the window at 5.1 and above, GoldED looks more presentable :)
In addition, returning to the roots of the processor, the main difficulty attributed to GoldED, and which I have to agree with, is managing 99% of the program’s functions exclusively through hotkeys. Thus, a newbie who is usually confused about being lazy to read many, many manuals will at first be rather difficult to figure out with program management. Therefore, I think this list of hotkeys will make life easier for the user, who is too lazy to read the README to GoldED.
Hotkeys
F1 - help, yes not simple, but context-sensitive. Depending on which mode the editor will be in - whether in letter editing mode, viewing the list of echoes, or origin changes, the contents of the issued help will differ. Closes the help window for the same F1
F2 - letter editing menu; allows you to edit other people's letters on your machine if necessary, and allows you to manage the saving for the subsequent sending of your letters, their deletion, or return to editing the header of the letter.
F3 - quick response to an open letter without quoting
F4, Shift + Q - the answer to the currently open letter with full quotation
F5, Alt + N / Alt + B - a quick response to an open letter in the required echo (with full quoting)
F6 - Search
F7 - save letter to text file or print it
F8 - displaying the hierarchy of responses to the currently open letter
F9 - display of all available messages in the currently open echo
F10 - search for node with output of information about it available from the nodelist
Ctrl + Insert - copy selected text
Shift + Insert - paste text from the clipboard
Alt + ' - display all valid links present in an open message (when you select the desired one using the cursors, it will be opened in the default browser, if it is http, and directly in the GED, if it is an area)
Alt + D - delete the currently opened message.
Alt + D in edit mode - delete the line
Alt + M - transfer / copy / format
Alt + I - info about the letter
Alt + V - letter letters
Cursors: up and down - navigation between menu items; left-right - sequential movement between letters in echo
PageUp \ Down - scrolling messages one screen up and down
Enter - confirmation of the data entered in the field and automatic transition to the next
Tab - standard, navigation between fields for input; when editing a message - “red lines”
Shift + cursor up / down - select text in an open message to delete or move
Ctrl + Q - instant forced exit from the program
I admit that the list of keys is incomplete, because in many respects it is clarified by typing.
Any constructive additions are welcome.
On this, perhaps, the first article of the cycle is completed.
Today we learned how to install a point-kit, configure it to work with a specific node, and even sent the first message to a local echo. In the next article we will talk about how in our time you can find a live and at the same time an interesting echo conference, about the rules of etiquette and behavior in echoes, as well as how you can still read and write in Fido.
All the best, your 2: 5020 / 2140.42 :)
I am very grateful to Sergey Poziturin, boss of node 2: 5020/2140, Ivan Agarkov, boss of node 2: 5020/848, and also all users of pushkin.local ehi for helping to prepare this material.
Source: https://habr.com/ru/post/98504/
All Articles