Alan.Platform Tutorial (Part 2)
In the first part, we started modeling checkers with the help of Alan.Platform. We created a library of elements, to which we added one element, an operator that controls the location of the checkers. Also, using the constructor, we created two checkers located at the corners of the platform. All this could be seen in the console, in the form of text, which was kindly compiled by ObjectDumper.
No matter how good ObjectDumper is, it’s difficult for our brain to see a board for playing checkers among key-value pairs. Therefore, you need to create a graphical representation for the model. This we will soon do.
From the graphical interface, we need two things. The first is the opportunity to see the objects of the created world in the window, to learn their properties. The second is the ability to act on these objects, change their properties. It just so happened that the same possibilities are required of the model of the organism - it should be able to “feel” the properties of the surrounding objects, and also be able to perform actions on them that change these properties.
This means that the creation of a graphical interface will be similar to the simulation of the body. And it is not just similar - the same classes and principles will be used. The easiest way to explain this is with the following diagram:
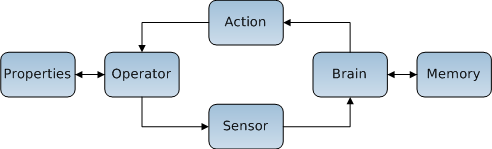
Arrows indicate in which direction the information is moving. As I said in the first part - the information goes in a circle. The operator and the brain interact with each other. At the same time, the states of the world (Properties) and the brain (Memory) change.
')
Actions and sensors in this case are mediators of this interaction, mediators. Their main task is to transform information from a form that is understandable to one side to a form that is understandable to the other. For the operator - this is a set of properties, and for the brain - an array of values.
Actions, sensors and the brain together are one entity - the body. In Alan.Platform the organism is implemented as a class derived from the component - the client. To him was added the ability to contain a set of sensors, actions and the brain.
Thus, for the system, our interface is a normal organism that has a certain shape, location and other properties that the model objects have. He himself is one of these objects. And we can all see it with “eyes” and interact with the system with its “hands”.
So, what parts will our body consist of? We need one sensor that will be connected to the CellBoard operator created earlier and that will be able to see the location of the checkers and convert this information into something suitable for display in the window. You also need one action that will move the checkers on the platform. Finally, you need a brain that will manage all of this. He will be responsible for rendering the checkers and handling user actions.
It sounds quite difficult, but the suitable brain is already in the Alan.Platform. It uses WPF to render objects. Moreover, it is itself inherited from FrameworkElement, so that it can be placed directly on the window.
Armed with theory, you can smoothly move on to the practical part. Copy the Platform.Explorer and ElementsLibSample projects from Alan.Platform into the previously created solution. Let's make Platform.Explorer a default project and add to it a link to a previously created element library containing CellBoard.
Let's start with the sensor. Add a new class UISensor to our library of elements.
Normally, the ChannelsCount indicates the number of values that are transmitted to the brain. But our interface brain is not quite ordinary and does not accept values. In order to squeeze at least some benefit from the attribute, a scale is transferred to its constructor. By convention, all property values range from 0 to 1. Thus, our checked board has dimensions 1x1. Using the scale, the board will have a size of 300x300 units when drawing in the window.
Next we have implementations of abstract methods. The Update method is declared in the abstract class Mediator, from which Sensor and Action are inherited. It helps to realize the "field of view". For a sensor it is a set of objects whose properties it can see. For an action, a set of objects whose properties it can change. These objects are stored in the VisibleElements protected field. Since we need to see all the objects, the implementation of the Update method will take the form:
The Transmit method is declared in the Sensor class. His task is to transmit to the brain information about the properties of objects, previously transforming it into a form that the brain can understand. This method is called by the operator when property values change. Therefore, the brain is always relevant information about the state of the world.
Our brain expects to receive information on how to draw objects. This mechanism uses the RenderInstructions - a simple wrapper for DrawingVisual. Three methods are defined in the brain that take instructions:
However, all this is not so important. The main thing is to understand that after calling any of the three methods, we will immediately see the result on the screen.
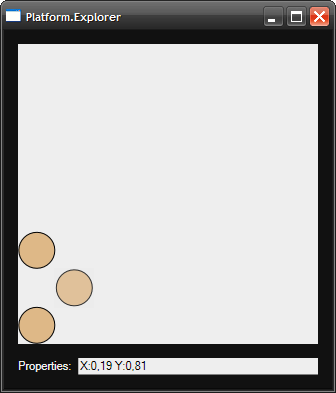
With arguments, I think, everything should be clear. Shapes is an enumerated type that so far contains only two forms - an ellipse and a rectangle. There are dimensions, there is a fill, but there are no coordinates themselves. It would not be desirable at each moving drafts to open and close the DrawingContext. Therefore, the movement will be implemented using the TranslateTransform. Initially, the centers of all checkers will be at the point (0,0), from where they will be transmitted to the destination. To offset the checkers on the screen, you just need to change the values of the X and Y properties of the corresponding TranslateTransform object. Since these properties are DependencyProperty, you can use animation to change them.
With drawing it seems to have figured out, you can begin to implement it. In the Transmit method, we will need to change the properties of the TranslateTransform. But before changing them, you need to add this transformation to the RenderInstructions. There you need to add all the other instructions. This must be done once after starting the program.
The most suitable place for this is the ConnectTo method, declared in the IConnectable interface, which all elements implement. It is called immediately after starting the program and helps to bind the elements. Therefore, it is a good place to initialize.
We add to our library of elements links to PresentationCore, PresentationFramework, WindowsBase and the ElementsLibSample project.
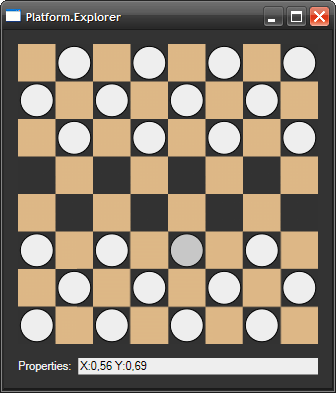
BaseUIBrain supports object selection. If you click on any of the checkers, at the bottom you can see the values of all its properties (values are rounded). With a little tweaking of XAML and world.xml, you can achieve the following result:
So, there is a sensor, there is a brain. Left action. Add a new class MoveChecker to our library of items.
Three arguments will suffice for our action. In the first one there will be a checker id to move, in the second one the value to which the coordinate “X” needs to be changed, and in the third one the value to which the coordinate Y is to be changed.
That part of the Alan.Platform, which is responsible for changing the properties, is closely related to the internal time of the platform, which I have not mentioned. Internal time is implemented in cycles. The center of time management is the static class Platform.Core.Concrete.Time.
The idea is that there are some objects, the state of which may depend on time. These objects are registered in the Time class. Then, when the user calls the Time.Tick () method, a similar method is called on all registered objects. The developer can override this method. These objects are called TimeObjects, and the PropertySet is one of them.
PropertySet allows you to schedule property changes as follows:
The reason why a delta is used, rather than a new property value, is simple — several deltas can be planned for one measure. And no matter in which order they will be applied, the end result will remain the same (simple arithmetic rule).
Now you can start implementing DoAction:
The UIBrain_KeyDown handler is very simple:
The Tick method returns control only when all its subscribers process this event. That is, when changes in properties scheduled for the next cycle will be applied. At the very end, the OnChanged method is called, which updates the property information at the bottom of the window. The beat will be counted when you press any of the keys.
UIBrain is ready. It remains only to specify it in world.xml instead of BaseUIBrain and you can run ... The launch fails because we forgot to implement CellBoard.ValidatePropertySet. This method is called immediately after changing the values of the properties in the set. It is in it that the laws of the world are realized. Here is what his ad looks like in the Operator class:
Restarting fails because we forgot to implement UISensor.Transmit as well. Here we need to change the properties of the TranslateTransform objects.
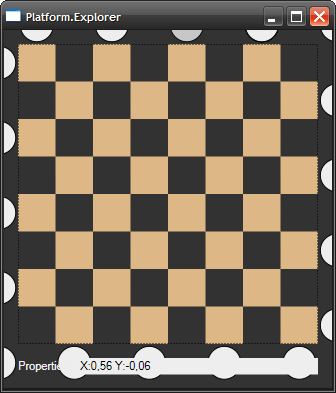
Of course, there are some shortcomings. For example, you can not remove a knocked checker, you can only move it outside the window. Deleting and adding objects is not currently supported in Alan.Platform. You can walk with checkers both forward and backward and even put one on top of another. In principle, this can be fixed - it is enough to add the appropriate code to the CellBoard.ValidatePropertySet, which will reject such checker states. You can also add colors to the checkers, and also add the state “lady-not lady”. All this can be done by adding another operator and connecting its own sensor and action to it.
This tutorial ends. In it, we created a model of a world inhabited by 24 checkers, one of which is an organism-interface. The archive with the final result can be downloaded here .
In general, the model does not have to be bound to WPF. It is quite possible by analogy to create a new Command Line Interface in the form of an organism and add it to the rest of the checkers. It is possible not to add organisms to the model at all, but then no one will see its state and no one will change it.
At the very end, I would like to answer the question - what is Alan.Platform? This is what allows you to forget about the service code, about creating and linking objects, about keeping them up-to-date, etc. You can just sit down and do modeling.
PS It may seem that this idea of creating objects at runtime is redundant, complex and inconvenient. It would be much simpler and clearer to create strongly typed objects with properties similar to how it is shared in ORM systems. On the one hand, this will simplify the creation of objects, since it will be possible to use all the advantages of OOP. On the other hand, it will complicate the creation of the laws of the world and the interaction of the brain with objects.
Those wishing to participate in the project or use it to create something, please contact the LAN or knock on the jabber:
openminded@xdsl.by
No matter how good ObjectDumper is, it’s difficult for our brain to see a board for playing checkers among key-value pairs. Therefore, you need to create a graphical representation for the model. This we will soon do.
From the graphical interface, we need two things. The first is the opportunity to see the objects of the created world in the window, to learn their properties. The second is the ability to act on these objects, change their properties. It just so happened that the same possibilities are required of the model of the organism - it should be able to “feel” the properties of the surrounding objects, and also be able to perform actions on them that change these properties.
This means that the creation of a graphical interface will be similar to the simulation of the body. And it is not just similar - the same classes and principles will be used. The easiest way to explain this is with the following diagram:
Arrows indicate in which direction the information is moving. As I said in the first part - the information goes in a circle. The operator and the brain interact with each other. At the same time, the states of the world (Properties) and the brain (Memory) change.
')
Actions and sensors in this case are mediators of this interaction, mediators. Their main task is to transform information from a form that is understandable to one side to a form that is understandable to the other. For the operator - this is a set of properties, and for the brain - an array of values.
Actions, sensors and the brain together are one entity - the body. In Alan.Platform the organism is implemented as a class derived from the component - the client. To him was added the ability to contain a set of sensors, actions and the brain.
Thus, for the system, our interface is a normal organism that has a certain shape, location and other properties that the model objects have. He himself is one of these objects. And we can all see it with “eyes” and interact with the system with its “hands”.
So, what parts will our body consist of? We need one sensor that will be connected to the CellBoard operator created earlier and that will be able to see the location of the checkers and convert this information into something suitable for display in the window. You also need one action that will move the checkers on the platform. Finally, you need a brain that will manage all of this. He will be responsible for rendering the checkers and handling user actions.
It sounds quite difficult, but the suitable brain is already in the Alan.Platform. It uses WPF to render objects. Moreover, it is itself inherited from FrameworkElement, so that it can be placed directly on the window.
Tutorial ["Part 2"]
Armed with theory, you can smoothly move on to the practical part. Copy the Platform.Explorer and ElementsLibSample projects from Alan.Platform into the previously created solution. Let's make Platform.Explorer a default project and add to it a link to a previously created element library containing CellBoard.
Let's start with the sensor. Add a new class UISensor to our library of elements.
using System;
using System.Collections. Generic ;
using Platform.Core.Concrete;
using Platform.Core.Elements;

namespace Checkers
{
[AssociatedOperator( "Checkers.CellBoard" )]
[ChannelsCount(300)]
public class UISensor : Sensor
{
public override void Update( IEnumerable <PropertySet> elements)
{
throw new NotImplementedException();
}

public override void Transmit()
{
throw new NotImplementedException();
}
}
}Normally, the ChannelsCount indicates the number of values that are transmitted to the brain. But our interface brain is not quite ordinary and does not accept values. In order to squeeze at least some benefit from the attribute, a scale is transferred to its constructor. By convention, all property values range from 0 to 1. Thus, our checked board has dimensions 1x1. Using the scale, the board will have a size of 300x300 units when drawing in the window.
Next we have implementations of abstract methods. The Update method is declared in the abstract class Mediator, from which Sensor and Action are inherited. It helps to realize the "field of view". For a sensor it is a set of objects whose properties it can see. For an action, a set of objects whose properties it can change. These objects are stored in the VisibleElements protected field. Since we need to see all the objects, the implementation of the Update method will take the form:
public override void Update( IEnumerable <PropertySet> elements)
{
this .VisibleElements = elements;
}The Transmit method is declared in the Sensor class. His task is to transmit to the brain information about the properties of objects, previously transforming it into a form that the brain can understand. This method is called by the operator when property values change. Therefore, the brain is always relevant information about the state of the world.
Our brain expects to receive information on how to draw objects. This mechanism uses the RenderInstructions - a simple wrapper for DrawingVisual. Three methods are defined in the brain that take instructions:
public void SetShape( int id, Shapes shape, double height, double width);
public void SetBrush( int id, Brush brush);
public void SetTransform( int id, Transform transform);However, all this is not so important. The main thing is to understand that after calling any of the three methods, we will immediately see the result on the screen.
With arguments, I think, everything should be clear. Shapes is an enumerated type that so far contains only two forms - an ellipse and a rectangle. There are dimensions, there is a fill, but there are no coordinates themselves. It would not be desirable at each moving drafts to open and close the DrawingContext. Therefore, the movement will be implemented using the TranslateTransform. Initially, the centers of all checkers will be at the point (0,0), from where they will be transmitted to the destination. To offset the checkers on the screen, you just need to change the values of the X and Y properties of the corresponding TranslateTransform object. Since these properties are DependencyProperty, you can use animation to change them.
With drawing it seems to have figured out, you can begin to implement it. In the Transmit method, we will need to change the properties of the TranslateTransform. But before changing them, you need to add this transformation to the RenderInstructions. There you need to add all the other instructions. This must be done once after starting the program.
The most suitable place for this is the ConnectTo method, declared in the IConnectable interface, which all elements implement. It is called immediately after starting the program and helps to bind the elements. Therefore, it is a good place to initialize.
We add to our library of elements links to PresentationCore, PresentationFramework, WindowsBase and the ElementsLibSample project.
BaseUIBrain brain;
int scale;

public override void ConnectTo(Component parent)
{
base .ConnectTo(parent);

this .brain = this .ConnectedBrain as BaseUIBrain;
this .scale = Sensor.GetChannelsCount( this .GetType());
this .brain.Scale = scale; // .
var checkerBrush = Brushes.BurlyWood;
double diameter = 0.12 * scale; // .

// Update ,
// VisibleElements .
foreach ( var checker in this .VisibleElements)
{
// .
double x = checker[ "X" ].Value * scale;
double y = checker[ "Y" ].Value * scale;

var translate = new TranslateTransform(x, y);

brain.SetShape(checker.Id, Shapes.Ellipse, diameter, diameter);
brain.SetBrush(checker.Id, checkerBrush);
brain.SetTransform(checker.Id, translate);
}
}<? xml version ="1.0" ? >
< component xmlns ="http://alan.codeplex.com/constructor/world" >
< operator name ="Checkers.CellBoard" />
< component >
< propertySet name ="Checker" operator ="Checkers.CellBoard" >
< property name ="X" value ="0.0625" />
< property name ="Y" value ="0.6875" />
</ propertySet >
</ component >
< component >
< propertySet name ="Checker" operator ="Checkers.CellBoard" >
< property name ="X" value ="0.0625" />
< property name ="Y" value ="0.9375" />
</ propertySet >
</ component >
< client >
< propertySet name ="Checker" operator ="Checkers.CellBoard" >
< property name ="X" value ="0.1875" />
< property name ="Y" value ="0.8125" />
</ propertySet >
< sensor name ="Checkers.UISensor" />
< brain name ="ElementsLibSample.UIElements.BaseUIBrain" />
</ client >
</ component >BaseUIBrain supports object selection. If you click on any of the checkers, at the bottom you can see the values of all its properties (values are rounded). With a little tweaking of XAML and world.xml, you can achieve the following result:
So, there is a sensor, there is a brain. Left action. Add a new class MoveChecker to our library of items.
using System;
using System.Linq;
using System.Collections. Generic ;
using Platform.Core.Concrete;

namespace Checkers
{
[AssociatedOperator( "Checkers.CellBoard" )]
[ChannelsCount(3)]
public class MoveChecker : Platform.Core.Elements.Action
{
public override void Update( IEnumerable <PropertySet> elements)
{
this .VisibleElements = elements;
}

public override void DoAction( params double [] args)
{
throw new NotImplementedException();
}
}
}Three arguments will suffice for our action. In the first one there will be a checker id to move, in the second one the value to which the coordinate “X” needs to be changed, and in the third one the value to which the coordinate Y is to be changed.
That part of the Alan.Platform, which is responsible for changing the properties, is closely related to the internal time of the platform, which I have not mentioned. Internal time is implemented in cycles. The center of time management is the static class Platform.Core.Concrete.Time.
The idea is that there are some objects, the state of which may depend on time. These objects are registered in the Time class. Then, when the user calls the Time.Tick () method, a similar method is called on all registered objects. The developer can override this method. These objects are called TimeObjects, and the PropertySet is one of them.
PropertySet allows you to schedule property changes as follows:
propertySet[ "PropertyName" ][ticks] = delta;checker[ "Y" ][1] = 0.125;The reason why a delta is used, rather than a new property value, is simple — several deltas can be planned for one measure. And no matter in which order they will be applied, the end result will remain the same (simple arithmetic rule).
Now you can start implementing DoAction:
public override void DoAction( params double [] args)
{
var checker = this .VisibleElements.First(x => x.Id == args[0]);

checker[ "X" ][1] = args[1];
checker[ "Y" ][1] = args[2];
}...
</ propertySet >
< action name ="Checkers.MoveChecker" />
< sensor name ="Checkers.UISensor" />
< brain name ="ElementsLibSample.UIElements.BaseUIBrain" />
</ client >
...using ElementsLibSample.UIElements;
namespace Checkers
{
public class UIBrain : BaseUIBrain
{
}
}public override void ConnectTo(Decorator parent)
{
base .ConnectTo(parent);
this .KeyDown += UIBrain_KeyDown;
}The UIBrain_KeyDown handler is very simple:
void UIBrain_KeyDown( object sender, KeyEventArgs e)
{
if ( this .selectedId != 0)
{
var moveChecker = this .actions[ "Checkers.MoveChecker" ];

switch (e.Key)
{
case Key.Q:
moveChecker.DoAction(selectedId, -0.125, -0.125);
break ;
case Key.W:
moveChecker.DoAction(selectedId, 0.125, -0.125);
break ;
case Key.S:
moveChecker.DoAction(selectedId, 0.125, 0.125);
break ;
case Key.A:
moveChecker.DoAction(selectedId, -0.125, 0.125);
break ;
}
Time.Tick();
OnChanged(selectedId);
}
}The Tick method returns control only when all its subscribers process this event. That is, when changes in properties scheduled for the next cycle will be applied. At the very end, the OnChanged method is called, which updates the property information at the bottom of the window. The beat will be counted when you press any of the keys.
UIBrain is ready. It remains only to specify it in world.xml instead of BaseUIBrain and you can run ... The launch fails because we forgot to implement CellBoard.ValidatePropertySet. This method is called immediately after changing the values of the properties in the set. It is in it that the laws of the world are realized. Here is what his ad looks like in the Operator class:
public abstract bool ValidatePropertySet(PropertySet ps);Restarting fails because we forgot to implement UISensor.Transmit as well. Here we need to change the properties of the TranslateTransform objects.
public override void Transmit()
{
foreach ( var element in VisibleElements)
{
var translate = brain.GetTransform<TranslateTransform>(
element.Id);
translate.X = element[ "X" ].Value * scale;
translate.Y = element[ "Y" ].Value * scale;
}
}Of course, there are some shortcomings. For example, you can not remove a knocked checker, you can only move it outside the window. Deleting and adding objects is not currently supported in Alan.Platform. You can walk with checkers both forward and backward and even put one on top of another. In principle, this can be fixed - it is enough to add the appropriate code to the CellBoard.ValidatePropertySet, which will reject such checker states. You can also add colors to the checkers, and also add the state “lady-not lady”. All this can be done by adding another operator and connecting its own sensor and action to it.
This tutorial ends. In it, we created a model of a world inhabited by 24 checkers, one of which is an organism-interface. The archive with the final result can be downloaded here .
In general, the model does not have to be bound to WPF. It is quite possible by analogy to create a new Command Line Interface in the form of an organism and add it to the rest of the checkers. It is possible not to add organisms to the model at all, but then no one will see its state and no one will change it.
At the very end, I would like to answer the question - what is Alan.Platform? This is what allows you to forget about the service code, about creating and linking objects, about keeping them up-to-date, etc. You can just sit down and do modeling.
PS It may seem that this idea of creating objects at runtime is redundant, complex and inconvenient. It would be much simpler and clearer to create strongly typed objects with properties similar to how it is shared in ORM systems. On the one hand, this will simplify the creation of objects, since it will be possible to use all the advantages of OOP. On the other hand, it will complicate the creation of the laws of the world and the interaction of the brain with objects.
- Analogue of the operator will not be possible to create, even using the Reflection API.
- The laws of the world will have to be built into the objects themselves.
- The inheritance tree will constantly grow.
- Composition can complicate the process of creating objects.
- Analogues of sensors and actions will have to either know about all types of objects, or use the Reflection API.
Those wishing to participate in the project or use it to create something, please contact the LAN or knock on the jabber:
openminded@xdsl.by
Source: https://habr.com/ru/post/98006/
All Articles