Configure client certificate authentication in IIS using OpenSSL
Good day,% username%!
Earlier, I talked about generating certificates with elliptic curves.
Today I will talk about how you can effortlessly configure IIS authentication using regular RSA client certificates, generate certificates for the server and client. And OpenSSL will help me in this as always.
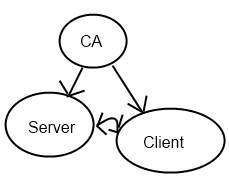
In order for everything to work, we will need at least 3 certificates:
- Root certificate (Certificate Authority or CA). They will sign all the rest.
- Certificate domain (server). IIS will check customers. Conversely, clients will be able to verify the authenticity of the server.
- Certificate (s) of client (s)
To work we need a separate folder, for example c: \ iis . It is necessary to create a file without a serial extension and write 01 there, just to create an empty index.txt file there . Depending on the configuration, OpenSSL may ask you to create some more inside this folder. In my case, this was the newcerts folder. Also in OpenSSL.cfg you will need to change in [CA_default] dir to c: / iis
1) Create a self-signed root certificate:
openssl req -new -x509 -newkey rsa:2048 -days 1000 -out c:\iis\ca.crt -keyout c:\iis\ca.key- -new means we want to create a new query.
- -x509 we want a self-signed certificate right away
- -newkey rsa: 2048 Suppose that the key will also generate us a length of 2048 bits. instead of rsa: <number of bits>, by the way, you can specify dsa : <file with parameters> or ec : <file with parameters>
- -days 1000 - the certificate will expire after 1000 days
- -out and -keyout indicate where to save the certificate and the private key from it
After a series of simple questions, the ca.crt certificate and the ca.key private key will appear in the iis folder .
')
Now, in order for IIS to recognize all certificates signed by root, you need to install the root certificate in the computer’s trusted certificate centers :
- Run mmc
- Add a snap-in certificates and indicate that it will manage certificates for the computer account , otherwise nothing will start.
- Open the "Trusted Root Certification Authorities" and import our CA there:

Done! You can start working with the server.
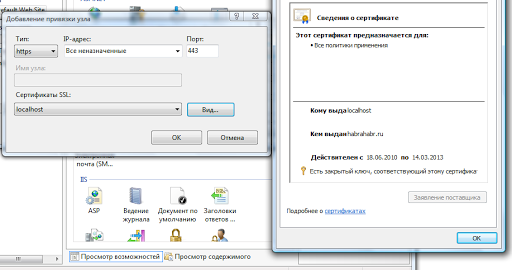
2) In the IIS management console, you need to go to the Server Certificates, right-click the menu and click on create a new certificate request . Save it to c: \ iis as server.csr
Now we will sign the server certificate request with the root certificate:
openssl ca -days 1000 -policy policy_anything -keyfile c:\iis\ca.key -cert c:\iis\ca.crt -in c:\iis\server.csr -out c:\iis\server.cer-policy policy_anything means that the certificate will be provided with all possible application policies. The easiest option. The remaining parameters, I believe, do not need an explanation. The main thing is not to get confused where to specify which file.
After that, we will have a server.cer server certificate in c: \ iis that needs to be installed in IIS.
To do this, we again go to the "server certificates", select "Certificate installation request" and there we specify c: \ iis \ server.cer.
Everything, the server has a certificate.
Now you need to create a new https binding in the bindings for the site and select our server certificate from the list:
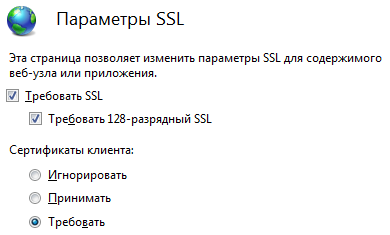
After that, in the SSL settings for the node, set the options as follows:
Done! There is a client. But at this stage it is already possible to go to https: // localhost / and see that it does not allow you without a certificate.
3) Generate a request for a client certificate
openssl req -new -newkey rsa:2048 -days 1000 -keyout c:\iis\client.key -out c:\iis\client.csrHere we didn’t specify -x509, so we received the usual certificate request and client private key.
Sign the request:
openssl ca -days 1000 -policy policy_anything -keyfile c:\iis\ca.key -cert c:\iis\ca.crt -in c:\iis\client.csr -out c:\iis\client.crtHere, too, everything is clear, as a result we will receive a client.crt client certificate.
Now, in order to import the client certificate into the Windows certificate store with the key, we need to convert crt + key into the .pfx container:
openssl pkcs12 -export -inkey c:\iis\client.key -in c:\iis\client.crt -out c:\iis\client.pfxHooray! Received client.pfx , double-clicking on which you can bring up the certificate import dialog and, in fact, establish what happened in your personal store.
If everything is done correctly, then after importing the certificate to the personal store you should be sent to https: // localhost / and show the contents.
You can generate another certificate with other data and also import it. Then when you go to the server you will be asked to choose any of them:

That's all )
Lastly, the aspx code of the page (save it as Default.aspx), which allows you to check everything: It displays information about the client certificate:
<%@ Page Language="C#"%>
<%@ Import Namespace="System.Security.Cryptography" %>
< script runat ="server" >
private void Page_Load( object sender, System.EventArgs e)
{
Response.Write( "<table width=50% cellspacing=1><tr> <th colspan=2>Current ClientCertificate Settings</th></tr>" );

Response.Write( "<tr><td>Subject</td><td>" +Request.ClientCertificate.Subject+ "</td></tr>" );
Response.Write( "<tr><td>SHA1 Fingerprint</td><td>" +GetCertificateFingerPrint()+ "</td></tr>" );
Response.Write( "<tr><td>Valid from</td><td>" +Request.ClientCertificate.ValidFrom+ "</td></tr>" );
Response.Write( "<tr><td>Valid Until</td><td>" +Request.ClientCertificate.ValidUntil+ "</td></tr>" );
Response.Write( "<tr><td>Issuer</td><td>" +Request.ClientCertificate.Issuer+ "</td></tr></table>" );
}
private String GetCertificateFingerPrint()
{
if (Request.ClientCertificate.IsPresent)
{
byte [] raw = Request.ClientCertificate.Certificate;
SHA1 sha1 = new SHA1CryptoServiceProvider();
byte [] hash = sha1.ComputeHash(raw);
StringBuilder res = new StringBuilder();
for ( int i = 0; i < hash.Length; i++)
{
res.Append(hash[i].ToString( "X2" ));
}
return res.ToString();
}
return "" ;
}
</ script >
Have fun!
Source: https://habr.com/ru/post/96827/
All Articles