Home linux server do it yourself
I want to share with the Chabrosoischestvo information about how I collected the home server.

From the software on the home server will “spin” the following set:
')
When choosing a hardware, there were several options:
The first option was immediately dropped due to noise, dust and power consumption. The second one was ordered while the components were moving, I managed to change my mind (I wanted to reduce noise and power consumption to a minimum). As a result, HP t5000 and Neoware CA2 thin clients were bought on Ebay. A month later, thin clients came out of two, after much deliberation, Neoware CA2 was chosen. It perfectly fit 2.5 'HDD and a second network card.
After finishing, literally, Neoware CA2, I began to install Ubuntu 9.10 on it from an office TFTP server. Installation produced the most minimal. If there were no set for network installation, I would install Debian from a USB CD-ROM and netinstall disk . I myself am an ardent fan of RHEL / CentOS, but on the home server I decided to put something from the debian family to expand my horizons.
Now we are going to install torrent client and webmord. The rtorrent + rutorrent bundle was chosen, the installation from the repositories was ticked off immediately, because The “native” package was compiled without xmlrpc-c which extends the functionality of the rutorrent. Below, in fact, a script for auto-installing rtorrent + rutorrent + lighttpd + php.
Install everything you need to compile xmlrpc-c, libtorrent, rtorrent
Compile and "wrap" in .deb package xmlrpc-c, libtorrent, rtorrent
Unfortunately, rtorrent does not know how to work in daemon mode, for this we will use screen
We create a config and folders for sessions and finished torrent downloads, and then we start rtorrent.
Now we will deal with the webmouth rutorrent. A web server and a php interpreter are required for the rutorrent to work.
The web server is ready, now we will install the rutorrent and several useful plugins for it.
Now you can go to server_ip / rutorrent and start using.
Now we’ll install a DHCP server and create a config for it so that clients receive:
router 192.168.1.1
dns server 8.8.8.8
time server time.nist.gov
tftp server 192.168.1.1
and for example, a fixed payout of 192.168.1.100 to the client with the MAC address 00: 1B: FC: 33: F0: 25
lines with option-150 are needed for my Cisco 7940 VoIP phone.
Now check if the tftp server is working.
Everything is fine, now we will create netinstall kits for several operating systems: Ubuntu karmic, Ubuntu lucid, Debian lenny, Debian sid, Debian squeeze, Fedora 13, CentOS 5.5, Mandriva 2010.0, Suse 11.2, Slackware 13.1, Hardware Detection Tool, memtest and MHDD. For this I propose to use a slightly modified script that I took from HowtoForge .
Now add SystemRescueCd to the PXE menu
Without much difficulty, you can add Acronis products, installation and launch of Windows XP and so on to this menu.
This is how our menu will look like:
Continued in the next part. Namely:
and summarize the article script that installs all this in “two clicks”.
I am pleased to hear comments and additions.
From the software on the home server will “spin” the following set:
- torrent client with web-muzzle
- DHCP - we distribute ip addresses and network settings
- TFTP - for network boot
- OpenVPN - for going to a network from a netbook from untrusted networks
- FTP / Samba / NFS - network access balls for home machines
- Radius - for WPA2 authorization
- DigiTemp - home temperature monitoring
Hardware
')
When choosing a hardware, there were several options:
- old comp
- mini-ITX self-assembly
- HP T5000 Thin Client
- thin client based on Neoware CA2
The first option was immediately dropped due to noise, dust and power consumption. The second one was ordered while the components were moving, I managed to change my mind (I wanted to reduce noise and power consumption to a minimum). As a result, HP t5000 and Neoware CA2 thin clients were bought on Ebay. A month later, thin clients came out of two, after much deliberation, Neoware CA2 was chosen. It perfectly fit 2.5 'HDD and a second network card.
After finishing, literally, Neoware CA2, I began to install Ubuntu 9.10 on it from an office TFTP server. Installation produced the most minimal. If there were no set for network installation, I would install Debian from a USB CD-ROM and netinstall disk . I myself am an ardent fan of RHEL / CentOS, but on the home server I decided to put something from the debian family to expand my horizons.
Soft
Torrent client and webmord
Now we are going to install torrent client and webmord. The rtorrent + rutorrent bundle was chosen, the installation from the repositories was ticked off immediately, because The “native” package was compiled without xmlrpc-c which extends the functionality of the rutorrent. Below, in fact, a script for auto-installing rtorrent + rutorrent + lighttpd + php.
Install everything you need to compile xmlrpc-c, libtorrent, rtorrent
apt-get install checkinstall subversion build-essential make autoconf autotools-dev automake libtool libcurl4-openssl-dev libsigc++-2.0-dev pkg-config libncurses5-dev
apt-get remove rtorrent libtorrent11 libxmlrpc-c3 libxmlrpc-c3-dev libxmlrpc-core-c3 libxmlrpc-core-c3-dev
Compile and "wrap" in .deb package xmlrpc-c, libtorrent, rtorrent
svn co xmlrpc-c.svn.sourceforge.net/svnroot/xmlrpc-c/advanced xmlrpc-c
cd xmlrpc-c
./configure --prefix=/usr && make && checkinstall -D

cd ..
wget libtorrent.rakshasa.no/downloads/libtorrent-0.12.6.tar.gz
tar zxfv libtorrent-0.12.6.tar.gz
cd libtorrent-0.12.6
rm -f scripts/{libtool,lt*}.m4 # Debian
./autogen.sh && ./configure --prefix=/usr && make && checkinstall -D

cd ..
wget libtorrent.rakshasa.no/downloads/rtorrent-0.8.6.tar.gz
tar zxfv rtorrent-0.8.6.tar.gz
cd rtorrent-0.8.6
rm -f scripts/{libtool,lt*}.m4 # Debian
./autogen.sh && ./configure --with-xmlrpc-c --prefix=/usr && make && checkinstall -D
Unfortunately, rtorrent does not know how to work in daemon mode, for this we will use screen
apt-get install screen -y
wget libtorrent.rakshasa.no/raw-attachment/wiki/RTorrentCommonTasks/rtorrentInit.sh --output-document=/etc/init.d/rtorrent
chmod +x /etc/init.d/rtorrent
sed -i 's/"user"/"torrents"/' /etc/init.d/rtorrent
update-rc.d rtorrent defaults
useradd -d /torrents -m torrents
We create a config and folders for sessions and finished torrent downloads, and then we start rtorrent.
mkdir /torrents/.rtorrent_session
cat >> /torrents/.rtorrent.rc <<EOF
port_range = 32001-32049
dht = auto
dht_port = 32000
peer_exchange = yes
use_udp_trackers = yes
directory = /torrents/
upload_rate = 10
download_rate = 100
session = /torrents/.rtorrent_session
scgi_port = 127.0.0.1:5000
EOF
chown -R torrents:torrents /torrents
/etc/init.d/rtorrent start
Now we will deal with the webmouth rutorrent. A web server and a php interpreter are required for the rutorrent to work.
apt-get install lighttpd php5-cgi php5-cli php5-curl curl -y
lighty-enable-mod fastcgi
echo 'server.modules += ( "mod_scgi" )' >> /etc/lighttpd/lighttpd.conf
cat >> /etc/lighttpd/lighttpd.conf <<EOF
scgi.server = (
"/RPC2" =>
( "127.0.0.1" =>
(
"host" => "127.0.0.1",
"port" => 5000,
"check-local" => "disable"
)
)
)
EOF
/etc/init.d/lighttpd force-reload
The web server is ready, now we will install the rutorrent and several useful plugins for it.
cd /var/www/
svn checkout rutorrent.googlecode.com/svn/trunk/rutorrent
cd /var/www/rutorrent/plugins/
svn checkout rutorrent.googlecode.com/svn/trunk/plugins/tracklabels
svn checkout rutorrent.googlecode.com/svn/trunk/plugins/cookies
svn checkout rutorrent.googlecode.com/svn/trunk/plugins/autotools
svn checkout rutorrent.googlecode.com/svn/trunk/plugins/erasedata
chown -R www-data:www-data /var/www/
Now you can go to server_ip / rutorrent and start using.
DHCP
Now we’ll install a DHCP server and create a config for it so that clients receive:
router 192.168.1.1
dns server 8.8.8.8
time server time.nist.gov
tftp server 192.168.1.1
and for example, a fixed payout of 192.168.1.100 to the client with the MAC address 00: 1B: FC: 33: F0: 25
aptitude install dhcp3-server
cat >> /etc/dhcp3/dhcpd.conf <<EOF
ddns-update-style interim;
not authoritative;

option domain-name-servers 8.8.8.8;
option subnet-mask 255.255.255.0;
option ntp-servers 192.43.244.18;

option option-150 code 150 = ip-address;
option option-150 192.168.1.1;

subnet 192.168.1.0 netmask 255.255.255.0 {
authoritative;
range 192.168.1.110 192.168.1.254;
option routers 192.168.1.1;
allow unknown-clients;
allow booting;
allow bootp;
next-server 192.168.1.1;
filename "pxelinux.0";

host shakirov-home {
option host-name "shakirov-home";
hardware ethernet 00:1B:FC:33:F0:25;
fixed-address 192.168.1.100; }
}
EOF
/etc/init.d/dhcp3-server restart
lines with option-150 are needed for my Cisco 7940 VoIP phone.
TFTP and network installation
aptitude install xinetd atftpd atftp

mkdir /tftpboot

cat >> /etc/xinetd.d/tftp <<EOF
service tftp
{
disable = no
socket_type = dgram
protocol = udp
wait = yes
user = root
server = /usr/sbin/in.tftpd
server_args = --tftpd-timeout 300 --retry-timeout 5 --mcast-port 1758 --mcast-addr 239.239.239.0-255 --mcast-ttl 1 --maxthread 100 --verbose=5 /tftpboot

per_source = 11
cps = 100 2
flags = IPv4
}
EOF

/etc/init.d/xinetd restart
Now check if the tftp server is working.
root@dvr:~# echo bla > /tftpboot/123
root@dvr:~# atftp 127.0.0.1
tftp> get 123
tftp>
root@dvr:~# cat 123
bla
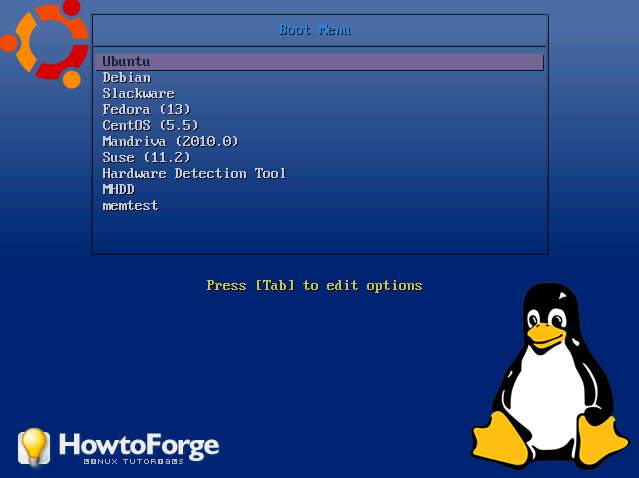
Everything is fine, now we will create netinstall kits for several operating systems: Ubuntu karmic, Ubuntu lucid, Debian lenny, Debian sid, Debian squeeze, Fedora 13, CentOS 5.5, Mandriva 2010.0, Suse 11.2, Slackware 13.1, Hardware Detection Tool, memtest and MHDD. For this I propose to use a slightly modified script that I took from HowtoForge .
apt-get install lftp -y

wget itblog.su/tftpboot_installs.sh
bash tftpboot_installs.sh
Now add SystemRescueCd to the PXE menu
wget "http://downloads.sourceforge.net/project/systemrescuecd/sysresccd-x86/1.6.3/systemrescuecd-x86-1.6.3.iso?use_mirror=citylan"
mount -o loop systemrescuecd-x86-1.6.1.iso /mnt/
cp /mnt/sysrcd.* /var/www/
cp /mnt/isolinux/initram.igz /tftpboot/
cp /mnt/isolinux/rescuecd /tftpboot/

cat >> /tftpboot/pxelinux.cfg/default <<EOF
label linux
menu label SystemRescue-CD x86-1.6.1
kernel rescuecd
append initrd=initram.igz showopts vga=normal video=ofonly setkmap=us rootpass=123321 netboot=http://192.168.1.1/sysrcd.dat #eth0=192.168.1.213/24
EOF
Without much difficulty, you can add Acronis products, installation and launch of Windows XP and so on to this menu.
This is how our menu will look like:
Continued in the next part. Namely:
- OpenVPN server for “walking” to the network from non-trusted networks (for example, from a hotel)
- FTP / Samba / NFS Network Balls
- Radius to authorize wi-fi clients
- DigiTemp the beginnings of a smart home, monitoring the temperature in the apartment and outside the window
- festival - talking alarm clock
- backups with hosting
and summarize the article script that installs all this in “two clicks”.
I am pleased to hear comments and additions.
Source: https://habr.com/ru/post/95898/
All Articles