We make high-quality binding books, do it yourself
As you know, specialized literature, and in particular, literature related to IT is an order of magnitude higher than regular books, of course, you can simply download books from the Internet and read on all sorts of devices, but these devices are not always available or they are not always charged at the right moment, but personally I practically do not perceive the textbooks from the display, the paper book with all its shortcomings is still better, as for me. Therefore, in the absence of money (a common problem among students), looking after a good book, I try to print it out and study it already in print.
At first, I simply printed on A4 sheets and sewed sideways with ordinary threads, the books were clumsy and not very comfortable, but somehow I came across a brochure of 1989, titled “The Second Life of the Book”, the brochure described many methods of restoration and repair of books , and also describes the types of bindings, that is what interested me the most. At that time, I just needed a book by David Flanagan “JavaScript. Detailed manual. That's just about how I made the binding and hard cover for this book and tell you.
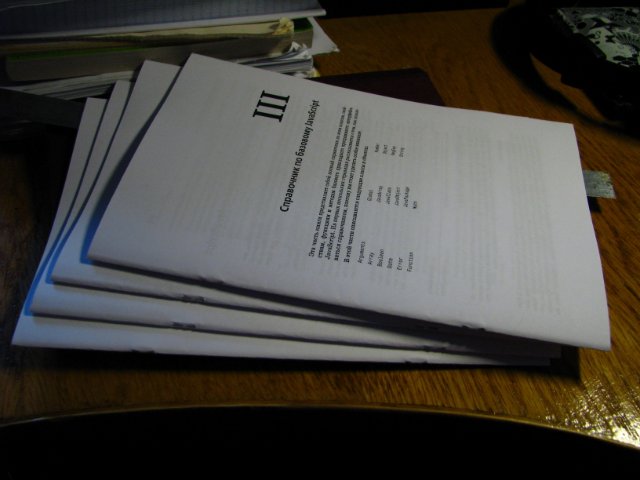
In fact, you first need to print the book itself, and print it in the form of brochures of 10 sheets of 40 pages each. Since ordinary paper is thicker than the one used in books, my book turned out to be quite thick and I decided to divide it into two parts - a tutorial and a reference book on JS. In the photo you will see the second part of the book (reference book), since the idea of writing this article came to me after finishing the first part.
')
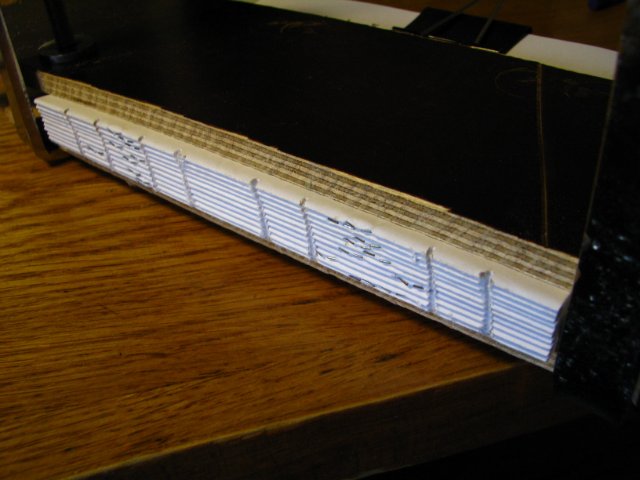
So the book is printed. For more convenience, I sewed brochures with regular brackets so that the leaves did not diverge and were fixed. It is necessary to sew all the brochures in about the same places so that the brackets do not interfere with making cuts. After all this, we take brochures, lay one on top of another in the right order and fix them in a vice. I’m afraid to do this without it if you want the edges of the book to be even and the sheets lay tight, so if you don’t have a vice to improvise. The edge of the future book should look out a little from the grip on the side where the binding will be, otherwise it will be inconvenient to glue and cut.
After fixing the pamphlets, we take a hacksaw or a saw with small teeth (a metal hacksaw will do) and make a file on the end of the book, there should be a fresh amount, a depth of about 3-4 mm, do not be afraid to do more, nothing bad will happen, but otherwise In case of insufficient depth, the work will complicate the work (this is exactly what I came up with when working on the first part).
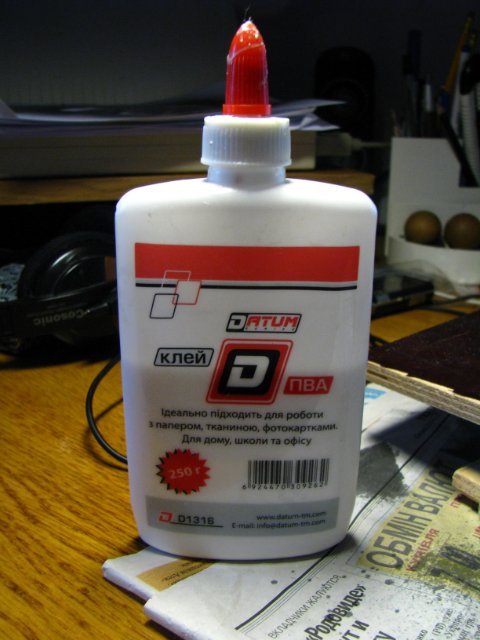
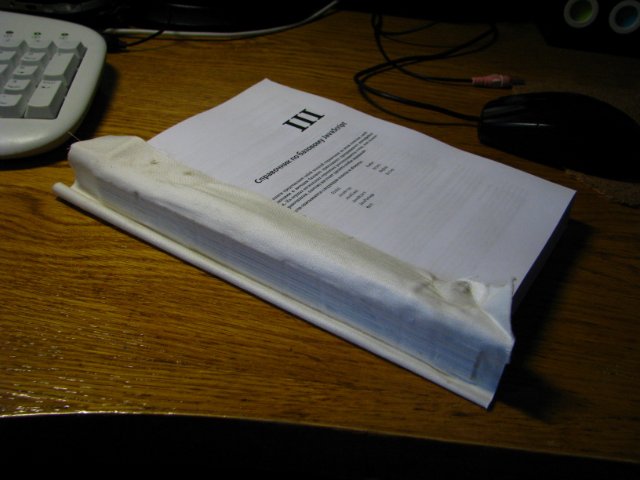
Now we take the PVA glue and abundantly smear the end of the book with glue, then we impose a previously prepared fabric (buy the glue thick and preferably in hardware stores, in the stationery stalls it is thinned).
I took the usual fabric, white, in length, it should be like the butt of the book, and in width should be 3-4 cm on each side.

For now our cover is drying, we can cover the cover. For the cover we need a piece of thick cardboard (I had a thickness of 2 mm) and a piece of thin cardboard and fabric.

Cut out two rectangles that will be sides of the book, remember that the cover should protrude a bit beyond the edges of the sheets. I cut the size of 217mm to 160mm. Now cut out the end of the cover, from a thin cardboard. It should match the thickness of the glued brochures. And cut two pieces of fabric 2–3 cm thick thicker than brochures. The length of one piece should coincide with the long cover of thick cardboard, and the second longer by 2-3 cm on each side. Proceeds. We take a longer piece of fabric, richly smear with PVA glue, glue a piece of thin cardboard in the center, and rectangles made of thick cardboard on the sides, and between this thin and thick cardboard there should be a distance of approximately 5 mm. This piece of fabric is glued to the front of the cover. Now we turn the cover upside-down and glue the second piece of fabric, and glue the sticking sides of the first piece of fabric over it (it seems to me that I described this piece of the article insufficiently, but I hope the photo will clarify the situation).


After that, I printed the cover of the original book on A4 sheets and glued it to the front side of the cover, but as time has shown, this is not very convenient because with frequent use ordinary paper quickly becomes dirty, it is best to use glossy paper, and the ideal is to use oracal self-adhesive films.


After our brochures have dried, we take them out of the grip.
Now we need to take a thread with a needle and sew each brochure to the fabric. We open the first brochure in the middle, and insert the needle from the side of the fabric into the previously made cut, pull out the needle from the other side and insert the needle into the next cut and so all the brochures are pretty easy, but you have to spend time.

After that we glue on the fabric and binding threads for durability. We are waiting until dry.

And here is the final part. We glue the sticking ends of the fabric from the binding with glue and glue it to our cover.

Then we take two clean sheets of A4, bend in half, and glue with one half to the back of the inside cover at the beginning and end of the book.

That's all. The book is ready.
Maybe someone will call it all a waste of time in our time of high technologies and process automation, but I still hope that this article will be useful to someone from the readers. Or it will be just informative.
At first, I simply printed on A4 sheets and sewed sideways with ordinary threads, the books were clumsy and not very comfortable, but somehow I came across a brochure of 1989, titled “The Second Life of the Book”, the brochure described many methods of restoration and repair of books , and also describes the types of bindings, that is what interested me the most. At that time, I just needed a book by David Flanagan “JavaScript. Detailed manual. That's just about how I made the binding and hard cover for this book and tell you.
Part one. Sawing and sticking
In fact, you first need to print the book itself, and print it in the form of brochures of 10 sheets of 40 pages each. Since ordinary paper is thicker than the one used in books, my book turned out to be quite thick and I decided to divide it into two parts - a tutorial and a reference book on JS. In the photo you will see the second part of the book (reference book), since the idea of writing this article came to me after finishing the first part.
')
So the book is printed. For more convenience, I sewed brochures with regular brackets so that the leaves did not diverge and were fixed. It is necessary to sew all the brochures in about the same places so that the brackets do not interfere with making cuts. After all this, we take brochures, lay one on top of another in the right order and fix them in a vice. I’m afraid to do this without it if you want the edges of the book to be even and the sheets lay tight, so if you don’t have a vice to improvise. The edge of the future book should look out a little from the grip on the side where the binding will be, otherwise it will be inconvenient to glue and cut.
After fixing the pamphlets, we take a hacksaw or a saw with small teeth (a metal hacksaw will do) and make a file on the end of the book, there should be a fresh amount, a depth of about 3-4 mm, do not be afraid to do more, nothing bad will happen, but otherwise In case of insufficient depth, the work will complicate the work (this is exactly what I came up with when working on the first part).
Now we take the PVA glue and abundantly smear the end of the book with glue, then we impose a previously prepared fabric (buy the glue thick and preferably in hardware stores, in the stationery stalls it is thinned).
I took the usual fabric, white, in length, it should be like the butt of the book, and in width should be 3-4 cm on each side.
Part two. Making a cover
For now our cover is drying, we can cover the cover. For the cover we need a piece of thick cardboard (I had a thickness of 2 mm) and a piece of thin cardboard and fabric.
Cut out two rectangles that will be sides of the book, remember that the cover should protrude a bit beyond the edges of the sheets. I cut the size of 217mm to 160mm. Now cut out the end of the cover, from a thin cardboard. It should match the thickness of the glued brochures. And cut two pieces of fabric 2–3 cm thick thicker than brochures. The length of one piece should coincide with the long cover of thick cardboard, and the second longer by 2-3 cm on each side. Proceeds. We take a longer piece of fabric, richly smear with PVA glue, glue a piece of thin cardboard in the center, and rectangles made of thick cardboard on the sides, and between this thin and thick cardboard there should be a distance of approximately 5 mm. This piece of fabric is glued to the front of the cover. Now we turn the cover upside-down and glue the second piece of fabric, and glue the sticking sides of the first piece of fabric over it (it seems to me that I described this piece of the article insufficiently, but I hope the photo will clarify the situation).
After that, I printed the cover of the original book on A4 sheets and glued it to the front side of the cover, but as time has shown, this is not very convenient because with frequent use ordinary paper quickly becomes dirty, it is best to use glossy paper, and the ideal is to use oracal self-adhesive films.
Part Three We sew and glue together
After our brochures have dried, we take them out of the grip.
Now we need to take a thread with a needle and sew each brochure to the fabric. We open the first brochure in the middle, and insert the needle from the side of the fabric into the previously made cut, pull out the needle from the other side and insert the needle into the next cut and so all the brochures are pretty easy, but you have to spend time.
After that we glue on the fabric and binding threads for durability. We are waiting until dry.
And here is the final part. We glue the sticking ends of the fabric from the binding with glue and glue it to our cover.
Then we take two clean sheets of A4, bend in half, and glue with one half to the back of the inside cover at the beginning and end of the book.
That's all. The book is ready.
Maybe someone will call it all a waste of time in our time of high technologies and process automation, but I still hope that this article will be useful to someone from the readers. Or it will be just informative.
Source: https://habr.com/ru/post/95761/
All Articles