Using the Command Pattern to Organize RPC Calls in GWT
In his last year's performance in the framework of Google I / O, Ray Rayan told the audience how to properly design the architecture of more or less large GWT projects. One of his recommendations is to use the Command pattern (pattern) to orginize RPC services. In this article I will try to briefly highlight this approach using the simplest GWT application as an example. For dispatching RPC calls, the gwt-dispatch GWT-Dispatch library will be used. I just want to warn you that this article is a symbiosis, conceptualization and compilation of several sources ( GWT-Dispatch Getting Started , GWT MVP Example ). Consider it as a quick start guide on how to build GWT applications correctly. All material is designed taking into account the fact that the server implementation of RPC services is also performed in Java.
It is no secret that in the development of smaller applications, design patterns (patterns) are in a hurry. Patterns are a kind of recipe for solving specific case cases. You can start in the study and application of design patterns with the Patterns on Wiki and further delve into the appropriate books, articles, works, etc.
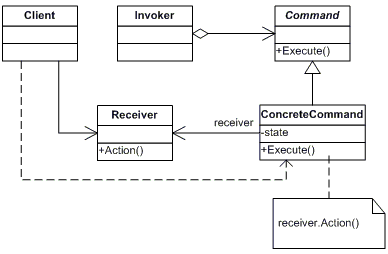
In short, the Command pattern (Command) allows you to perform specific implementations of the Command interface (Action, etc.) through a unified interface.
')
Regarding GWT RPC, the use of this approach will allow you to have one RPC service call interface (dispatcher) and transfer the object of the corresponding action (command) to it.
So, to implement RPC interaction in a project using commands, we need to connect additional libraries to the project:
To connect these libraries to the project, simply put the gin-1.0.jar, guice-2.0.jar, guice-servlet-2.0.jar and gwt-dispatch-1.0.0.jar files into WEB-INF / lib and add them to the Build Path project. The configuration of the GWT-module with the connected modules looks like this for me:
I will illustrate the creation of a team with an example of creating one RPC call. Its essence will be simple as a door: send the parameter read from the input field to the server method and get an answer. Everything. Oh yeah, display the response received on the UI. The demo project also contains a call that receives an array of fake DTO objects from the server. His code will not be discussed in this article. If interested, I can provide it further in the comments.
To create an RPC command, you need to create a class that implements the Action interface:
As you can see, nothing complicated. This command encapsulates a parameter that will be passed to the server. The only interesting point here is an indication that the result of the execution will be an object of the class SingleRequestResult:
which also encapsulates data that will “arrive” to client code.
At the moment, preparations on the client side are over. It's time to take toasting coffee beans that will work on the server. By the way, our server will work on Google App Engine.
The GWT-Dispatch library provides tools for organizing dispatchers for both client and server parts.
Let's start the server-side configuration with the servlet manager that will handle the RPC calls:
The
Now we implement a handler that will be tied to the command declared on the client side (
The command handler implements a generic interface, the parameterization of which indicates the command and its result. In this case, these are
The result of the
Well, the
In addition to directly dispatching and providing the Action and Result interfaces, the GWT-Dispatch library also provides integration with Google Guice. This integration allows you to register command handlers in a Guice context:
Let's tie it all together using the
The
The last step that is needed in order for all of this to play as a single ensemble is to specify the necessary listener in the web.xml file and the corresponding query filter:
The server part is ready. It now remains to associate the RPC calls with the client code with the dispatcher.
For calls to RPC commands in the GWT code, the interface is
Below I will only give you a click handler on a button that initiates an RPC call through the specified interface and displays the result received from the server side:
The main point here is that we give the dispatcher an initialized command to send it to the server. In the callback from the received SingleRequestResponse, the result is simply retrieved:
Everything is written, implemented, configured and even works!
The screenshot below shows the structure of the demo project in the Project Packages panel.

If you look at it, you can see that another RPC team,
Project for live-viewing is available RPC Command Demo Project
The described approach of RPC interaction does not diminish the role of simple RPC calls, which were discussed a little in the article Authorization via the User Service in GWT applications . In some cases, when you have one, maximum two references to the server side in your project, it makes little sense to make a garden out of Action, Result, some Guice, and others like them, because it only complicates the code. On the other hand, the use of “correct” practices for building an OOP code increases its structurization, readability and _ add your benefit_.
Moreover, I know several projects on GWT, which generally do not contain Java on the server side. So with such a server implementation, it is natural to use some common messaging format, for example, JSON or XML. But that's another story…
I am waiting for constructive criticism, wishes and, of course, questions!
Thank.
It is no secret that in the development of smaller applications, design patterns (patterns) are in a hurry. Patterns are a kind of recipe for solving specific case cases. You can start in the study and application of design patterns with the Patterns on Wiki and further delve into the appropriate books, articles, works, etc.
In short, the Command pattern (Command) allows you to perform specific implementations of the Command interface (Action, etc.) through a unified interface.
')
Regarding GWT RPC, the use of this approach will allow you to have one RPC service call interface (dispatcher) and transfer the object of the corresponding action (command) to it.
Connection of necessary libraries
So, to implement RPC interaction in a project using commands, we need to connect additional libraries to the project:
- GWT-Dispatch - GWT-implementation of a call manager. This library also provides Action and Result interfaces for organizing your teams and their execution results.
- Google Guice - Google's Dependency Injection Framework. Allows to organize dependency management in server code using Dependency Injection-approach. It is much easier for the well-known Spring Framework, and, accordingly, it works faster. During the implementation of the demo project, Guice also served as a servlet manager and initializing part of the entire server pollock. But more about that later.
- Google GIN - Guice implementation for GWT. Allows you to use the DI-approach in the client (read, GWT) code. We obviously will not use it, it is required as a dependency.
To connect these libraries to the project, simply put the gin-1.0.jar, guice-2.0.jar, guice-servlet-2.0.jar and gwt-dispatch-1.0.0.jar files into WEB-INF / lib and add them to the Build Path project. The configuration of the GWT-module with the connected modules looks like this for me:
<? xml version ="1.0" encoding ="UTF-8" ? > < module rename-to ='rpc_command' > < inherits name ='com.google.gwt.user.User' /> < inherits name ="com.google.gwt.inject.Inject" /> < inherits name ="net.customware.gwt.dispatch.Dispatch" /> < entry-point class ='net.pimgwt.client.RpcCommandEntryPoint' /> < source path ='client' /> </ module > * This source code was highlighted with Source Code Highlighter .
<? xml version ="1.0" encoding ="UTF-8" ? > < module rename-to ='rpc_command' > < inherits name ='com.google.gwt.user.User' /> < inherits name ="com.google.gwt.inject.Inject" /> < inherits name ="net.customware.gwt.dispatch.Dispatch" /> < entry-point class ='net.pimgwt.client.RpcCommandEntryPoint' /> < source path ='client' /> </ module > * This source code was highlighted with Source Code Highlighter .<? xml version ="1.0" encoding ="UTF-8" ? > < module rename-to ='rpc_command' > < inherits name ='com.google.gwt.user.User' /> < inherits name ="com.google.gwt.inject.Inject" /> < inherits name ="net.customware.gwt.dispatch.Dispatch" /> < entry-point class ='net.pimgwt.client.RpcCommandEntryPoint' /> < source path ='client' /> </ module > * This source code was highlighted with Source Code Highlighter .<? xml version ="1.0" encoding ="UTF-8" ? > < module rename-to ='rpc_command' > < inherits name ='com.google.gwt.user.User' /> < inherits name ="com.google.gwt.inject.Inject" /> < inherits name ="net.customware.gwt.dispatch.Dispatch" /> < entry-point class ='net.pimgwt.client.RpcCommandEntryPoint' /> < source path ='client' /> </ module > * This source code was highlighted with Source Code Highlighter .<? xml version ="1.0" encoding ="UTF-8" ? > < module rename-to ='rpc_command' > < inherits name ='com.google.gwt.user.User' /> < inherits name ="com.google.gwt.inject.Inject" /> < inherits name ="net.customware.gwt.dispatch.Dispatch" /> < entry-point class ='net.pimgwt.client.RpcCommandEntryPoint' /> < source path ='client' /> </ module > * This source code was highlighted with Source Code Highlighter .<? xml version ="1.0" encoding ="UTF-8" ? > < module rename-to ='rpc_command' > < inherits name ='com.google.gwt.user.User' /> < inherits name ="com.google.gwt.inject.Inject" /> < inherits name ="net.customware.gwt.dispatch.Dispatch" /> < entry-point class ='net.pimgwt.client.RpcCommandEntryPoint' /> < source path ='client' /> </ module > * This source code was highlighted with Source Code Highlighter .<? xml version ="1.0" encoding ="UTF-8" ? > < module rename-to ='rpc_command' > < inherits name ='com.google.gwt.user.User' /> < inherits name ="com.google.gwt.inject.Inject" /> < inherits name ="net.customware.gwt.dispatch.Dispatch" /> < entry-point class ='net.pimgwt.client.RpcCommandEntryPoint' /> < source path ='client' /> </ module > * This source code was highlighted with Source Code Highlighter .<? xml version ="1.0" encoding ="UTF-8" ? > < module rename-to ='rpc_command' > < inherits name ='com.google.gwt.user.User' /> < inherits name ="com.google.gwt.inject.Inject" /> < inherits name ="net.customware.gwt.dispatch.Dispatch" /> < entry-point class ='net.pimgwt.client.RpcCommandEntryPoint' /> < source path ='client' /> </ module > * This source code was highlighted with Source Code Highlighter .<? xml version ="1.0" encoding ="UTF-8" ? > < module rename-to ='rpc_command' > < inherits name ='com.google.gwt.user.User' /> < inherits name ="com.google.gwt.inject.Inject" /> < inherits name ="net.customware.gwt.dispatch.Dispatch" /> < entry-point class ='net.pimgwt.client.RpcCommandEntryPoint' /> < source path ='client' /> </ module > * This source code was highlighted with Source Code Highlighter .<? xml version ="1.0" encoding ="UTF-8" ? > < module rename-to ='rpc_command' > < inherits name ='com.google.gwt.user.User' /> < inherits name ="com.google.gwt.inject.Inject" /> < inherits name ="net.customware.gwt.dispatch.Dispatch" /> < entry-point class ='net.pimgwt.client.RpcCommandEntryPoint' /> < source path ='client' /> </ module > * This source code was highlighted with Source Code Highlighter .
Organizing a specific team on the GWT side
I will illustrate the creation of a team with an example of creating one RPC call. Its essence will be simple as a door: send the parameter read from the input field to the server method and get an answer. Everything. Oh yeah, display the response received on the UI. The demo project also contains a call that receives an array of fake DTO objects from the server. His code will not be discussed in this article. If interested, I can provide it further in the comments.
To create an RPC command, you need to create a class that implements the Action interface:
* This source code was highlighted with Source Code Highlighter .
- package net.pimgwt.client.rpc;
- import net.customware.gwt.dispatch.shared.Action;
- @SuppressWarnings ( "serial" )
- public class SingleRequestAction implements Action <SingleRequestResult> {
- private String param;
- public SingleRequestAction () {
- }
- public SingleRequestAction (String param) {
- this .param = param;
- }
- public String getParam () {
- return this .param;
- }
- }
As you can see, nothing complicated. This command encapsulates a parameter that will be passed to the server. The only interesting point here is an indication that the result of the execution will be an object of the class SingleRequestResult:
* This source code was highlighted with Source Code Highlighter .
- package net.pimgwt.client.rpc;
- import net.customware.gwt.dispatch.shared.Result;
- @SuppressWarnings ( "serial" )
- public class SingleRequestResult implements Result {
- private String resultMessage;
- public SingleRequestResult () {}
- public SingleRequestResult (String resultMessage) {
- this .resultMessage = resultMessage;
- }
- public String getResultMessage () {
- return this .resultMessage;
- }
- }
which also encapsulates data that will “arrive” to client code.
At the moment, preparations on the client side are over. It's time to take toasting coffee beans that will work on the server. By the way, our server will work on Google App Engine.
Server implementation of RPC services
The GWT-Dispatch library provides tools for organizing dispatchers for both client and server parts.
Let's start the server-side configuration with the servlet manager that will handle the RPC calls:
* This source code was highlighted with Source Code Highlighter .
- package net.pimgwt.server;
- import net.customware.gwt.dispatch.server.service.DispatchServiceServlet;
- import com.google.inject.servlet.ServletModule;
- public class DispatcherServletModule extends ServletModule {
- @Override
- protected void configureServlets () {
- serve ( "/ rpc_command / dispatch" ) .with (DispatchServiceServlet. class );
- }
- }
The
DispatcherServletModule class is ServletModule . It rewrites the parent method configureServlets() , which matches the RPC-URL of the servlet manager implementation that is provided by GWT-Dispatch. By default, the URL that will be listened to by the dispatcher is based on the application_name / dispatch scheme.Now we implement a handler that will be tied to the command declared on the client side (
SingleRequestAction command):* This source code was highlighted with Source Code Highlighter .
- package net.pimgwt.server;
- import net.customware.gwt.dispatch.server.ActionHandler;
- import net.customware.gwt.dispatch.server.ExecutionContext;
- import net.customware.gwt.dispatch.shared.ActionException;
- import net.pimgwt.client.rpc.SingleRequestAction;
- import net.pimgwt.client.rpc.SingleRequestResult;
- public class SingleRequestHandler implements ActionHandler <SingleRequestAction, SingleRequestResult> {
- @Override
- public SingleRequestResult execute (SingleRequestAction action, ExecutionContext
- context) throws ActionException {
- return new SingleRequestResult ( "You are entered:" + action.getParam ());
- }
- @Override
- public Class <SingleRequestAction> getActionType () {
- return SingleRequestAction. class ;
- }
- @Override
- public void rollback (SingleRequestAction action, SingleRequestResult result,
- ExecutionContext context) throws ActionException {}
- }
The command handler implements a generic interface, the parameterization of which indicates the command and its result. In this case, these are
SingleRequestAction and SingleRequestResult respectively. The ActionHandler interface also ActionHandler the implementation class to provide the execute(), getActionType() and rollback() methods, whose names speak for themselves. In the code above, for such a simple command as the SingleRequestAction the rollback action in case of failure is simply left blank. Nothing to roll back.The result of the
execute() method execution is a SingleRequestResult object, to which we simply write the text of the response that will be passed to the caller (client) side.Well, the
getActionType() method should return a reference to the class of the command to which the handler is attached. This is necessary so that the dispatcher can correctly call the necessary handler, and not some other one.In addition to directly dispatching and providing the Action and Result interfaces, the GWT-Dispatch library also provides integration with Google Guice. This integration allows you to register command handlers in a Guice context:
* This source code was highlighted with Source Code Highlighter .
- package net.pimgwt.server;
- import net.customware.gwt.dispatch.server.guice.ActionHandlerModule;
- public class RpcCommandHandlerModule extends ActionHandlerModule {
- @Override
- protected void configureHandlers () {
- bindHandler (SingleRequestHandler. class );
- //. . .
- }
- }
Let's tie it all together using the
GuiceServletContextListener class, which will “listen” to what is happening from the outside and react when the / rpc_command / dispatch request comes from the client and start the handler of the corresponding command:* This source code was highlighted with Source Code Highlighter .
- package net.pimgwt.server;
- import com.google.inject.Guice;
- import com.google.inject.Injector;
- import com.google.inject.servlet.GuiceServletContextListener;
- public class RpcCommandGuiceConfig extends GuiceServletContextListener {
- @Override
- protected Injector getInjector () {
- return Guice.createInjector ( new RpcCommandHandlerModule (), new DispatcherServletModule ());
- }
- }
The
GuiceServletContextListener class GuiceServletContextListener provided by the Guice framework as a means of integrating it with Java Servlets. The code above will perform all the necessary injections (injects) in the right places. Thus, we have the GWT-Dispatch and Guice integration chain with Servlets closed.The last step that is needed in order for all of this to play as a single ensemble is to specify the necessary listener in the web.xml file and the corresponding query filter:
* This source code was highlighted with Source Code Highlighter .
- <? xml version = "1.0" encoding = "UTF-8" ? >
- <! Doctype web-app
- PUBLIC "- // Sun Microsystems, Inc.//DTD Web Application 2.3 // EN"
- "http://java.sun.com/dtd/web-app_2_3.dtd" >
- < web-app >
- < filter >
- < filter-name > guiceFilter </ filter-name >
- < filter-class > com.google.inject.servlet.GuiceFilter </ filter-class >
- </ filter >
- < filter-mapping >
- < filter-name > guiceFilter </ filter-name >
- < url-pattern > / * </ url-pattern >
- </ filter-mapping >
- < listener >
- < listener-class > net.pimgwt.server.RpcCommandGuiceConfig </ listener-class >
- </ listener >
- < welcome-file-list >
- < welcome-file > index.html </ welcome-file >
- </ welcome-file-list >
- </ web-app >
GuiceFilter configured to filter all requests that fall on the server side of the client. Naturally, in the url-param-instructions, you can specify your URL pattern to listen. How to do this I will not say, these are obvious things and they are not related to the subject matter.The server part is ready. It now remains to associate the RPC calls with the client code with the dispatcher.
Dispatching commands in GWT code
For calls to RPC commands in the GWT code, the interface is
DispatchAsync . You can implement this interface as you wish, for example, as a dispatcher who can cache the results obtained earlier. For the demo project, I chose the “boxed” implementation of DefaultDispatchAsync again from the GWT-Dispatch package.Below I will only give you a click handler on a button that initiates an RPC call through the specified interface and displays the result received from the server side:
* This source code was highlighted with Source Code Highlighter .
- //. . .
- private DispatchAsync rpcDispatcher = new DefaultDispatchAsync ();
- //. . .
- @UiField Button singleValueTestButton;
- //. . .
- @UiHandler ( "singleValueTestButton" )
- public void singleValueButtonClicked (ClickEvent event ) {
- responseLable.setText ( "" );
- rpcDispatcher.execute ( new SingleRequestAction (paramTextbox.getText ()), new
- AsyncCallback <SingleRequestResult> () {
- @Override
- public void onFailure (Throwable caught) {
- responseLable.setText ( "Error occured:" +
- caught.getMessage ());
- }
- @Override
- public void onSuccess (SingleRequestResult result) {
- responseLable.setText (result.getResultMessage ());
- }
- });
- }
The main point here is that we give the dispatcher an initialized command to send it to the server. In the callback from the received SingleRequestResponse, the result is simply retrieved:
responseLable.setText(result.getResultMessage());Everything is written, implemented, configured and even works!
Demo project
The screenshot below shows the structure of the demo project in the Project Packages panel.
If you look at it, you can see that another RPC team,
MultiRequestAction , is implemented in the project. The result of its execution is a MultiRequestResult , which in turn contains a list of DummyDTO objects, which is filled in a loop in the server handler of this command.Project for live-viewing is available RPC Command Demo Project
Instead of conclusion
The described approach of RPC interaction does not diminish the role of simple RPC calls, which were discussed a little in the article Authorization via the User Service in GWT applications . In some cases, when you have one, maximum two references to the server side in your project, it makes little sense to make a garden out of Action, Result, some Guice, and others like them, because it only complicates the code. On the other hand, the use of “correct” practices for building an OOP code increases its structurization, readability and _ add your benefit_.
Moreover, I know several projects on GWT, which generally do not contain Java on the server side. So with such a server implementation, it is natural to use some common messaging format, for example, JSON or XML. But that's another story…
I am waiting for constructive criticism, wishes and, of course, questions!
Thank.
Source: https://habr.com/ru/post/94844/
All Articles