Folding do-it-yourself table
Two years ago, there was a need to acquire / make a stage for subject and macro shooting. Having found out the prices for branded subject tables, the desire to buy it completely disappeared (the table I needed cost about 9,000 rubles). During a brainstorming session, an idea was born, having realized that, I received an excellent folding table for a penny.
Traffic pictures in the article about 400kb .
')
I did it like this:

My cot was in poor condition, so I took off the old paint with sandpaper and painted it again.
plastic corners. I liked the second option more, although we lose the opportunity to roll the plastic into a tube, but at the same time the background installation on the table takes 2 seconds.
Here's what it looks like:

We fasten the corners to the double-sided tape in such a way that they serve as spacers and rest against the tubes of the frame, then the background will not travel from side to side and will keep the shape clearly at any angle of the backrest. By experience, my design with a very large margin, you can make the corners very small and then the background will curl into a tube.
Photo in folded form:

Backrest tilt control:
Examples of work performed on this table:


If you have questions about working with this table, ask - I will answer. Thanks for attention.
Traffic pictures in the article about 400kb .
')
Task
Get a compact, lightweight, functional and be sure to fold the stage.Required materials and tools
- Cot
- Plastic sheet thickness from 1mm
- Clips for paper (the largest)
- Hacksaw
Optional
- Plastic corners
- Double-sided tape
- Insulation for pipes
- Bag from folding "country" table
Implementation
Unfortunately, I made the table 2 years ago and the process of its construction was not preserved, but on the other hand it is very simple and I will describe each stage in detail.First stage
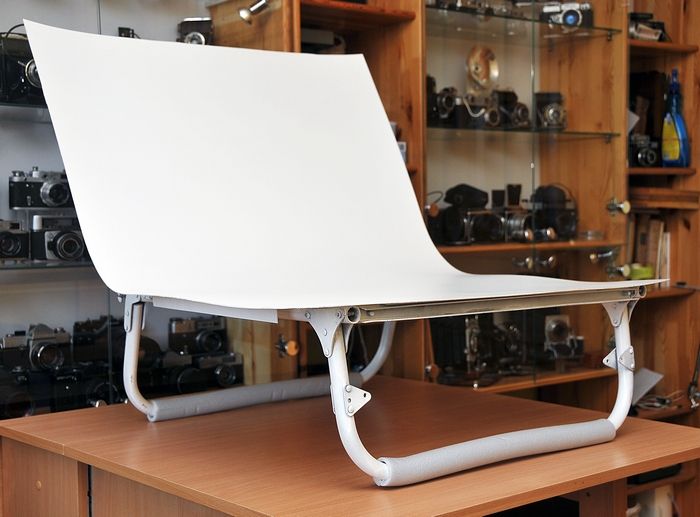
To begin with, we have to choose a cot, this is an important and crucial point because This is the basis of our table and it should serve faithfully for many years. My choice fell on the old Soviet children's cot, it is more compact and ideally suited to my requirements. The size of the usable area in my case is 60x60 cm . First of all, get rid of all unnecessary springs, screws, brackets, cloth, you need to carefully disassemble and set aside. After that, take a hacksaw for metal and cut off one or two segments from the clamshell. Like this:I did it like this:
My cot was in poor condition, so I took off the old paint with sandpaper and painted it again.
Second phase
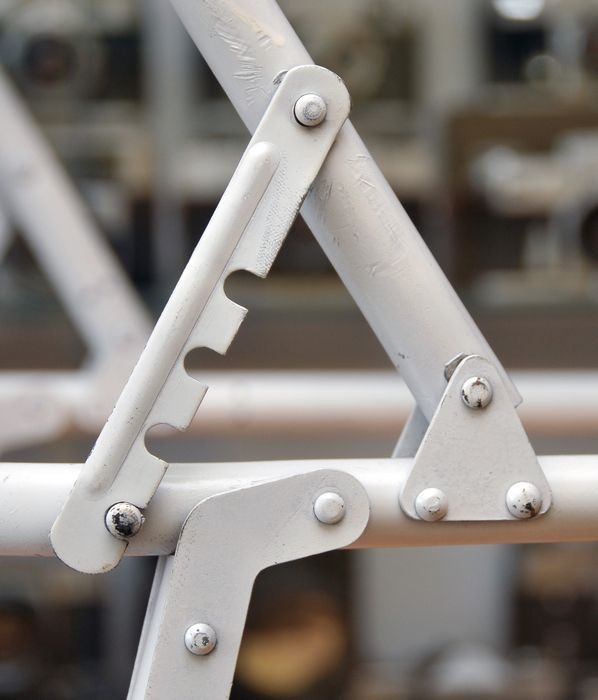
The choice of plastic is a creative moment, I chose based on the fact that sufficient strength is needed so that the plastic does not bend under 2-3 kilograms of cargo and that it remains possible to highlight the object from below through plastic. After 2 years of careful use, plastic was only slightly scratched, it is inevitable and easy to replace. There are two options for attaching plastic to a “cot”. The first - clips for paper, the secondplastic corners. I liked the second option more, although we lose the opportunity to roll the plastic into a tube, but at the same time the background installation on the table takes 2 seconds.
Here's what it looks like:
We fasten the corners to the double-sided tape in such a way that they serve as spacers and rest against the tubes of the frame, then the background will not travel from side to side and will keep the shape clearly at any angle of the backrest. By experience, my design with a very large margin, you can make the corners very small and then the background will curl into a tube.
Third stage
Everything is very simple - in any hardware store we buy insulation for pipes with a diameter of 2 cm (specify the diameter of the clamshell frame pipes) and make soft “legs” for the table from it. Insulation is cut to the desired length, cut on one side and put on the frame. The result can be seen in the first photo.Total
We got an excellent table, with an adjustable back, interchangeable backgrounds and easy folding!Photo in folded form:
Backrest tilt control:
Examples of work performed on this table:
If you have questions about working with this table, ask - I will answer. Thanks for attention.
Source: https://habr.com/ru/post/92917/
All Articles