We throw antivirus in the trash
Some people perceive antivirus as an integral part of the operating system and simply do not think of their existence without a heap of protective packages from different manufacturers that freely let in the infection, but cause terrible brakes and a whole heap of conflicts, up to the loss in BSOD (blue screen of death :)). the best antivirus is the OS itself! you just need to learn how to use it correctly!
So before you begin to tell you how to configure the OS from the invasions of ominous viruses, worms and other infections spreading through the Internet and through various media. What do I and you get after building this security system:
+ restriction of access to the system for running programs;
+ ban on changing system files;
')
+ a ban on changing both system and application programs in memory;
+ ban on implementation in other processes;
+ to differentiate access between users of one computer;
This method of protection has many other minor advantages, but this is already a consequence of these four.
I am using OS: Windows XP Professional. This is important because for example, the Home Edition does not have the tools to manage user groups and the security system.
So, let's start with:
I. First you need to create an administrator record and create (preferably) a password for it (if it has not been created yet). Although during installation, the system by default creates a built-in account with the name “Administrator”, but I immediately create a name for it, for example, “admin”.
I count on the fact that you already have a system installed and you need to create an account:
Go to Start> Settings> Control Panel> User Accounts:
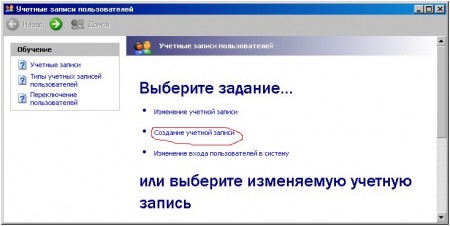
Creating an account ...
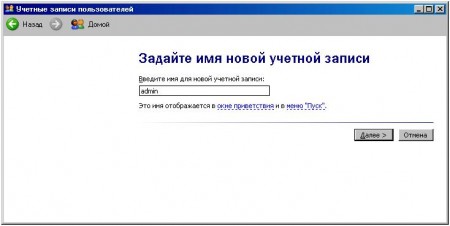
Call it "admin", for example ...
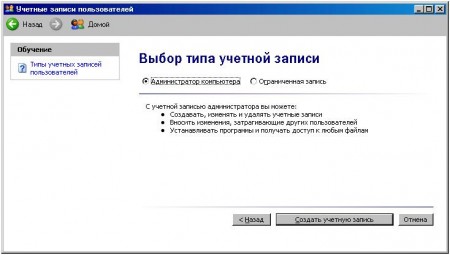
And choose the type of account "Computer Administrator".
ATTENTION!!! I had a case when at such creation of an administrator account all documents in the folder “My documents” were lost and I could not return them: '(. Unfortunately, this is probably a developer flaw, so call me, I can't help you with anything. So just in case, copy all your documents from this folder to the backup folder.
So the account is created. Now put the password on it. Select the created entry and click "Create Password":
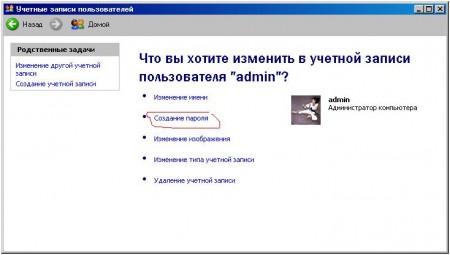
Enter the password. Everything! Administrator we have created.
Now you need to create an account for us. Those. The one in which we will constantly work:
1. Click again, "Create an account."
2. Enter the name, for example “user”.
3. Put the account type "Limited account".
4. If you want, you can put a password on it (if you do not want other users of this computer to log into your account).
Platform created. In principle, at this stage you can stop if you do not keep some very important documents (passwords, reports, important literature), but if you have one, I recommend reading this article to the end.
Ii. If you are reading this line, then you are not indifferent to the fate of your information accumulated in the computer. So what do I want to do now? :):
+ Create a folder in which all my documents will be stored and access to which I can get ONLY I and no one else (even the system will not have access to my folder!);
1. So, we exit the current user profile and go to the newly created “user”.
2. Go to the drive on which we want to create this folder.
A WARNING!!! To create a folder of this type, you must have a disk under the control of the NTFS file system! If the disk has the FAT32 file system, then this folder creation will not be available :(. This is due to the different structure of the file systems and their use.
If your disk works with NTFS, then rejoice - you can read more :).
3. Now we will configure full access to security properties, since by default it is simple. Go to Tools> Folder Options ...> View. And uncheck "Use simple file sharing":
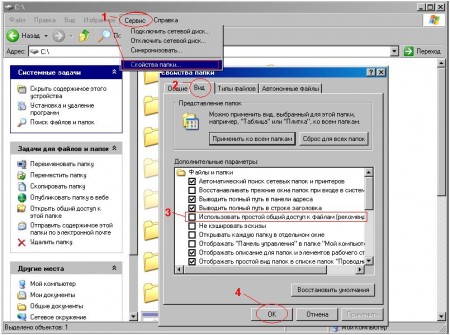
OK.
Now the Security tab has become available. To check this, right-click on any folder and select "Properties":
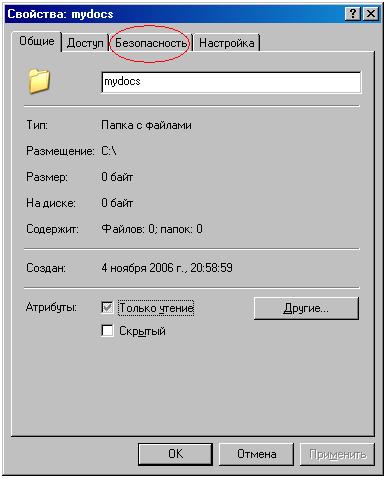
If this tab! suddenly! unavailable, so this disk works for you with the FAT32 file system or with any other non-NTFS system.
At this stage, you can safely build what was intended, well, sir:
1. Go to the drive you selected (I have 2 drives C and D working with NTFS. I will create a folder on drive C).
2. Create a folder and call it somehow, for example, “mydocs”.
3. Now go to the folder properties. Open the "Security" tab. And we see something like this:

All that is in the tab "Security" may be different! This is due to where to create the folder. If you create a folder on the disk where your OS is installed (where the WINDOWS folder is located. C: \ WINDOWS). If the folder is created on the disk where the OS is installed, the picture will be as follows: FIGURE 1.
If the folder is created on a disk where there is no OS, then the picture can be like this: FIGURE 2.
But do not be scared there is nothing terrible.
From now on, let's take a closer look at all the items in the “Groups or Users” list.
This list lists all users and user groups that have access to this folder. For example, I have the following lines:
sergey (SERG \ sergey) - user sergey located on a computer with the name SERG and having a profile with the name sergey has “Special Permissions”.
SYSTEM is a built-in profile for a system that has “Full access to this folder”.
Administrators (SERG \ Administrators) - the “Administrators” user group located on the SERG computer has the “Administrators” profile and having “Full access” to the folder.
Users (SERG \ Users) - the users group “Users” located on the computer SERG has the “Users” profile and having such access: “Read and execute” (you can read and execute the contents of the folder), “List the contents of the folder” (you can see the list of files and subfolders) and "Reading" (you can read the attributes of files and subfolders).
CREATOR OWNER - built-in profile for additional security management of the folder owner.
All - built-in profile that determines the level of access for other users not only of your computer, but also of users located in the local network.
Fuhhh. Well, at the first stage, this knowledge is enough to create a folder isolated from all users on the computer. Now we do the following:
Well, we are done with the creation of the folder to which only you have access!
Now about the rules of working with such a system:
ALL programs, without exception, install the administrator account.
Methods:
1. Log into the account and install the program.
2. Right-click on the installation file (it may be called: setup.exe, install.exe, in short it should have the EXE extension), select the menu item “Run as ...” and in the appeared window select / enter the name of the account. admin account and password. So file run as administrator of a computer with full privileges.
So check our security system.
This is what the installation program told me when I launched the installation of the ACDSee 8.0 image viewer:
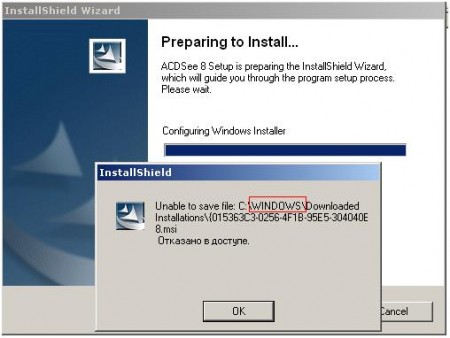
GGG :). He tried to write the file to the WINDOWS directory. Oops! :) Not here it was. Recording is forbidden to us. It works.
But what the installer told me when I tried to install a program for creating and viewing flash-animation on my own behalf:

Not bad right? :)
2. Well, we can check the ban on changing system files ourselves if you go to the WINDOWS folder and try to delete that thread. The same with the Program Files folder.
3. And this is how I mumble :) on me the system when I tried to remove the system process. You can terminate processes running ONLY on your behalf. Here is iChat for example I can complete :):

4. Verify the implementation process is complicated. It is necessary to write a program, but believe in a word. It is working.
The author of the original article: Chris Kaspersky
So before you begin to tell you how to configure the OS from the invasions of ominous viruses, worms and other infections spreading through the Internet and through various media. What do I and you get after building this security system:
+ restriction of access to the system for running programs;
+ ban on changing system files;
')
+ a ban on changing both system and application programs in memory;
+ ban on implementation in other processes;
+ to differentiate access between users of one computer;
This method of protection has many other minor advantages, but this is already a consequence of these four.
I am using OS: Windows XP Professional. This is important because for example, the Home Edition does not have the tools to manage user groups and the security system.
So, let's start with:
I. First you need to create an administrator record and create (preferably) a password for it (if it has not been created yet). Although during installation, the system by default creates a built-in account with the name “Administrator”, but I immediately create a name for it, for example, “admin”.
I count on the fact that you already have a system installed and you need to create an account:
Go to Start> Settings> Control Panel> User Accounts:
Creating an account ...
Call it "admin", for example ...
And choose the type of account "Computer Administrator".
ATTENTION!!! I had a case when at such creation of an administrator account all documents in the folder “My documents” were lost and I could not return them: '(. Unfortunately, this is probably a developer flaw, so call me, I can't help you with anything. So just in case, copy all your documents from this folder to the backup folder.
So the account is created. Now put the password on it. Select the created entry and click "Create Password":
Enter the password. Everything! Administrator we have created.
Now you need to create an account for us. Those. The one in which we will constantly work:
1. Click again, "Create an account."
2. Enter the name, for example “user”.
3. Put the account type "Limited account".
4. If you want, you can put a password on it (if you do not want other users of this computer to log into your account).
Platform created. In principle, at this stage you can stop if you do not keep some very important documents (passwords, reports, important literature), but if you have one, I recommend reading this article to the end.
Ii. If you are reading this line, then you are not indifferent to the fate of your information accumulated in the computer. So what do I want to do now? :):
+ Create a folder in which all my documents will be stored and access to which I can get ONLY I and no one else (even the system will not have access to my folder!);
1. So, we exit the current user profile and go to the newly created “user”.
2. Go to the drive on which we want to create this folder.
A WARNING!!! To create a folder of this type, you must have a disk under the control of the NTFS file system! If the disk has the FAT32 file system, then this folder creation will not be available :(. This is due to the different structure of the file systems and their use.
If your disk works with NTFS, then rejoice - you can read more :).
3. Now we will configure full access to security properties, since by default it is simple. Go to Tools> Folder Options ...> View. And uncheck "Use simple file sharing":
OK.
Now the Security tab has become available. To check this, right-click on any folder and select "Properties":
If this tab! suddenly! unavailable, so this disk works for you with the FAT32 file system or with any other non-NTFS system.
At this stage, you can safely build what was intended, well, sir:
1. Go to the drive you selected (I have 2 drives C and D working with NTFS. I will create a folder on drive C).
2. Create a folder and call it somehow, for example, “mydocs”.
3. Now go to the folder properties. Open the "Security" tab. And we see something like this:
All that is in the tab "Security" may be different! This is due to where to create the folder. If you create a folder on the disk where your OS is installed (where the WINDOWS folder is located. C: \ WINDOWS). If the folder is created on the disk where the OS is installed, the picture will be as follows: FIGURE 1.
If the folder is created on a disk where there is no OS, then the picture can be like this: FIGURE 2.
But do not be scared there is nothing terrible.
From now on, let's take a closer look at all the items in the “Groups or Users” list.
This list lists all users and user groups that have access to this folder. For example, I have the following lines:
sergey (SERG \ sergey) - user sergey located on a computer with the name SERG and having a profile with the name sergey has “Special Permissions”.
SYSTEM is a built-in profile for a system that has “Full access to this folder”.
Administrators (SERG \ Administrators) - the “Administrators” user group located on the SERG computer has the “Administrators” profile and having “Full access” to the folder.
Users (SERG \ Users) - the users group “Users” located on the computer SERG has the “Users” profile and having such access: “Read and execute” (you can read and execute the contents of the folder), “List the contents of the folder” (you can see the list of files and subfolders) and "Reading" (you can read the attributes of files and subfolders).
CREATOR OWNER - built-in profile for additional security management of the folder owner.
All - built-in profile that determines the level of access for other users not only of your computer, but also of users located in the local network.
Fuhhh. Well, at the first stage, this knowledge is enough to create a folder isolated from all users on the computer. Now we do the following:
| If the folder is created on the disk where the OS is installed | If the folder is created on a disk where there is no OS |
  We remove the checkmark from the "Inherit from parent object ...". And click the button "Delete" in the window that appears:  Now in the "Advanced Security Settings for mydocs" window, click "OK". This is what you should do: 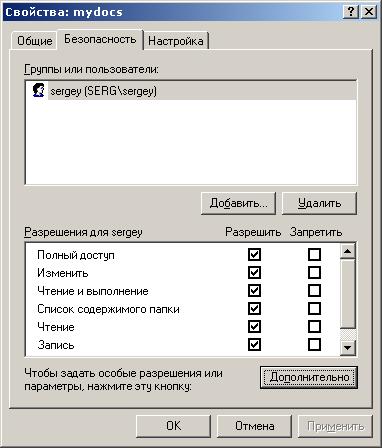 Well that's all! :) It seems not so difficult. |  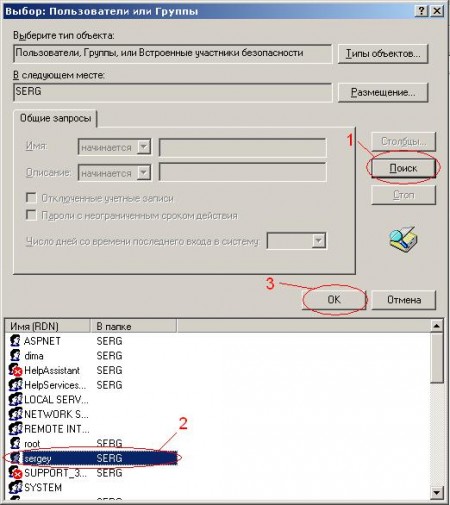 Here we select our profile (Name (RDN)). Here, look for the name of your account. If called uch. record with the name "user", then look for "user". I called mine “sergey”, accordingly I choose “sergey”.  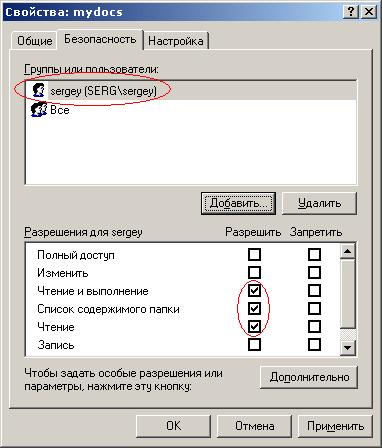 Now we have added a user (I have “sergey”) with such permissions. But we need only to have access to this folder (even the administrator will not be able to access this folder). Do the following:   Here we go into the heart of the security profile for this folder :). Do not be scared. I will explain what I will not, because This is the topic of an entire article or two :). Simply remove the checkmark from “Inherit from parent object applicable to children ...”. This window will appear: 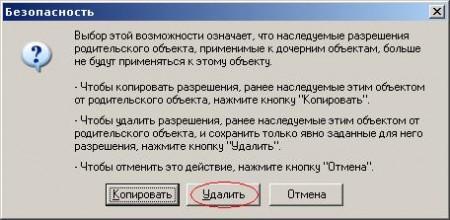 Click "Delete". Now in the "Advanced Security Settings for mydocs" window, click "OK". This is what you should do: 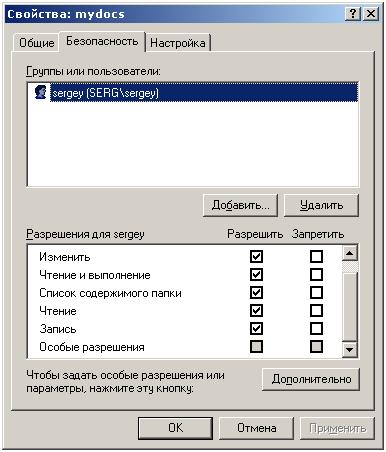 There should be one entry. That's all! Fuhhh. We did it :). |
Well, we are done with the creation of the folder to which only you have access!
Now about the rules of working with such a system:
ALL programs, without exception, install the administrator account.
Methods:
1. Log into the account and install the program.
2. Right-click on the installation file (it may be called: setup.exe, install.exe, in short it should have the EXE extension), select the menu item “Run as ...” and in the appeared window select / enter the name of the account. admin account and password. So file run as administrator of a computer with full privileges.
So check our security system.
This is what the installation program told me when I launched the installation of the ACDSee 8.0 image viewer:
GGG :). He tried to write the file to the WINDOWS directory. Oops! :) Not here it was. Recording is forbidden to us. It works.
But what the installer told me when I tried to install a program for creating and viewing flash-animation on my own behalf:
Not bad right? :)
2. Well, we can check the ban on changing system files ourselves if you go to the WINDOWS folder and try to delete that thread. The same with the Program Files folder.
3. And this is how I mumble :) on me the system when I tried to remove the system process. You can terminate processes running ONLY on your behalf. Here is iChat for example I can complete :):
4. Verify the implementation process is complicated. It is necessary to write a program, but believe in a word. It is working.
The author of the original article: Chris Kaspersky
Source: https://habr.com/ru/post/8978/
All Articles