An example of using the Twitter API library on AIR
In this topic, I want to give an example of using my Twitter API for ActionScript 3.0 for Adobe AIR. Twitter supports 2 authentication methods: Basic Auth not recommended for use and OAuth preferred. The library implements OAuth authentication.
The example will describe the implementation of an AIR application that uses OAuth for authentication and allows you to send tweets and view friend status.
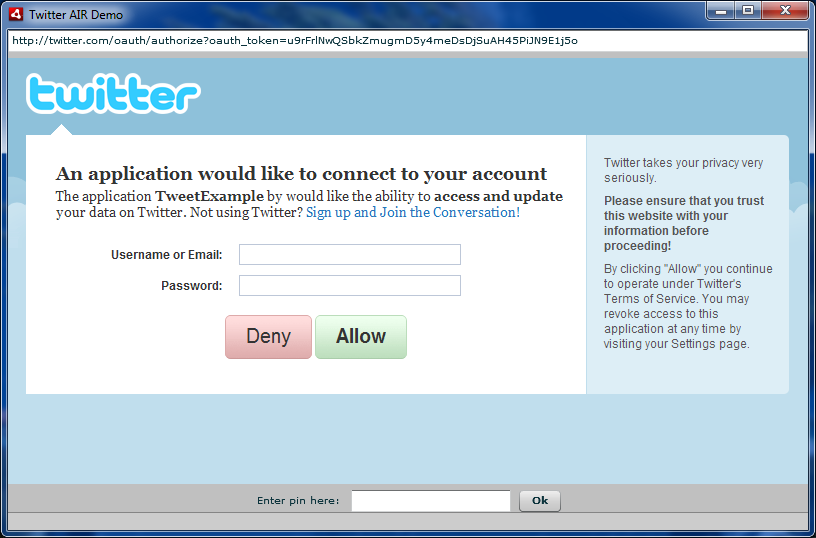
To begin with, we will create mxml structure necessary for us. We need two windows in ViewStack 'e. The first window is the authorization window (with HTML component and a PIN code entry field).
The second window is a list with friends tweets and a tweet box.
The OAuth authentication algorithm for desktop applications is as follows:
All interaction with the Twitter API occurs through the TwitterAPI class.
And OAuth authentication is done via the twitterApi.connection property.
After successfully receiving the Request Token, you need to show the user the Twitter access window.
This is done like this:
After the user has entered the PIN, you need to send it back to the API.
When authorization is successful, we switch to the twitterScreen window and load tweets.
We send tweets as follows:
Any operation can be performed via the twitterApi.post (operation, postType, priority) method. Moreover, they can be performed both sequentially with a given priority of each command, and immediately after the execution of the post () method without completing the previous operation. For this, the postType field must be POST_TYPE_NORMAL or POST_TYPE_ASYNC, respectively. A list of all supported operations is here: dev.dborisenko.com/twitter-actionscript-api/docs/commands-summary.html
')
Example source : dev.dborisenko.com/twitter-actionscript-api/examples/TwitterAIRDemo/srcview
Compiled example: twitter-actionscript-api.googlecode.com/files/TwitterAIRDemo.air
Library link: twitter-actionscript-api.googlecode.com/files/TwitterAPI_v1.2.swc
Library Documentation: dev.dborisenko.com/twitter-actionscript-api/docs
The Google Code Library itself: code.google.com/p/twitter-actionscript-api
The example will describe the implementation of an AIR application that uses OAuth for authentication and allows you to send tweets and view friend status.
To begin with, we will create mxml structure necessary for us. We need two windows in ViewStack 'e. The first window is the authorization window (with HTML component and a PIN code entry field).
<mx:VBox width= "100%" height= "100%" id= "authScreen" > <mx:TextInput text= "{authHTML.location}" editable= "false" width= "100%" /> <mx:HTML id= "authHTML" width= "100%" height= "100%" /> <mx:HBox width= "100%" horizontalAlign= "center" verticalAlign= "middle" > <mx:Label text= "Enter pin here:" /> <mx:TextInput id= "pinTextInput" /> <mx:Button label= "Ok" click= "pinOkButton_clickHandler(event)" id= "pinOkButton" /> </mx:HBox > </mx:VBox ><mx:VBox width= "100%" height= "100%" id= "authScreen" > <mx:TextInput text= "{authHTML.location}" editable= "false" width= "100%" /> <mx:HTML id= "authHTML" width= "100%" height= "100%" /> <mx:HBox width= "100%" horizontalAlign= "center" verticalAlign= "middle" > <mx:Label text= "Enter pin here:" /> <mx:TextInput id= "pinTextInput" /> <mx:Button label= "Ok" click= "pinOkButton_clickHandler(event)" id= "pinOkButton" /> </mx:HBox > </mx:VBox ><mx:VBox width= "100%" height= "100%" id= "authScreen" > <mx:TextInput text= "{authHTML.location}" editable= "false" width= "100%" /> <mx:HTML id= "authHTML" width= "100%" height= "100%" /> <mx:HBox width= "100%" horizontalAlign= "center" verticalAlign= "middle" > <mx:Label text= "Enter pin here:" /> <mx:TextInput id= "pinTextInput" /> <mx:Button label= "Ok" click= "pinOkButton_clickHandler(event)" id= "pinOkButton" /> </mx:HBox > </mx:VBox ><mx:VBox width= "100%" height= "100%" id= "authScreen" > <mx:TextInput text= "{authHTML.location}" editable= "false" width= "100%" /> <mx:HTML id= "authHTML" width= "100%" height= "100%" /> <mx:HBox width= "100%" horizontalAlign= "center" verticalAlign= "middle" > <mx:Label text= "Enter pin here:" /> <mx:TextInput id= "pinTextInput" /> <mx:Button label= "Ok" click= "pinOkButton_clickHandler(event)" id= "pinOkButton" /> </mx:HBox > </mx:VBox ><mx:VBox width= "100%" height= "100%" id= "authScreen" > <mx:TextInput text= "{authHTML.location}" editable= "false" width= "100%" /> <mx:HTML id= "authHTML" width= "100%" height= "100%" /> <mx:HBox width= "100%" horizontalAlign= "center" verticalAlign= "middle" > <mx:Label text= "Enter pin here:" /> <mx:TextInput id= "pinTextInput" /> <mx:Button label= "Ok" click= "pinOkButton_clickHandler(event)" id= "pinOkButton" /> </mx:HBox > </mx:VBox ><mx:VBox width= "100%" height= "100%" id= "authScreen" > <mx:TextInput text= "{authHTML.location}" editable= "false" width= "100%" /> <mx:HTML id= "authHTML" width= "100%" height= "100%" /> <mx:HBox width= "100%" horizontalAlign= "center" verticalAlign= "middle" > <mx:Label text= "Enter pin here:" /> <mx:TextInput id= "pinTextInput" /> <mx:Button label= "Ok" click= "pinOkButton_clickHandler(event)" id= "pinOkButton" /> </mx:HBox > </mx:VBox ><mx:VBox width= "100%" height= "100%" id= "authScreen" > <mx:TextInput text= "{authHTML.location}" editable= "false" width= "100%" /> <mx:HTML id= "authHTML" width= "100%" height= "100%" /> <mx:HBox width= "100%" horizontalAlign= "center" verticalAlign= "middle" > <mx:Label text= "Enter pin here:" /> <mx:TextInput id= "pinTextInput" /> <mx:Button label= "Ok" click= "pinOkButton_clickHandler(event)" id= "pinOkButton" /> </mx:HBox > </mx:VBox ><mx:VBox width= "100%" height= "100%" id= "authScreen" > <mx:TextInput text= "{authHTML.location}" editable= "false" width= "100%" /> <mx:HTML id= "authHTML" width= "100%" height= "100%" /> <mx:HBox width= "100%" horizontalAlign= "center" verticalAlign= "middle" > <mx:Label text= "Enter pin here:" /> <mx:TextInput id= "pinTextInput" /> <mx:Button label= "Ok" click= "pinOkButton_clickHandler(event)" id= "pinOkButton" /> </mx:HBox > </mx:VBox ><mx:VBox width= "100%" height= "100%" id= "authScreen" > <mx:TextInput text= "{authHTML.location}" editable= "false" width= "100%" /> <mx:HTML id= "authHTML" width= "100%" height= "100%" /> <mx:HBox width= "100%" horizontalAlign= "center" verticalAlign= "middle" > <mx:Label text= "Enter pin here:" /> <mx:TextInput id= "pinTextInput" /> <mx:Button label= "Ok" click= "pinOkButton_clickHandler(event)" id= "pinOkButton" /> </mx:HBox > </mx:VBox >
The second window is a list with friends tweets and a tweet box.
- <mx: VBox width = "100%" height = "100%" id = "twitterScreen" >
- <mx: List width = "100%" height = "100%" dataProvider = "{twitterStatuses}" id = "tweetsList" >
- <mx: itemRenderer >
- <mx: Component >
- <mx: HBox width = "100%" height = "100" borderStyle = "solid" >
- <mx: Image height = "100%" source = "{data.user.profileImageUrl}" />
- <mx: VBox height = "100%" width = "100" >
- <mx: Text width = "100%" text = "{data.user.screenName}" />
- <mx: Text width = "100%" text = "{data.createdAt}" />
- </ mx: vbox >
- <mx: Text width = "100%" height = "100%" text = "{data.text}" />
- </ mx: HBox >
- </ mx: Component >
- </ mx: itemRenderer >
- </ mx: List >
- <mx: HBox width = "100%" horizontalAlign = "center" verticalAlign = "middle" >
- <mx: TextArea width = "100%" height = "100%" id = "tweetTextInput"
- textInput = "tweetTextInput_textInputHandler (event)" />
- <mx: Button label = "Send" click = "sendTweetButton_clickHandler (event)"
- enabled = "{tweetTextInput.text! = ''}"
- height = "100%"
- id = "sendTweetButton" />
- </ mx: HBox >
- </ mx: vbox >
The OAuth authentication algorithm for desktop applications is as follows:
- We receive Request Token. This requires CONSUMER_KEY and CONSUMER_SECRET , which can be obtained here .
- In the browser, you need to open the authorization window, where the user must allow the application access to his profile. To do this, he should enter his data and get a PIN code. (The URL for the authorization window is obtained from the received Token's request).
- If the entered PIN is correct, then the application returns Access Token, which is used for all further operations with the service.
All interaction with the Twitter API occurs through the TwitterAPI class.
- var twitterApi : TwitterAPI = new TwitterAPI ( ) ;
And OAuth authentication is done via the twitterApi.connection property.
- // Listen to the Token Request receipt event
- twitterApi.connection. addEventListener ( OAuthTwitterEvent.REQUEST_TOKEN_RECEIVED, handleRequestTokenReceived ) ;
- // Listen to the Token Request Request Error event
- twitterApi.connection. addEventListener ( OAuthTwitterEvent.REQUEST_TOKEN_ERROR, handleRequestTokenError ) ;
- // Listen to the Access Token receive error event
- twitterApi.connection. addEventListener ( OAuthTwitterEvent.ACCESS_TOKEN_ERROR, handleAccessTokenError ) ;
- // Listen to the successful authorization event
- twitterApi.connection. addEventListener ( OAuthTwitterEvent.AUTHORIZED, handleAuthorized ) ;
- // Log in
- twitterApi.connection.authorize ( CONSUMER_KEY, CONSUMER_SECRET ) ;
After successfully receiving the Request Token, you need to show the user the Twitter access window.
This is done like this:
- protected function handleRequestTokenReceived ( event : OAuthTwitterEvent ) : void
- {
- authHTML.location = twitterApi.connection.authorizeURL;
- }
After the user has entered the PIN, you need to send it back to the API.
- protected function pinOkButton_clickHandler ( event : MouseEvent ) : void
- {
- twitterApi.connection.grantAccess ( pinTextInput. text ) ;
- }
When authorization is successful, we switch to the twitterScreen window and load tweets.
- // Initialize status loading operation
- var op : TwitterOperation = new LoadHomeTimeline ( ) ;
- // Listen to the command completion event
- var handler : Function = function ( event : TwitterEvent ) : void
- {
- op. removeEventListener ( TwitterEvent. COMPLETE , handler ) ;
- if ( event.success )
- {
- // Operation completed successfully
- status = "Tweets loaded" ;
- // Get the list of downloaded tweets
- twitterStatuses = event. data as ArrayCollection;
- }
- else
- {
- // The operation completed with an error
- status = "Loading error:" + event. data . toString ( ) ;
- }
- } ;
- op. addEventListener ( TwitterEvent. COMPLETE , handler ) ;
- // Start the operation
- twitterApi.post ( op ) ;
We send tweets as follows:
- var text : String = tweetTextInput. text ;
- // Initialize status update operation
- var op : TwitterOperation = new UpdateStatus ( text ) ;
- var handler : Function = function ( event : TwitterEvent ) : void
- {
- op. removeEventListener ( TwitterEvent. COMPLETE , handler ) ;
- if ( event.success )
- {
- // Operation completed successfully
- status = "Tweet sent" ;
- loadTweets ( ) ;
- tweetTextInput. text = "" ;
- }
- else
- {
- // The operation completed with an error
- status = "Error of status sending:" + event. data . toString ( ) ;
- }
- } ;
- op. addEventListener ( TwitterEvent. COMPLETE , handler ) ;
- // Start the operation
- twitterApi.post ( op ) ;
Any operation can be performed via the twitterApi.post (operation, postType, priority) method. Moreover, they can be performed both sequentially with a given priority of each command, and immediately after the execution of the post () method without completing the previous operation. For this, the postType field must be POST_TYPE_NORMAL or POST_TYPE_ASYNC, respectively. A list of all supported operations is here: dev.dborisenko.com/twitter-actionscript-api/docs/commands-summary.html
')
Example source : dev.dborisenko.com/twitter-actionscript-api/examples/TwitterAIRDemo/srcview
Compiled example: twitter-actionscript-api.googlecode.com/files/TwitterAIRDemo.air
Library link: twitter-actionscript-api.googlecode.com/files/TwitterAPI_v1.2.swc
Library Documentation: dev.dborisenko.com/twitter-actionscript-api/docs
The Google Code Library itself: code.google.com/p/twitter-actionscript-api
Source: https://habr.com/ru/post/88688/
All Articles