Installing and configuring rTorrent in Debian

 rTorrent is another one of the most popular torrent clients in the world of Unix-like operating systems (I already wrote about Transmission a little earlier). When creating this client, according to the author , at the head of the corner were “high performance and good code”, and using mmap to display files in memory allows you to achieve a three-fold advantage over broadband channels over the official client . Another characteristic feature of rTorrent is the presence of many different web-based interfaces “for all tastes” for remote control. It is about installing and configuring all this I want to tell this time.
Install rTorrent
When installing rTorrent, I will assume that all actions are performed in the latest version of Debian (at the time of writing this article, 2010-03-27 is Debian Lenny ). Often, when using this OS, people choose either a stable branch of the repositories, or a test branch, and they differ in the versions contained in them. Unfortunately, the rtorrent package version 0.7.9 is in the stable branch while the newest version has already reached the number 0.8.6. In this regard, I will talk about installing the latest version of rTorrent separately for the test, and separately for stable repository branches.
Installing rTorrent with a stable branch of Debian repositories
Last time, when describing the installation of the newest version of Transmission , I used a compilation of the source code, which rightly caused a storm of indignation and criticism :) This time I will show how to achieve the desired result without using the compiler.
All we need is to connect the test branch of the repositories and install a fresh version of the package from it, but make it so that the whole system (with the exception of our package) remains on a stable branch. You can accomplish this task using the “pinning” mechanism (I don’t know how “pinning” is euphonically translated into Russian) for more details about which can be found in the official documentation or, for example, right here .
')
To do this, test repositories should be added to the
/etc/apt/sources.list file:deb http://ftp.ua.debian.org/debian/ testing main
deb http://security.debian.org/ testing/updates mainI added the Ukrainian mirror, you, choose the most suitable for you, depending on geographical location or personal preferences;)
The next step is to create the
/etc/apt/preferences file and set its priorities for the repositories in such a way that by default packages are selected from a stable branch:Package: *
Pin: release a=stable
Pin-Priority: 700
Package: *
Pin: release a=testing
Pin-Priority: 650Now you need to update the list of available packages:
# aptitude updateAnd install the latest rTorrent version available:
# aptitude -t testing install rtorrentwhere the option "
-t " we explicitly set the use of a test repository to install this package.Next, go to the rTorrent configuration.
Installing rTorrent with a test branch of Debian repositories

If your system is initially configured to use a test repository branch, then the installation, in your case, boils down to just one command:
# aptitude install rtorrentAfter that, you can proceed to setting up rTorrent.
RTorrent setup
Create a file with
~/.rtorrent.rc similar to this:# torrent .
# NAT ""
port_range = 32001-32049
# DHT
dht = auto
# UDP DHT
dht_port = 32000
#
peer_exchange = yes
# UDP
use_udp_trackers = yes
# -
directory = /arch/.Downloading/
#
upload_rate = 80
download_rate = 800
# rTorrent
session = /home/username/.rtorrent_session
# rpc
scgi_port = 127.0.0.1:5000Create a folder to store the rTorrent session:
$ mkdir .rtorrent_sessionIn general, I gave only the basic rTorrent settings. More details about the settings of this wonderful torrent client can be read here , here and here .
Startup setting rTorrent
In order for rTorrent to automatically start when the machine starts, you need to perform a few simple steps. First, install the
screen necessary to ensure the work of the torrent client in the background:# aptitude install screenThen load the startup script:
# cd /etc/init.d/# wget http://libtorrent.rakshasa.no/raw-attachment/wiki/RTorrentCommonTasks/rtorrentInit.shEdit the file and specify the username from which rTorrent will be launched:
user="user"Making the file executable:
# chmod +x rtorrentInit.shWe set the owner of the system root file:
# chown root:root rtorrentInit.shWe include "automatic loading":
# update-rc.d rtorrentInit.sh defaultsEverything, now the demon can be started by executing the following command:
# /etc/init.d/rtorrentInit.sh startNow, during every boot of the machine, our torrent client will automatically start.
web interfaces

To work web-interfaces, as you probably already guessed, you need a web-server. It can be both Apache and Lighttpd , and, quite possibly, some other. However, for definiteness, I will consider all examples based on Apache. If you don’t have a web server installed, then the next item is for you, otherwise - you just flip through the waves.
Install apache
To install Apache, you need to run a few simple commands. Let's start by installing the web server itself and the
scgi module required for remote control of rTorrent:# aptitude install apache2 libapache2-mod-scgiSet the module settings in the
/etc/apache2/httpd.conf file:SCGIMount /RPC2 127.0.0.1:5000and turn it on:
# a2enmod scgiNext, install PHP:
# aptitude install php5 php5-common libapache2-mod-php5 php5-curland restart apache:
# apache2ctl restartAfter installing Apache, proceed to reviewing various web interfaces to rTorrent.
wTorrent
For its work, wTorrent requires a
sqlite database. Install it:# aptitude install sqlite3 php5-sqlite
# apache2ctl restartNow download wTorrent directly:
# cd / var / www /
# svn co svn: //wtorrent-project.org/repos/trunk/wtorrent/
Set the access rights for the web server:
# chown -R www-data:www-data ./wtorrent/Next, we send the browser to the address
http://< IP >/wtorrent/install.php and configure it in the same way as this screenshot: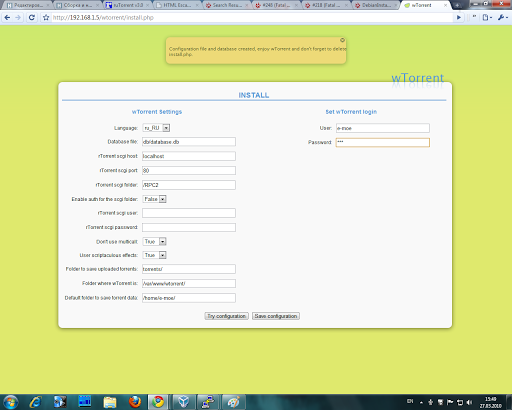
( Click to enlarge )
Be sure, for security reasons, delete the
install.php file:# rm wtorrent/install.phpAnd now you can evaluate the result by going to
http://< IP >/wtorrent/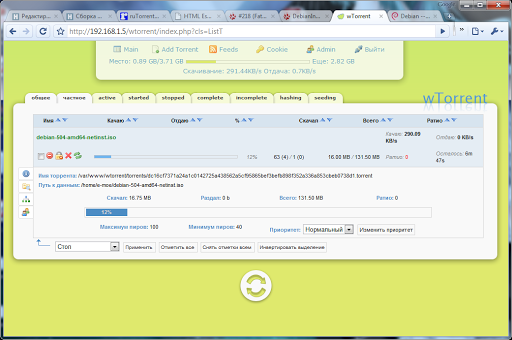
( Click to enlarge )
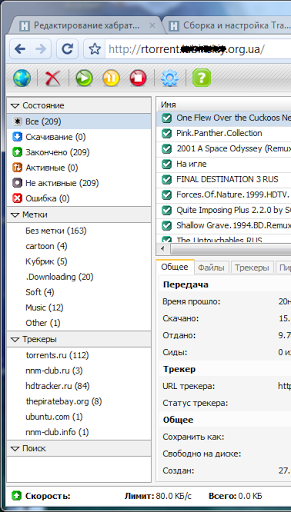
ruTorrent
To configure ruTorrent, download the latest version from SVN:
# cd /var/www/
# svn checkout http://rutorrent.googlecode.com/svn/trunk/rutorrent
And we will set access rights for the web server:
# chown -R www-data:www-data ./rutorrent/Now, to open the newly installed ruTorrent, you need to send a browser to the address
http://< IP >/rutorrent/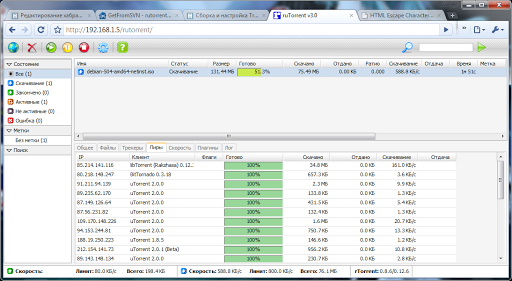
( Click to enlarge )
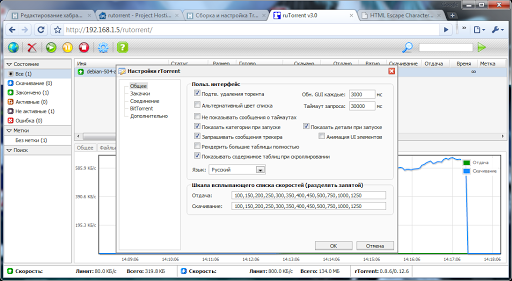
( Click to enlarge )
Also, I can not fail to note that under ruTorrent there are many useful plug-ins that significantly expand standard features. So, with the help of plug-ins, you can implement the processing of RSS feeds , traffic accounting , speed limits on a schedule and much more. The full list of plugins is here . I will show the process of installing the plugin on the example of Tracklabels which will automatically add tags depending on the download tracker.
# cd /var/www/rutorrent/plugins/
# svn checkout rutorrent.googlecode.com/svn/trunk/plugins/tracklabels
# chown -R www-data:www-data /var/www/rutorrent/plugins/
In this case, all other plugins are added in the same way. And you can see the result of installing the plugin immediately after updating the page in the browser:
( Click to enlarge )
And another, well, just delightful, ruTorrent idea flashed. Namely, the rudiments of multiplayer work appear in it, where each person has his own torrent client with its own settings and restrictions (for example, in terms of speed). More details about this can be found at the following link:
forums.rutorrent.org/index.php?topic=87.0
Other web-interfaces and programs for remote control
On the web interfaces I described, the list does not end at all. They are not so little created and developed. A list of the most popular can be viewed on the official site rTorretn'a: libtorrent.rakshasa.no/wiki/UtilsList
And again about the automation of downloads
Do not forget again and again remind you of such a convenient thing as automating the downloads of your favorite TV shows from RSS feeds of various trackers. And despite the fact that the web interfaces described above have either built-in tools for processing RSS feeds (wTorrent), or are expanded by the corresponding plug-ins (ruTorrent) of these funds, unfortunately, is not always enough. More details below:
- I already wrote on this topic here (on the example of LostFilm 'a) and here (on the example of the Cinema Hall ). Both solutions are implemented as shell commands and are based on
grep,wget,curl; - In addition, another way to automate with FlexGet described Alukar here ;
- And one more variant of processing RSS feeds with the help of Yahoo Pipes is reviewed by AmoN, a hubman , in this post.
Tuning rTorrent under heavy loads
For more advanced rTorrent settings with large loads, you can read both on the official site and in user comments:
% username%, and how you protunil your rTorrent config?
UPD . Added a section about tuning rTorrent under heavy loads.
Source: https://habr.com/ru/post/88405/
All Articles