Build and configure Transmission in Debian or anything you wanted to know about Transmission but were afraid to ask

 Transmission is one of the most popular torrent clients in the world of Unix-like operating systems and, for example, is the default choice in distributions such as Ubuntu , Fedora and openSUSE . In its work, Transmission consumes noticeably less system resources than other torrent clients, due to which it can and is used in many embedded OS even devices such as home WiFi routers / access points or network media players. In addition, Transmission has a built-in web-based interface and does not require Apache , Lighttpd , or any other http server for its operation. It is about installing and configuring the latest version of this wonderful torrent client and I want to tell in this post.
Building Transmission from Source
Unfortunately, the standard repositories have an outdated version. That is why the package of the latest version of Transmission will be assembled and installed.
Note : Thanks for the advice on the installation method, thanks to BaBL .
So, first of all we need to download the archive with the sources of the torrent Transmission client. The download link can be found on the official page .
Note : all the instructions below are shown on the example of the Debian OS, however they can be reproduced with minor changes on other distributions.
$ wget http://mirrors.m0k.org/transmission/files/transmission-1.92.tar.bz2Note : at the time of writing the post (2010-03-16) the latest Transmission version was 1.92.
After downloading the archive with the source code it should be unpacked:
')
$ tar xvjf transmission-1.92.tar.bz2as a result, the entire contents of the archive will be unpacked in the folder “transmission-1.92”. Go to her:
$ cd transmission-1.92To successfully compile, you need to install the missing utilities and libraries:
# aptitude install build-essential automake autoconf libtool pkg-config libcurl4-openssl-dev intltool libxml2-dev libglib2.0-dev checkinstallNext, set the build options:
$ ./configure -q --disable-gtk --disable-nlswhere "
--disable-gtk " disables the GTK client build, and"--disable-nls" - an option designed specifically for servers and embedded systems, removes dependencies from gettext and intltool.
Now you can run the compilation:
$ make -sAnd right after successful compilation, let's start creating a
.deb package. For this we need root privileges :# checkinstall -D --install=noHere and below, commands requiring privileges for their root launch are marked with the prefix "#".
At the request for entering a brief description of the package, we enter something in the style of " Transmission - cross-platform BitTorrent client " and press Enter twice as a sign of the end of the text.
Next, a menu appears with information about the package being collected. Make sure that the package version and release are set and the build is started by pressing Enter.
Now install the created package:
# dpkg -i transmission_1.92*.debEverything, at this stage installation is complete. Next we are waiting for the setting.
Note : more details about the Transmission assembly from the source code can be found here .
Transmission Setup

First of all, when setting up Transmission, you should create a new user in the system. At the same time, for security reasons, the created user must be without a password, which is what the next
--disabled-password "# adduser --disabled-password transmissionAfter creating the user, switch to his console:
# su transmissionHereinafter, to explicitly identify the commands that need to be run on behalf of the newly created user, I will use the
transmission@host:~$ "Next, you should start the
transmission-daemon and immediately stop it in order for it to create files with default settings. Run:transmission@host:~$ transmission-daemon -fwhere the option "
-f " indicates that the program is not demonized .Now, to stop the
transmission-daemon , on the keyboard, press CRTL-C. After that, all the default settings will be recorded in the user's home folder transmission in the following path:/home/transmission/.config/Perform Transmission configuration. To do this, your favorite editor needs to change the settings.json file. This file contains all the settings in JSON format .
transmission@host:~$ nano /home/transmission/.config/transmission-daemon/settings.jsonThis file contains many settings (the full list of which can be found here ), but I usually change only these:
"peer-port": 51413- port for incoming connections. If you are behind NAT 's, then take care of forwarding this port;"download-dir": "\/arc"- folder where downloads will be located. I draw attention to the fact that such characters as "/" need to be escaped. In addition, make sure that the usertransmission, with the rights of which the torrent client is running, has the right to write on this path;"incomplete-dir": "\/arc\/Incomplete"- folder in which there will be still unfinished downloads. Upon completion, they will be moved along the path specified in the "download-dir" option. Also make sure that the usertransmissionhas the right to write on this path;"incomplete-dir-enabled": true- enable the previous option;"rpc-enabled": true- enable remote control. This also includes web-based management;"rpc-whitelist-enabled": true- enables the so-called "white list" of IP addresses from which remote control of Transmission is possible. This includes remote control via a web interface;"rpc-whitelist": "127.0.0.1,192.168.*.*"- "white list". It is possible to set not only local, but also real external IP addresses;"rpc-authentication-required": true- require authentication for remote control;"rpc-username": ""- login for remote control;"rpc-password": ""- password;- "Rpc-port": 9091 - port for access to remote control.
For the future, I want to draw your attention to the fact that simply changing the settings.json settings file during Transmission does not affect its operation, and upon exiting it, they will be overwritten by the settings that were at the time of launch. In order for a working Transmission to load new settings during its operation, it should send a
SIGHUP signal:# killall -HUP transmission-daemonNow, at the end of the settings, it is better to exit the user's console
transmission . More we do not need it.transmission@host:~$ exitSetting up the transmission-daemon autoload
In order for the
transmission-daemon automatically start at the start of the machine, you need to perform several simple steps. First, you need to take the startup script at this address http://trac.transmissionbt.com/wiki/Scr ipts/initd/etc/init.d/transmission-daemon file.Making the file executable:
# chmod +x /etc/init.d/transmission-daemonWe set the owner of the system root file:
# chown root:root /etc/init.d/transmission-daemonWe include "automatic loading":
# update-rc.d transmission-daemon defaultsEverything, now the demon can be started by executing the following command:
# /etc/init.d/transmission-daemon startNow, during every boot of the machine, our torrent client will automatically start.
Remote control
There are several options for remote control. One of them is the built-in web-interface. To open it, you need to send a browser to the address
http://< IP >:9091/ (the port is set in the settings.json settings file by the " rpc-port " parameter). And this is how it looks: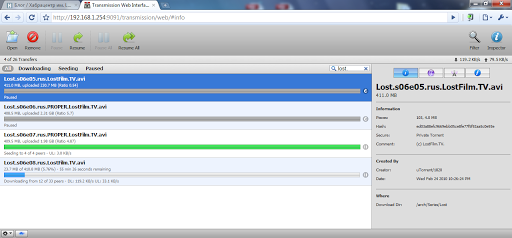
( click to enlarge )
Another remote control option is the cross-platform (Windows, Linux and Mac OS X) open source Transmission Remote GUI program. This rather functional program with µTorrent-like interface has much more features than the built-in web-interface. Among its functionality, I would like to note the filtering of torrents by status and tracker, the definition of the country and host name of peers, the association with .torrent files, the choice of a folder for downloading, the setting of priorities and much more.
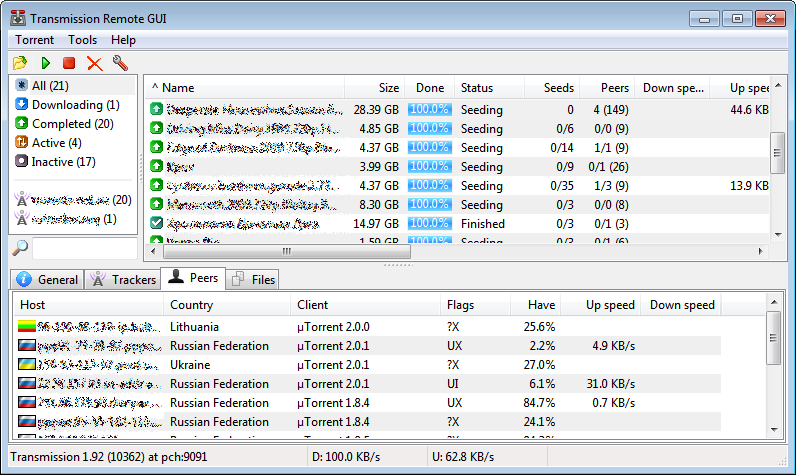
(Main window with a list of peers)
More screenshots of the Transmission Remote GUI .
I also want to note a similar project - transmission-remote-dotnet . Unfortunately, this development is designed for the Windows world (developed on .NET), however, it has a greater number of options and features than the previous version, and as for me, it looks nicer and more harmonious.
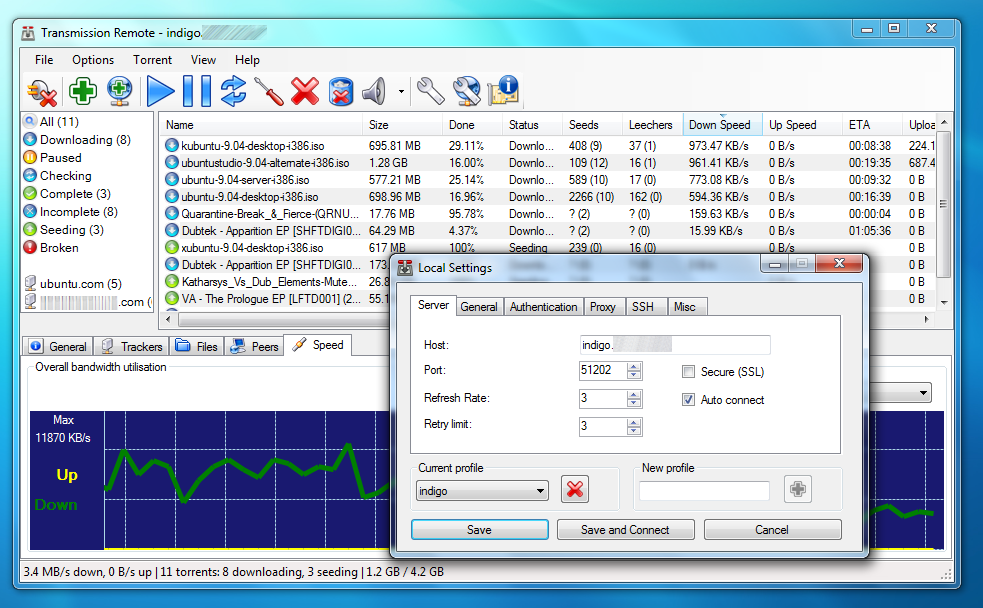
( Transmission-remote-dotnet screenshot with settings)
More screenshots of transmission-remote-dotnet .
And finally, I can not fail to mention such a plugin for FireFox as Autotrans . The plugin adds the “Torrent It!” Item to the context menu of the links to the .torrent files upon a click on which starts the download of the selected file on your Transmission daemon.
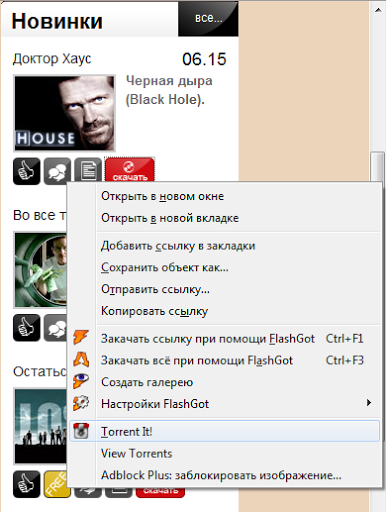
(Context menu plugin Autotrans )
But this is not all that can be done with Transmission. You can view other features at this address.
To the issue of automation downloads
And I also want to remind you about the automation of downloads of your favorite TV shows from RSS feeds of various trackers:
- I already wrote about this a little earlier here (on the example of LostFilm 'a) and here (on the example of the Cinema Hall ). Both solutions are implemented as shell commands and are based on
grep,wget,curl; - In addition, another way to automate with FlexGet described Alukar here ;
- And one more variant of processing RSS feeds with the help of Yahoo Pipes is reviewed by AmoN, a hubman , in this post.
UPD . As librarian suggests in the comments, there is another, more correct, way of assembling Transmission. Added a separate item.
UPD2 . Added description of transmission-remote-dotnet.
UPD3 . Updated the installation point. Thanks for helping out BaBL .
Source: https://habr.com/ru/post/87287/
All Articles