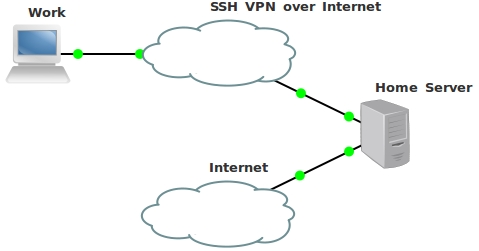
SSH VPN over Internet (SSH tun tunneling)
There was a need to organize a tunnel between your work computer and the home server, with the subsequent transport of all work traffic through the home server to the Internet.
To solve this problem, the best technology is Vitual Private Network (VPN). But with what help to implement this technology?
- I chose SSH.
The fact is that OpenSSH since version 4.3 supports tun tunneling. I took advantage of this ...
')
Schematically it will look like this:
First you need to install OpenSSH on the server. I have Ubuntu Server, and I do it like this:
Although, most likely, it is already installed. I have - exactly installed;)
Take a look at a more detailed scheme, and discuss it.
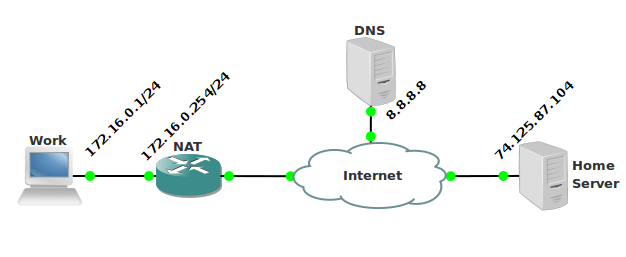
As can be seen from the figure, the work computer has IP 172.16.0.1 with a mask of 255.255.255.0 and a default gateway of 172.16.0.254, and IP 8.8.8.8 is specified as the DNS
Client routing table (Work):
To organize a tunnel, tunneling must be enabled in the OpenSSH configuration file. In
Nuances:
Connecting to the server and creating a tunnel is done using the command
The -w switch will create tun0 devices on the server and client, combining them together.
Here is the description from the man.
Tun tun devices.
On the
On the
You can test using ping (from the client's computer):
Now you need to start all traffic through tun0, for this you just need to specify tun0 as the default gateway, but you will lose connection with the server (Home Server) and DNS server. Therefore, before deleting the current default gateway (172.16.0.254), you must add routes to the server and DNS server in the routing table. What can be done as follows:
After that, we delete the current default gateway (172.16.0.254) and specify the IP address that we assigned on the server tun0 interface (10.0.0.1) as the gateway
After completing the above steps, the client's routing table (Work) takes the following form:
Now all traffic that goes to unknown subnets, and all unknowns, except addresses 8.8.8.8 and 74.125.87.104, goes through 10.0.0.1, that is, through an encrypted SSH tunnel. But the server does not do anything with it, traffic. Because you need to configure NAT for the client. To do this, add a rule to iptables
Enable ip forward-ing in the kernel
Do not forget to make it so that it turns on when the system boots ...
We find the commented line
All, mission complete , now all traffic is sent through the ssh tunnel and NAT to the Internet. The tunnel is encrypted, the traffic to the server is protected!
To solve this problem, the best technology is Vitual Private Network (VPN). But with what help to implement this technology?
- I chose SSH.
The fact is that OpenSSH since version 4.3 supports tun tunneling. I took advantage of this ...
')
Schematically it will look like this:
First you need to install OpenSSH on the server. I have Ubuntu Server, and I do it like this:
sudo aptitude install openssh-server
Although, most likely, it is already installed. I have - exactly installed;)
Take a look at a more detailed scheme, and discuss it.
As can be seen from the figure, the work computer has IP 172.16.0.1 with a mask of 255.255.255.0 and a default gateway of 172.16.0.254, and IP 8.8.8.8 is specified as the DNS
Work:
IP address: 172.16.0.1
Netmask: 255.255.255.0
Default Gateway: 172.16.0.254
DNS: 8.8.8.8
Client routing table (Work):
   172.16.0.0 0.0.0.0 255.255.255.0 U 1 0 0 eth0
   169.254.0.0 0.0.0.0 255.255.0.0 U 1000 0 0 eth0
   0.0.0.0 172.16.0.254 0.0.0.0 UG 0 0 0 eth0
169.254.0.0 is the zeroconf route.
To organize a tunnel, tunneling must be enabled in the OpenSSH configuration file. In
/etc/ssh/sshd_config , add the line PermitTunnel point-to-point and restart the OpenSSH server service ssh restartNuances:
The fact is that in order to organize a tunnel, you need to log in to the server as root, which is not good! Therefore, there are two solutions to the problem:
1. We put on root a complex password like md5 hash.
2. Set up authorization by keys.
Which method to choose is up to you. For the example I am describing, this is irrelevant.
If you want to use password authentication, enable PermitRootLogin yes in the config so that you can log in as root.
Connecting to the server and creating a tunnel is done using the command
sudo ssh root@74.125.87.104 -w 0:0Be sure to do it via sudo or root. A tun device will be created, which requires privileges.
The -w switch will create tun0 devices on the server and client, combining them together.
Here is the description from the man.
-w local_tun[:remote_tun]
Requests tunnel device forwarding with the specified tun (4) devices between the client (local_tun) and the server (remote_tun)
Tun tun devices.
On the
ifconfig tun0 10.0.0.1/30 pointopoint 10.0.0.2On the
ifconfig tun0 10.0.0.2/30 pointopoint 10.0.0.1You can test using ping (from the client's computer):
     user @ host: ~ $ ping 10.0.0.1 -c 2
     PING 10.0.0.1 (10.0.0.1) 56 (84) bytes of data.
     64 bytes from 10.0.0.1: icmp_seq = 1 ttl = 64 time = 5.80 ms
     64 bytes from 10.0.0.1: icmp_seq = 2 ttl = 64 time = 8.61 ms

     --- 10.0.0.1 ping statistics ---
     2 packets transmitted, 2 received, 0% packet loss, time 1001ms
     rtt min / avg / max / mdev = 5.800 / 7.209 / 8.618 / 1.409 ms
Now you need to start all traffic through tun0, for this you just need to specify tun0 as the default gateway, but you will lose connection with the server (Home Server) and DNS server. Therefore, before deleting the current default gateway (172.16.0.254), you must add routes to the server and DNS server in the routing table. What can be done as follows:
route add -host 74.125.87.104 gw 172.16.0.254
route add -host 8.8.8.8 gw 172.16.0.254
After that, we delete the current default gateway (172.16.0.254) and specify the IP address that we assigned on the server tun0 interface (10.0.0.1) as the gateway
route del default
route add default gw 10.0.0.1
After completing the above steps, the client's routing table (Work) takes the following form:
     74.125.87.104 172.16.0.254 255.255.255.255 UGH 0 0 0 eth0
     8.8.8.8 172.16.0.254 255.255.255.255 UGH 0 0 0 eth0
     10.0.0.0 0.0.0.0 255.255.255.252 U 0 0 0 tun0
     172.16.0.0 0.0.0.0 255.255.255.0 U 1 0 0 eth0
     169.254.0.0 0.0.0.0 255.255.0.0 U 1000 0 0 eth0
     0.0.0.0 10.0.0.1 0.0.0.0 UG 0 0 0 tun0
Now all traffic that goes to unknown subnets, and all unknowns, except addresses 8.8.8.8 and 74.125.87.104, goes through 10.0.0.1, that is, through an encrypted SSH tunnel. But the server does not do anything with it, traffic. Because you need to configure NAT for the client. To do this, add a rule to iptables
iptables -t nat -A POSTROUTING -s 10.0.0.2 -j MASQUERADE
Enable ip forward-ing in the kernel
sysctl -w net.ipv4.ip_forward=1
Do not forget to make it so that it turns on when the system boots ...
mcedit /etc/sysctl.conf
PS> mcedit is a text editor. You can use any other.
We find the commented line
net.ipv4.ip_forward=1 and uncomment it.All, mission complete , now all traffic is sent through the ssh tunnel and NAT to the Internet. The tunnel is encrypted, the traffic to the server is protected!
Source: https://habr.com/ru/post/87197/
All Articles