Localization of WPF applications
In the article I will talk about existing approaches to localization of WPF applications and show in detail the localization process using resource files (resx). This can be useful for those who are just starting to learn WPF or are already working with this technology, but have not encountered multilingual applications.
MSDN offers several ways to localize WPF applications — for example, an XML file, a resource file (RESX), or via XAML. As an example, the last option was considered there, its advantages are described - but there are also a number of drawbacks, like:
1) Different sources for localization of the UI itself (markup elements) and messages from the code (MessageBox, any status changes, etc.).
2) Unnecessary dances with editing the project, unloading the table of rows through the console, loading them into satellite assemblies.
3) Careful control of the Uid of each UI element.
There are also own approaches, for example through MergedDictionaries .
Due to various reasons, each of them did not suit me very well - either unnecessary gestures (such as manual editing the csproj file, shamanism with the developer machine locales), attracting various additional utilities, unnecessary pieces of code (merging dictionaries depending on locale) is a trifle but unaesthetic. But with the resx files, everything went perfectly - and moreover, it left the usual workflow (with WinForms) of translating the application.
Let's take a closer look at how to use the features of Visual Studio to localize WPF applications. Let's create a test project WpfAppLocalized with one window - Login.
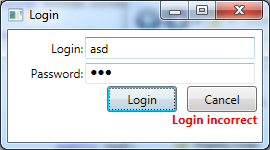
To begin with, we will determine which elements need to be localized - the Login, Password tags, the Login, Cancel buttons, messages about an invalid login / password, a message about successful login.
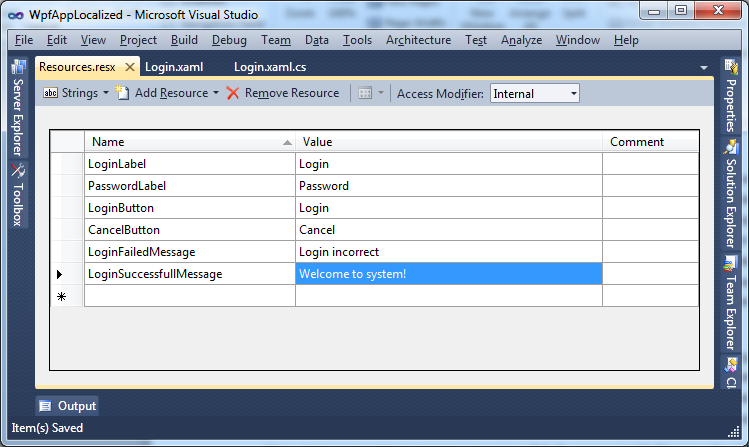
So, open the automatically created resource file WpfAppLocalized / Properties / Resources.resx (or create a new resource file) - and fill in the string resources with the necessary values.
In the code, you can access resources in several ways - but the Studio helpfully creates proxy classes - and you can use the static properties of the automatically generated class WpfAppLocalization.Properties.Resources to access the value - this moment is extremely important. In the meantime, let's start with the simplest - the display of messages. We write a simple handler for clicking on Login:
Everything is simple and clear. But now the turn of the most interesting is localization of XAML markup. Of course, you can act in the forehead - assign a name to each element and, at the time of initializing the components, assign values from resources to the desired properties - but this is not the Jedi way. As I noted above, Studio generates a class for a resource file with a set of static properties for accessing each resource line ... and “Of course, x: Static!” Immediately comes to mind. Markup-Extension x: Static is used to initialize the property values of XAML elements through static properties. But first, you need to declare your namespace, through which we will refer to the static class in the markup:
The most important line for us is “xmlns: res =“ clr-namespace: WpfAppLocalized.Properties ”.” This is the actual binding of the XML namespace res to the namespace in the code. Now you can fill in the values of the properties of the controls via Static - and this is how it looks for the Login tag:
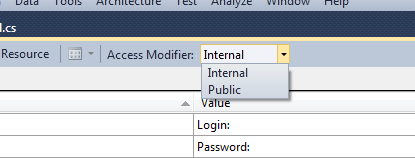
As you noticed, the Text property is now initialized via extension Static — i.e. The value of the LoginLabel static property of the Resources class is taken. However, if you try to do this in Visual Studio, the editor will say that “Type 'res: Resources' does not contain a static member named 'LoginLabel'”, and when launched, the exception “'WpfAppLocalized.Properties.Resources.LoginLabel' StaticExtension cannot be resolved to an enumeration, static field, or static property ". The reason is very simple - by default, the proxy class for resources is generated with the internal modifier - i.e. these resources are not available to the XAML loader. You just need to change the modifier to public - after that the application will work.
So, at this stage, all interface elements and all messages use only texts from resources - now it’s time to add support for various languages. This is done very simply - you just need to copy the source file of Resources Resources.resx - to the new Resources. {Cl-LN} .resx, where cl is the culture (country) and LN is the language. For example, for the Russian language in Russia, the resource file will be called Resources.ru-RU.resx. For, for example, Canada - we can make two files Resources.ca-EN.resx, Resources.ca-FR.resx - for English and French. If there is no need for division into languages, then it can be omitted, Resources.ru.resx - will be applied to the country of Russia. So, we open a new resource file - and we see that it is now filled in the same way as the main one - but now you can safely translate the inscriptions in English into your native Russian - and to avoid unnecessary files in the project, put an access modifier for this resource No code generation ( Yes, weird such a modifier).
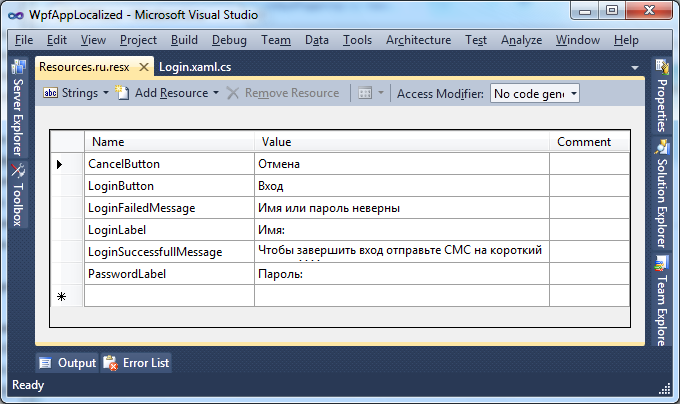
Great, translation is complete. Now it's time to ask - where do you need to code the logic of resource selection depending on the culture? The answer is - but nowhere is it necessary. After a successful build of the application, another folder will appear in the EXE folder, containing the WpfAppLocalized.resources.dll file. These are localized resources. At the time of launch, the .NET Framework application, depending on the culture and language of the operating system, will load one or another satellite assembly and, accordingly, certain resources will be used. Here is the localized version of the application:

That's all, thank you for your attention.
')
PS While re-reading the article, I thought - what questions could potentially arise and decided to answer right away.
Q: How to forcefully change the application language (give a choice to the user, for example)?
A: The system determines which culture resources to load using the value System.Threading.Thread.CurrentThread.CurrentUICulture. Accordingly, to change the language of the application to Russian in the WpfAppLocalization constructor before InitializeComponent you need to add:
System.Threading.Thread.CurrentThread.CurrentUICulture = System.Globalization.CultureInfo.GetCultureInfo ("en-US");
Q: Can I use the same resource assembly in different applications?
A: Yes, you can - only the namespace connection will change a little - the assembly name will be added there - xmlns: res = "clr-namespace: WpfAppLocalized.Properties, assembly = GlobalRes.dll".
Q: What if the application is launched with a language for which there is no satellite assembly?
A: The resources of the main assembly will be used.
UPD: Laid out the WpfAppLocalized project.
MSDN offers several ways to localize WPF applications — for example, an XML file, a resource file (RESX), or via XAML. As an example, the last option was considered there, its advantages are described - but there are also a number of drawbacks, like:
1) Different sources for localization of the UI itself (markup elements) and messages from the code (MessageBox, any status changes, etc.).
2) Unnecessary dances with editing the project, unloading the table of rows through the console, loading them into satellite assemblies.
3) Careful control of the Uid of each UI element.
There are also own approaches, for example through MergedDictionaries .
Due to various reasons, each of them did not suit me very well - either unnecessary gestures (such as manual editing the csproj file, shamanism with the developer machine locales), attracting various additional utilities, unnecessary pieces of code (merging dictionaries depending on locale) is a trifle but unaesthetic. But with the resx files, everything went perfectly - and moreover, it left the usual workflow (with WinForms) of translating the application.
Let's take a closer look at how to use the features of Visual Studio to localize WPF applications. Let's create a test project WpfAppLocalized with one window - Login.
To begin with, we will determine which elements need to be localized - the Login, Password tags, the Login, Cancel buttons, messages about an invalid login / password, a message about successful login.
So, open the automatically created resource file WpfAppLocalized / Properties / Resources.resx (or create a new resource file) - and fill in the string resources with the necessary values.
In the code, you can access resources in several ways - but the Studio helpfully creates proxy classes - and you can use the static properties of the automatically generated class WpfAppLocalization.Properties.Resources to access the value - this moment is extremely important. In the meantime, let's start with the simplest - the display of messages. We write a simple handler for clicking on Login:
if (Login.Text.Equals( "admin" ) && Password.Password.Equals( "admin" ))
{
MessageBox.Show(Properties.Resources.LoginSuccessfullMessage);
}
else
{
ErrorMessage.Text = Properties.Resources.LoginFailedMessage;
}

* This source code was highlighted with Source Code Highlighter .
Everything is simple and clear. But now the turn of the most interesting is localization of XAML markup. Of course, you can act in the forehead - assign a name to each element and, at the time of initializing the components, assign values from resources to the desired properties - but this is not the Jedi way. As I noted above, Studio generates a class for a resource file with a set of static properties for accessing each resource line ... and “Of course, x: Static!” Immediately comes to mind. Markup-Extension x: Static is used to initialize the property values of XAML elements through static properties. But first, you need to declare your namespace, through which we will refer to the static class in the markup:
< Window x:Class ="WpfAppLocalized.MainWindow"
xmlns ="http://schemas.microsoft.com/winfx/2006/xaml/presentation"
xmlns:x ="http://schemas.microsoft.com/winfx/2006/xaml"
xmlns:res ="clr-namespace:WpfAppLocalized.Properties"
Title ="Login" Height ="150" Width ="270" MaxWidth ="270" MinWidth ="270" MaxHeight ="150" MinHeight ="150" >

* This source code was highlighted with Source Code Highlighter .
The most important line for us is “xmlns: res =“ clr-namespace: WpfAppLocalized.Properties ”.” This is the actual binding of the XML namespace res to the namespace in the code. Now you can fill in the values of the properties of the controls via Static - and this is how it looks for the Login tag:
< TextBlock HorizontalAlignment ="Right" VerticalAlignment ="Center" Grid . Column ="0" Text ="{x:Static res:Resources.LoginLabel}" />

* This source code was highlighted with Source Code Highlighter .
As you noticed, the Text property is now initialized via extension Static — i.e. The value of the LoginLabel static property of the Resources class is taken. However, if you try to do this in Visual Studio, the editor will say that “Type 'res: Resources' does not contain a static member named 'LoginLabel'”, and when launched, the exception “'WpfAppLocalized.Properties.Resources.LoginLabel' StaticExtension cannot be resolved to an enumeration, static field, or static property ". The reason is very simple - by default, the proxy class for resources is generated with the internal modifier - i.e. these resources are not available to the XAML loader. You just need to change the modifier to public - after that the application will work.
So, at this stage, all interface elements and all messages use only texts from resources - now it’s time to add support for various languages. This is done very simply - you just need to copy the source file of Resources Resources.resx - to the new Resources. {Cl-LN} .resx, where cl is the culture (country) and LN is the language. For example, for the Russian language in Russia, the resource file will be called Resources.ru-RU.resx. For, for example, Canada - we can make two files Resources.ca-EN.resx, Resources.ca-FR.resx - for English and French. If there is no need for division into languages, then it can be omitted, Resources.ru.resx - will be applied to the country of Russia. So, we open a new resource file - and we see that it is now filled in the same way as the main one - but now you can safely translate the inscriptions in English into your native Russian - and to avoid unnecessary files in the project, put an access modifier for this resource No code generation ( Yes, weird such a modifier).
Great, translation is complete. Now it's time to ask - where do you need to code the logic of resource selection depending on the culture? The answer is - but nowhere is it necessary. After a successful build of the application, another folder will appear in the EXE folder, containing the WpfAppLocalized.resources.dll file. These are localized resources. At the time of launch, the .NET Framework application, depending on the culture and language of the operating system, will load one or another satellite assembly and, accordingly, certain resources will be used. Here is the localized version of the application:
That's all, thank you for your attention.
')
PS While re-reading the article, I thought - what questions could potentially arise and decided to answer right away.
Q: How to forcefully change the application language (give a choice to the user, for example)?
A: The system determines which culture resources to load using the value System.Threading.Thread.CurrentThread.CurrentUICulture. Accordingly, to change the language of the application to Russian in the WpfAppLocalization constructor before InitializeComponent you need to add:
System.Threading.Thread.CurrentThread.CurrentUICulture = System.Globalization.CultureInfo.GetCultureInfo ("en-US");
Q: Can I use the same resource assembly in different applications?
A: Yes, you can - only the namespace connection will change a little - the assembly name will be added there - xmlns: res = "clr-namespace: WpfAppLocalized.Properties, assembly = GlobalRes.dll".
Q: What if the application is launched with a language for which there is no satellite assembly?
A: The resources of the main assembly will be used.
UPD: Laid out the WpfAppLocalized project.
Source: https://habr.com/ru/post/86778/
All Articles